一步一步教你学会自定义View并了解其绘制原理(一)
自定义view的绘制过程,看了很多关于自定义view的帖子、博客,写的也都不错,但我想通过图片+代码+注释的方式写一篇因为图片带给人的记忆效果远比长篇大论的文字好的多,再加上代码的辅助说明,那就更容易的掌握了,废话不多说,撸起袖子,开干!
自定义view的种类
- 继承自View(重写onMeasure、onLayout、onDraw方法)
- 继承自ViewGroup派生特殊的Layout
- 集成特定的View(如Textview)
- 继承特定的ViewGroup(如LinearLayout)
本文主要讲的是后两种的实现方式以Textview和LinearLayout为例
一、继承Textview并重写父类的构造函数
首先当我们自定义一个ConstructionView extends Textview时,系统会提示我们重写父类的构造函数,如图所示

下面是Textview的这四个构造函数的源码
 public TextView(Context context) {
 //若只调用这一个构造函数,传入的AttributeSet 为空,这时系统会抛异常,意思是传入的AttributeSet 不能为空
 //Caused by: java.lang.NoSuchMethodException:  [class android.content.Context, interface android.util.AttributeSet]
        this(context, null);
    }
//不能为空的原因就是加了@Nullable验证
    public TextView(Context context, @Nullable AttributeSet attrs) {
        this(context, attrs, com.android.internal.R.attr.textViewStyle);
    }

    public TextView(Context context, @Nullable AttributeSet attrs, int defStyleAttr) {
        this(context, attrs, defStyleAttr, 0);
    }

    @SuppressWarnings("deprecation")
    public TextView(
            Context context, @Nullable AttributeSet attrs, int defStyleAttr, int defStyleRes) {
        super(context, attrs, defStyleAttr, defStyleRes);
        //此处省略若干代码...
        }
所以在我们自定义View时,重写的构造函数一定要传入AttributeSet 对象,如果你非要调用第一个构造函数,你可以这样写:
public ConstrctionView(Context context) {
//在调用父类构造器的时候传入一个AttributeSet 对象
        super(context,com.android.internal.R.attr.textViewStyle);
    }
//也可通过直接调用第2个(或者第3、4个)
    public ConstrctionView(Context context, AttributeSet attrs) {
        super(context, attrs);
    }
现在自定义的ConstructionView有了,接下来就来看下view是如何绘制的
二、View的绘制流程
说到view的绘制过程,相信大家都知道,就是onMeasure–onLayout–onDraw这几个方法嘛,说的没错,但是如果在复杂的布局中每一个view又是如何绘制的呢?如果你很清楚,那就不用在这篇文章上耽误时间了,布局文件如下:
"1.0" encoding="utf-8"?>
"http://schemas.android.com/apk/res/android"
    xmlns:tools="http://schemas.android.com/tools"
    android:id="@+id/activity_fibonacci"
    android:layout_width="match_parent"
    android:layout_height="match_parent"
    tools:context="com.kcgz.interview.FibonacciActivity">

    <com.kcgz.interview.view.ViewGroup1
        android:id="@+id/vg001"
        android:layout_width="match_parent"
        android:layout_height="match_parent"
        android:background="@color/colorAccent"
        android:orientation="vertical">


        <com.kcgz.interview.view.ViewGroup2
            android:layout_margin="20dp"
            android:layout_width="match_parent"
            android:layout_height="0dp"
            android:layout_weight="1"
            android:background="#00ff00"
            android:orientation="vertical"
            android:gravity="center">
            <com.kcgz.interview.view.MyView1
                android:layout_width="wrap_content"
                android:layout_height="wrap_content"
                android:background="#f58407"
                android:text="textview1" />
            <com.kcgz.interview.view.MyView2
                android:layout_marginTop="10dp"
                android:layout_width="wrap_content"
                android:layout_height="wrap_content"
                android:background="#dedede"
                android:text="textview2"/>
        com.kcgz.interview.view.ViewGroup2>

        <com.kcgz.interview.view.ViewGroup2
            android:layout_margin="20dp"
            android:layout_width="match_parent"
            android:layout_height="0dp"
            android:layout_weight="1"
            android:background="#0000ff"
            android:orientation="vertical"
            android:gravity="center">
            <com.kcgz.interview.view.MyView1
                android:layout_width="wrap_content"
                android:layout_height="wrap_content"
                android:background="#f58407"
                android:text="textview1" />
            <com.kcgz.interview.view.MyView2
                android:layout_marginTop="10dp"
                android:layout_width="wrap_content"
                android:layout_height="wrap_content"
                android:background="#dedede"
                android:text="textview2"/>
        com.kcgz.interview.view.ViewGroup2>
    com.kcgz.interview.view.ViewGroup1>
通过图片看更直观,为了方便区分布局,特意加了背景色:
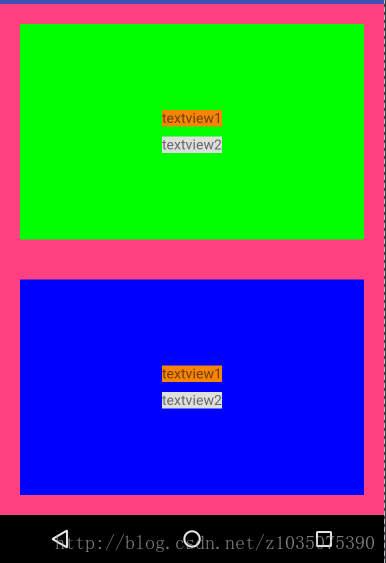
下面继续贴ViewGroup1与MyView1的代码,因为ViewGroup2,MyView2都是复制的这里就不在贴代码了,如果需要可以去github上下载源码查看。
//ViewGroup1
public class ViewGroup1 extends LinearLayout {
    public static final String TAG="viewgroup1";

    //这里只重写了两个参数的构造函数
    public ViewGroup1(Context context, AttributeSet attrs) {
        super(context, attrs);
    }

    @Override
    protected void onMeasure(int widthMeasureSpec, int heightMeasureSpec) {
        ViewUtils.i(TAG,"onMeasure开始执行");
        super.onMeasure(widthMeasureSpec, heightMeasureSpec);
        ViewUtils.i(TAG,"onMeasure执行完毕");
    }

    @Override
    protected void onLayout(boolean changed, int l, int t, int r, int b) {
        ViewUtils.i(TAG,"onLayout开始执行");
        super.onLayout(changed, l, t, r, b);
        ViewUtils.i(TAG,"onLayout执行完毕");
    }

    @Override
    protected void dispatchDraw(Canvas canvas) {
        ViewUtils.i(TAG,"dispatchDraw开始执行");
        super.dispatchDraw(canvas);
        ViewUtils.i(TAG,"dispatchDraw执行完毕");
    }
    @Override
    protected void onDraw(Canvas canvas) {
        ViewUtils.i(TAG,"onDraw开始执行");
        super.onDraw(canvas);
        ViewUtils.i(TAG,"onDraw执行完毕");
    }
}
//MyView1
public class MyView1 extends TextView {
public static final String TAG="MyView1";
public MyView1(Context context, AttributeSet attrs) {
super(context, attrs);
}
@Override
protected void onMeasure(int widthMeasureSpec, int heightMeasureSpec) {
ViewUtils.i(TAG,"onMeasure开始执行");
super.onMeasure(widthMeasureSpec, heightMeasureSpec);
ViewUtils.i(TAG,"onMeasure执行完毕");
}
@Override
protected void onLayout(boolean changed, int l, int t, int r, int b) {
ViewUtils.i(TAG,"onLayout开始执行");
super.onLayout(changed, l, t, r, b);
ViewUtils.i(TAG,"onLayout执行完毕");
}
@Override
protected void onDraw(Canvas canvas) {
ViewUtils.i(TAG,"onDraw开始执行");
super.onDraw(canvas);
ViewUtils.i(TAG,"onDraw执行完毕");
}
}
02-23 23:45:56.502 5922-5922/com.kcgz.interview I/viewgroup1: onMeasure开始执行
02-23 23:45:56.502 5922-5922/com.kcgz.interview I/viewgroup2: onMeasure开始执行
02-23 23:45:56.502 5922-5922/com.kcgz.interview I/MyView1: onMeasure开始执行
02-23 23:45:56.502 5922-5922/com.kcgz.interview I/MyView1: onMeasure执行完毕
02-23 23:45:56.502 5922-5922/com.kcgz.interview I/MyView2: onMeasure开始执行
02-23 23:45:56.502 5922-5922/com.kcgz.interview I/MyView2: onMeasure执行完毕
02-23 23:45:56.502 5922-5922/com.kcgz.interview I/viewgroup2: onMeasure执行完毕
02-23 23:45:56.502 5922-5922/com.kcgz.interview I/viewgroup1: onMeasure执行完毕
02-23 23:45:56.502 5922-5922/com.kcgz.interview I/viewgroup1: onLayout开始执行
02-23 23:45:56.502 5922-5922/com.kcgz.interview I/viewgroup2: onLayout开始执行
02-23 23:45:56.502 5922-5922/com.kcgz.interview I/MyView1: onLayout开始执行
02-23 23:45:56.502 5922-5922/com.kcgz.interview I/MyView1: onLayout执行完毕
02-23 23:45:56.502 5922-5922/com.kcgz.interview I/MyView2: onLayout开始执行
02-23 23:45:56.502 5922-5922/com.kcgz.interview I/MyView2: onLayout执行完毕
02-23 23:45:56.502 5922-5922/com.kcgz.interview I/viewgroup2: onLayout执行完毕
02-23 23:45:56.502 5922-5922/com.kcgz.interview I/viewgroup1: onLayout执行完毕
02-23 23:45:56.503 5922-5922/com.kcgz.interview I/viewgroup1: onDraw开始执行
02-23 23:45:56.503 5922-5922/com.kcgz.interview I/viewgroup1: onDraw执行完毕
02-23 23:45:56.503 5922-5922/com.kcgz.interview I/viewgroup1: dispatchDraw开始执行
02-23 23:45:56.503 5922-5922/com.kcgz.interview I/viewgroup2: onDraw开始执行
02-23 23:45:56.503 5922-5922/com.kcgz.interview I/viewgroup2: onDraw执行完毕
02-23 23:45:56.503 5922-5922/com.kcgz.interview I/viewgroup2: dispatchDraw开始执行
02-23 23:45:56.503 5922-5922/com.kcgz.interview I/MyView1: onDraw开始执行
02-23 23:45:56.503 5922-5922/com.kcgz.interview I/MyView1: onDraw执行完毕
02-23 23:45:56.503 5922-5922/com.kcgz.interview I/MyView2: onDraw开始执行
02-23 23:45:56.503 5922-5922/com.kcgz.interview I/MyView2: onDraw执行完毕
02-23 23:45:56.503 5922-5922/com.kcgz.interview I/viewgroup2: dispatchDraw执行完毕
02-23 23:45:56.503 5922-5922/com.kcgz.interview I/viewgroup1: dispatchDraw执行完毕
以上便是启动Acticity后的view的绘制结果
如果你有耐心看完,就应该知道复杂布局的view是如何绘制的了,当然如果你没有耐心,那就看下面的图,结果就一目了然了:
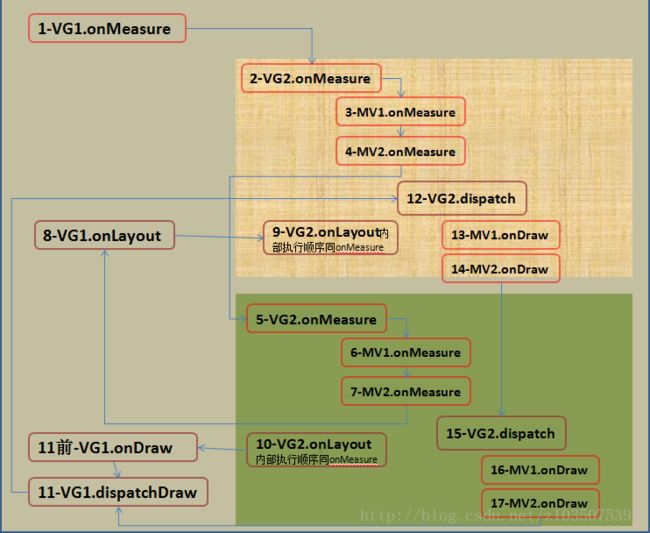
画的不好,但大概的意思表示出来了,需要说明的是,在自定义的ViewGroup中,若在布局文件中没有给ViewGroup设置背景色,将不会调用viewGroup的onDraw方法,直接调用dispatchDraw方法,然后遍历子View中的onDraw方法进行绘制,下一篇会写一下View是如何开始执行的,如有错误希望您能指出,我会第一时间纠正。
源码下载