android,利用layoutParams代码动态布局空间位置
本文借鉴优秀文章:http://www.cnblogs.com/shaweng/archive/2012/07/10/2585134.html
Android开发:LayoutParams的用法
LayoutParams继承于Android.View.ViewGroup.LayoutParams.
LayoutParams相当于一个Layout的信息包,它封装了Layout的位置、高、宽等信息。假设在屏幕上一块区域是由一个Layout占领的,如果将一个View添加到一个Layout中,最好告诉Layout用户期望的布局方式,也就是将一个认可的layoutParams传递进去。
可以这样去形容LayoutParams,在象棋的棋盘上,每个棋子都占据一个位置,也就是每个棋子都有一个位置的信息,如这个棋子在4行4列,这里的“4行4列”就是棋子的LayoutParams。
但LayoutParams类也只是简单的描述了宽高,宽和高都可以设置成三种值:
1,一个确定的值;
2,FILL_PARENT,即填满(和父容器一样大小);
3,WRAP_CONTENT,即包裹住组件就好。
在JAVA中动态构建的布局,常常这样写:
setLayoutParams(new LayoutParams(LayoutParams.FILL_PARENT, LayoutParams.FILL_PARENT));
上面这一句话其实是子对父的,也就是说,父布局下的子控件要设置这句话。


因为布局很多,虽然都继承至ViewGroup但是各个布局还是有很大的不同。


很显然上面这句应该这样写才算准确:
setLayoutParams(new TableRow.LayoutParams(TableRow.LayoutParams.FILL_PARENT,TableRow.LayoutParams.FILL_PARENT));
这表示这个子控件的父布局是一个TableRow , 这样的LayoutParams 太多,所以应明确指明。

下面分别说下两个常用到布局:
1. FrameLayout下动态设置子控件居中,动态用JAVA代码要这样实现:这表示这个子控件的父布局是一个TableRow , 这样的LayoutParams 太多,所以应明确指明。
下面分别说下两个常用到布局:
1. FrameLayout下动态设置子控件居中,动态用JAVA代码要这样实现:
FrameLayout.LayoutParams lytp = new FrameLayout.LayoutParams(80,LayoutParams.WRAP_CONTENT);
lytp .gravity = Gravity.CENTER;
btn.setLayoutParams(lytp);
2. RelativeLayout下动态设置子控件居中:
RelativeLayout.LayoutParams lp=new RelativeLayout.LayoutParams(LayoutParams.WRAP_CONTENT,LayoutParams.WRAP_CONTENT);
lp.addRule(RelativeLayout.ALIGN_PARENT_RIGHT, RelativeLayout.TRUE);
lp.addRule(RelativeLayout.ALIGN_PARENT_TOP, RelativeLayout.TRUE);
btn1.setLayoutParams(lp);
实例:
从网页响应获取Json 对象,并解析
@SuppressWarnings("unchecked")
		Map markJsonMap = (Map) mapJson.get("adlogo");
		if(markJsonMap != null){
			String position = (String) markJsonMap.get("position");
			String markTumbString = (String) markJsonMap.get("thumb");
			String smlscreen = (String) markJsonMap.get("smlscreen");
			String bigscreen = (String) markJsonMap.get("bigscreen");
			HomeActivity.mCornerMark.setPosition(position);
			HomeActivity.mCornerMark.setThumb(markTumbString);
			HomeActivity.mCornerMark.setSmlscreen(smlscreen);
			HomeActivity.mCornerMark.setBigscreen(bigscreen);
			setCornerMark();
		}
解析后代码设置角标图片的大小,位置,异步下载图片
/**
	 * 动态设置角标位置
	 * */
	private void setCornerMark(){
		if(!HomeActivity.mCornerMark.getThumb().equals("") && HomeActivity.mCornerMark.getThumb().length() != 0)
		{
//			WindowManager wm = (WindowManager) mContex
//					.getSystemService(Context.WINDOW_SERVICE);
//
//			int width = wm.getDefaultDisplay().getWidth();
//			int height = wm.getDefaultDisplay().getHeight();

			FrameLayout.LayoutParams reParams = (android.widget.FrameLayout.LayoutParams) HomeActivity.home_surface_viewLyout.getLayoutParams();
			int width = reParams.width;
			int height = reParams.height;
			RelativeLayout.LayoutParams params;
			//width, height * 48 / 128
			//获取控件布局参数
			Configuration config = mContex.getResources().getConfiguration();
			if (config.orientation == Configuration.ORIENTATION_LANDSCAPE)
			{
				String[] paramString = HomeActivity.mCornerMark.getBigscreen().split(",");
				int whidthString = Integer.parseInt(paramString[0]);
				int heightString = Integer.parseInt(paramString[1]);
				//转dp
				whidthString = DensityUtil.px2dip(mContex,whidthString);
				heightString = DensityUtil.px2dip(mContex,heightString);
				params = new LayoutParams(whidthString,heightString);
			}else{
				String[] paramString = HomeActivity.mCornerMark.getSmlscreen().split(",");
				int whidthString = Integer.parseInt(paramString[0]);
				int heightString = Integer.parseInt(paramString[1]);
				//转dp
				whidthString = (int) (width*0.005*whidthString);
				heightString = (int) (height*0.005*heightString);

				whidthString = DensityUtil.px2dip(mContex,whidthString);
				heightString = DensityUtil.px2dip(mContex,heightString);
				params = new RelativeLayout.LayoutParams(whidthString,heightString);
			}

			//动态指定控件大小,位置
			Log.v("Position", HomeActivity.mCornerMark.getPosition());
			if(HomeActivity.mCornerMark.getPosition().equals("1")){
				params.leftMargin=20;
				params.topMargin=20;
				params.addRule(RelativeLayout.ALIGN_PARENT_LEFT, RelativeLayout.TRUE);
				params.addRule(RelativeLayout.ALIGN_PARENT_TOP, RelativeLayout.TRUE);
			}
			else if(HomeActivity.mCornerMark.getPosition().equals("2")){
				params.rightMargin=20;
				params.topMargin=20;
				params.addRule(RelativeLayout.ALIGN_PARENT_RIGHT, RelativeLayout.TRUE);
				params.addRule(RelativeLayout.ALIGN_PARENT_TOP, RelativeLayout.TRUE);
			}else if (HomeActivity.mCornerMark.getPosition().equals("3")) {
				params.leftMargin=20;
				params.bottomMargin=20;
				params.addRule(RelativeLayout.ALIGN_PARENT_LEFT, RelativeLayout.TRUE);
				params.addRule(RelativeLayout.ALIGN_PARENT_BOTTOM, RelativeLayout.TRUE);
			}else if(HomeActivity.mCornerMark.getPosition().equals("4")){
				params.rightMargin=20;
				params.bottomMargin=20;
				params.addRule(RelativeLayout.ALIGN_PARENT_RIGHT, RelativeLayout.TRUE);
				params.addRule(RelativeLayout.ALIGN_PARENT_BOTTOM, RelativeLayout.TRUE);
			}


			HomeActivity.img_cornermark.setLayoutParams(params);

			DownLoadTask downLoadTask = new DownLoadTask(HomeActivity.img_cornermark);
			downLoadTask.execute(HomeActivity.mCornerMark.getThumb());

		}
	}
遇到的问题:
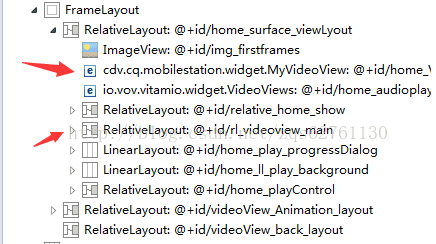
1. 在RelativeLayout里的布局,图片不显示?
RelativeLayout 层次布局是通过xml 文件 Relativelayout 由底层到外层进行布局的 ,应该在底层布局之上
2.在RelativeLayout里,代码实现位置是用
	params.addRule(RelativeLayout.ALIGN_PARENT_LEFT, RelativeLayout.TRUE);
	params.addRule(RelativeLayout.ALIGN_PARENT_TOP, RelativeLayout.TRUE);
3.不同手机分辨率等比列显示:
String[] paramString = HomeActivity.mCornerMark.getSmlscreen().split(",");
				int whidthString = Integer.parseInt(paramString[0]);
				int heightString = Integer.parseInt(paramString[1]);
				//转dp
				whidthString = (int) (width*0.005*whidthString);
				heightString = (int) (height*0.005*heightString);

				whidthString = DensityUtil.px2dip(mContex,whidthString);
				heightString = DensityUtil.px2dip(mContex,heightString);
				params = new RelativeLayout.LayoutParams(whidthString,heightString);