【课程免费分享】4 Spring各种Aware注入的原理与实战
4、Spring各种Aware注入的原理与实战
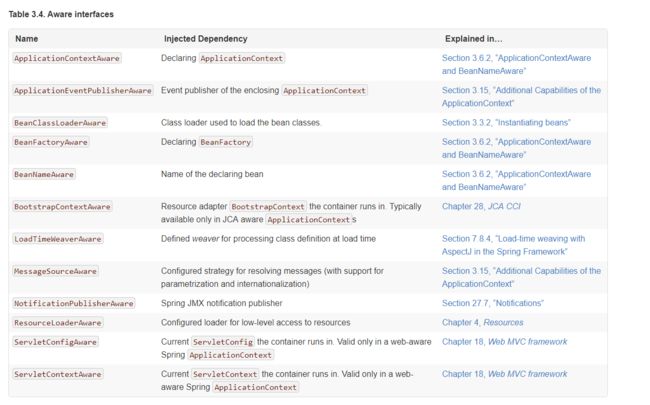
Spring通过接口回调的方式提供了多个非常方便的XXAware接口,方便在开发过程中获取到Spring上下文核心组件,而且这些XXAware都有一个共同的父接口Aware。Aware都是在bean初始化回调前就进行回调的。在官方文档中列出了常用的Aware:

举个例子:当我们需要获取Application和BeanFactory时,只需要实现对应的Aware接口:
@Component
public class BussinessBean implements ApplicationContextAware, BeanFactoryAware {
private static Logger log = LoggerFactory.getLogger(BussinessBean.class);

@Override
public void setApplicationContext(ApplicationContext applicationContext) throws BeansException {
	log.info("==>setApplicationContext");
}

@Override
public void setBeanFactory(BeanFactory beanFactory) throws BeansException {
	log.info("==>setBeanFactory");
}
}
在回调后输出log,运行后可以看到控制台输出的log
INFO  com.cml.chat.lesson.lesson4.BussinessBean - ==>setBeanFactory
INFO  com.cml.chat.lesson.lesson4.BussinessBean - ==>setApplicationContext
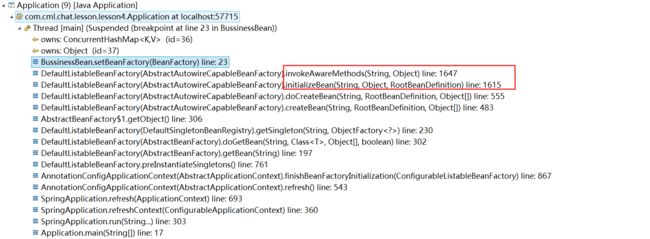
非常简单的使用就完成了Application和BeanFactory的获取,那么这个是如何实现的呢?为什么是在bean初始化回调前就调用了呢?下面进行原理大剖析,老规矩,以调试的方式获取到BeanFactoryAware的调用链关系

这个回调链是不是和BeanPostProcessor的调用链非常类似?
进入AbstractAutowireCapableBeanFactory.initializeBean和invokeAwareMethods方法
protected Object initializeBean(final String beanName, final Object bean, RootBeanDefinition mbd) {
if (System.getSecurityManager() != null) {
AccessController.doPrivileged(new PrivilegedAction是不是非常熟悉?竟然是和BeanPostProcessor调用链是相同的(不熟悉的话请先看前面的文章《如何在bean初始化回调前后进行自定义操作》),通过invokeAwareMethods方法调用的时机,这就解释说明了为什么BeanPostProcessor,BeanClassLoaderAware,BeanFactoryAware会在bean初始化回调前就回调了。
不是还有其他多个Aware接口么,为什么这几个Aware会优先调用?
因为这几个Aware都是bean相关的,所以在初始化bean的时候就被调用了。
当bean实现了Aware接口时,初始化后会先进行对应的接口回调,从上面代码可以看出调用顺序BeanNameAware->BeanClassLoaderAware->BeanFactoryAware
目前只有这三个Aware找到了,那么剩下的呢?
这里继续使用万能的方法查看ApplicationAware的调用链:
可以看出ApplicationAware是通过ApplicationContextAwareProcessor进行回调的,
class ApplicationContextAwareProcessor implements BeanPostProcessor {
private final ConfigurableApplicationContext applicationContext;
private final StringValueResolver embeddedValueResolver;
/**
* Create a new ApplicationContextAwareProcessor for the given context.
*/
public ApplicationContextAwareProcessor(ConfigurableApplicationContext applicationContext) {
this.applicationContext = applicationContext;
this.embeddedValueResolver = new EmbeddedValueResolver(applicationContext.getBeanFactory());
}
@Override
public Object postProcessBeforeInitialization(final Object bean, String beanName) throws BeansException {
AccessControlContext acc = null;
if (System.getSecurityManager() != null &&
(bean instanceof EnvironmentAware || bean instanceof EmbeddedValueResolverAware ||
bean instanceof ResourceLoaderAware || bean instanceof ApplicationEventPublisherAware ||
bean instanceof MessageSourceAware || bean instanceof ApplicationContextAware)) {
acc = this.applicationContext.getBeanFactory().getAccessControlContext();
}
if (acc != null) {
AccessController.doPrivileged(new PrivilegedAction又是BeanPostProcessor,看来BeanPostProcessor在Spring系统中还是占据举足轻重的地位啊。
这里在bean初始化回调前进行其他Aware接口的回调
可以看出调用顺序:EnvironmentAware->EmbeddedValueResolverAware->ResourceLoaderAware->ApplicationEventPublisherAware->MessageSourceAware->ApplicationContextAware
bean相关的aware是在bean工厂初始化的时候就回调了,而且回调传入的是bean工厂自身。那么ApplicationContextAwareProcessor的各种Aware实例对象又是从哪里获取的呢?又是如何融合到上下文中的呢?在前面的文章《如何在bean初始化回调前后进行自定义操作》中已经有详细说明了,这里就不多啰嗦了。
通过ApplicationContextAwareProcessor构造方法,继续往上查找调用链在AbstractApplicationContext.prepareBeanFactory中进行了调用
protected void prepareBeanFactory(ConfigurableListableBeanFactory beanFactory) {
	//略...
	// Configure the bean factory with context callbacks.
	beanFactory.addBeanPostProcessor(new ApplicationContextAwareProcessor(this));
	//略...

}
prepareBeanFactory方法在AbstractApplicationContext.refresh中调用
	public void refresh() throws BeansException, IllegalStateException {
	synchronized (this.startupShutdownMonitor) {
		// Prepare this context for refreshing.
		prepareRefresh();
		//略。。。
		}
refresh方法是在Spring上下文启动的时候进行调用的,在SpringBoot中非web环境使用的是AnnotationConfigApplicationContext。通过SpringApplication的createApplicationContext方法获得
 String DEFAULT_WEB_CONTEXT_CLASS = "org.springframework."
		+ "boot.context.embedded.AnnotationConfigEmbeddedWebApplicationContext";
 String[] WEB_ENVIRONMENT_CLASSES = { "javax.servlet.Servlet",
		"org.springframework.web.context.ConfigurableWebApplicationContext" };

	protected ConfigurableApplicationContext createApplicationContext() {
	Class contextClass = this.applicationContextClass;
	if (contextClass == null) {
		try {
			contextClass = Class.forName(this.webEnvironment
					? DEFAULT_WEB_CONTEXT_CLASS : DEFAULT_CONTEXT_CLASS);
		}
		catch (ClassNotFoundException ex) {
		//略
		}
	}
	return (ConfigurableApplicationContext) BeanUtils.instantiate(contextClass);
}
这样从SpringBoot启动到Aware接口调用的整个逻辑就分析完毕了。又是一个BeanPostProcessor的妙用。
总结
通过上述的说明,可以得出已知的几个Aware接口回调顺序为:BeanNameAware->BeanClassLoaderAware->BeanFactoryAware->EnvironmentAware->EmbeddedValueResolverAware->ResourceLoaderAware->ApplicationEventPublisherAware->MessageSourceAware->ApplicationContextAware
除了bean相关的Aware是在bean初始化后进行回调的,剩下的大部分都是通过BeanPostProcessor进行回调处理。现在有没有发现BeanPostProcessor还真是好用。
实战
那么这么好用,这里也来自己实现个MyAware。在bean初始化完成后,将ApplicationContext和BeanFactory一起通过Aware回调给所有的MyAware实现类。
首先定义MyAware接口:
public interface MyAware extends Aware {
void setAware(ApplicationContext applicationContext, BeanFactory beanFactory);
}
添加自定义MyAwareProcessor
@Component
public class MyAwareProcessor implements BeanPostProcessor, BeanFactoryAware, ApplicationContextAware {

private ApplicationContext applicationContext;
private BeanFactory beanFactory;

@Override
public void setApplicationContext(ApplicationContext applicationContext) throws BeansException {
	this.applicationContext = applicationContext;
}

@Override
public void setBeanFactory(BeanFactory beanFactory) throws BeansException {
	this.beanFactory = beanFactory;
}

@Override
public Object postProcessBeforeInitialization(Object bean, String beanName) throws BeansException {
	if (bean instanceof MyAware) {
		((MyAware) bean).setAware(applicationContext, beanFactory);
	}
	return bean;
}

@Override
public Object postProcessAfterInitialization(Object bean, String beanName) throws BeansException {
	return bean;
}

}
测试实现类MyAwareTest,这里只是简单的输出ApplicationContext和BeanFactory类名
@Component
public class MyAwareTest implements MyAware {
private static Logger log = LoggerFactory.getLogger(MyAwareTest.class);

@Override
public void setAware(ApplicationContext applicationContext, BeanFactory beanFactory) {
	log.info("MyAwareTest.setAware===>applicationContext:" + applicationContext.getClass().getSimpleName() + ",beanFactory:"
			+ beanFactory.getClass().getSimpleName());
}

}
项目启动后可以看到输出log:
com.cml.chat.lesson.lesson4.MyAwareTest - MyAwareTest.setAware===>applicationContext:AnnotationConfigApplicationContext,beanFactory:DefaultListableBeanFactory
这样一个超简单的MyAware就实现了。
