vue-router(笔记)
文章目录
- 1.路由简介
- 1.1 什么是路由
- 1.2 后端路由与前端路由
- 1.2.1 后端路由阶段
- 1.2.2 前端路由阶段
- 1.3 URL的hash和HTML5的history
- 1.3.1 URL的hash
- 1.3.2 HTML5的history模式
- 2.vue-router的安装配置
- 3.vue-router的使用
- 3.1在components文件夹下创建两个组件
- 3.2配置路由映射:组件和路径的映射关系(在index.js文件中)
- 3.3 使用路由:通过router-link和router-view标签
- 3.4路由的默认值和history模式
- 3.5 router-link的其他属性
- 3.6 通过代码进行路由跳转($router属性)
- 4.vue-router深入
- 4.1 动态路由
- $router 与 $route的区别
- 4.2 vue-router的打包文件解析和懒加载
- 4.3 嵌套路由
- 4.4 vue-router 的参数传递
- 4.5 router 和 route 的由来
- 5. vue-router其他
- 5.1 vue-router的导航守卫
- 5.2 导航守卫补充
- 5.3 完整的导航解析流程
- 5.4 keep-alive
- keep-alive的属性
- 6. TabBar的实现
- 6.1 实现TabBar的思路
- 6.2 **初步实现**
- 6.3 **将tabbar抽离成组件**
- 6.4 实现点击某个图标使其图标变红和文字变色(动态),并显示出该页内容
- 6.5 别名配置
- 7.promise
- 7.1 什么是promise
- 7.2 promise的基本使用
- 7.2.1 什么时候使用promise
- 7.2.2 promise对象
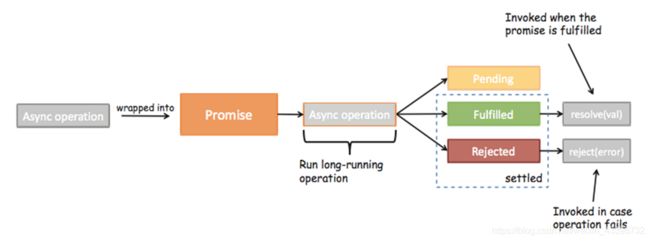
- 7.3 promise的三种状态
- 7.4 promise的链式调用
- 7.5 promise的all的使用
- 8.vuex
- 8.1 什么是vuex
- 数据流层
- 8.2 vuex基本使用
- 通过提交mutation的方式修改state小案例
- 8.3 vuex中核心概念
- 8.3.1 state单一状态树
- 8.3.2 getters
- 8.3.3 mutations
- 1. 提交载荷(Payload)
- 2. 对象风格的提交方式
- 3. Mutation 需遵守 Vue 的响应规则
- 4. 使用常量代替mutation事件类型
- 5. mutation必须是同步函数
- 8.3.4 action
- 8.3.5 mudules
- 模块的局部状态
- 插点知识点(对象解构赋值)
- 8.3.6 vuex----store文件夹的目录结构
- 9. axios
- 9.1 axios简介
- 9.2 axios的使用和配置
- 9.2.1 安装
- 9.2.2 基本使用
- get请求
- post请求
- axios发送并发请求(使用axios.all(类似promise.all))
- 9.3 axios API
- 9.4 创建axios实例(axios.create)
- 9.5 拦截器 interceptors
- 添加拦截器
- 取消拦截器
- 9.6 axios封装
- request.js
- main.js/引入request的文件
1.路由简介
1.1 什么是路由
- 路由就是通过互联的网络把信息从源地址传送到目的地的活动
- 路由提供了两种机制:路由和转送
- 路由:是决定数据包从来源到目的地的路径
- 转送:就是将数据转移
- 路由表
– 路由表本质就是一个映射表,决定了数据包的指向
1.2 后端路由与前端路由
1.2.1 后端路由阶段
- 服务器直接生产渲染好HTML页面,返回给客户端进行显示。
- 缺点:整个页面模块由后端人员负责;编写和维护不方便。
1.2.2 前端路由阶段
- 前后端分离阶段
- 随着ajax出现,前后端分离
- 后端提供API提供数据,前端通过ajax获取数据
- 单页面富应用阶段
- SPA最主要的特点是在前后端分离的基础上结了一层前端路由,也就是前端来维护一套路由规则
- 改变url,页面不进行整体的刷新。 整个网站只有一个html页面。
1.3 URL的hash和HTML5的history
1.3.1 URL的hash
- URL的hash是通过锚点(#),本质上是改变window.location的href属性。
- 可以通过直接赋值location.hash来改变href,但是页面并不会发生刷新。
- 可以通过改变hash改变url,此时页面是未刷新的。
- vue-router其实用的就是这样的机制,改变url地址,这个url地址存在一份路由映射表里面,比如/user代表要请求用户页面,只要配置了这个路由表(路由关系),就可以前端跳转而不刷新页面,所有的数据请求都走ajax。
1.3.2 HTML5的history模式
- 同样的使用HTML5的history模式也是不会刷新页面的,history对象栈结构,先进后出,pushState类似压入栈中,back是回退。
hristory.pushState({}, '', '/foo')
history.back()
- replaceState模式与pushState模式区别在于replaceState模式浏览器没有返回只是替换,不是压入栈中。
- go只能在pushState模式中使用,go是前进后退到哪个历史页面。
history.go(-1)//回退一个页面
history.go(1)//前进一个页面
history.forward()//等价于go(1)
history.back()//等价于go(-1)
2.vue-router的安装配置
- 安装:npm install vue-router --save
- 在模块化工程中使用它
//配置路由相关信息
//先导入vue和vue-router
import Vue from 'vue'
import Router from 'vue-router'
import HelloWorld from '@/components/HelloWorld'

//1. 通过vue.use(插件)来安装插件
Vue.use(Router)

//2. 创建vueRouter对象
const routes = [
	//配置路由和组件之间的对应关系
]

const router = new Router({
  routes,
})

//3.将router对象传到vue实例中
export default router;

//4.在main.js中使用router
import router from './router/index'

new Vue({
  el: '#app',
  router,//使用路由对象,简写对象增强写法
  render: h => h(App)
})
3.vue-router的使用
3.1在components文件夹下创建两个组件
Home和About 组件
我是About
我是About内容,哈哈哈
3.2配置路由映射:组件和路径的映射关系(在index.js文件中)
const routes = [
  {
    path: '/home',
    component: Home
  },
  {
    path: '/about',
    component: About
  }
]
3.3 使用路由:通过router-link和router-view标签
    首页
    关于
3.4路由的默认值和history模式
- 路由的默认值(修改index.js的routes)
{
    path: '',
    redirect: '/home'   //缺省时重新定向为首页
  },
添加缺省值,并重定向到/home路径,此时打开页面,直接显示home组件内容。此时页面URL为:(有#,因为此时默认为hash模式)

- 修改hash为history模式(修改index.js文件的router对象)
const router = new Router({
  routes,
  mode: 'history'  //修改模式为history
})
3.5 router-link的其他属性
- to属性:用于跳转指定的路径
- tag属性:指定渲染成什么组件(tag=‘button’渲染成按钮)
- replace属性:在history模式下使用replaceState而不是pushState,此时不会留下history记录,浏览器的返回按钮是不能使用的。
- active-class属性:当router-link对应的路由匹配成功的时候,会自动给当前元素设置一个router-link-active的class,设置active-class可以修改默认的名称。
- 在进行高亮显示的导航菜单或者底部tabbar时,会用到该属性
- 但是通常不会修改类的属性,会直接使用默认的router-link-active
- 如果每个router-link都要加上active-class=‘active’,那就在路由里面统一更改。
const router = new Router({
  //配置路由和组件之间的应用关系
  routes,
  mode: 'history',//修改模式为history
  linkActiveClass: 'active'
})
3.6 通过代码进行路由跳转($router属性)
export default {
name: 'App',
methods:{
homeClick(){
// this.$router.push('./home')
//不想让他返回
this.$router.replace('./home')
console.log('homeClick');
},
aboutClick(){
// this.$router.push('./about')
this.$router.replace('./about')
console.log('aboutClick');
}
}
}
4.vue-router深入
4.1 动态路由
- 一个页面的path路径可能是不确定的,例如可能有/user/aaaa或者/user/bbbb,除了/user之外,后面还跟上了用户ID/user/123等。这种path和component的匹配关系,叫动态路由。
- 新建User组件
我是user
我是user内容,嘿嘿嘿
用户ID是:{{ userId }}
用户ID是:{{ $route.params.userId }}
该组件定义一个计算属性,通过this.$route.params.userId获取处于激活状态的路由参数userId。
- 配置路由参数index.js(使用:userId指定动态路由参数userId。)
{
    path: '/user/:userId',
    component: User
  }
- app.vue中添加user页面的,并添加userId变量
用户

data(){
    return{
      userId: 'XXX'
    }
  },
$router 与 $route的区别
$route是代表处于激活状态的路由,这里指的也就是
{
    path: '/user/:userId',
    name: 'User',
}
$router 指的是router对象,也就是
const router = new Router({})
4.2 vue-router的打包文件解析和懒加载
-
为什么要懒加载:打包时候js太大,页面响应缓慢
-
懒加载:如果组件模块化了,当路由被访问的时候才开始加载被选中的组件,这样就是懒加载。(需要的时候再加载)
-
使用 npm run build 命令将之前创建的项目打包,打开dist文件夹,目录结构如下:
· app.xxx.js是我们自己编写的业务代码
· vendor.xxx.js是第三方框架,例如vue/vue-router/axios等
· mainfest.xxx.js是为了打包的代码做底层支持的,一般是webpack帮我们做一些事情
· 除了这三个还多了js文件,分别是创建的组件,因为这些组件是懒加载的所以被分开打包了。 -
组件懒加载
// import Home from '../components/Home'
// import About from  '../components/About'
// import User from  '../components/User'

const Home = () => import('../components/Home')
const About = () => import('../components/About')
const User = () => import('../components/User')

在routes里直接使用Home   About    User
4.3 嵌套路由
平常在一个home页面中,我们可能需要/home/news和/home/message访问一些内容,一个路由映射一个组件就像后端一个api对应一个controller的一个requestMapping一样,访问两个路由也会分别渲染这两个组件。
- 创建两个子组件 HomeNews 和 HomeMessage
- 配置路由映射关系(在Home的路由映射关系里配置,写在children里path不用加‘/’)
{
    path: '/home',
    component: Home,
    children: [
      {
        path: '',
        redirect: 'news'
      },
      {
        path: 'news',
        component: HomeNews
      },
      {
        path: 'message',
        component: HomeMessage
      }
    ]
  },
- 在Home.vue里使用两个组件
    我是Home
    我是Home内容,哈哈哈
    新闻
    消息
4.4 vue-router 的参数传递
之前的动态路由说的userId也是参数传递的方式的一种,准备新建一个Profile.vue组件,并配置路由映射,添加指定的。
App.vue组件:
档案
profile.vue组件:


    我是profile组件
    {{ $route.query.name }}
    {{ $route.query.age }}
    {{ $route.query.height }}
传递参数主要有两种类型:params 和 query
- params的类型也就是动态路由形式
- 配置路由的格式:/user/:userId
- 传递的方式:在path后面跟上对应的userId
- 传递形成的路径:/user/123,/user/xxx
- 通过$route.params.userId获取指定userId
- query类型
- 配置路由的格式:/profile,也就是普通的配置
- 传递的方式:对象中使用query的key作为传递的方式
- 传递形成的路径:/profile?name=zty&age=24&height=177(这个传递的是三个键值对)
使用代码编写传递数据,使用button代替,并添加点击事件。
UserClick(){
      this.$router.push('/User/' + this.userId)
},
profileClick(){
	this.$router.push({
    	path: '/profile',
    	query:{
    	 name: 'sylvia',
         age: 22,
         height: 1.62
    	 }
    })
}
4.5 router 和 route 的由来
vue全局对象 .$router 与 main.js 导入的 router 对象是一个对象,也就是我们router/index.js 导出的对象 router 。
main.js:
new Vue({
  el: '#app',
  router,
  render: h => h(App)
})
index.js:
const router = new Router({
  routes,
  mode: 'history',  //修改模式为history
  linkActiveClass: 'active'
})
//3.将router对象传到vue实例中
export default router;
this.$route对象是当前处于活跃的路由,有params和query属性可以用来传递参数。
查看vue-router源码,在我们项目中的router/index.js中,vue 对于插件必须要使用Vue.use(Router),来安装插件,也就是执行vue-router的install.js。
其中index.js是入口文件,入口js文件就是导入并执行了install.js文件。
发现:install.js中有注册2个全局组件RouterView和RouterLink,所以我们能使用和组件。
-
$ router 和 $ route是继承自vue的原型
怎么理解原型?学过Java 的都知道有父类和子类,子类也可以有自己的子类,但是他们都有一个处于最顶层的类Object(所有类的父类)。在Vue中就有那一个Vue类似Object,在java中在Object中定义的方法,所有的类都可以使用可以重写,类似的Vue.prototype(Vue的原型)定义的属性方法,他的原型链上的对象都可以使用,而 $ router 和 $ route 都在Vue的原型链上。 -
在main.js入口文件中在vue的原型上定义一个方法test,然后在User组件中尝试调用。
//在vue的原型上添加test方法
Vue.prototype.test = function () {
  console.log("test")
}
这是用户界面
这里是用户页面的内容。
用户ID是: {{ userId }}
启动项目点击User页面上的按钮,打开浏览器控制台查看日志发现test方法被执行了,而User组件中并未定义test方法,却可以调用。
继续来读install.js,install.js中一开始就将Vue这个类当参数传入了install方法中,并把Vue赋值给_Vue。
 Object.defineProperty(Vue.prototype, '$router', {
    get () { return this._routerRoot._router }
  })
//Object.defineProperty用来定义属性
  Object.defineProperty(Vue.prototype, '$route', {
    get () { return this._routerRoot._route }
  })
Object.defineProperty用来定义属性,以上代码就是给Vue.prototype(Vue原型)添加$ router和$ route属性并给属性赋值,等价于
Vue.prototype.$router = {
    get () { return this._routerRoot._router }
}
Vue.prototype.$route = {
  get () { return this._routerRoot._route }
}
也就是在Vue的原型上添加 r o u t e r 和 router和 router和route属性,再查看get()返回值this._routerRoot._router
5. vue-router其他
5.1 vue-router的导航守卫
问题:我们经常需要在路由跳转后,例如从用户页面跳转到首页,页面内容虽然可以自己定义,但是只有一个html文件,也只有一个title标签,我们需要改变标题。
可以使用vue的生命周期函数在组件被创建的时候修改title标签内容。
created() {
	//创建的时候修改title
    document.title = '关于'
}
mounted() {
    //数据被挂载到dom上的时候修改title
}
update() {
    //页面刷新的时候修改
}
当然不能每个组件去写生命周期函数,如果我们能监听路由的变化(了解路由从哪来往哪里跳转),那我们就能在跳转中修改title标签,这就是导航守卫能做的事情。
修改router/index.js:
/**
 * 前置钩子:从from跳转到to
 * from 来的路由
 * to 要去的路由
 */
router.beforeEach((to,from,next) => {
  //从from跳转到to
  document.title = to.matched[0].meta.title;
  console.log(to);
  next()    //必须调用,不调用不会跳转
})
router.beforeEach()称为前置钩子(前置守卫),顾名思义,跳转之前做一些处理。
当然每个路由配置上也要加上meta属性,不然就取不到了,为什么要使用matched[0],因为如果你是嵌套路由,没有给子路由添加meta(元数据:描述数据的数据)属性,就会显示undefined,使用matched[0]表示取到匹配的第一个就会找到父路由的meta属性。
const routes = [
  {
    path: '',
    redirect: '/home'   //缺省时重新定向为首页
  },
  {
    path: '/home',
    component: Home,
    meta:{
      title: '首页'
    },
    children: [
      {
        path: '',
        redirect: 'news'
      },
      {
        path: 'news',
        component: HomeNews
      },
      {
        path: 'message',
        component: HomeMessage
      }
    ]
  },
  {
    path: '/about',
    component: About,
    meta:{
      title: '关于'
    }
  },
  {
    path: '/user/:userId',
    component: User,
    meta:{
      title: '用户'
    }
  },
  {
    path: '/profile',
    component: profile,
    meta:{
      title: '档案'
    }
  }
]
5.2 导航守卫补充
前面说了前置守卫router.beforeEach(),相对的应该也存在后置守卫(后置钩子),顾名思义,也就是在跳转之后的回调函数。
/**
 * 后置钩子
 */
router.afterEach((to, from) => {
  console.log('后置钩子调用了----')
})
- 前置守卫和后置守卫都是全局守卫。
- 还有路由独享的守卫
- 组件内的守卫(具体见官网)
路由独享守卫,路由私有的
{
    path: '/about',//about 前端路由地址
    name: 'About',
    component: () => import('@/components/About'),
    beforeEnter: (to, from, next) => {
      console.log('来自' + from.path + ',要去' + to.path)
      next()
    },
    meta: {
      title: '关于'
    }
  },
组件内的守卫,直接在组件中定义的属性
const Foo = {
  template: `...`,
  beforeRouteEnter (to, from, next) {
    // 在渲染该组件的对应路由被 confirm 前调用
    // 不!能!获取组件实例 `this`
    // 因为当守卫执行前,组件实例还没被创建
  },
  beforeRouteUpdate (to, from, next) {
    // 在当前路由改变,但是该组件被复用时调用
    // 举例来说,对于一个带有动态参数的路径 /foo/:id,在 /foo/1 和 /foo/2 之间跳转的时候,
    // 由于会渲染同样的 Foo 组件,因此组件实例会被复用。而这个钩子就会在这个情况下被调用。
    // 可以访问组件实例 `this`
  },
  beforeRouteLeave (to, from, next) {
    // 导航离开该组件的对应路由时调用
    // 可以访问组件实例 `this`
  }
}
具体信息看官网:vue-router导航守卫
5.3 完整的导航解析流程
- 导航被触发。
- 在失活的组件里调用离开守卫。
- 调用全局的 beforeEach 守卫。
- 在重用的组件里调用 beforeRouteUpdate 守卫 (2.2+)。
- 在路由配置里调用 beforeEnter。
- 解析异步路由组件。
- 在被激活的组件里调用 beforeRouteEnter。
- 调用全局的 beforeResolve 守卫 (2.5+)。
- 导航被确认。
- 调用全局的 afterEach 钩子。
- 触发 DOM 更新。
- 用创建好的实例调用 beforeRouteEnter 守卫中传给 next 的回调函数。
5.4 keep-alive
先给Home组件加上created()和destoryed()2个生命周期函数。
在首页和关于组件之间路由跳转的时候,Home组件一直重复创建和销毁的过程,每次创建都是新的Home组件。
需求:当我点击首页消息页面,随后跳转到关于页面,又跳转到首页,此时我希望显示的是首页的消息页面而不是默认的新闻页面。
解决:此时就需要keep-alive来使组件保持状态,缓存起来,离开路由后,Home组件生命周期的destroyed()不会被调用,Home组件不会被销毁。
- keep-alive是Vue内置的一个组件,可以使被包含的组件保留状态,或者避免重新渲染。
- router-view也是一个组件,如果用 keep-alive 将其包起来,所有路径匹配到的视图组件都会被缓存。
启动项目,发现 keep-alive 无效。
在跳转关于页面的时候Home组件并没有被销毁,说明keep-alive生效了。仔细查看路由配置发现,/home被默认重定向到了/home/news。所以在访问/home的时候每次出来的都是新闻。
解决:
- 为了解决问题,在Home组件中引入activated()和deactivated()两个函数,这2个函数与keep-alive有关,不使用keep-alive的这两个函数无效。
- activated()当组件属于进入活跃状态的时候调用
- deactivated()当组件属于退出活跃状态的时候调用(此时路由已经跳转,所以不能在此方法中修改路由,因为修改的是to路由)
activated(){
    console.log('调用actived')
    this.$router.push(this.path)//在活跃的时候将保存的路由给当前路由
  },
  deactivated(){
    console.log('调用actived')
    console.log(this.$route.path)
    this.path = this.$route.path//变成不活跃状态,将最后的路由保存起来
  }
发现还是不行,由于deactivated()调用的时候,此时路由已经跳转,所以不能在此方法中修改路由,因为修改的是to路由。
- 使用路由守卫(组件内守卫),beforeRouteLeave (to, from , next)在离开路由的时候将当前的路由赋值给path并保存起来。
 activated(){
    console.log('调用actived')
    this.$router.push(this.path)
  },
  // deactivated(){
  //   console.log('调用actived')
  //   console.log(this.$route.path)
  //   this.path = this.$route.path
  // },
  beforeRouterLeave(to, from, next) {
    console.log(this.$route.path)
    this.path = this.$route.path
    next()
  }
此时问题解决!
keep-alive的属性
我们将包起来,那所有的组件都会缓存,都只会创建一次,如果我们需要某一个组件每次都创建销毁,就需要使用exclude属性。
此时Profile和User组件(这里组件需要有name属性,分别为Profile和User)就被排除在外,每次都会创建和销毁。相对应的也有include属性,顾名思义就是包含,只有选中的才有keep-alive。
6. TabBar的实现
6.1 实现TabBar的思路
- 下方单独的Tab-Bar组件如何封装?
- 自定义Tab-Bar组件,在APP中使用
- 让Tab-Bar位置在底部,并设置你需要的样式
- Tab-Bar中显示的内容由外部决定
- 定义插槽
- flex布局平分Tab-Bar
- 自定义Tab-Bar-Item,可以传入图片和文字
- 定义Tab-Bar-Item,并定义两个插槽:图片和文字
- 给插槽外层包装div,设置样式
- 填充插槽,实现底部Tab-Bar的效果
- 传入高亮图片
- 定义另一个插槽,插入active-icon的数据
- 定义一个变量isActicve,通过v-show来决定是否显示对应的icon
- Tab-Bar-Item绑定路由数据
- 安装路由:npm install vue-router --save
- 在router/index.js配置路由信息,并创建对应的组件
- main.js中注册router
- App.vue中使用router-link和router-view
- 点击item跳转到对应的路由,并且动态决定isActive
- 监听item的点击,通过this.$router.replace()替换路由路径
- 通过this.$route.path.indexOf(this.link)!==-1来判断是否使active
- 动态计算active样式
- 封装新的计算属性:this.isActive?{‘color’: ‘red’}:{}
6.2 初步实现
注意:如果每次都要复用tabbar,那每次都需要复制粘贴,应该要把tabbar抽离出来。
6.3 将tabbar抽离成组件
在components下新建tabbar文件夹,新建TarBar.vue和TabBarItem.vue,TabBarItem组件是在组件TarBar中抽取出来的,可以传入图片和文字(比如首页),所有需要使用插槽代替。
- TarBar.vue
- TabBarItem.vue 组件中插入2个插槽一个用于插入图片一个用于插入文字。
- 在 App.vue 中使用
 首页
首页
 分类
分类
 购物车
购物车
 我的
我的
6.4 实现点击某个图标使其图标变红和文字变色(动态),并显示出该页内容
要实现需要用到路由
- 图片变色:引用两张图片,使用 v-if 和 v-else 来处理图片是否变色,在路由处于活跃的时候,变红色
- 文字变色:给文字绑定动态style,当路由处于活跃的时候,通过 props 传值来设置文字颜色。
- MainTabBar.vue

 首页
首页

 分类
分类

 购物车
购物车

 我的
我的
- TabBarItem.vue
- App.vue
- 路由的配置
const Home = () => import('../views/home/Home')
const Category = () => import('../views/category/Category')
const Cart = () => import('../views/cart/Cart')
const Profile = () => import('../views/profile/Profile')


Vue.use(Router)

const routes = [
  {
    path: '',
    redirect: '/home'
  },
  {
    path: '/home',
    component: Home
  },
  {
    path: '/category',
    component: Category
  },
  {
    path: '/cart',
    component: Cart
  },
  {
    path: '/profile',
    component: Profile
  }
]

export default new Router({
  routes,
  mode: 'history'
})
6.5 别名配置
经常的我们向引入图片文件等资源的时候使用相对路径,诸如…/assets/xxx这样的使用…/获取上一层,如果有多个上层就需要…/…/xxx等等这样不利于维护代码。此时就需要一个能获取到指定目录的资源的就好了。
- 在webpack.base.config中配置使用别名,找到resolve:{}模块,增加配置信息
resolve: {
    extensions: ['.js', '.vue', '.json'],
    alias: {
      '@': resolve('src'),
      'assets': resolve('src/assets'),
      'components': resolve('src/components'),
      'views': resolve('src/views'),
    }
  },
- MainTabBar.vue的路径
import TabBar from "@/components/tabbar/TabBar";
import TabBarItem from "@/components/tabbar/TabBarItem";


7.promise
7.1 什么是promise
简单说Promise是异步编程的一种解决方案。
- Promise是ES6中的特性。
- 什么是异步操作?
网络请求中,对端服务器处理需要时间,信息传递过程需要时间,不像我们本地调用一个js加法函数一样,直接获得1+1=2的结果。这里网络请求不是同步的,有时延,不能立即得到结果。 - 如何处理异步事件
对于网络请求这种,一般会使用回调函数,在服务端传给我数据成功后,调用回调函数。例如ajax调用。
$.ajax({
	success:function(){
		...
	}
})
如果碰到嵌套网络请求,例如第一次网络请求成功后回调函数再次发送网络请求,这种代码就会让人很难受。
$.ajax({
	success:function(){
		$.ajax({
			...
        })
	}
})
如果还需要再次网络请求,那么又要嵌套一层,这样的代码层次不分明很难读,也容易出问题。
7.2 promise的基本使用
7.2.1 什么时候使用promise
一般情况下有异步操作时,使用promise对这个异步操作进行封装(解决异步请求冗余这样的问题,promise就是用于封装异步请求的。)
7.2.2 promise对象
  //promise的参数是一个函数(resolve, reject) = {}
  //函数的参数resolve, reject本身又是函数
  //链式编程
new Promise((resolve, reject) => {})
- 模拟定时器的异步事件
用定时器模拟网络请求,定时2秒为网络请求事件,用console.log()表示需要执行的代码。、
  new Promise((resolve, reject) => {
    //第一次网络请求的代码
    setTimeout(() => {
      resolve()
    },2000)
  }).then(() => {
    //第一次拿到结果的处理代码
    console.log('hello world');

    return new Promise((resolve, reject) => {
      //第二次网络请求的代码
      setTimeout(() => {
        resolve()
      },2000)
    })
  }).then(() => {
    //第二次拿到结果的处理代码
    console.log('hello vue');

    return new Promise((resolve, reject) => {
      //第三次网络请求的代码
      setTimeout(() => {
        resolve()
      },2000)
    })
  }).then(() =>{
    //第三次拿到结果的处理代码
    console.log('hello python');
  })
调用resolve()就能跳转到then()方法就能执行处理代码,then()回调的返回值又是一个Promise对象。层次很明显,只要是then()必然就是执行处理代码,如果还有嵌套必然就是返回一个Promise对象,这样调用就像java中的StringBuffer的append()方法一样,链式调用。
//将请求与数据处理分离开来
  new Promise((resolve, reject) => {
    setTimeout(() => {
      //成功时调用resolve
      resolve('hello world')

      //失败时调用reject
      reject('error message')
    },1000)
  }).then((data) => {  //成功时处理
    console.log(data);
  }).catch(err => {   //失败时处理
    console.log(err);
  })
7.3 promise的三种状态
- pending状态:等待状态,比如正在进行的网络请求还未响应,或者定时器还没到时间
- fulfill状态:当我们主动回调了resolve函数,就处于满足状态,并会回调then()
- reject:拒绝状态,当我们主动回调reject函数,就处于该状态,并且会回调catch()
7.4 promise的链式调用
网络请求:aaa
处理:aaa111
处理:aaa111222
  new Promise((resolve, reject) => {
    setTimeout(() => {
      resolve('aaa')
    },1000)
  }).then(res => {
    console.log(res);
    return new Promise(resolve => {
      resolve(res + '111')
    })
  }).then(res => {
    console.log(res);
    return new Promise(resolve => {
      resolve(res +'222')
    })
  }).then(res => {
    console.log(res);
  })
简写Promise.resolve()。
new Promise((resolve, reject) => {
    setTimeout(() => {
      resolve('aaa')
    },1000)
  }).then(res => {
    console.log(res);
    return Promise.resolve(res + '111')
  }).then(res => {
    console.log(res);
    return Promise.resolve(res + '222')
  }).then(res => {
    console.log(res);
  })
还可以直接省略掉Promise.resolve()
省略掉Promise.resolve
  new Promise((resolve, reject) => {
    setTimeout(() => {
      resolve('aaa')
    },1000)
  }).then(res => {
    console.log(res);
    return res + '111'
  }).then(res => {
    console.log(res);
    return res + '222'
  }).then(res => {
    console.log(res);
  })
如果中途发生异常,可以通过catch()捕获异常,也可以通过throw抛出异常,类似java
new Promise((resolve, reject) => {
    setTimeout(() => {
      resolve('aaa')
    },1000)
  }).then(res => {
    console.log(res);
    // return Promise.resolve(res + '111')     //成功处理

    // return Promise.reject('error message')     //失败

    throw 'error message'   //直接抛出异常
  }).then(res => {
    console.log(res);
    return Promise.resolve(res + '222')
  }).then(res => {
    console.log(res);
  }).catch(err => {
    console.log(err);
  })
7.5 promise的all的使用
- 有这样一个情况,一个业务需要请求2个地方(A和B)的数据,只有A和B的数据都拿到才能走下一步。
- 由于不知道网络请求A和网络请求B哪个先返回结果,所以需要定义一个函数只有2个请求都返回数据才回调成功。
var isResult1 = false
  var isResult2 = false
  //请求1
  $.ajax({
    url: '',
    success: function () {
      console.log('结果1');
      isResult1 = true
      handleResult()
    }
  })
  //请求2
  $.ajax({
    url: '',
    success: function () {
      console.log('结果2');
      isResult2 = true
      handleResult()
    }
  })

  function handleResult() {
    if(isResult1 && isResult2){

    }
  }
- promise的all方法可以实现
- ajax1和ajax2的结果都放在resolve()中,Promise将其放在results中了,使用setTimeout模拟。
Promise.all([
    // new Promise((resolve, reject) => {
    //   $.ajax({
    //     url: 'url1',
    //     success: function () {
    //       resolve()
    //     }
    //   })
    // }),
    // new Promise((resolve, reject) => {
    //   $.ajax({
    //     url: 'url2',
    //     success: function () {
    //       resolve()
    //     }
    //   })
    // })
    new Promise((resolve, reject) => {
      setTimeout(() => {
        resolve({name: 'sylvia', age: 18})
      },1000)
    }),
    new Promise((resolve, reject) => {
      setTimeout(() => {
        resolve({name: 'xxx', age: 18})
      },2000)
    })
  ]).then(results => {
    console.log(results);
  })
8.vuex
8.1 什么是vuex
Vuex是一个专为Vue.js应用程序开发的状态管理模式。它采用集中式存储管理应用的所有组件的状态,并以相应的规则保证状态以一种可预测的方式发生变化。
其实最简单理解为,在我们写Vue组件中,一个页面多个组件之间想要通信数据,那你可以使用Vuex
- Vuex 是一个专为 Vue.js 应用程序开发的状态管理模式
- Vuex状态管理 === 管理组件数据流动 === 全局数据管理
- Vue的全局数据池,在这里它存放着大量的复用或者公有的数据,然后可以分发给组件
- Vue双向数据绑定的MV框架,数据驱动(区别节点驱动),模块化和组件化,所以管理各组件和模块之间数据的流向至关重要
- Vuex是一个前端非持久化的数据库中心,Vuex其实是Vue的重要选配,一般小型不怎么用,大型项目运用比较多,所以页面刷新,Vuex数据池会重置
路由 -> 管理的是组件流动
vuex -> 管理的是数据流动
什么状态需要组件间共享?
- 用户的登录状态、用户名称、头像等
- 商品的收藏、购物车中的商品等
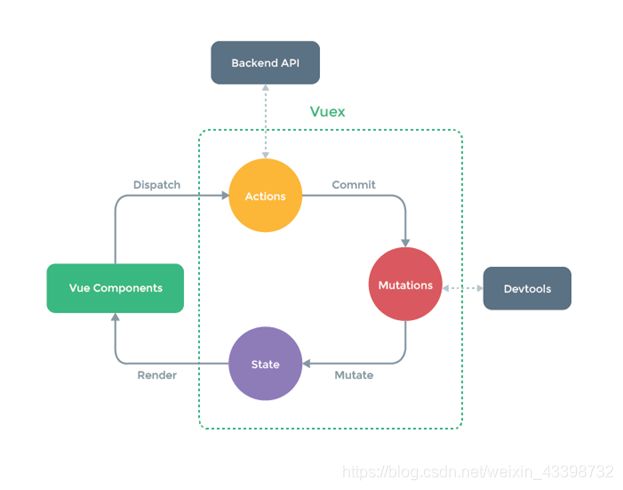
数据流层
- 数据流都是单向的
- 组件能够调用action
- action用来派发mutation
- 只有mutation可以改变状态
- store是响应式的,无论state什么时候更新,组件都将同步更新
8.2 vuex基本使用
- 安装vuex: npm install vuex --save
- 在 src 新建一个文件夹 store,在 store 里新建 index.js
import Vue from 'vue'
import Vuex from 'vuex'

//1.安装插件
Vue.use(Vuex)

//2.创建对象
const store = new Vuex.Store({
  state: {
    count: 1000,
  }
})

//3.导出
export default store
- 在 main.js 里导入并使用
import Vue from 'vue'
import App from './App'
import router from './router'
import store from "./store";

Vue.config.productionTip = false

/* eslint-disable no-new */
new Vue({
  el: '#app',
  router,
  store,
  render: h => h(App)
})
- 使用$.store.state
//父组件App.js:
{{ message }}
---------app内容---------
{{ $store.state.count }}
---------hello vuex内容---------
//子组件HelloVue.js:
{{ $store.state.count }}
1. 提取出一个公共的store对象,用于保存在多个组件中共享的状态
2. 将store对象放置在new Vue对象中,这样可以保证在所有的组件中都可以使用到
3. 在其他组件中使用store对象中保存的状态即可
	- 通过this.$store.属性 的方式来访问状态
	- 通过this.$store.commit('mutation中方法')来修改状态
注意:
我们通过提交mutation的方式,而非直接改变$store.state.count
因为vuex可以更明确追踪state的变化,所以不要直接改变$store.state.count的值,通过数据流层来改变state的值
通过提交mutation的方式修改state小案例
- store/index.js:
const store = new Vuex.Store({
  state: {
    count: 1000,
  },
  mutations: {
    increment(state){
      state.count++
    },
    decrement(state){
      state.count--
    }
  }
})
- App.vue
{{ $store.state.count }}
methods: {
addition(){
return this.$store.commit('increment')
},
subtraction(){
return this.$store.commit('decrement')
}
}
8.3 vuex中核心概念
getters相当于组件的computed
mutation相当于组件的methods
8.3.1 state单一状态树
Vuex 使用单一状态树,用一个对象就包含了全部的应用层次状态。至此它便作为一个唯一的数据源而存在。这也意味着,每个应用将仅仅包含一个store实例。
单状态树让我们能够直接地定位任一特定的状态片段,在调试的过程中也能轻易地取得整个当前应用状态的快照。
8.3.2 getters
用来从store获取Vue组件数据,类似于computed。
- Getter 接受 state 作为其第一个参数:
state: {
    count: 1000,
  },
  getters: {
    countPower(state) {
      return state.count * state.count
    },
  },
- getters 也可以接受其他 getter 作为第二个参数:
state: {
    students: [
      {id:110, name: 'sylvia', age: 18},
      {id:111, name: 'xxx', age: 20},
      {id:112, name: 'dhy', age: 24},
      {id:113, name: 'tyy', age: 30}
    ]
  },
  getters: {
    more20stuLength(state,getters) {
      // return state.students.filter(s => s.age >= 20).length
      return getters.more20stu.length
    },
  },
- getter 返回一个函数,来实现给 getter 传参。对 store 里的数组进行查询时非常有用
state: {
    students: [
      {id:110, name: 'sylvia', age: 18},
      {id:111, name: 'xxx', age: 20},
      {id:112, name: 'dhy', age: 24},
      {id:113, name: 'tyy', age: 30}
    ]
  },
  getters: {
    moreAgeStu(state){
      return function (age) {
        return state.students.filter(s => s.age >= age).length
      }
    }
  },

//调用
{{ $store.getters.moreAgeStu(18) }}
注意: getter 在通过方法访问时,每次都会去进行调用,而不会缓存结果。
8.3.3 mutations
事件处理器用来驱动状态的变化,类似于methods,同步操作。
更改 Vuex 的 store 中的状态的唯一方法是提交 mutation。
每个 mutation 都有一个字符串的 事件类型 (type) 和 一个 回调函数 (handler)。这个回调函数就是我们实际进行状态更改的地方,并且它会接受 state 作为第一个参数。
当外界需要通过mutation的handler 来修改state的数据时,不能直接调用 mutation的handler,而是要通过 commit 方法 传入类型。
store.mutations.increment,这种方式是错误的,必须使用 store.commit(‘increment’,value) ,value可作为要传递进入store的数据
1. 提交载荷(Payload)
你可以向 store.commit 传入额外的参数,即 mutation 的 载荷(payload)
methods: {
    addCount(count){
      return this.$store.commit('addCount',count)
    },
    addStudent(){
      const stu = { id:114,name:'aaa',age:33};
      return this.$store.commit('addStudent',stu)
    }
  }
mutations: {
    addCount(state,count) {
      console.log(count);     //传入的count数值,例如5,10
      state.count += count
    },
    addStudent(state,stu){
      state.students.push(stu)
    }
  }
2. 对象风格的提交方式
提交 mutation 的另一种方式是直接使用包含 type 属性的对象。
当使用对象风格的提交方式,整个对象都作为载荷传给 mutation 函数,因此 handler 保持不变:
addCount(state,payload) {
      console.log(payload);       //payload对象  {type: "addCount", count: 5}
      state.count += payload.count
    },
addCount(count){
      return this.$store.commit({
        type: 'addCount',
        count
      })
    },
3. Mutation 需遵守 Vue 的响应规则
既然 Vuex 的 store 中的状态是响应式的,那么当我们变更状态时,监视状态的 Vue 组件也会自动更新。
- 提前在你的 store 中初始化好所有所需属性
- 当给state中的对象添加新属性时,使用下面的方式:
- 使用 Vue.set(obj, ‘newProp’, 123)
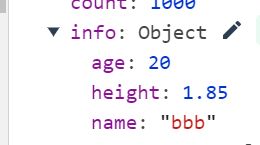
Vue.delete(state.info, ‘age’) - 以新对象替换老对象。例如,利用对象展开运算符我们可以这样写:state.obj = { …state.obj, newProp: 123 }
- 使用 Vue.set(obj, ‘newProp’, 123)
4. 使用常量代替mutation事件类型
- 新建 mutation-types.js 文件,定义常量来管理 mutation 中的类型:
//mutation-types.js
export const INCREMENT = 'increment'
或者直接导出对象:
export default {
  INCREMENT: 'increment'
}
- 在 store.js 中引入 mutation-types.js,引入类型常量使用
import Vue from 'vue'
import Vuex from 'vuex'
import {INCREMENT} from "./mutation-types";

//1.安装插件
Vue.use(Vuex)

//2.创建对象
const store = new Vuex.Store({
  state: {},
  getters: {},
  mutations: {
    // 我们可以使用 ES2015 风格的计算属性命名功能来使用一个常量作为函数名
    [INCREMENT](state){
      state.count++
    },
  }
addition(){
      return this.$store.commit(INCREMENT)
    },
5. mutation必须是同步函数
- 当我么我们使用devtools时,devtools可以帮助我们捕捉mutation的快照。
- 如果是异步操作,namedevtools将不能很好地追踪到这个操作什么时候会被完成。
- 通常情况下,不要再mutation中使用异步操作
updateInfo(state) {
      setTimeout(() => {
        state.info.name = 'xxx'
      },1000)
   }
8.3.4 action
可以给组件使用的函数,以此用来驱动事件处理器 mutations,异步操作。
Action 类似于 mutation,不同在于:
- Action 提交的是 mutation,而不是直接变更状态。(mutation是修改state的唯一途径)
- Action 可以包含任意异步操作。
actions: {
    aUpdateInfo(context) {
      setTimeout(() => {
        context.commit('updateInfo')
      })
    }
  }
- Action 函数接受一个与 store 实例具有相同方法和属性的 context 对象,因此你可以调用 context.commit 提交一个 mutation,或者通过 context.state 和 context.getters 来获取 state 和 getters。
- vue里的需要经过action,使用 this.$store.dispatch
updateInfo() {
      // return this.$store.commit('updateInfo')
      this.$store.dispatch('aUpdateInfo')
    }
- Actions 支持同样的载荷方式和对象方式进行分发:
// 以载荷形式分发
store.dispatch('incrementAsync', {
  amount: 10
})

// 以对象形式分发
store.dispatch({
  type: 'incrementAsync',
  amount: 10
})
- Action 通常是异步的,那么如何知道 action 什么时候结束呢?更重要的是,我们如何才能组合多个 action,以处理更加复杂的异步流程?
store.dispatch 可以处理被触发的 action 的处理函数返回的 Promise,并且 store.dispatch 仍旧返回 Promise:
actions: {
    // aUpdateInfo(context,payload) {
    //   setTimeout(() => {
    //     context.commit('updateInfo')
    //     console.log(payload.message);
    //     payload.success()
    //   },1000)
    // }
    aUpdateInfo(context,payload) {
      return new Promise((resolve, reject) => {
        setTimeout(() => {
          context.commit('updateInfo')
          console.log(payload)

          resolve()
        },1000)
      })
    }
  }
updateInfo() {
      // return this.$store.commit('updateInfo')
      // this.$store.dispatch('aUpdateInfo',{
      //   message: '我是携带的信息',
      //   success: () => {
      //     console.log('里面已经完成了');
      //   }
      // })
      this.$store
          .dispatch('aUpdateInfo','我是携带的信息')
          .then(() => {
            console.log('里面已经完成了');
          })
    }
8.3.5 mudules
由于使用单一状态树,应用的所有状态会集中到一个比较大的对象。当应用变得非常复杂时,store 对象就有可能变得相当臃肿。
为了解决以上问题,Vuex 允许我们将 store 分割成模块(module)。每个模块拥有自己的 state、mutation、action、getter、甚至是嵌套子模块——从上至下进行同样方式的分割:
const moduleA = {
  state: { ... },
  mutations: { ... },
  actions: { ... },
  getters: { ... }
}

const moduleB = {
  state: { ... },
  mutations: { ... },
  actions: { ... }
}

const store = new Vuex.Store({
  modules: {
    a: moduleA,
    b: moduleB
  }
})

store.state.a // -> moduleA 的状态
store.state.b // -> moduleB 的状态

假设模块A state 中 有 ‘city’,在外界访问时,则用 store.state.a.city
模块的局部状态
- 对于模块内部的 mutations 和 getters,接收的第一个参数是模块的局部状态对象。
- 对于模块内部的 getters,根节点状态会作为第三个参数暴露出来
- 同样,对于模块内部的 action,局部状态通过 context.state 暴露出来,根节点状态则为 context.rootState
const moduleA = {
  state: {
    name: 'zhangsan'
  },
  getters: {
    fullName(state) {
      // 这里的 `state` 对象是模块的局部状态
      return state.name + 'fullName'
    },
    fullName2(state,getters){
      return getters.fullName + 'fullName2'
    },
    fullName3(state,getters,rootState) {
      return getters.fullName2 + rootState.count
    }
  },
  mutations: {
    updateName(state,payload) {
      state.name = payload
    }
  },
  actions: {
    aUpdateName(context){
      console.log(context);
      setTimeout(() =>{
        context.commit('updateName','wangwu')
      },1000)
    }
  },
}
插点知识点(对象解构赋值)
const obj = {
  name: 'xxx',
  age: 22,
  height: 1.60
}

const {name,age,height} = obj
console.log(name);  //xxx
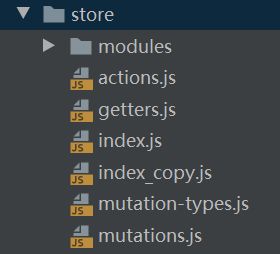
8.3.6 vuex----store文件夹的目录结构
import getters from "./getters";
import mutations from "./mutations";
import actions from "./actions";
import moduleA from "./modules/moduleA";

const store = new Vuex.Store({
  state,
  getters,
  mutations,
  actions,
  modules: {
    a: moduleA
  }
})
9. axios
9.1 axios简介
Axios 是一个基于 promise 的 HTTP 库,可以用在浏览器和 node.js 中。
9.2 axios的使用和配置
9.2.1 安装
npm install axios --save
9.2.2 基本使用
get请求
axios.get('/user', {     //参数可拼接在URL后面
  params: {
    name: 'krislin'
  }
}).then(function (response) {
  console.log(response);
}).catch(function (error) {
  console.log(error)
}
post请求
axios.post('/user',{
    name:'krislin',
    address:'china'
})
.then(function(response){
    console.log(response);
})
.catch(function(error){
    console.log(error);
});
axios发送并发请求(使用axios.all(类似promise.all))
axios.all([
  axios({
    url: 'http://152.136.185.210:8000/api/n3/home/multidata'
  }),
  axios({
    url: 'http://152.136.185.210:8000/api/n3/home/data',
    params: {
      type: 'sell',
      page: 3
    }
  })
]).then(results => {
  console.log(results);
})

//使用axios.spread()使两个结果分开
axios.all([ axios(),axios() ])
.then(axios.spread((res1,res2) => {
  console.log(res1);
  console.log(res2);
}))
9.3 axios API
可以通过向 axios 传递相关配置来创建请求:
// 发送 POST 请求
axios({
  method: 'post',
  url: '/user/12345',

  //post使用data,get使用params
  data: {
    firstName: 'Fred',
    lastName: 'Flintstone'
  }
});
请求配置中,只有url是必须的,如果没有指明的话,默认是Get请求
9.4 创建axios实例(axios.create)
const instance = axios.create({
  baseURL: 'http://152.136.185.210:8000/api/n3',
  timeout: 5000
})

instance({
  url: '/home/data',
  params: {
    type: 'sell',
    page: 1
  }
}).then(res => {
  console.log(res);
})
9.5 拦截器 interceptors
添加拦截器
//添加一个请求拦截器
axios.interceptors.request.use(function(config){
    //在请求发送之前做一些事
    return config;
},function(error){
    //当出现请求错误是做一些事
    return Promise.reject(error);
});

//添加一个返回拦截器
axios.interceptors.response.use(function(response){
    //对返回的数据进行一些处理
    return response;
},function(error){
    //对返回的错误进行一些处理
    return Promise.reject(error);
});
取消拦截器
var myInterceptor = axios.interceptors.request.use(function(){/*...*/});
axios.interceptors.rquest.eject(myInterceptor);
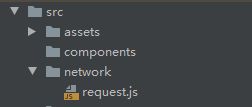
9.6 axios封装
request.js
import axios from 'axios'

export function request(config) {
  //1.创建axios的实例
  const instance1 = axios.create({
    baseURL: 'http://152.136.185.210:8000/api/n3',
    timeout: 5000
  })

  //2.axios的拦截器
  //2.1 请求拦截的作用
  instance1.interceptors.request.use(config => {
    //在发送请求之前做些什么
    // console.log(config);
    //1. 比如config中的一些信息不符合服务器的要求

    //2. 比如每次发送网络请求时,都希望在界面显示一个请求的图标

    //3. 某些网络请求(比如登录(token)),必须携带一些特殊的信息

    return config
  },err => {
    // console.log(err);
  })

  //2.2 响应拦截
  instance1.interceptors.response.use(res => {
    //对响应数据做些什么
    console.log(res);
    return res.data
  },err => {
    console.log(err);
  })

  //3.4 发送真正的网络请求
  return instance1(config)
}
main.js/引入request的文件
import {request} from "./network/request";

request({
  url: '/home/multidata'
}).then(res => {
  console.log(res);
}).catch(err => {
  console.log(err);
})


