Centos7部署ELK日志收集系统
简介
ELK是Elasticsearch、Logstash、Kibana三款开源软件的简称,对外可以作为日志管理系统,它可以收集任何来源的日志,并且对日志进行分析与可视化展示
Elasticsearch是一款开源分布式搜索引擎,它的主要功能为提供收集、分析、存储数据
Logstash是一款服务端的数据传输软件,它的主要功能日志的收集、分析、过滤工具,它可以从不同的来源中提取数据,转换并存储到Elasticsearch中供后续处理
Kibana是一款基于web的图形界面,它的主要功能是搜索、分析和可视化存储在Elasticsearch中的日志数据
前期准备
准备三台Centos7虚拟机,配置IP地址和hostname,关闭防火墙和selinux,同步系统时间,配置IP地址和hostname映射
| hostname | ip |
|---|---|
| 192.168.29.143 | node1 |
| 192.168.29.142 | node2 |
| 192.168.29.144 | node3 |
三台机器的部署架构为
| 结点 | 部署架构 |
|---|---|
| node1 | elasticsearch+logstash+kibana |
| node2 | elasticsearch |
| node3 | logstash+redis+nginx+httpd |
从官网下载elasticsearch、logstash、kibana的压缩包
安装Java环境
从官网下载jdk压缩包并解压
三个结点均要安装java环境
#添加环境变量
[root@node1 ~]# vi /etc/profile
JAVA_HOME=/usr/local/java
CLASS_PATH=.:$JAVA_HOME/lib/dt.jar:$JAVA_HOME/lib/tools.jar
PATH=$PATH:$JAVA_HOME/bin
export PATH JAVA_HOME CLASS_PATH
#重新读取环境变量
[root@node1 ~]# source /etc/profile
#查看java环境配置情况
[root@node1 ~]# java -version
java version "1.8.0_241"
Java(TM) SE Runtime Environment (build 1.8.0_241-b07)
Java HotSpot(TM) 64-Bit Server VM (build 25.241-b07, mixed mode)
node3安装配置redis
[root@node3 ~]# yum install epel-release -y
[root@node3 ~]# yum install redis -y
#修改配置文件
[root@node3 ~]# vi /etc/redis.conf
bind 0.0.0.0
daemonize yes
#启动服务
[root@node3 ~]# systemctl start redis
node3安装配置Nginx
从nginx官网下载yum源配置文件
[root@node3 ~]# yum install nginx -y
#配置日志输出格式为json
[root@node3 ~]# vi /etc/nginx/nginx.conf
http {
    include       /etc/nginx/mime.types;
    default_type  application/octet-stream;
    log_format   main  '{ "time_local": "$time_local", '
                             '"remote_addr": "$remote_addr", '
                             '"remote_user": "$remote_user", '
                             '"body_bytes_sent": "$body_bytes_sent", '
                             '"request_time": "$request_time", '
                             '"status": "$status", '
                             '"host": "$host", '
                             '"request": "$request", '
                             '"request_method": "$request_method", '
                             '"uri": "$uri", '
                             '"http_referrer": "$http_referer", '
                             '"http_x_forwarded_for": "$http_x_forwarded_for", '
                             '"http_user_agent": "$http_user_agent" '
                        '}';
                           access_log  /var/log/nginx/access.log  main;
    sendfile        on;
    keepalive_timeout  65;
    include /etc/nginx/conf.d/*.conf;
}
#为了使Nginx和httpd不产生冲突,把Nginx监听端口改为8080
[root@node3 ~]# vi  /etc/nginx/conf.d/default.conf
listen		8080;
#启动服务
[root@node3 ~]# systemctl start nginx
node3安装配置httpd
[root@node3 ~]# yum install httpd -y
#配置日志输出格式为json
[root@node3 ~]# vi /etc/httpd/conf/httpd.conf

	LogFormat "{ \
	\"@timestamp\": \"%{%Y-%m-%dT%H:%M:%S%z}t\", \
	\"@version\": \"1\", \
	\"tags\":[\"apache\"], \
	\"message\": \"%h %l %u %t \\\"%r\\\" %>s %b\", \
	\"clientip\": \"%a\", \
	\"duration\": %D, \
	\"status\": %>s, \
	\"request\": \"%U%q\", \
	\"urlpath\": \"%U\", \
	\"urlquery\": \"%q\", \
	\"bytes\": %B, \
	\"method\": \"%m\", \
	\"site\": \"%{Host}i\", \
	\"referer\": \"%{Referer}i\", \
	\"useragent\": \"%{User-agent}i\" \
	}" ls_apache_json

      # You need to enable mod_logio.c to use %I and %O
      #LogFormat "%h %l %u %t \"%r\" %>s %b \"%{Referer}i\" \"%{User-Agent}i\" %I %O" combinedio
    </IfModule>
    CustomLog "logs/access_log" ls_apache_json
</IfModule>
#启动服务
[root@node3 ~]# systemctl start httpd.service
系统设置
#node1和node2结点设置
[root@node1 ~]# cat /etc/security/limits.conf
*               soft    nofile           65540
*               hard    nofile           65540
#设置完需要重启机器 生效
创建用户
#由于elasticsearch不能使用root用户运行,需要在node1和node2结点上创建kawhi用户
[root@node1 ~]# useradd kawhi
[root@node1 ~]# echo 123456 | passwd --stdin kawhi

[root@node2 ~]# useradd kawhi
[root@node2 ~]# echo 123456 | passwd --stdin kawhi
ELK部署
node1和node2部署elasticsearch集群
上传压缩包并解压
[root@node1 ~]# tar -zxvf elasticsearch-7.6.0-linux-x86_64.tar.gz -C /usr/local/elasticsearch
[root@node2 ~]# tar -zxvf elasticsearch-7.6.0-linux-x86_64.tar.gz -C /usr/local/elasticsearch

#修改node1配置文件
[root@node1 ~]# vi /usr/local/elasticsearch/config/elasticsearch.yml
cluster.name: my-cluster
node.name: node1
bootstrap.memory_lock: false
network.host: 192.168.29.143
http.port: 9200
discovery.seed_hosts: ["192.168.29.143","192.168.29.142"]
cluster.initial_master_nodes: ["192.168.29.143"]
node.max_local_storage_nodes: 100
http.cors.enabled: true
http.cors.allow-origin: "*"

#修改node2配置文件
[root@node2 ~]# vi /usr/local/elasticsearch/config/elasticsearch.yml
cluster.name: my-cluster
node.name: node2
bootstrap.memory_lock: false
network.host: 192.168.29.142
http.port: 9200
discovery.seed_hosts: ["192.168.29.143","192.168.29.142"]
cluster.initial_master_nodes: ["192.168.29.143"]

#把elasticsearch的权限改为kawhi用户
[root@node1 ~]# chown -R kawhi:kawhi /usr/local/elasticsearch
[root@node2 ~]# chown -R kawhi:kawhi /usr/local/elasticsearch
启动服务
[root@node1 ~]# su kawhi
[root@node1 ~]# cd /usr/local/elasticsearch/bin/
[root@node1 ~]# nohup ./elasticsearch > /dev/null 2>&1

[root@node2 ~]# su kawhi
[root@node2 ~]# cd /usr/local/elasticsearch/bin/
[root@node2 ~]# nohup ./elasticsearch > /dev/null 2>&1
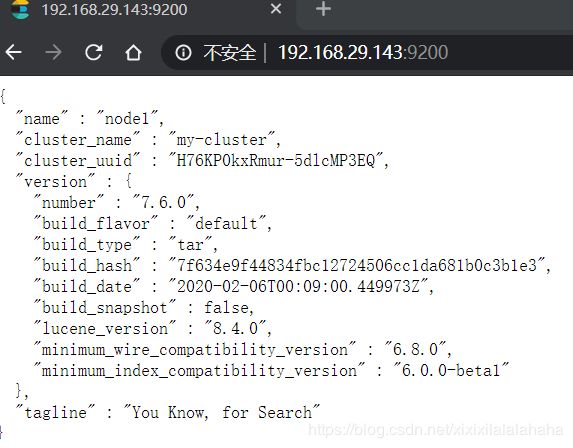
查看elasticsearch运行情况
访问http://node1:9200

访问http://node2:9200

node1部署elasticsearch-head-master插件
#安装npm
[root@node1 ~]# yum install npm -y
上传压缩包并解压
[root@node1 ~]# unzip elasticsearch-head-master.zip
[root@node1 ~]# mv elasticsearch-head-master/ /usr/local/head-master
[root@node1 ~]# cd /usr/local/head-master/_site
[root@node1 ~]# npm install
启动服务
[root@node1 ~]# cd /usr/local/head-master/
[root@node1 ~]# nohup npm run start >/dev/null 2>&1
查看head-master插件运行情况
访问http://node1:9100

node1和node3结点部署logstash
上传压缩包并解压
[root@node1 ~]# tar -zvxf logstash-7.6.0.tar.gz -C /usr/local/logstash
[root@node3 ~]# tar -zvxf logstash-7.6.0.tar.gz -C /usr/local/logstash
#创建日志收集配置文件夹
[root@node1 ~]# mkdir /usr/local/logstash/conf.d/
[root@node3 ~]# mkdir /usr/local/logstash/conf.d/
node1添加日志收集文件,从node3的redis数据库读取数据,存储到elasticsearch中
[root@node1 ~]# cat /usr/local/logstash/conf.d/redis_to_elk.conf
input {
    redis {
        port => "6379"
        host => "192.168.29.144"
        data_type => "channel"
        key => "logstash:redis"
        type => "redis-input"
  }
}
output {
	    elasticsearch {
		hosts => ["192.168.29.143"]
		index => "logstash-%{+YYYY.MM.dd}"
	  }
}
node3添加日志收集文件,把apache和nginx的日志存储到redis中
[root@node3 ~]# vi/usr/local/logstash/conf.d/web_to_redis.conf
input {
    file {
        path => ["/var/log/nginx/access.log"]
        type => "nginx_log"
    }
    file {
        path => ["/etc/httpd/logs/access_log"]
        type => "apache_access_log"
    }
}
output {
   	redis{
		host => "192.168.29.144"
		key => 'logstash:redis'
		data_type => 'channel'
		port => '6379'
	    }
  stdout {

        codec    => rubydebug

    }
}
启动服务
#node3结点
[root@node3 ~]# cd /usr/local/logstash/bin/
[root@node3 bin]# ./logstash -f /usr/local/logstash/conf.d/web_to_redis.conf &
#node1结点
[root@node1 ~]# cd /usr/local/logstash/bin/
[root@node1 bin]# ./logstash -f /usr/local/logstash/conf.d/redis_to_elk.conf &
查看logstash运行情况
#命令行最后输出以下语句证明启动成功
Successfully started Logstash API endpoint {:port=>9600}
node1结点部署 kibana
上传压缩包并解压
[root@node1 ~]# tar -zxvf kibana-7.6.0-linux-x86_64.tar.gz -C /usr/local/kibana
#修改配置文件
[root@node1 ~]# vi /usr/local/kibana/config/kibana.yml
server.host: "0.0.0.0"
启动服务
[root@node1 ~]# cd /usr/local/kibana/bin/
[root@node1 bin]# ./kibana --allow-root &
查看kibana运行情况
[root@node1 ~]# netstat -tnlp |grep 5601
tcp        0      0 0.0.0.0:5601            0.0.0.0:*               LISTEN      3644/./../node/bin/
测试验证
生成日志
通过浏览器访问node3的Nginx服务器和apache服务器产生日志

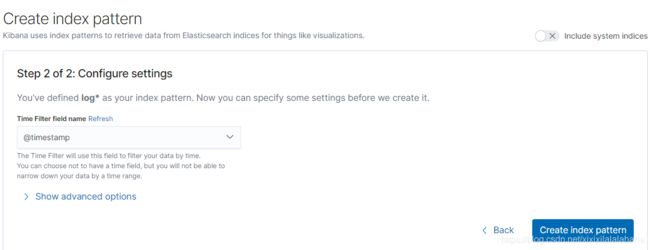
配置kibana的模板


根据node1中logstash日志收集文件中定义的output标签中的index属性格式进行填写查找模板


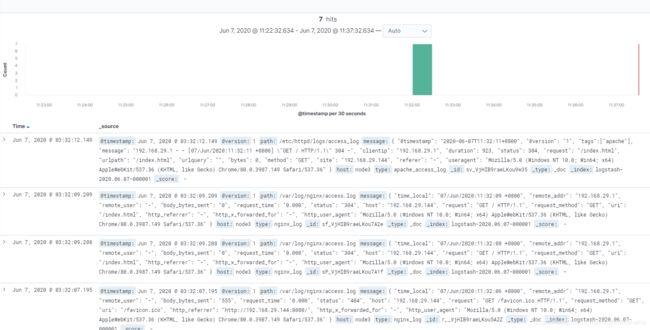
查看日志收集情况
![]()

自此ELK日志收集系统部署完成并成功运转
