Android 中 scrollTo | scrollBy | Scroller 的使用
先来说 scrollTo()与scrollBy()的使用与区别:
这两个函数都是在
View.java中,所以这两个都可以对View视图进行滚动。
阅读这两个函数的源码就可以找出它们的区别了。

- 可以发现
scrollBy()最终调用的还是scrollTo(),只是对参数进行了改变;mScrollX、mScrollY代表的就是View x、y轴当前滑动的距离。 - 通过分析我们可以看出一点:
scrollTo()是将View滚动到指定的一个位置A(x,y)scrollBy()是将View从上次滚动的位置 继续滚动一定的距离
- 这两个函数一般都是作用于
ViewGroup的,滚动其内部子View;如果作用于View上的话 效果会很糟糕的(不信你试试)
区别说完了,那就动手来写代码实践吧!
- 效果图

使用一个LinearLayout内部放置两个
Button即可,用来分别调用scrollBy()和scrollTo()函数。
- scrollTo
final LinearLayout layout = findViewById(R.id.layout);
final Button scrollTo = findViewById(R.id.scroll_to);
/*
 * 第一个参数x表示相对于当前位置横向移动的距离,正值向左移动,负值向右移动,
 * 第二个参数y表示相对于当前位置纵向移动的距离,正值向上移动,负值向下移动
 */
scrollTo.setOnClickListener(new View.OnClickListener() {
    @Override
    public void onClick(View v) {
        //移动到相对于容器的左上角 x 200 y 200的一个位置
        //绝对坐标计算
        layout.scrollTo(-200, -200);
    }
});- scrollBy
final LinearLayout layout = findViewById(R.id.layout);
final Button scrollBy = findViewById(R.id.scroll_by);
/*
 * 第一个参数x表示相对于当前位置横向移动的距离,正值向左移动,负值向右移动,
 * 第二个参数y表示相对于当前位置纵向移动的距离,正值向上移动,负值向下移动
 */
scrollBy.setOnClickListener(new View.OnClickListener() {
    @Override
    public void onClick(View v) {
        //在相对于上次的位置移动50个px
        layout.scrollBy(-50, -50);
    }
});接下来说Scroller这个类的使用,封装了滚动的操作
在布局中放置一个自定义的ViewGroup,并添加一个子View。
看下我们最终实现的效果,让View竖直向下滚动:

- 自定义的ViewGroup
MyViewGroup
class MyViewGroup extends LinearLayout {

    private Scroller scroller;

    public MyViewGroup(Context context) {
        super(context);
    }

    public MyViewGroup(Context context, @Nullable AttributeSet attrs) {
        super(context, attrs);
        scroller = new Scroller(context);
    }

    public void startScroll() {
         /*
           调用startScroll()方法来初始化滚动数据并刷新界面
           startScroll()第一个参数是滚动开始时X的坐标,第二个参数是滚动开始时Y的坐标,
           第三个参数是横向滚动的距离,正值表示向左滚动,第四个参数是纵向滚动的距离,正值表示向上滚动
          */
        scroller.startScroll(0, getScrollY(), 0, -200);
        invalidate();
    }

    @Override
    public void computeScroll() {
        //判断是否滚动完成
        if (scroller.computeScrollOffset()) {
            scrollTo(scroller.getCurrX(), scroller.getCurrY());
        }
    }
}- 通过点击TextView触发滚动逻辑MyViewGroup中的
startScroll()
final MyViewGroup myView = findViewById(R.id.view);
final View tv = findViewById(R.id.tv);
tv.setOnClickListener(new View.OnClickListener() {
    @Override
    public void onClick(View v) {
        myView.startScroll();
}- 第一步:在ViewGroup的构造函数中初始化Scroller scroller =
new Scroller(context); - 第二步:调用
scroller.startScroll(0, getScrollY(), 0, -200);设置View需要滚动到的位置,参数意思已经在上面代码中给出。这个函数只是对View滚动的一些参数设置,并没有开始滚动。 - 第三步:调用View 的
invalidate();对界面进行刷新,从而调用onDraw()函数而onDraw()函数中又调用了computeScroll()函数。 - 第四步:重写
computeScroll()函数对View进行滚动,一般情况下代码也就是上面这样固定的写法。scroller.getCurrX()、scroller.getCurrY()获取当前滚动的偏移量,
基础说完了,就可以自己动手写个案例练练手熟悉熟悉。
自定义ViewGroup 仿系统的ViewPage效果
自定义实现的效果:
- 布局代码:摆放三个View
- 自定义Group的逻辑:宽度充满屏幕、里面的子View充满Group并水平排列View
- 先处理自定Group逻辑,摆放子view 逻辑都写在注释里了
@Override
    protected void onMeasure(int widthMeasureSpec, int heightMeasureSpec) {
        super.onMeasure(widthMeasureSpec, heightMeasureSpec);
        width = measure(widthMeasureSpec);

        int childCount = getChildCount();
        for (int i = 0; i < childCount; i++) {
            View child = getChildAt(i);
            this.measureChild(child, widthMeasureSpec, heightMeasureSpec);
            // 获取容器内的 高度最高的一个View的高度 作为此Group的高度
            if (MeasureSpec.getMode(heightMeasureSpec) == MeasureSpec.AT_MOST) {
                height = Math.max(height, child.getHeight());
            }
        }
        // 初始化右边界值 左边界为0
        rightBorder = getChildAt(getChildCount() - 1).getRight();
        //设置group的大小
        setMeasuredDimension(width, height);
    }

    private int measure(int spec) {
        DisplayMetrics dm = getResources().getDisplayMetrics();
        int defaultWidth = dm.widthPixels;
        switch (MeasureSpec.getMode(spec)) {
            //表示开发人员可以将视图按照自己的意愿设置成任意的大小,没有任何限制。
            // 这种情况比较少见,一般在绘制自定义View的时候才会用到
            case MeasureSpec.UNSPECIFIED:
                return defaultWidth;
            //wrap_content
            case MeasureSpec.AT_MOST:
                return defaultWidth;
            //match_parent 或者 固定大小的时候 layout_width="200dp"
            case MeasureSpec.EXACTLY:
                return MeasureSpec.getSize(spec);
            default:
                break;
        }
        return defaultWidth;
    }

    @Override
    protected void onLayout(boolean changed, int l, int t, int r, int b) {
        //所有View水平排列
        int childCount = getChildCount();
        int l1 = 0;
        for (int i = 0; i < childCount; i++) {
            View childView = getChildAt(i);
            /*
              容器内view的总宽度
             */
            int totalWidth = l1 + childView.getMeasuredWidth();
            childView.layout(l1, 0, totalWidth, childView.getMeasuredHeight());
            l1 += childView.getMeasuredWidth();
        }
    }
接下来就是来处理我们的滑动逻辑,当往左滑动时候:下一页出现了1/3的宽度 那么就可以让它自动滚动到下一页,同理 当往右滑动的时候前一页出现了1/3 那么也让它自动滚动到前一页;当是第一页 或者 最后一页的时候就不允许滑动了。
- 复写
onTouchEvent处理触摸事件
/**
* 当前容器的宽度
*/
private int width;
/**
* 当前容器的高度
*/
private int height;
/**
* 滚动
*/
private Scroller scroller;
/**
* 最右边的边界
*/
private int rightBorder;
/**
* x轴滑动的起点
*/
private float lastX;
/**
* getRawX() 获取当前点距离屏幕的距离
*/
@Override
public boolean onTouchEvent(MotionEvent event) {
switch (event.getAction()) {
case MotionEvent.ACTION_DOWN:
lastX = event.getRawX();
break;
case MotionEvent.ACTION_MOVE:
float curr = event.getRawX();
//向右滑动时为负数,计算与上次移动距离的差值
float scrolled = lastX - curr;
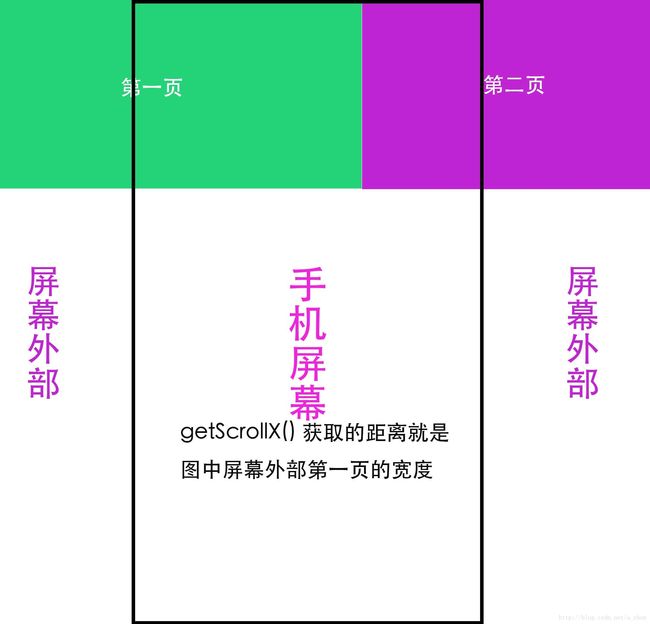
//getScrollX()获取x轴滑动的距离 向左滑动正值 反之负值
if (getScrollX() + scrolled < 0) {
//当滑动到了最左边就不能继续滑动了
scrollTo(0, 0);
return true;
} else if (getScrollX() + scrolled + width > rightBorder) {
//当滑动到最右边的时候就不能继续滑动了
scrollTo(rightBorder - width, 0);
return true;
}
scrollBy((int) scrolled, 0);
lastX = curr;
break;
case MotionEvent.ACTION_UP:
//需求:当第二个View进入屏幕1/3的时候 就让他自动滚动到第二个View上
//往左滑动的距离加上 View的宽度(也就是屏幕宽度)的2/3 在除以单个View的宽度就可以知道
//当前需要滑动到第几个View了
int page = (getScrollX() + width * 2 / 3) / width;
// 计算x轴需要滑动的距离
int scrollX = page * width - getScrollX();
/*
调用startScroll()方法来初始化滚动数据并刷新界面
startScroll()第一个参数是滚动开始时X的坐标,第二个参数是滚动开始时Y的坐标,
第三个参数是横向滚动的距离,正值表示向左滚动,第四个参数是纵向滚动的距离,正值表示向上滚动
在滚动过程中会不断调用computeScroll()函数
*/
scroller.startScroll(getScrollX(), 0, scrollX, 0);
invalidate();
break;
default:
break;
}
return super.onTouchEvent(event);
}
@Override
public void computeScroll() {
//返回值为boolean,true说明滚动尚未完成,false说明滚动已经完成
if (scroller.computeScrollOffset()) {
scrollTo(scroller.getCurrX(), scroller.getCurrY());
}
}