linux下新增一个磁盘需要先挂载,然后才能使用,以下是日常使用挂载的场景,简单总结使用方法,实验环境均为虚拟机:
一、挂载新增硬盘
新增硬盘分区格式化后就可以挂载使用了。我们可以通过命令:fdisk -l查看新增加的分区:
[root@localhost /]# fdisk -l

Disk /dev/sda: 21.5 GB, 21474836480 bytes
255 heads, 63 sectors/track, 2610 cylinders
Units = cylinders of 16065 * 512 = 8225280 bytes
Sector size (logical/physical): 512 bytes / 512 bytes
I/O size (minimum/optimal): 512 bytes / 512 bytes
Disk identifier: 0x0006dc39

   Device Boot      Start         End      Blocks   Id  System
/dev/sda1   *           1          26      204800   83  Linux
Partition 1 does not end on cylinder boundary.
/dev/sda2              26         281     2048000   82  Linux swap / Solaris
Partition 2 does not end on cylinder boundary.
/dev/sda3             281        2611    18717696   83  Linux

Disk /dev/sdb: 10.7 GB, 10737418240 bytes
255 heads, 63 sectors/track, 1305 cylinders
Units = cylinders of 16065 * 512 = 8225280 bytes
Sector size (logical/physical): 512 bytes / 512 bytes
I/O size (minimum/optimal): 512 bytes / 512 bytes
Disk identifier: 0xdff11876

   Device Boot      Start         End      Blocks   Id  System
/dev/sdb1               1         132     1060258+  83  Linux
/dev/sdb2             133         394     2104515   83  Linux
/dev/sdb3             395         787     3156772+  83  Linux

Disk /dev/mapper/vgdata-lvdata1: 3221 MB, 3221225472 bytes
255 heads, 63 sectors/track, 391 cylinders
Units = cylinders of 16065 * 512 = 8225280 bytes
Sector size (logical/physical): 512 bytes / 512 bytes
I/O size (minimum/optimal): 512 bytes / 512 bytes
Disk identifier: 0x00000000
这里是虚拟机,添加了两块硬盘,其中sdb是新增的。挂载方法如下:
[root@localhost /]# mount /dev/sdb1 /wangchengjun/
[root@localhost /]# df -h
Filesystem      Size  Used Avail Use% Mounted on
/dev/sda3        18G  5.3G   12G  32% /
tmpfs           504M     0  504M   0% /dev/shm
/dev/sda1       194M   25M  160M  14% /boot
/dev/sdb1      1020M   34M  935M   4% /wangchengjun
sdb的第一个分区已经挂载成功。
二、挂载光盘
[root@localhost /]# mount /dev/cdrom /wangchengjun/
mount: block device /dev/sr0 is write-protected, mounting read-only
三、挂载iso文件
光盘镜像文件就是以iso为后缀名的文件。在linux下,你可以把光盘直接复制成镜像文件,当然也可以把镜像文件挂载到某一个目录下。
1. 把光盘复制成镜像文件
cp /dev/cdrom /tmp/linux.iso
这样就可以把光盘制作成镜像文件,同样也可以把镜像文件当成光盘一样来挂载
2. 挂载镜像文件
[root@localhost tmp]# mount -o loop /tmp/linux.iso /wangchengjun/
[root@localhost tmp]# ls /wangchengjun/
CentOS_BuildTag  p_w_picpaths    RELEASE-NOTES-en-US.html  RPM-GPG-KEY-CentOS-Debug-6     TRANS.TBL
EULA             isolinux  repodata                  RPM-GPG-KEY-CentOS-Security-6
GPL              Packages  RPM-GPG-KEY-CentOS-6      RPM-GPG-KEY-CentOS-Testing-6
四、挂载优盘
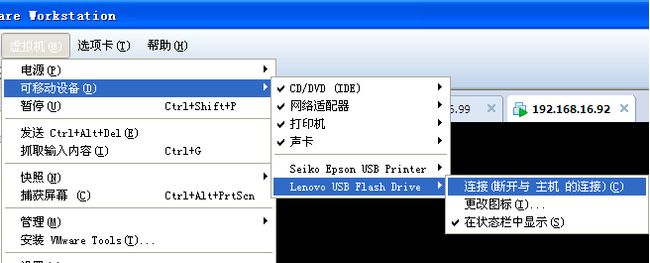
在电脑上插入优盘后,需要在虚拟机上连接一下,才能识别,方法如下:
然后通过fdisk -l ,可以看到新增的优盘:
Device Boot      Start         End      Blocks   Id  System
/dev/sdc4   *           1         488     3915648    b  W95 FAT32
Partition 4 has different physical/logical endings:
     phys=(486, 254, 63) logical=(487, 125, 22)
当前优盘的格式为fat32,可以直接挂载:
[root@localhost ~]# mount /dev/sdc4 /wangchengjun/
[root@localhost ~]# ls /wangchengjun/
111   1.txt  2.txt  4.txt            COMMAND.COM  install.log.syslog  stringdoc.txt
1.sh  2.sh   3.txt  anaconda-ks.cfg  install.log  sllllllllllll.txt   userch.log
五、挂载windows共享文件夹
[root@localhost ~]# mount -t cifs -o username=administrator,password= //192.168.16.2/公司内部文件共享 /mnt
[root@localhost ~]# ls /mnt/
1.txt                    采购部    定稿样本  计划部                 生产部          体系文件      销售部
六、挂载nfs
mount -t nfs -o nolock 192.168.16.10:/home/ /mnt/
其中t指定挂载类型,o指定挂载不加锁
七、挂载samba
mount -t cifs //10.0.4.67/myshare /mnt -o username=user1,password=123456
八、挂载ftp
Linux挂载ftp服务器,需要用到一个名为fuse-curlftpfs的包。正常情况下无法通过yum的方式获取此包,因此需要先安装DAG repository
Centos5 64位 wget http://pkgs.repoforge.org/rpmforge-release/rpmforge-release-0.5.3-1.el5.rf.x86_64.rpm
Centos5 32位 wget http://pkgs.repoforge.org/rpmforge-release/rpmforge-release-0.5.3-1.el5.rf.i386.rpm
Centos6 64位 wget http://pkgs.repoforge.org/rpmforge-release/rpmforge-release-0.5.3-1.el6.rf.x86_64.rpm
Centos6 32位 wget http://pkgs.repoforge.org/rpmforge-release/rpmforge-release-0.5.3-1.el6.rf.i686.rpm
然后是安装下载的rpm包
rpm -ivh rpmforge-release-0.5.3-1.el5.rf.x86_64.rpm
然后就可以通过yum的方式安装fuse-curlftpfs了
yum install fuse-curlftpfs -y
在Centos6上执行此命令,可能会遇到 Requires: libcurl.so.3 的错误,解决方法:编辑 /etc/yum.repos.d/rpmforge.repo 文件,把 [rpmforge-extras] 项打开,再执行 yum clean all 即可。
接下来就可以挂载ftp了
写法1:curlftpfs ftp://用户名:密码@ftp地址 挂载点 -o codepage=utf8
写法2:curlftpfs ftp://ftp地址 挂载点 -o user="用户名:密码"
