opencv3.3 svm的使用
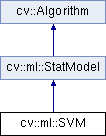
在OpenCV 3.3中取消了CvSVM类的定义,结构变成了这样的了:
具体可参考文档:
http://docs.opencv.org/3.3.0/d1/d2d/classcv_1_1ml_1_1SVM.html#a77d9a35898cae44ac9071c4b35bc96a8#include
#include
#include
#include
#include
#include
#include
#include
#include
#include
#include
#include
#include
#include // setw()
using namespace std;
#include
#include
#include
#include // svm
using namespace cv;
int main(int argc, char** argv)
{
cout << ">> ----" << "\n" << endl;
int wid = 512;
int hei = 512;
Mat image = Mat::zeros(hei, wid, CV_8UC3);
// Set up training data
int labels[4] = {1, -1, -1, -1};
Mat labelsMat(4, 1, CV_32SC1, labels);
float trainingData[4][2] = { {501, 10}, {255, 10}, {501, 255}, {10, 501} };
Mat trainingDataMat(4, 2, CV_32FC1, trainingData);
Ptr svm = ml::SVM::create();
// Type of a SVM formulation. See SVM::Types. Default value is SVM::C_SVC
svm->setType(ml::SVM::C_SVC);
// Initialize with one of predefined kernels. See SVM::KernelTypes
// Linear kernel. No mapping is done, linear discrimination (or regression)
// is done in the original feature space. It is the fastest option.
	if (0)
		svm->setKernel(ml::SVM::LINEAR);
	else{
		svm->setKernel(ml::SVM::POLY);
		svm->setDegree(1.0);
	}
// Termination criteria of the iterative SVM training procedure which
// solves a partial case of constrained quadratic optimization problem.
// You can specify tolerance and/or the maximum number of iterations.
// Default value is TermCriteria(TermCriteria::MAX_ITER + TermCriteria::EPS, 1000, FLT_EPSILON );
svm->setTermCriteria(TermCriteria(TermCriteria::MAX_ITER + TermCriteria::EPS, 1000, FLT_EPSILON));
// train
// The second parameter: int lyout. See:
// cv::ml::SampleTypes has two values: ROW_SAMPLE, COL_SAMPLE
svm->train(trainingDataMat, ml::ROW_SAMPLE, labelsMat);
Vec3b green(0,255,0), blue (255,0,0);
// Show the decision regions given by the SVM
for (int i = 0; i < image.rows; ++i)
for (int j = 0; j < image.cols; ++j) {
Mat sampleMat = (Mat_(1,2) << i,j);
// predict
float response = svm->predict(sampleMat);
if (response == 1)
image.at(j, i) = green;
else if (response == -1)
image.at(j, i) = blue;
}
// Show the training data
int thickness = -1;
int lineType = 8;
circle(image, Point(501, 10), 6, Scalar( 0, 0, 0), thickness, lineType);
circle(image, Point(255, 10), 6, Scalar(255, 255, 255), thickness, lineType);
circle(image, Point(501, 255), 6, Scalar(255, 255, 255), thickness, lineType);
circle(image, Point( 10, 501), 6, Scalar(255, 255, 255), thickness, lineType);
// Show support vectors
thickness = 2;
lineType = 8;
// The method returns all the support vectors as a floating-point matrix,
// where support vectors are stored as matrix rows.
Mat SupportVectorsMat = svm->getSupportVectors();
for (int r = 0; r < SupportVectorsMat.rows; r++) {
float* data = SupportVectorsMat.ptr(r);
cout << r << " " << data[0] << " " << data[1] << endl;
circle(image, Point((int)data[0], (int)data[1]), 6, Scalar(255, 0, 255), thickness, lineType);
}
imshow("SVM Simple Example", image); // show it to the user
waitKey(0);
cout << "\n" << ">> ----" << endl;
return 0;
}
if (0)
svm->setKernel(ml::SVM::LINEAR);
else{
svm->setKernel(ml::SVM::POLY);
svm->setDegree(1.0);
}https://github.com/Itseez/opencv/blob/2.4/modules/ml/src/svm.cpp#L1531