目标检测:一、YOLOV3: tf,keras版本 从0开始解读源码
从0开始入手目标检测
YOLO V3算是我入手目标检测第一个学习的网络,里面很多概念比如anchor,也是看源码之后学到的,感兴趣的可以看看yolo系列从V1~V3,来了解下这个领域的一些问题和技术。
当然,了解一个技术最好最快的方式就是阅读论文和看源码。
原文:YOLOV3
完整的代码见:YOLOV3-keras
开始之前引入各个模块:
关于yolo方面的一些细节,box是如何通过网格预测出来的,以及anchor的含义,可以看看这篇
"""YOLO_v3 Model Defined in Keras."""

from functools import wraps,reduce
import os
import numpy as np
import tensorflow as tf
from keras import backend as K
from keras.layers import Conv2D, Add, ZeroPadding2D, UpSampling2D, Concatenate, MaxPooling2D
from keras.layers.advanced_activations import LeakyReLU
from keras.layers.normalization import BatchNormalization
from keras.models import Model
from keras.regularizers import l2
from keras.layers import Input, Lambda
from keras.models import Model
import xml.etree.ElementTree as ET
from PIL import Image
from os import getcwd
from keras.optimizers import Adam
from keras.callbacks import TensorBoard, ModelCheckpoint, ReduceLROnPlateau, EarlyStopping
import sys
一、网络结构:

首先我们定义一个compose函数,它的功能是把各个层级联起来,方便我们构建网络代码(这种骚操作我也是第一次学习到):
def compose(*funcs):
    """Compose arbitrarily many functions, evaluated left to right.

    Reference: https://mathieularose.com/function-composition-in-python/
    """
    # return lambda x: reduce(lambda v, f: f(v), funcs, x)
    if funcs:
        return reduce(lambda f, g: lambda *a, **kw: g(f(*a, **kw)), funcs)
    else:
        raise ValueError('Composition of empty sequence not supported.')
接下来我们定义卷积层,这里用了wrap装饰器,将传入的参数加入到darknet_conv_kwargs这个字典中,在以字典的多参方式传入到Conv2D中
@wraps(Conv2D)
def DarknetConv2D(*args, **kwargs):
    """Wrapper to set Darknet parameters for Convolution2D."""
    darknet_conv_kwargs = {'kernel_regularizer': l2(5e-4)}
    darknet_conv_kwargs['padding'] = 'valid' if kwargs.get('strides')==(2,2) else 'same'
    darknet_conv_kwargs.update(kwargs)
    return Conv2D(*args, **darknet_conv_kwargs)
接下来定义个DarknetConv2D+BN的层,方法和上面两个是一样的,compose的作用就在这里体现了:
def DarknetConv2D_BN_Leaky(*args, **kwargs):
    """Darknet Convolution2D followed by BatchNormalization and LeakyReLU."""
    no_bias_kwargs = {'use_bias': False}
    no_bias_kwargs.update(kwargs)
    return compose(
        DarknetConv2D(*args, **no_bias_kwargs),
        BatchNormalization(),
        LeakyReLU(alpha=0.1))
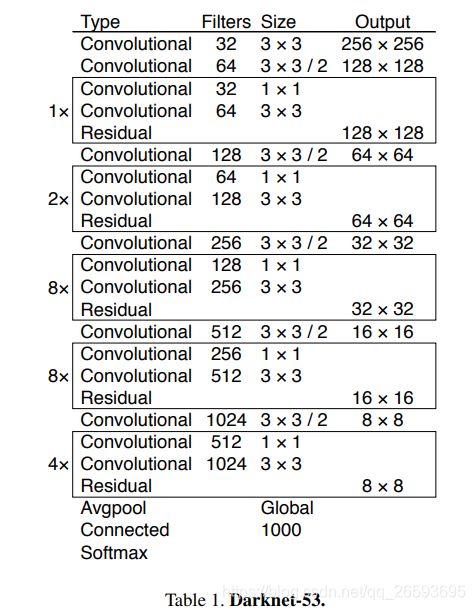
接下来定义个resblock_body 即残差网络的一个Bolck_body,这里采取的不是’same‘的padding方法,而是对特征图的左上角进行填充,过程是这样的:padding->DarkCon2D_BN->res_block * n
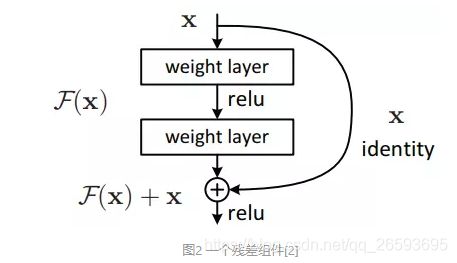
其中 res_block: input->DarkCon2D_BN*2=y->Add(input,y) ,这是个残差结构.注意第一个conv_bn的卷积核是第二个的一半,在图中可以看到。

注意:这里每次进入一个resblock部分,都进行了步长为2的卷积,在网络图中和下面的代码中都能看到,这样就是每个block_body之后的特征图都会比原图缩小一倍,最后输出的y1,y2,y3 一次是原图的1/32 1/16 1/8 ,这里要注意这个缩放尺度,因为后面做转化的时候需要乘这个尺度,
由于上面定义了,当strid为(2,2)的时候,padding为vaild,所以计算大小为:ceil((input_size-kernel_size+1)/stride),但是卷积之前有个padding的操作。
比如原图是416,先padding成了417 * 417,再做卷积得到ceil((417-3+1)/2)=208 ,如果是same模式,会保证卷积核在中心位置,计算卷积的时候会对图片的前后都填充0.输出大小是ceil(417/2)=209
def resblock_body(x, num_filters, num_blocks):
    '''A series of resblocks starting with a downsampling Convolution2D'''
    # Darknet uses left and top padding instead of 'same' mode
    x = ZeroPadding2D(((1,0),(1,0)))(x)
    x = DarknetConv2D_BN_Leaky(num_filters, (3,3), strides=(2,2))(x)
    for i in range(num_blocks):
        y = compose(
                DarknetConv2D_BN_Leaky(num_filters//2, (1,1)),
                DarknetConv2D_BN_Leaky(num_filters, (3,3)))(x)
        x = Add()([x,y])
    return x
经过上面的准备工作,我们就可以根据之前的网络图来构建整个Body部分了
body的层数依次是1,2,8,8,4 ,当然这里是去除了池化和全连接层的,因为还没完。
def darknet_body(x):
    '''Darknent body having 52 Convolution2D layers'''
    x = DarknetConv2D_BN_Leaky(32, (3,3))(x) # 3
    x = resblock_body(x, 64, 1) # 3+  1+3+7*1=15   res1
    x = resblock_body(x, 128, 2) # 15 + 1+3+7*2=33  res2
    x = resblock_body(x, 256, 8)  # 33+ 1+3+7*8= 93   res8
    x = resblock_body(x, 512, 8) # 93 + 1+3+7*8= 153   res8
    x = resblock_body(x, 1024, 4) # 153 + 1+3+7*4=185  res4
    return x
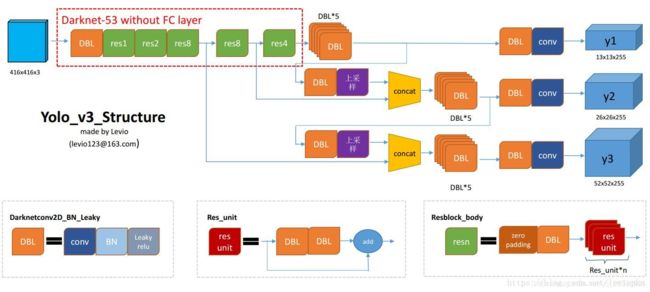
完成了主干部分,现在就是要对各个尺度的特征图进行提取了,这里详细看下这个图:

DBL部分就是我们上面定义的DarkCon2D_BN 层, res unit部分就是我们上面代码resblock_body的循环那部分,resblock_body 就是我门定义的resblock_body层。
可以看出 我们已经完成了Darknet-53 without FClayer,画红框的部分,接下来就是要完成到三个不同尺度张量的部分了。
我们先定义个last_layer层,它实现的是输出到每个张量的最后一层:

其中,x就是DBL*5的部分,y就是DBL+Conv的部分:
卷积核大小依次是1x1 和3x3,卷积核数量是1倍和2倍的关系。
def make_last_layers(x, num_filters, out_filters):
    '''6 Conv2D_BN_Leaky layers followed by a Conv2D_linear layer'''
    x = compose(
            DarknetConv2D_BN_Leaky(num_filters, (1,1)),
            DarknetConv2D_BN_Leaky(num_filters*2, (3,3)),
            DarknetConv2D_BN_Leaky(num_filters, (1,1)),
            DarknetConv2D_BN_Leaky(num_filters*2, (3,3)),
            DarknetConv2D_BN_Leaky(num_filters, (1,1)))(x)
    y = compose(
            DarknetConv2D_BN_Leaky(num_filters*2, (3,3)),
            DarknetConv2D(out_filters, (1,1)))(x)

    return x, y
接下来就是实现整个网络的部分了。
我们先对得到的 Darknet-53 without FClayer 部分做一次 make_last_layers,得到y1,而x部分经过一个DBL+upsampling和之前的re8部分的输出concatenate,在经过make_last_layers,得到y2和x,重复上述操作得到y3。
最终输出为y1,y2,y3。
注意:这里通过层数索引的方式得到之前的输出层,索引见darknet_body部分的注释(下表从0开始所以索引是层数-1),我们需要计算总共经过了第几层,其实还可以通过命名的方式,直接获得层数。
def yolo_body(inputs, num_anchors, num_classes):
    """Create YOLO_V3 model CNN body in Keras."""
    darknet = Model(inputs, darknet_body(inputs))
    x, y1 = make_last_layers(darknet.output, 512, num_anchors*(num_classes+5))

    x = compose(
            DarknetConv2D_BN_Leaky(256, (1,1)),
            UpSampling2D(2))(x)
    x = Concatenate()([x,darknet.layers[152].output])
    x, y2 = make_last_layers(x, 256, num_anchors*(num_classes+5))

    x = compose(
            DarknetConv2D_BN_Leaky(128, (1,1)),
            UpSampling2D(2))(x)
    x = Concatenate()([x,darknet.layers[92].output])
    x, y3 = make_last_layers(x, 128, num_anchors*(num_classes+5))

    return Model(inputs, [y1,y2,y3])
这里,部分读者可能发现了,图片中最后输出的张量,特征图数量都是255,但是这里,代码中的是num_anchors*(num_classes+5),请记住这个数量,这里我们是根据实际任务而定的。
二、输出处理
我们得到的tensor 也就是box prior并不是直接的box信息,需要进行一定的计算
这里说下anchor的概念:
我们确定一个物体的位置需要四个信息 ( x 1 , x 2 , y 1 , y 2 ) (x1,x2,y1,y2) (x1,x2,y1,y2),即左上坐标和又下坐标确定一个方框,或者以中心坐标+长宽的表示方式: ( c x . c y , l , w ) (c_x.c_y,l,w) (cx.cy,l,w),当模型有对图片缩放,需要将坐标进行归一化操作。
在深度学习之前,我们都是采用滑动窗口的方式,在图片上不停地滑动窗口,得到多个候选框,在从多个候选框中合并出目标box。
而一个Anchor Box可以由:边框的纵横比和边框的面积(尺度)来定义,相当于一系列预设边框的生成规则,根据Anchor Box,可以在图像的任意位置,生成一系列的边框。
由于Anchor box 通常是以CNN提取到的Feature Map 的点为中心位置,生成边框,所以一个Anchor box不需要指定中心位置。
详细见:anchor详解
请充分了解如何通过anchor得到边框的位置和大小。这里不在过多赘述了。在Yolo中的anchor是通过Kmean聚类得来的。共生成9种长宽。
有了anchor的知识,我们就可以继续下一步了。
我们需要进一步将模型得到的y1,y2,y3三个box prior 转化为对应Box的参数。
box prior 的形状是 (batch_size,raw,col,num_anchors * (num_classes+5))
这里的5分别代表着x,y的偏移量和Box的长宽,和一个置信度。
这部分代码我们一步步分析,首先我们应该构建一个对于输出张量的网格,里面保存着每个point的位置信息。其大小为:
grid_shape=(grid_shape[0],grid_shape[1],1,2),2是因为存放x,y坐标,比如目标的的位置对应到feat上是(raw,col)=(0,1),那么获取这个位置的坐标就应该是:
tensor[0,1,0,:]=[0,1]
grid_shape = K.shape(feats)[1:3] # raw, col  #取得该输出张量Y的大小
grid_y = K.tile(K.reshape(K.arange(0, stop=grid_shape[0]), [-1, 1, 1, 1]),[1, grid_shape[1], 1, 1])
#tile(A,reps)A:array_like 输入的array
# reps:array_like A沿各个维度重复的次数,
# 其实就是得到了一个(grid_shape[0],grid_shape[1],1,1)的张量

grid_x = K.tile(K.reshape(K.arange(0, stop=grid_shape[1]), [1, -1, 1, 1]),
    [grid_shape[0], 1, 1, 1]) #shape=(raw,col,1,1)
grid = K.concatenate([grid_x, grid_y]) #变成(raw,col,1,2)  其实就是个网格表
grid = K.cast(grid, K.dtype(feats)) # 相同数据类型
接下来将我们的anchor也转化为相同维度的张量,原本维度是(n,2),里面存放着n个anchor的长宽,shape=(1,1,1,number,2),各维度对应的意义是(batch_size,raw,col,number,point),number是anchor的数量,point 是点的位置(x,y)
num_anchors = len(anchors) #这里是3
# Reshape to batch, height, width, num_anchors, box_params.
anchors_tensor = K.reshape(K.constant(anchors), [1, 1, 1, num_anchors, 2])  #将anchor转化为张量的形状
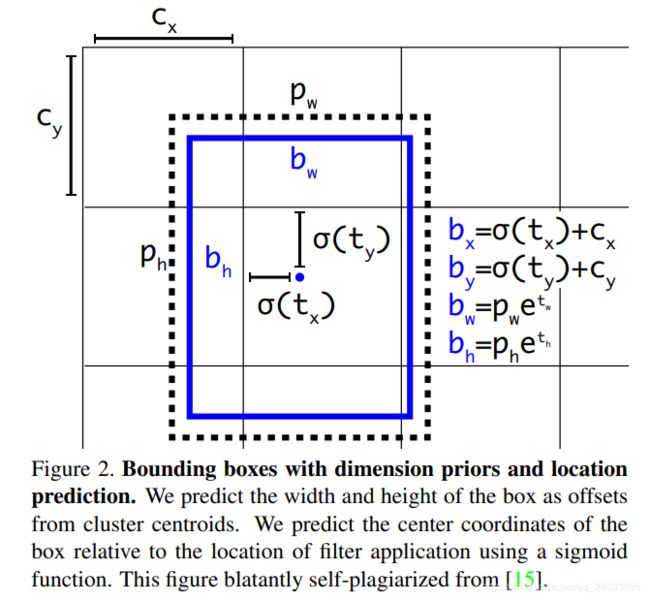
接下来我们获取Box的信息,下面是转化公式: b x = σ ( t x ) + c x b y = σ ( t y ) + c y b w = p w e t w b h = p h e t h b_x=\sigma(t_x)+c_x \\[3pt]b_y=\sigma(t_y)+c_y \\[3pt]b_w=p_we^{t_w}\\[3pt]b_h=p_he^{t_h} bx=σ(tx)+cxby=σ(ty)+cybw=pwetwbh=pheth
c x c_x cx是网格对应的坐标, σ ( t x ) \sigma(t_x) σ(tx)中 t x t_x tx是box prior张量的输出值,通过sigmod函数,范围在-1-1之间,也就是每个网格的point的位置+(-1,1)的修正值,不会越过相邻的point。最后除以网格大小,做一个归一化。恢复的时候要乘上row,col。

box的wh,是 e t w e^{t_w} etw乘 a n c h o r anchor anchor得到的,这里的anchor其实就是box的不同缩放尺度的长宽,同样这里做了归一化
输出的box_wh,box_xy的形状为(batch_size,raw,col,n_anchor,2)
box_confidence,的形状:(batch_size,raw,col,n_anchor,1)
box_class_probs的形状:(batch_size,raw,col,n_anchor,1) 从代码中可以看出也经过了sigmod函数,
feats = K.reshape(
feats, [-1, grid_shape[0], grid_shape[1], num_anchors, num_classes + 5]) ##将输出形状变成(batch_size,grid_shape[0],grid_shape[1],n_anchor,n_class+5)

# Adjust preditions to each spatial grid point and anchor size.  (x, y, w, h, confidence)
box_xy = (K.sigmoid(feats[..., :2]) + grid) / K.cast(grid_shape[::-1], K.dtype(feats)) #::-1列表反转的操作 得到x,y的系数(归一化了)
#box_xy_shape=(batch_size,h,w,2) 最后一维存放着x,y坐标
box_wh = K.exp(feats[..., 2:4]) * anchors_tensor / K.cast(input_shape[::-1], K.dtype(feats)) #对输出的长宽根据给的锚进行了尺度缩放
#box_wh_shape=(batch_size,h,w,2) 最有一维存放着宽和长
box_confidence = K.sigmoid(feats[..., 4:5])
# box_confidence=(batch_size,h,w,1) 最有一维存放着confidence
box_class_probs = K.sigmoid(feats[..., 5:])
# box_class_probs=(batch_size,h,w,n_class) 最有一维存放着分类结果
if calc_loss == True:
	return grid, feats, box_xy, box_wh
###总结,这个函数是将yolobody的输出转换为box的网格输出,从这里可以知道yolo的输出其实是输出x,y相对于网格的偏移量,box的长框系数,以及confidence
return box_xy, box_wh, box_confidence, box_class_probs
这部分的完整代码:
yolo_head(feats, anchors, num_classes, input_shape, calc_loss=False) 将输出张量转化我们需要的形式。
def yolo_head(feats, anchors, num_classes, input_shape, calc_loss=False):
    """Convert final layer features to bounding box parameters."""
    """输入的分别是网络的输出张量Y_shape=(batch_size,raw,col,num_anchors*(num_classes+5)),anchors,分类数量,输入网络的图片大小"""
    num_anchors = len(anchors) #这里anchor的数量一般是3
    # Reshape to batch, height, width, num_anchors, box_params.
    anchors_tensor = K.reshape(K.constant(anchors), [1, 1, 1, num_anchors, 2])  #

    grid_shape = K.shape(feats)[1:3] # raw, col  #取得该输出张量Y的大小
    grid_y = K.tile(K.reshape(K.arange(0, stop=grid_shape[0]), [-1, 1, 1, 1]),[1, grid_shape[1], 1, 1])
    #np.tile(A,reps)
    # A:array_like 输入的array
    # reps:array_like A沿各个维度重复的次数,
    # 其实就是得到了一个(grid_shape[0],grid_shape[1],1,1,1)的张量
    grid_x = K.tile(K.reshape(K.arange(0, stop=grid_shape[1]), [1, -1, 1, 1]),
        [grid_shape[0], 1, 1, 1])
    grid = K.concatenate([grid_x, grid_y]) #变成(raw,col,1,2)  其实就是个网格表
    grid = K.cast(grid, K.dtype(feats))

    feats = K.reshape(
        feats, [-1, grid_shape[0], grid_shape[1], num_anchors, num_classes + 5]) ##理所当然的形状(batch_size,h,w,3,n_class+5)
    #feats_shape=(batch_size,h,w,3,5+n_class)
    # Adjust preditions to each spatial grid point and anchor size.  (x, y, w, h, confidence)
    box_xy = (K.sigmoid(feats[..., :2]) + grid) / K.cast(grid_shape[::-1], K.dtype(feats)) #::-1列表反转的操作 得到x,y的系数(归一化了)
    #box_xy_shape=(batch_size,h,w,2) 最后一维存放着x,y坐标
    box_wh = K.exp(feats[..., 2:4]) * anchors_tensor / K.cast(input_shape[::-1], K.dtype(feats)) #对输出的长宽根据给的锚进行了尺度缩放
    #box_wh_shape=(batch_size,h,w,2) 最有一维存放着宽和长
    box_confidence = K.sigmoid(feats[..., 4:5])
    # box_confidence=(batch_size,h,w,1) 最有一维存放着confidence
    box_class_probs = K.sigmoid(feats[..., 5:])
    # box_class_probs=(batch_size,h,w,n_class) 最有一维存放着分类结果
    if calc_loss == True:
        return grid, feats, box_xy, box_wh
    ###总结,这个函数是将yolobody的输出转换为box的网格输出,从这里可以知道yolo的输出其实是输出x,y相对于网格的偏移量,box的长框系数,以及confidence
    return box_xy, box_wh, box_confidence, box_class_probs
三、修正输出误差
现在我们从模型输出Box prior 得到了每个点上的Box信息,但我们还需要对提取的box信息做一些修正,比如原图是413413,你输出张量分别是13 * 13 ,26 * 26,52 * 52 ,以最小的张量为基准,我们的缩放比例是 13/413=0.031476997…
对应到真实的张量 new_shape=4130.03147=12.99711,我们是取整为13, 这就有了误差,所以模型输出的x,y要加上这个误差。同样 误差也要归一化。
同时我们还原到原图对应真实的坐标尺寸,乘上scale=input_shape/new_shape
def yolo_correct_boxes(box_xy, box_wh, input_shape, image_shape):
    '''Get corrected boxes'''
    box_yx = box_xy[..., ::-1]
    box_hw = box_wh[..., ::-1]
    input_shape = K.cast(input_shape, K.dtype(box_yx))
    image_shape = K.cast(image_shape, K.dtype(box_yx))
    new_shape = K.round(image_shape * K.min(input_shape/image_shape)) #将原图缩放为输入图片的尺寸(最小的,其实一般wh都一样)
    offset = (input_shape-new_shape)/2./input_shape ##误差 真实尺度-图片原本缩放后尺度 得到误差
    scale = input_shape/new_shape
    box_yx = (box_yx - offset) * scale  #修正误差
    box_hw *= scale

    box_mins = box_yx - (box_hw / 2.)  #左上角
    box_maxes = box_yx + (box_hw / 2.)  #右下角
    boxes =  K.concatenate([
        box_mins[..., 0:1],  # y_min
        box_mins[..., 1:2],  # x_min
        box_maxes[..., 0:1],  # y_max
        box_maxes[..., 1:2]  # x_max
    ])

    # Scale boxes back to original image shape.
    boxes *= K.concatenate([image_shape, image_shape])
    return boxes
接下来我们整合上面的两个函数,一个是获得box信息,一个是修正box并得到原尺度的左上右下四个坐标。最后我们获取Box的分数,它是由 box_confidence * box_class_probs 得到,观察之前我们写的代码,可以发现confidence和probs 都经过了sigmod函数。confidence表示这个框内存在目标的概率,probs表示每个类的概率
最终得到 boxes_shape=(-1,4),box_scores=(-1,n_class) .这是 一个box prior 的所有boxe信息。(注意模型有3个prior)
def yolo_boxes_and_scores(feats, anchors, num_classes, input_shape, image_shape):
    '''Process Conv layer output'''
    box_xy, box_wh, box_confidence, box_class_probs = yolo_head(feats,
        anchors, num_classes, input_shape)  ###得到和y_true一样的格式
    boxes = yolo_correct_boxes(box_xy, box_wh, input_shape, image_shape)
    boxes = K.reshape(boxes, [-1, 4])
    box_scores = box_confidence * box_class_probs
    box_scores = K.reshape(box_scores, [-1, num_classes])
    # boxes_shape=(-1,4),box_scores=(-1,n_class)
    return boxes, box_scores
有了上面这些代码,我们已经可以将模型的输出,转化为boxe的对应原图的真实坐标和分数。那么我们的标签要如何转化为模型的输出形式呢,我们后续是要计算loss的,即三个box prior,他们的形状在强调下是(batch_size,raw,col,n_anchor*(5+n_class)).
四、标签转化
先看看 我们标签应该是怎样的:shape=(m, T, 5),m是样本的数量,T是一个样本内box数量,5分别表示x_min, y_min, x_max, y_max, class_id 。即左上右下和分类Id
我们还需要anchor,shape=(N, 2),输入图片的大小:input_shape,和分类个数:num_classes
同样 我们先一步步分析:
首先我们有三个box prior,对应不同尺度。而anchor 有9个,对应3种尺度的3种长宽。
其次我们的标签是左上和右下的坐标,应该转换为中心坐标x,y和box长宽的形式
所以我们先转标签形式,并创建和box prior一样的张量。
assert (true_boxes[..., 4]<num_classes).all(), 'class id must be less than num_classes'
num_layers = len(anchors)//3 # default setting
anchor_mask = [[6,7,8], [3,4,5], [0,1,2]] if num_layers==3 else [[3,4,5], [1,2,3]] # 为了后面计算Box对应anchor的索引

true_boxes = np.array(true_boxes, dtype='float32')
input_shape = np.array(input_shape, dtype='int32')
boxes_xy = (true_boxes[..., 0:2] + true_boxes[..., 2:4]) // 2  ##计算中心区域的位置, (m,T,2)
boxes_wh = true_boxes[..., 2:4] - true_boxes[..., 0:2]          ##计算长宽 ,(m,T,2)
true_boxes[..., 0:2] = boxes_xy/input_shape[::-1]          #归一化
true_boxes[..., 2:4] = boxes_wh/input_shape[::-1]           #归一化

m = true_boxes.shape[0]    #表示样本个数
grid_shapes = [input_shape//{0:32, 1:16, 2:8}[l] for l in range(num_layers)]  ## 三个Y的网格大小
y_true = [np.zeros((m,grid_shapes[l][0],grid_shapes[l][1],len(anchor_mask[l]),5+num_classes),
   dtype='float32') for l in range(num_layers)]  #所以一个y_true的OP 是[y1,y2,y3] y1_shape=(batch_size,raw,col,n_anchor,5+n_class)
接下来就是把真实盒子的标签信息放到我们上面创建的y_true里面就可以了。现在问题来了,y_true里面有3个尺度的box_prior,而每个box_prior又有三种长宽比,我们的盒子标签信息应该放在哪个point处呢。
这里我们是通过计算真实box与每种anchor的iou,来取最大的iou,作为我们box需要放置的对应anchor尺度的地方。
但是anchor只有长宽,所以我们需要把box,anchor中心都放在(0,0)处来计算iou。
 # Expand dim to apply broadcasting.  anchors_shape=(-1,2) 其实就是(9,2)
anchors = np.expand_dims(anchors, 0) #变成了(1,9,2)
anchor_maxes = anchors / 2.      #因为需要在原点处比较,中心就是长宽的一半
anchor_mins = -anchor_maxes
valid_mask = boxes_wh[..., 0]>0  #((m,T,bool))  有box的地方为true,因为盒子数量可能少于20
接下来就是对每个样本的盒子和anchor计算iou,然后放到合适的box prior位置:
for b in range(m):
    # Discard zero rows.
    wh = boxes_wh[b, valid_mask[b]]  #这时候是(-1,2),-1表示一个样本中有效盒子的数量
    if len(wh)==0: continue              #如果图片不存在目标 就下一张图片
    # Expand dim to apply broadcasting.
    wh = np.expand_dims(wh, -2)   ##(-1,1,2) 为了后面使用maximum
    box_maxes = wh / 2.          ##这里和anchors一样的操作
    box_mins = -box_maxes

    ##这部分是求各个盒子和anchors的IOU
    intersect_mins = np.maximum(box_mins, anchor_mins) # 每个盒子和所有的anchors做比较
    # ,shape=(-1,9,2) -1是盒子个数,每个盒子会得到9个与anchor的比较值
    intersect_maxes = np.minimum(box_maxes, anchor_maxes) #(-1,9,2) 每个盒子和所有的anchors做比较
    intersect_wh = np.maximum(intersect_maxes - intersect_mins, 0.) # 得到交集部分的长宽,同时保证交集为正
    intersect_area = intersect_wh[..., 0] * intersect_wh[..., 1] # 得到交集面积(-1,9)
    box_area = wh[..., 0] * wh[..., 1]  # 盒子面积 (-1,1)
    anchor_area = anchors[..., 0] * anchors[..., 1] # anchor面积 (1,9)
    # box_area + anchor_area  (-1,9)
    iou = intersect_area / (box_area + anchor_area - intersect_area) #(-1,9) 所有盒子对应9个anchor的iou

    # Find best anchor for each true box
    best_anchor = np.argmax(iou, axis=-1)  #(-1)  每个盒子对应的anchors最大的index
    #比如第一个盒子对应第6个anchor最大  那么该处的索引是best_anchor[0]=5  以此类推
这样我们就得到了每个样本种每个盒子对应的anchor的索引,只要把盒子信息放到对应的box prior 的对应的长宽比anchor即可。
for t, n in enumerate(best_anchor):  #t表示盒子的索引,n表示对应anchors的索引
    for l in range(num_layers): #总共三个box prior
        if n in anchor_mask[l]: #判断该索引 是否是该prior的的索引 可以参考上面anchor_mask的设置
            i = np.floor(true_boxes[b,t,0]*grid_shapes[l][1]).astype('int32') #该样本的该盒子的x*网格的大小尺度 对应col的位置,记住x,y和row,col是反过来的
            j = np.floor(true_boxes[b,t,1]*grid_shapes[l][0]).astype('int32')  #其实就是将在原图上box的中心位置

            # 转换到输出张量上对应的尺度的位置
            k = anchor_mask[l].index(n)  #该anchor在对应张量Y上对应anchors的索引
            c = true_boxes[b,t, 4].astype('int32')   #box的类别
            y_true[l][b, j, i, k, 0:4] = true_boxes[b,t, 0:4]
            y_true[l][b, j, i, k, 4] = 1    # 对应类别的confidence为1  #比如如果是相同的BOX的尺度,那么在这个张量上的对应的网格的位置是相同的
            y_true[l][b, j, i, k, 5+c] = 1   # 另对应类别为1
这样 整个将标签转化为对应目标tensor的任务就完成了。这部分完整代码如下:
def preprocess_true_boxes(true_boxes, input_shape, anchors, num_classes):
    '''Preprocess true boxes to training input format

    Parameters
    ----------
    true_boxes: array, shape=(m, T, 5)
        Absolute x_min, y_min, x_max, y_max, class_id relative to input_shape. m个样本t个框,5个指标
    input_shape: array-like, hw, multiples of 32
    anchors: array, shape=(N, 2), wh
    num_classes: integer

    Returns
    -------
    y_true: list of array, shape like yolo_outputs, xywh are reletive value

    '''
    assert (true_boxes[..., 4]<num_classes).all(), 'class id must be less than num_classes'
    num_layers = len(anchors)//3 # default setting
    anchor_mask = [[6,7,8], [3,4,5], [0,1,2]] if num_layers==3 else [[3,4,5], [1,2,3]]

    true_boxes = np.array(true_boxes, dtype='float32')
    input_shape = np.array(input_shape, dtype='int32')
    boxes_xy = (true_boxes[..., 0:2] + true_boxes[..., 2:4]) // 2  ##计算中心区域的位置 (m,T,2) 其实这里的T目前还是20,因为设置的最多盒子数量是20
    boxes_wh = true_boxes[..., 2:4] - true_boxes[..., 0:2]          ##计算长宽 (m,T,2)
    true_boxes[..., 0:2] = boxes_xy/input_shape[::-1]          #归一化
    true_boxes[..., 2:4] = boxes_wh/input_shape[::-1]           #归一化

    m = true_boxes.shape[0]    #表示样本个数
    grid_shapes = [input_shape//{0:32, 1:16, 2:8}[l] for l in range(num_layers)]  ## 三个Y的网格大小
    y_true = [np.zeros((m,grid_shapes[l][0],grid_shapes[l][1],len(anchor_mask[l]),5+num_classes),
        dtype='float32') for l in range(num_layers)]  #所以一个y_true的OP 是[y1,y2,y3] y1_shape=(batch_size,raw,col,n_anchor,5+n_class)

    # Expand dim to apply broadcasting.  anchors_shape=(-1,2) 其实就是(9,2)
    anchors = np.expand_dims(anchors, 0) #变成了(1,9,2) 为了后面使用maximum
    anchor_maxes = anchors / 2.      #因为需要在原点处比较,中心就是长宽的一半
    anchor_mins = -anchor_maxes
    valid_mask = boxes_wh[..., 0]>0  #((m,T,bool))  有box的地方为true,因为盒子数量可能少于20

    for b in range(m):
        # Discard zero rows.
        wh = boxes_wh[b, valid_mask[b]]  #这时候是(-1,2),-1表示一个样本中有效盒子的数量
        if len(wh)==0: continue              #如果图片不存在目标 就下一张图片
        # Expand dim to apply broadcasting.
        wh = np.expand_dims(wh, -2)   ##(-1,1,2) 为了后面使用maximum
        box_maxes = wh / 2.          ##这里和anchors一样的操作
        box_mins = -box_maxes

        ##这部分是求各个盒子和anchors的IOU
        intersect_mins = np.maximum(box_mins, anchor_mins) # 每个盒子和所有的anchors做比较
        # ,shape=(-1,9,2) -1是盒子个数,每个盒子会得到9个与anchor的比较值
        intersect_maxes = np.minimum(box_maxes, anchor_maxes) #(-1,9,2) 每个盒子和所有的anchors做比较
        intersect_wh = np.maximum(intersect_maxes - intersect_mins, 0.) # 得到交集部分的长宽,同时保证交集为正
        intersect_area = intersect_wh[..., 0] * intersect_wh[..., 1] # 得到交集面积(-1,9)
        box_area = wh[..., 0] * wh[..., 1]  # 盒子面积 (-1,1)
        anchor_area = anchors[..., 0] * anchors[..., 1] # anchor面积 (1,9)
        # box_area + anchor_area  (-1,9)
        iou = intersect_area / (box_area + anchor_area - intersect_area) #(-1,9) 所有盒子对应9个anchor的iou

        # Find best anchor for each true box
        best_anchor = np.argmax(iou, axis=-1)  #(-1)  每个盒子对应的anchors最大的index

        for t, n in enumerate(best_anchor):  #t表示盒子的索引,n表示对应anchors的索引
            for l in range(num_layers): #总共三个box prior
                if n in anchor_mask[l]: #判断该索引 是否是该prior的的索引 可以参考上面anchor_mask的设置
                    i = np.floor(true_boxes[b,t,0]*grid_shapes[l][1]).astype('int32') #该样本的该盒子的x*网格的大小尺度 对应col的位置,记住x,y和row,col是反过来的
                    j = np.floor(true_boxes[b,t,1]*grid_shapes[l][0]).astype('int32')  #其实就是将在原图上box的中心位置

                    # 转换到输出张量上对应的尺度的位置
                    k = anchor_mask[l].index(n)  #该anchor在对应张量Y上对应anchors的索引
                    c = true_boxes[b,t, 4].astype('int32')   #box的类别
                    y_true[l][b, j, i, k, 0:4] = true_boxes[b,t, 0:4]
                    y_true[l][b, j, i, k, 4] = 1    # 对应类别的confidence为1  #比如如果是相同的BOX的尺度,那么在这个张量上的对应的网格的位置是相同的
                    y_true[l][b, j, i, k, 5+c] = 1   # 另对应类别为1

    return y_true
至此,我们的代码基本快完成了,现在我们由了模型输出的prior 也由了真实标签的y_true,接下来就是定义loss部分了
五、计算Loss
我们模型预测的所有box,可能会出现一个物体多个框的情况,这在目标检测中常见的问题,所以需要非极大值抑制。为了方便iou的计算,我们先写一个计算Iou的函数 ,当然这里的iou和我们上面代码计算的iou稍微不同的是这里计算的两个方框是有x,y的,所以不需要假设移到中心计算,而是实际计算iou的值。
计算iou  注意输入的b1,b2形状是不一样的
def box_iou(b1, b2):
    '''Return iou tensor

    Parameters
    ----------
    b1: tensor, shape=(i1,...,iN, 4), xywh
    b2: tensor, shape=(j, 4), xywh

    Returns
    -------
    iou: tensor, shape=(i1,...,iN, j)

    '''

    # Expand dim to apply broadcasting.
    b1 = K.expand_dims(b1, -2)
    b1_xy = b1[..., :2]
    b1_wh = b1[..., 2:4]
    b1_wh_half = b1_wh/2.
    b1_mins = b1_xy - b1_wh_half
    b1_maxes = b1_xy + b1_wh_half

    # Expand dim to apply broadcasting.
    b2 = K.expand_dims(b2, 0)
    b2_xy = b2[..., :2]
    b2_wh = b2[..., 2:4]
    b2_wh_half = b2_wh/2.
    b2_mins = b2_xy - b2_wh_half
    b2_maxes = b2_xy + b2_wh_half

    intersect_mins = K.maximum(b1_mins, b2_mins)
    intersect_maxes = K.minimum(b1_maxes, b2_maxes)
    intersect_wh = K.maximum(intersect_maxes - intersect_mins, 0.)
    intersect_area = intersect_wh[..., 0] * intersect_wh[..., 1]
    b1_area = b1_wh[..., 0] * b1_wh[..., 1]
    b2_area = b2_wh[..., 0] * b2_wh[..., 1]
    iou = intersect_area / (b1_area + b2_area - intersect_area)

    return iou
好了,有了计算iou的函数,我们就可以把真实标签和模型预测进行比较计算了:
首先同样看看我们定义loss部分的输入:
yolo_loss(args, anchors, num_classes, ignore_thresh=.5, print_loss=False)
其中:
args=[*yolo_outputs,*y_true] 模型处理的输出和真实的标签(上面的代码就是处理这两个的)
yolo_outputs: list of tensor, the output of yolo_body or tiny_yolo_body
y_true: list of array, the output of preprocess_true_boxes
anchors: array, shape=(N, 2), wh
num_classes: integer
ignore_thresh: float, the iou threshold whether to ignore object confidence loss
第一步:初始化
num_layers = len(anchors)//3 # default setting
yolo_outputs = args[:num_layers]  ## 这里的arg 前num_layers个是yolobody的输出张量,后面是多个y_true的输入张量 见train.py
y_true = args[num_layers:]
anchor_mask = [[6,7,8], [3,4,5], [0,1,2]] if num_layers==3 else [[3,4,5], [1,2,3]]
input_shape = K.cast(K.shape(yolo_outputs[0])[1:3] * 32, K.dtype(y_true[0]))  #yolo_output 应该是(batch_size,h,w,3*(5 + 80) = 255) 所以这里取的是模型的输出尺寸
                                                                                #乘32是因为第一个是以32的比例切割的,则元素大小要乘32
grid_shapes = [K.cast(K.shape(yolo_outputs[l])[1:3], K.dtype(y_true[0])) for l in range(num_layers)] #三个输出张量y1,y2,y3的h,w尺寸
loss = 0
m = K.shape(yolo_outputs[0])[0] # batch size, tensor  得到tensor的batch_size
mf = K.cast(m, K.dtype(yolo_outputs[0])) ##保证所有的op的类型都和y_true是一样的
接下来就是对每个prior求其loss,我们先要处理模型的输出,并将真实标签转化为模型的预测值,我们会用到我们直接写好的处理box prior的函数
for l in range(num_layers):
      object_mask = y_true[l][..., 4:5]  #...表示:,:,:  可以少些几个冒号而已 这里取的 (x, y, w, h, confidence)中的confidence
      true_class_probs = y_true[l][..., 5:] #这里取的是类别

      grid, raw_pred, pred_xy, pred_wh = yolo_head(yolo_outputs[l],  ##输入的分别是yolo_body的输出张量Y,anchor,分类数量,最大张量的大小
           anchors[anchor_mask[l]], num_classes, input_shape, calc_loss=True)
      pred_box = K.concatenate([pred_xy, pred_wh])

      # Darknet raw box to calculate loss.
      raw_true_xy = y_true[l][..., :2]*grid_shapes[l][::-1] - grid  #真实的x,y偏移量 (之前归一化了)
      raw_true_wh = K.log(y_true[l][..., 2:4] / anchors[anchor_mask[l]] * input_shape[::-1]) #长宽做了个Log的变换
      raw_true_wh = K.switch(object_mask, raw_true_wh, K.zeros_like(raw_true_wh)) # avoid log(0)=-inf #如果confidence是1者有值,0的话为0值
      box_loss_scale = 2 - y_true[l][...,2:3]*y_true[l][...,3:4]  # h*w
剩下就是计算loss了,我们除了对box的长宽预测是计算均方误差,其他比如x,y的偏差,confidence,标签概率均用二值的交叉熵来作为Loss
loss部分完整代码如下,这部分代码比较难理解,请读者根据注释好好理解下:
def yolo_loss(args, anchors, num_classes, ignore_thresh=.5, print_loss=False):
'''Return yolo_loss tensor

Parameters
----------
args=[*yolo_outputs,*y_true]
yolo_outputs: list of tensor, the output of yolo_body or tiny_yolo_body
y_true: list of array, the output of preprocess_true_boxes
anchors: array, shape=(N, 2), wh
num_classes: integer
ignore_thresh: float, the iou threshold whether to ignore object confidence loss

Returns
-------
loss: tensor, shape=(1,)

'''
num_layers = len(anchors)//3 # default setting
yolo_outputs = args[:num_layers]  ## 这里的arg 前num_layers个是yolobody的输出张量,后面是多个y_true的输入张量 见train.py
y_true = args[num_layers:]
anchor_mask = [[6,7,8], [3,4,5], [0,1,2]] if num_layers==3 else [[3,4,5], [1,2,3]]
input_shape = K.cast(K.shape(yolo_outputs[0])[1:3] * 32, K.dtype(y_true[0]))  #yolo_output 应该是(batch_size,h,w,3*(5 + 80) = 255) 所以这里取的是模型的输出尺寸
                                                                                #乘32是因为第一个是以32的比例切割的,则元素大小要乘32
grid_shapes = [K.cast(K.shape(yolo_outputs[l])[1:3], K.dtype(y_true[0])) for l in range(num_layers)] #三个输出张量y1,y2,y3的h,w尺寸
loss = 0
m = K.shape(yolo_outputs[0])[0] # batch size, tensor  得到tensor的batch_size
mf = K.cast(m, K.dtype(yolo_outputs[0])) ##保证所有的op的类型都和y_true是一样的

for l in range(num_layers):
    object_mask = y_true[l][..., 4:5]  #...表示:,:,:  可以少些几个冒号而已 这里取的 (x, y, w, h, confidence)中的confidence
    true_class_probs = y_true[l][..., 5:] #这里取的是类别

    grid, raw_pred, pred_xy, pred_wh = yolo_head(yolo_outputs[l],  ##输入的分别是yolo_body的输出张量Y,anchor,分类数量,最大张量的大小
         anchors[anchor_mask[l]], num_classes, input_shape, calc_loss=True)
    pred_box = K.concatenate([pred_xy, pred_wh])

    # Darknet raw box to calculate loss.
    raw_true_xy = y_true[l][..., :2]*grid_shapes[l][::-1] - grid  #真实的x,y偏移量 (之前归一化了)
    raw_true_wh = K.log(y_true[l][..., 2:4] / anchors[anchor_mask[l]] * input_shape[::-1]) #长宽做了个Log的变换
    raw_true_wh = K.switch(object_mask, raw_true_wh, K.zeros_like(raw_true_wh)) # avoid log(0)=-inf #如果confidence是1者有值,0的话为0值
    box_loss_scale = 2 - y_true[l][...,2:3]*y_true[l][...,3:4]  # h*w

    # Find ignore mask, iterate over each of batch.
    ignore_mask = tf.TensorArray(K.dtype(y_true[0]), size=1, dynamic_size=True)  ##可以 随时变换size的tensor矩阵
    object_mask_bool = K.cast(object_mask, 'bool')  ##这个是真实的mask 就是网格的confidence
    def loop_body(b, ignore_mask):
        true_box = tf.boolean_mask(y_true[l][b,...,0:4], object_mask_bool[b,...,0]) #得到的是(j,4)的张量,j表示所有cell的数量,4表示x,y,h,w
        iou = box_iou(pred_box[b], true_box)
        best_iou = K.max(iou, axis=-1)
        ignore_mask = ignore_mask.write(b, K.cast(best_iou<ignore_thresh, K.dtype(true_box)))
        return b+1, ignore_mask
    _, ignore_mask = K.control_flow_ops.while_loop(lambda b,*args: b<m, loop_body, [0, ignore_mask])
    ignore_mask = ignore_mask.stack()
    ignore_mask = K.expand_dims(ignore_mask, -1)

    # K.binary_crossentropy is helpful to avoid exp overflow.
    xy_loss = object_mask * box_loss_scale * K.binary_crossentropy(raw_true_xy, raw_pred[...,0:2], from_logits=True)
    wh_loss = object_mask * box_loss_scale * 0.5 * K.square(raw_true_wh-raw_pred[...,2:4])
    confidence_loss = object_mask * K.binary_crossentropy(object_mask, raw_pred[...,4:5], from_logits=True)+ \
        (1-object_mask) * K.binary_crossentropy(object_mask, raw_pred[...,4:5], from_logits=True) * ignore_mask
    class_loss = object_mask * K.binary_crossentropy(true_class_probs, raw_pred[...,5:], from_logits=True)

    xy_loss = K.sum(xy_loss) / mf
    wh_loss = K.sum(wh_loss) / mf
    confidence_loss = K.sum(confidence_loss) / mf
    class_loss = K.sum(class_loss) / mf
    loss += xy_loss + wh_loss + confidence_loss + class_loss
    if print_loss:
        loss = tf.Print(loss, [loss, xy_loss, wh_loss, confidence_loss, class_loss, K.sum(ignore_mask)], message='loss: ')
return loss
六、生成模型
至此 模型的搭建基本完成,我们利用写的所有函数,来搭建这个模型:
def create_model(input_shape, anchors, num_classes, load_pretrained=True, freeze_body=2,
        weights_path='test/yolo_weights.h5'):
'''create the training model'''
K.clear_session() # get a new session
image_input = Input(shape=(None, None, 3))
h, w = input_shape   #输入的图片大小
num_anchors = len(anchors)   #钩子的数量

y_true = [Input(shape=(h//{0:32, 1:16, 2:8}[l], w//{0:32, 1:16, 2:8}[l], \
    num_anchors//3, num_classes+5)) for l in range(3)]   #三种比例的label [input((h,w,n_anchors,n_class))*3]
                                                        ## num_classes+5 其中5是因为每个框还需要(x, y, w, h, confidence)五个基本参数

model_body = yolo_body(image_input, num_anchors//3, num_classes)   ### 输入到yolo body中 得到主体模型
print('Create YOLOv3 model with {} anchors and {} classes.'.format(num_anchors, num_classes))

if load_pretrained:    #是否加载预训练的模型
    model_body.load_weights(weights_path, by_name=True, skip_mismatch=True)
    print('Load weights {}.'.format(weights_path))
    if freeze_body in [1, 2]:    #是否冻结所有层 还是保留最后3层输出
        # Freeze darknet53 body or freeze all but 3 output layers.
        num = (185, len(model_body.layers)-3)[freeze_body-1]
        for i in range(num): model_body.layers[i].trainable = False
        print('Freeze the first {} layers of total {} layers.'.format(num, len(model_body.layers)))

model_loss = Lambda(yolo_loss, output_shape=(1,), name='yolo_loss',
    arguments={'anchors': anchors, 'num_classes': num_classes, 'ignore_thresh': 0.5,'print_loss':False})(
    [*model_body.output, *y_true])   #keras 的lambda层 一般是用来做op的运算的简单layer,这里是用来构建loss层
                                      #   *可以让多参以list的形式输入
model = Model([model_body.input, *y_true], model_loss)
model.summary()
return model
至此模型算是全面搭建完了,当然真正的代码不止这些,最后你要得到输出的画,还需要将prior转化成box信息,同时还有评估你预测的box,设置阈值,当confidence 和iou低于阈值时舍去他们。还有就是标签转化部分的函数,我们用labelImg工具生成标签是xml文件,将xml文件里面的信息要转化为我们需要的标签形式。同时anchor的生成需要K-mean算法部分来进行聚类。完整的代码见:YOLOV3-keras
总结
从开始到现在,如果你能完整看到这里,体会代码的含义,相信你对目标检测问题一定会有所了解,当初我第一次看这个代码的时候,由于之前从来没接触过目标检测,所以一条条注释,看了一星期才看完,要完全搞懂更是花了很长时间。
对于看源码,我的建议是:
1、先大体总览,知道每部分的函数是上面作用,对应输入输出是什么。
2、整合运行代码,先跑通
3、对每个部分的代码细细研究
4、在结合论文,全篇浏览