python学习日记21- keras学习2: 样本增强
在keras中,可以使用ImageDataGenerator来扩大样本,生成batch
代码样例:
import time
#from tensorflow import keras
from tensorflow.keras.preprocessing.image import ImageDataGenerator
import numpy as np
import scipy
#随机生成7幅100×100的rgb图 imgs=np.random.randint(0,10,size=(7,100,100,3))
imgs = imgs.astype(‘float32’)/10
#生成图像数据规则定义
datagen = ImageDataGenerator(
featurewise_center=True,
featurewise_std_normalization=True,
rotation_range=20,
width_shift_range=0.2,
height_shift_range=0.2,
horizontal_flip=True)
#准备
datagen.fit(imgs)
#给图像标号,按照规则生成batch
f=datagen.flow(imgs,[0,1,2,3,4,5,6],batch_size=3)
#print(f.next()[1])
#显示
for index,(x,y) in enumerate(f):
if index==10:#生成10个batch
break
print(x.shape,y)
执行结果:
(3, 100, 100, 3) [2 4 1]#第一批用2 4 1图像
(3, 100, 100, 3) [6 5 3]#第二批用654图像
(1, 100, 100, 3) [0]#第三批用0
(3, 100, 100, 3) [3 6 2]
(3, 100, 100, 3) [0 5 4]
(1, 100, 100, 3) [1]
(3, 100, 100, 3) [4 2 6]
(3, 100, 100, 3) [5 3 0]
(1, 100, 100, 3) [1]
(3, 100, 100, 3) [1 5 4]
注:
1曾报错没有scipy,在conda环境中,conda list显示没有安装scipy,pip install Scipy后,加上import scipy,运行程序成功
2type(f)
tensorflow.python.keras.preprocessing.image.NumpyArrayIterator
3在flow之前,fit(x, augment=False, rounds=1)
计算依赖于数据的变换所需要的统计信息(均值方差等),只有使用featurewise_center,featurewise_std_normalization或zca_whitening时需要此函数。
4关于ImageDataGenerator
https://keras.io/preprocessing/image/
从cifar10图像库中,选取10幅图增强,测试 ImageDataGenerator的效果。能看到标签对应正确和图像,有平移倾斜反转效果。但亮度效果有问题。
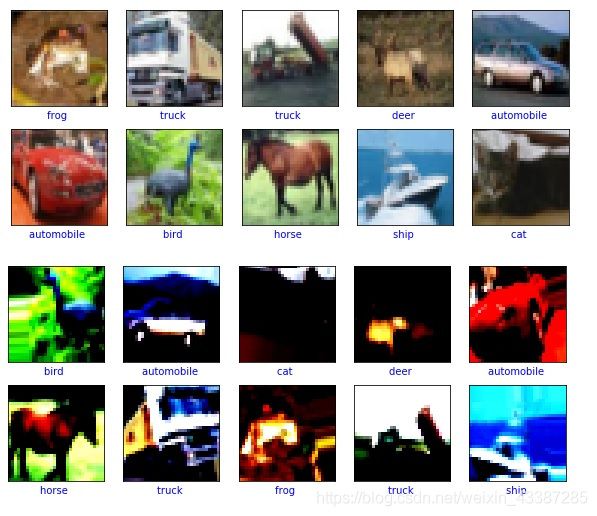
a, 怀疑是中间有颜色表达有范围的错误变化。通过print图像像素颜色值,发现图像增强后,原本0-255的颜色,甚至产生了负数float[-0.66945744 -0.78620785 -1.0303636 ]。
修改方案,在图像增强前,将rgb:0-255变换到0-1的float之间
x_train = x_train.astype(‘float32’)/255
x_test = x_test.astype(‘float32’)/255
b,如果使用brightness_range=[0, 1.0]项,需要引入PIL库。该库仅支持到2.7.官网http://pythonware.com/products/pil/
对于python3.0以上版本,可以pip install pillow代替
该项参数,在keras-cn版本的文档中没有(https://keras-cn.readthedocs.io/en/latest/preprocessing/image/#imagedatagenerator),
在英文文档中有介绍(https://keras.io/preprocessing/image/)
c,在ImageDataGenerator的参数中,逐一排查参数的影响。去掉一些项目。去掉和featurewise相关的变换设置。仅保留空间坐标的图像变换后,增强图像结果,亮度范围基本和原图一致

5关于flow函数
https://keras.io/preprocessing/image/
f=flow(x,
y=None,
batch_size=32,
shuffle=True,
sample_weight=None,
seed=None,
save_to_dir=None,
save_prefix=’’,
save_format=‘png’,
subset=None)
生成一个iterator f,可以不断的next,每个next都指向下一个batch,每个batch有参数batch_size所设置的样本数。
batch个数由f进行了多少次next决定
for index,(x,y) in enumerate(f):
if index==5:
break
print(x.shape,y)
(5, 100, 100, 3) [2 4 1 6 5]
(2, 100, 100, 3) [3 0]
(5, 100, 100, 3) [6 1 4 2 3]
(2, 100, 100, 3) [5 0]
(5, 100, 100, 3) [3 5 4 6 0]
