Django学习之用户登录逻辑编写
app应用的逻辑将在views.py中进行编写
另外在html提交的POST表单中要加入{% csrf_token %},注意是
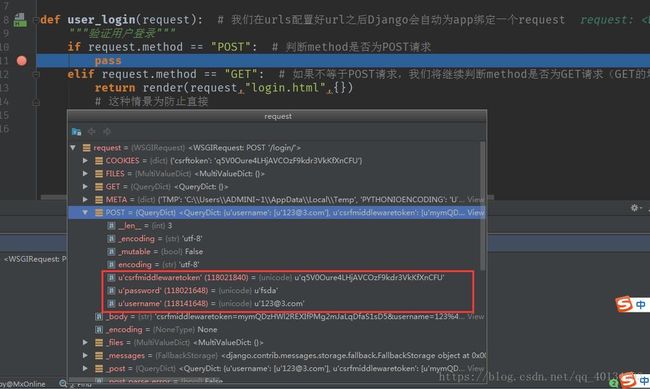
之间加入当我们发起了POST提交表单请求后就会出现一个对象
我们需要做的就是取出数据和验证这个数据,方法 user_name = request.POST.get("username","") 取出username,默认值空
然后用django提供的方法(authenticate)来验证账号和密码 from django.contrib.auth import authenticate
# _*_ encoding:utf-8 _*_

from django.shortcuts import render
from django.contrib.auth import authenticate,login # authenticate是验证,login是登录成功

# Create your views here.

def user_login(request):  # 我们在urls配置好url之后Django会自动为app绑定一个request
    """验证用户登录"""
    if request.method == "POST":  # 判断method是否为POST请求
        user_name = request.POST.get("username","")  # 取出用户名
        pass_word = request.POST.get("password","")  # 取出密码
        # 下面用django提供的方法来验证账号和密码,先导入 from django.contrib.auth import authenticate
        user = authenticate(user_name,pass_word) # 如果账号和密码认证成功就返回一个对象,否则返回None
        if user is not None: # 如果user不为空
            login(request,user) # login会在request的对象里面加入一些参数,所以我们返回request对象时就完成了登录
            return render(request,"index.html") # 返回request对象,并跳转到index.html中

    elif request.method == "GET":  # 如果不等于POST请求,我们将继续判断method是否为GET请求(GET的场景一般为用户点击登录按钮时)
        return render(request,"login.html",{})
HTML页面接收验证:
            {% if request.user.is_authenticated %}

                {% sele %}

            {% endif %}
  现在我们只能通过账号和密码登录,下一步做邮箱和账号都可以登录

  首先我们需要写一个类在views.py当中
  from django.contrib.auth.backends import ModelBackend  # 用于验证其他登录方式(邮箱)

from .models import UserProfile

# Create your views here.

class CustomBackend(ModelBackend):
    """用于验证其他形式的账号,我们主要需要继承和调用ModelBackend的authenticate方法,并注册到settings当中"""
    def authenticate(self, username=None, password=None, **kwargs):
        try:
            user = UserProfile.objects.get(username=username)  # 这里只能查询用户是否是唯一的,因为POST过来的数据是明文,所以不能直接password查询
            if user.check_password(password): # 这里是将密码用check..方法进行加密后查询,如果正确就返回,否者为None
                return user
        except Exception as e:  # 如果出现异常,说明没有匹配成功
            return None
  然后再配置 settings.py文件:
  # Application definition
AUTHENTICATION_BACKENDS = (
    'users.views.CustomBackend',
)
# 元组形式主要要加逗号,不然容易出现未知错误
  完成以上步骤就能实现了账号和密码的登录验证(还未加入email验证)

  要想使用其他类型账号登录就需要加入Q方法(并级查询,注意settings.py中确认已经配置了AUTHENTICATION_BACKENDS)
  # _*_ encoding:utf-8 _*_

from django.shortcuts import render
from django.contrib.auth import authenticate,login # authenticate是验证,login是登录成功
from django.contrib.auth.backends import ModelBackend  # 用于验证其他登录方式
from django.db.models import Q  # 用于并级运算(主要并级查询email)

from .models import UserProfile

# Create your views here.

class CustomBackend(ModelBackend):
    """用于验证其他形式的账号,我们主要需要继承和调用ModelBackend的authenticate方法,并注册到settings当中"""
    def authenticate(self, username=None, password=None, **kwargs):
        try:
            #user = UserProfile.objects.get(username=username)  # 这里只能查询用户是否是唯一的,因为POST过来的数据是明文,所以不能直接password查询
            user = UserProfile.objects.get(Q(username=username)|Q(email=username)) # 要实现并级查询就需要加入Q方法,这样就能查询账号和email账号了
            if user.check_password(password): # 这里是将密码用check..方法进行加密后查询,如果正确就返回,否者为None
                return user
        except Exception as e:  # 如果出现异常,说明没有匹配成功
            return None


def user_login(request):  # 我们在urls配置好url之后Django会自动为app绑定一个request
    """验证用户登录"""
    if request.method == "POST":  # 判断method是否为POST请求
        user_name = request.POST.get("username","")  # 取出用户名
        pass_word = request.POST.get("password","")  # 取出密码
        # 下面用django提供的方法来验证账号和密码,先导入 from django.contrib.auth import authenticate
        user = authenticate(username=user_name,password=pass_word) # 如果认证成功就返回一个对象,否则返回None
        if user is not None: # 如果user不为空
            login(request,user) # login会在request的对象里面加入一些参数,所以我们返回request对象时就完成了登录
            return render(request,"index.html") # 返回request对象,并跳转到index.html中
        else:
            return render(request,"login.html",{})

    elif request.method == "GET":  # 如果不等于POST请求,我们将继续判断method是否为GET请求(GET的场景一般为用户点击登录按钮时)
        return render(request,"login.html",{})
  (现在很奇怪,只能登录超级用户,具体原因不详;以后再研究)

  下一步我们做一个错误提示,如登录验证失败时提示相关信息
  主要以slse: return render(request,"login.html"{"msg":"需要返回的错误提示"}) 这句操作,并在html加入{{  msg  }}
          if user is not None: # 如果user不为空
            login(request,user) # login会在request的对象里面加入一些参数,所以我们返回request对象时就完成了登录
            return render(request,"index.html") # 返回request对象,并跳转到index.html中
        else:
            return render(request,"login.html",{})
  html中

  加入{{  msg  }}
  {{ msg }}
  以上方法是基于函数来做的,下面我们要基于类来做用户登录


  # _*_ encoding:utf-8 _*_

from django.shortcuts import render
from django.contrib.auth import authenticate,login # authenticate是验证,login是登录成功
from django.contrib.auth.backends import ModelBackend  # 用于验证其他登录方式
from django.db.models import Q  # 用于并级运算(主要并级查询email)
from django.views.generic.base import View  # 需要继承View方法来做类的登录逻辑

from .models import UserProfile

# Create your views here.

class CustomBackend(ModelBackend):
    """用于验证其他形式的账号,我们主要需要继承和调用ModelBackend的authenticate方法,并注册到settings当中"""
    def authenticate(self, username=None, password=None, **kwargs):
        try:
            #user = UserProfile.objects.get(username=username)  # 这里只能查询用户是否是唯一的,因为POST过来的数据是明文,所以不能直接password查询
            user = UserProfile.objects.get(Q(username=username)|Q(email=username)) # 要实现并级查询就需要加入Q方法,这样就能查询账号和email账号了
            if user.check_password(password): # 这里是将密码用check..方法进行加密后查询,如果正确就返回,否者为None
                return user
        except Exception as e:  # 如果出现异常,说明没有匹配成功
            return None


class LoginView(View):
    """
    这里是用类方法来做验证登录的逻辑
    使用类方法时我们还需要修改URLS的配置
    """
    def get(self,request):  # 等价于get方法判断,就不用我们自己去取method了
        return render(request, "login.html", {})

    def post(self,request):  # 等价于post方法判断,就不用我们自己去取method了
        user_name = request.POST.get("username", "")  # 取出用户名
        pass_word = request.POST.get("password", "")  # 取出密码
        # 下面用django提供的方法来验证账号和密码,先导入 from django.contrib.auth import authenticate
        user = authenticate(username=user_name, password=pass_word)  # 如果认证成功就返回一个对象,否则返回None
        if user is not None:  # 如果user不为空
            login(request, user)  # login会在request的对象里面加入一些参数,所以我们返回request对象时就完成了登录
            return render(request, "index.html")  # 返回request对象,并跳转到index.html中
        else:
            return render(request, "login.html", {"msg": "用户名或密码错误"})
  urls.py的配置
  # _*_ encoding:utf-8 _*_
"""MxOnline URL Configuration

The `urlpatterns` list routes URLs to views. For more information please see:
    https://docs.djangoproject.com/en/1.9/topics/http/urls/
Examples:
Function views
    1. Add an import:  from my_app import views
    2. Add a URL to urlpatterns:  url(r'^$', views.home, name='home')
Class-based views
    1. Add an import:  from other_app.views import Home
    2. Add a URL to urlpatterns:  url(r'^$', Home.as_view(), name='home')
Including another URLconf
    1. Import the include() function: from django.conf.urls import url, include
    2. Add a URL to urlpatterns:  url(r'^blog/', include('blog.urls'))
"""
from django.conf.urls import url
from django.contrib import admin
from django.views.generic import TemplateView
# 用于处理模板文件,这样django就能自动识别出templates文件夹

import xadmin
from users.views import LoginView  # 导入views里面的LoginView类操作

urlpatterns = [
    url(r'^xadmin/', xadmin.site.urls),

    url(r'^$',TemplateView.as_view(template_name="index.html"),name="index"),
    # 首页的url配置
    url(r'^login/$',LoginView.as_view(),name="login"), # 这里不用于函数的指向方法,我们是用LoginView转换为as_view,它会给我们返回一个函数句柄
]
