ocr的预处理--透视变换,重映射,仿射变换,水平矫正
图像校正可以参考这个:https://blog.csdn.net/wsp_1138886114/article/details/83374333
透视变化:
#include
using namespace cv;
#define CV_SHOW(x) imshow("df",x);waitKey(0)
static void testImageRectification(cv::Mat &I);
void main()
{
	Mat I;
	//I = imread("D:\\test.bmp");
	I = imread("D:\\360安全浏览器下载\\790f419bb941d239b7f5ba70b0ce82fa\\7.png");
	testImageRectification(I);
}
static void testImageRectification(cv::Mat &image_original)
{
	CV_SHOW(image_original); // CV_SHOW是cv::imshow的一个自定义宏,忽略即可
	cv::Mat &&image = image_original.clone();

	cv::Mat image_gray;
	cv::cvtColor(image, image_gray, cv::COLOR_BGR2GRAY);
	//cv::threshold(image_gray, image_gray, g_threshVal, g_threshMax, cv::THRESH_BINARY);
	cv::threshold(image_gray, image_gray, 110, 250, cv::THRESH_BINARY);

	std::vector< std::vector > contours_list;
	{
		std::vector hierarchy;
		// Since opencv 3.2 source image is not modified by this function
		cv::findContours(image_gray, contours_list, hierarchy,
			cv::RetrievalModes::RETR_EXTERNAL, cv::ContourApproximationModes::CHAIN_APPROX_NONE);
	}

	for (uint32_t index = 0; index < contours_list.size(); ++index) {
		cv::RotatedRect &&rect = cv::minAreaRect(contours_list[index]);
		if (rect.size.area() > 1000) {
			if (rect.angle != 0.) {
				// 此处可通过cv::warpAffine进行旋转矫正,本例不需要
			} //if

			cv::Mat &mask = image_gray;
			cv::drawContours(mask, contours_list, static_cast(index), cv::Scalar(255), cv::FILLED);

			cv::Mat extracted(image_gray.rows, image_gray.cols, CV_8UC1, cv::Scalar(0));
			image.copyTo(extracted, mask);
			CV_SHOW(extracted);

			std::vector poly;
			cv::approxPolyDP(contours_list[index], poly, 30, true); // 多边形逼近,精度(即最小边长)设为30是为了得到4个角点
			cv::Point2f pts_src[] = { // 此处顺序调整是为了和后面配对,仅作为示例
				poly[1],
				poly[0],
				poly[3],
				poly[2]
			};

			cv::Rect &&r = rect.boundingRect(); // 注意坐标可能超出图像范围
			cv::Point2f pts_dst[] = {
				cv::Point(r.x, r.y),
				cv::Point(r.x + r.width, r.y),
				cv::Point(r.x + r.width, r.y + r.height) ,
				cv::Point(r.x, r.y + r.height)
			};
			cv::Mat &&M = cv::getPerspectiveTransform(pts_dst, pts_src); // 我这里交换了输入,因为后面指定了cv::WARP_INVERSE_MAP,你可以试试不交换的效果是什么

			cv::Mat warp; cv::warpPerspective(image, warp, M, image.size(), cv::INTER_LINEAR + cv::WARP_INVERSE_MAP, cv::BORDER_REPLICATE);
			CV_SHOW(warp);
		} //if
	}
}
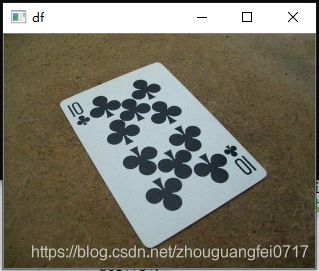
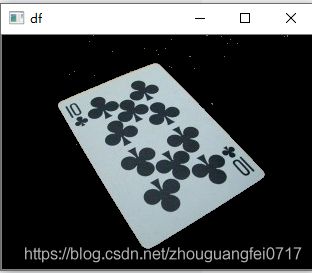
效果展示:
重映射
重映射就是把一幅图像中某个位置的像素放置到另一个图片中指定位置的过程。
用一个数学公式来表示就是:
其中的 f 就是映射方式,也就说,像素点在另一个图像中的位置是由 f 来计算的。
在OpenCV中,用的是remap函数实现重映射。就是把图的像素重新放一个位置
#include
#include
#include
#include

using namespace cv;
using namespace std;

//基本重映射实验

int main()
{
	Mat srcImage = imread("2.jpg");

	if (!srcImage.data)
	{
		cout << "找不到这张图片!" << endl;
		return -1;
	}

	imshow("Src Pic", srcImage);

	Mat dstImage, map_x, map_y;
	dstImage.create(srcImage.size(), srcImage.type());//创建和原图一样的效果图
	map_x.create(srcImage.size(), CV_32FC1);
	map_y.create(srcImage.size(), CV_32FC1);

	//遍历每一个像素点,改变map_x & map_y的值,实现翻转180度
	for (int j = 0; j < srcImage.rows; j++)
	{
		for (int i = 0; i < srcImage.cols; i++)
		{
			map_x.at(j, i) = static_cast(i);
			map_y.at(j, i) = static_cast(srcImage.rows - j);
		}
	}

	//进行重映射操作
	remap(srcImage, dstImage, map_x, map_y, INTER_LINEAR, BORDER_CONSTANT, Scalar(0, 0, 0));
	imshow("重映射效果图", dstImage);

	waitKey();
	return 0;
}
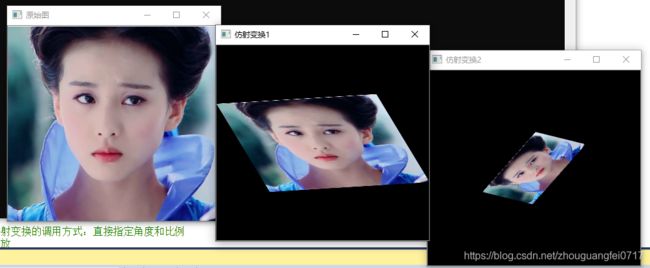
仿射变换
#include
#include
#include

using namespace std;
using namespace cv;
//仿射变换实验
int main()
{
	Mat src = imread("2.jpg");
	Mat dst_warp, dst_warpRotateScale;
	Point2f srcPoints[3];//原图中的三点
	Point2f dstPoints[3];//目标图中的三点

	//第一种仿射变换的调用方式:三点法
	//三个点对的值,上面也说了,只要知道你想要变换后图的三个点的坐标,就可以实现仿射变换
	srcPoints[0] = Point2f(0, 0);
	srcPoints[1] = Point2f(0, src.rows - 1);
	srcPoints[2] = Point2f(src.cols - 1, 0);
	//映射后的三个坐标值
	dstPoints[0] = Point2f(0, src.rows*0.3);
	dstPoints[1] = Point2f(src.cols*0.25, src.rows*0.75);
	dstPoints[2] = Point2f(src.cols*0.75, src.rows*0.25);

	Mat M1 = getAffineTransform(srcPoints, dstPoints);//由三个点对计算变换矩阵
	warpAffine(src, dst_warp, M1, src.size());//仿射变换


	//第二种仿射变换的调用方式:直接指定角度和比例
	//旋转加缩放
	Point2f center(src.cols / 2, src.rows / 2);//旋转中心
	double angle = 45;//逆时针旋转45度
	double scale = 0.5;//缩放比例

	Mat M2 = getRotationMatrix2D(center, angle, scale);//计算旋转加缩放的变换矩阵
	warpAffine(dst_warp, dst_warpRotateScale, M2, src.size());//仿射变换

	imshow("原始图", src);
	imshow("仿射变换1", dst_warp);
	imshow("仿射变换2", dst_warpRotateScale);
	waitKey(0);

	return 0;
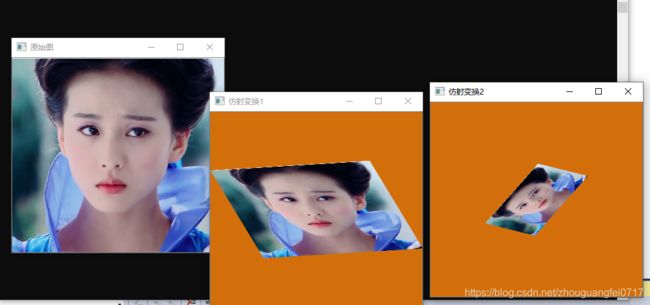
改变颜色warpAffine(dst_warp, dst_warpRotateScale, M2, src.size(), 1, 0, Scalar(11, 111, 211));//仿射变换
基于文本的图像校正
#include "opencv2/imgproc.hpp"
#include "opencv2/highgui.hpp"
#include
#include
using namespace cv;
using namespace std;

#define ERROR 1234

//度数转换
double DegreeTrans(double theta)
{
	double res = theta / CV_PI * 180;
	return res;
}


//逆时针旋转图像degree角度(原尺寸)
void rotateImage(Mat src, Mat& img_rotate, double degree)
{
	//旋转中心为图像中心
	Point2f center;
	center.x = float(src.cols / 2.0);
	center.y = float(src.rows / 2.0);
	int length = 0;
	length = sqrt(src.cols*src.cols + src.rows*src.rows);
	//计算二维旋转的仿射变换矩阵
	Mat M = getRotationMatrix2D(center, degree, 1);
	warpAffine(src, img_rotate, M, Size(length, length), 1, 0, Scalar(255, 255, 255));//仿射变换,背景色填充为白色
}

//通过霍夫变换计算角度
double CalcDegree(const Mat &srcImage, Mat &dst)
{
	Mat midImage, dstImage;

	Canny(srcImage, midImage, 50, 200, 3);
	cvtColor(midImage, dstImage, CV_GRAY2BGR);

	//通过霍夫变换检测直线
	vector lines;
	HoughLines(midImage, lines, 1, CV_PI / 180, 300, 0, 0);//第5个参数就是阈值,阈值越大,检测精度越高
	//cout << lines.size() << endl;

	//由于图像不同,阈值不好设定,因为阈值设定过高导致无法检测直线,阈值过低直线太多,速度很慢
	//所以根据阈值由大到小设置了三个阈值,如果经过大量试验后,可以固定一个适合的阈值。

	if (!lines.size())
	{
		HoughLines(midImage, lines, 1, CV_PI / 180, 200, 0, 0);
	}
	//cout << lines.size() << endl;

	if (!lines.size())
	{
		HoughLines(midImage, lines, 1, CV_PI / 180, 150, 0, 0);
	}
	//cout << lines.size() << endl;
	if (!lines.size())
	{
		cout << "没有检测到直线!" << endl;
		return ERROR;
	}

	float sum = 0;
	//依次画出每条线段
	for (size_t i = 0; i < lines.size(); i++)
	{
		float rho = lines[i][0];
		float theta = lines[i][1];
		Point pt1, pt2;
		//cout << theta << endl;
		double a = cos(theta), b = sin(theta);
		double x0 = a * rho, y0 = b * rho;
		pt1.x = cvRound(x0 + 1000 * (-b));
		pt1.y = cvRound(y0 + 1000 * (a));
		pt2.x = cvRound(x0 - 1000 * (-b));
		pt2.y = cvRound(y0 - 1000 * (a));
		//只选角度最小的作为旋转角度
		sum += theta;

		line(dstImage, pt1, pt2, Scalar(55, 100, 195), 1, LINE_AA); //Scalar函数用于调节线段颜色

		imshow("直线探测效果图", dstImage);
	}
	float average = sum / lines.size(); //对所有角度求平均,这样做旋转效果会更好

	cout << "average theta:" << average << endl;

	double angle = DegreeTrans(average) - 90;

	rotateImage(dstImage, dst, angle);
	//imshow("直线探测效果图2", dstImage);
	return angle;
}


void ImageRecify(const char* pInFileName, const char* pOutFileName)
{
	double degree;
	Mat src = imread(pInFileName);
	imshow("原始图", src);
	Mat dst;
	//倾斜角度矫正
	degree = CalcDegree(src, dst);
	if (degree == ERROR)
	{
		cout << "矫正失败!" << endl;
		return;
	}
	rotateImage(src, dst, degree);
	cout << "angle:" << degree << endl;
	imshow("旋转调整后", dst);

	Mat resulyImage = dst(Rect(0, 0, dst.cols, 500)); //根据先验知识,估计好文本的长宽,再裁剪下来
	imshow("裁剪之后", resulyImage);
	imwrite("recified.jpg", resulyImage);
}


int main()
{
	ImageRecify("G:\\source\\repos\\expression_recognition\\Project1\\7.jpg", "FinalImage.jpg");
	waitKey();
	return 0;
}
但是这种只能识别这些简单的校正。 比如有红色印章,这个时候需要先处理印章。
import cv2
import numpy as np

np.set_printoptions(threshold=np.inf)
image=cv2.imread(r'G:\source\repos\expression_recognition\Project1\22.jpg')

hue_image = cv2.cvtColor(image, cv2.COLOR_BGR2HSV)
low_range = np.array([150, 103, 100])
high_range = np.array([180, 255, 255])
th = cv2.inRange(hue_image, low_range, high_range)
index1 = th == 255

img = np.zeros(image.shape, np.uint8)
img[:, :] = (255,255,255)
img[index1] = image[index1]#(0,0,255)
cv2.imshow('original_img', image)
cv2.imshow('extract_img', img)
cv2.waitKey(0)
cv2.destroyAllWindows()
效果图;
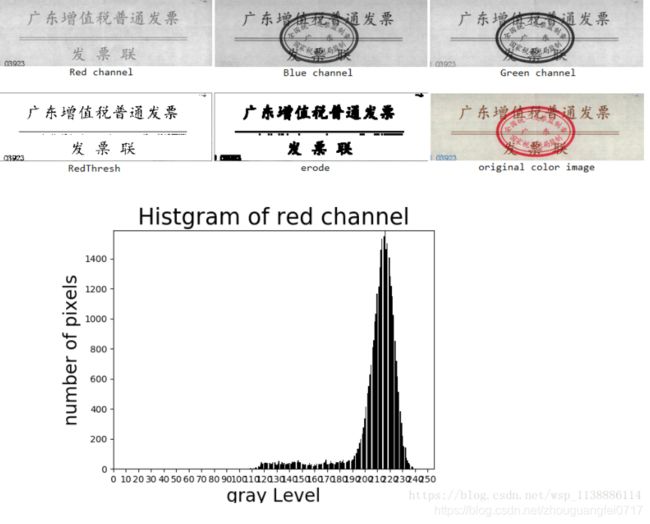
#去除印章
import cv2
import numpy as np
import matplotlib.pyplot as plt


image0=cv2.imread("fapiao.png",cv2.IMREAD_COLOR)   # 以BGR色彩读取图片
image = cv2.resize(image0,None,fx=0.5,fy=0.5,
                   interpolation=cv2.INTER_CUBIC)  # 缩小图片0.5倍(图片太大了)
cols,rows,_=image.shape                            # 获取图片高宽
B_channel,G_channel,R_channel=cv2.split(image)     # 注意cv2.split()返回通道顺序

cv2.imshow('Blue channel',B_channel)
cv2.imshow('Green channel',G_channel)
cv2.imshow('Red channel',R_channel)

pixelSequence=R_channel.reshape([rows*cols,])     # 红色通道的histgram 变换成一维向量
numberBins=256                                    # 统计直方图的组数
plt.figure()                                      # 计算直方图
manager = plt.get_current_fig_manager()
histogram,bins,patch=plt.hist(pixelSequence,
                              numberBins,
                              facecolor='black',
                              histtype='bar')     # facecolor设置为黑色
#设置坐标范围
y_maxValue=np.max(histogram)
plt.axis([0,255,0,y_maxValue])
#设置坐标轴
plt.xlabel("gray Level",fontsize=20)
plt.ylabel('number of pixels',fontsize=20)
plt.title("Histgram of red channel", fontsize=25)
plt.xticks(range(0,255,10))
#显示直方图
plt.pause(0.05)
plt.savefig("histgram.png",dpi=260,bbox_inches="tight")
plt.show()


#红色通道阈值(调节好函数阈值为160时效果最好,太大一片白,太小干扰点太多)
_,RedThresh = cv2.threshold(R_channel,160,255,cv2.THRESH_BINARY)

#膨胀操作(可以省略)
element = cv2.getStructuringElement(cv2.MORPH_RECT,(3, 3))
erode = cv2.erode(RedThresh, element)

#显示效果
cv2.imshow('original color image',image)
cv2.imshow("RedThresh",RedThresh)
cv2.imshow("erode",erode)

# 保存图像
cv2.imwrite('scale_image.jpg',image)
cv2.imwrite('RedThresh.jpg',RedThresh)
cv2.imwrite("erode.jpg",erode)

cv2.waitKey(0)
cv2.destroyAllWindows()
- 读取原始图像A
- 提取图像的红色通道,得到红色通道灰度值图片B
- 计算B的统计直方图C,确定最佳的阈值threshold
- 根据阈值,对B进行二值化,得到最终图片D
- (可选)应用膨胀算子对D进行操作,得到图片E
去掉印章来源:https://blog.csdn.net/wsp_1138886114/article/details/82858380
