CNTK API文档翻译(7)——对MNIST数据使用卷积神经网络
在本期教程之前需要先完成第四期教程。在本期教程中,我们将使用MNIST训练卷积神经网络。
介绍
卷积神经网络(Convolutional Neural Network,CNN/ConvNet)是一种与上一篇文章解释的多层感知机神经网络相似的前馈人工神经网络。卷积神经网络利用了数据的空间性质,在空间性质上,我们考虑不同要素的形状、大小和颜色。打个比方:自然场景中的对象经常是边缘,角/定点(由两条或更多的边缘组成)、色块。这些图元通常使用不同的检测器或者检测器的相互结合来识识别,以实现在真是计算机视觉中的图像理解(对象分类,兴趣区域识别、场景描述等),这种检测器也被叫做滤波器。卷积是一种以图像和滤波器为输入的数据操作,生成一个已经滤波的输出结果,这个结果代表了输入图像的一些特征,比如边缘、颜色、角等。根据以往的经验,滤波器通常是一组权重值,有些人为创建,有些使用数学函数生成(比如,高斯滤波器、Laplacian滤波器、Canny边缘检测滤波器等)。滤波器的输出值会通过非线性激活函数映射成需要的值,这步操作很像人体大脑细胞,又叫神经元。
卷积神经网络提供了通过机器学习这这些滤波器的方法,而不是使用一个明确的数学模型,根据实际经验,机器学习的方法要比人为设定的模型更靠谱。有了卷积神经网络,我们就可以集中经历训练滤波器的权重而不是训练全连接神经网络中连接的节点的权重,因此与传统的多层感知机神经网络相比,需要训练的权重会大大减少。在卷积神经网络中,我们训练几个滤波器可能只需要几个数据,也可能需要大量的数据,这取决于神经网络的复杂程度。
很多卷积神经网络的概念都被证明和大脑视觉皮层有相似的部分。在大脑视觉皮层上有一组被称为视觉感受野(RF)的神经元细胞在收到刺激是会做出反应,与之相应的,在卷积神经网络中,对应滤波器尺寸的输入区域可以被认为是一个感受野。在计算机视觉项目中流行的深度卷积神经网络(比如AlexNet, VGG, Inception, ResNet)都有很多这种生物学上的概念。
问题:(见上上期,本期略
目标:(见上上期,本期略)
方法:(见上上期,本期略)
数据读取
在本部分我们将使用第四期下载的数据。在本期教程中我们使用上期我们下载的MNIST数据,这个数据集有6000个训练图像和10000个测试图像,每个图像是28×28像素。所以输入的特征值应该是784(28×28)个,每个代表一个像素。变量num_output_classes设置为10,与MNIST图像代表的数字(0-9)对应。
在之前的教程中,我们将输入的图像如图展开成一个向量,但是在卷积神经网络中,我们不这么干。
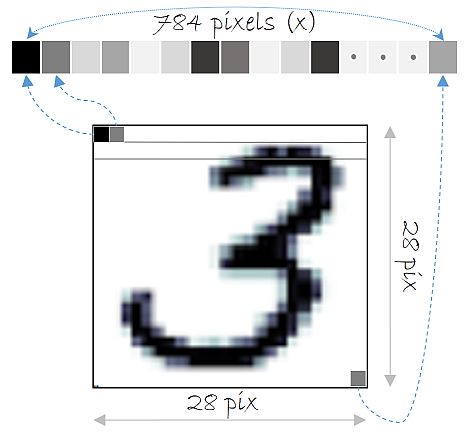
输入数据大小
在处理图像的卷积神经网络中,输入数据通常会被规整成一个三维矩阵(分别是色彩通道数、图像宽度和高度),这会保存图像中像素之间的空间关系。不过在本教程中,MNIST数据是单色彩通道的(黑白灰度),所以输入数据大小是(1,图像宽度,图像高度).
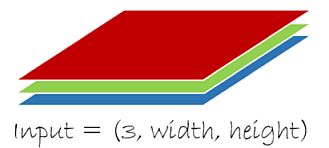
表现自然场景的图片经常会使用红绿蓝(RGB)三色通道,这种情况下输入数据大小就应该是(3,图像宽度,图像高度)。假设RGB数据表示的是一个体积空间,有体积的宽度、高度和深度这三个数据,那么输入数据的大小就应该是(3,体积宽度,体积高度,体积深度)。以此类推,CNTK允许有更高维的输入数据。
# Ensure we always get the same amount of randomness
np.random.seed(0)

# Define the data dimensions
# images are 28 x 28 with 1 channel of color (gray)
input_dim_model = (1, 28, 28)
# used by readers to treat input data as a vector
input_dim = 28*28
num_output_classes = 10数据格式数据在我们的计算机上以CNTK文本格式(CTF)存储,CTF格式是一种简单的文本格式,他包含一系列的样本,样本中记录其属性名和属性值。以MNIST数据为例,每个样本包含两个属性,一个是lables,另一个是features,所以其格式是:
|labels 0 0 0 1 0 0 0 0 0 0 |features 0 255 0 123 … (784 integers each representing a pixel gray level)
在本教程中,我们将使用图像像素值作为features,然后定义一个create_reader函数来读取训练数据和测试数据,函数中会使用CNTK提供的CTFDeserializer方法,标签会使用一位有效码。
# Read a CTF formatted text (as mentioned above) using the CTF deserializer from a file
def create_reader(path, is_training, input_dim, num_label_classes):

    ctf = C.io.CTFDeserializer(path, C.io.StreamDefs(
          labels=C.io.StreamDef(field='labels', shape=num_label_classes, is_sparse=False),
          features=C.io.StreamDef(field='features', shape=input_dim, is_sparse=False)))

    return C.io.MinibatchSource(ctf,
        randomize = is_training, max_sweeps = C.io.INFINITELY_REPEAT if is_training else 1)


# Ensure the training and test data is available for this tutorial.
# We search in two locations in the toolkit for the cached MNIST data set.

data_found=False # A flag to indicate if train/test data found in local cache
for data_dir in [os.path.join("..", "Examples", "Image", "DataSets", "MNIST"),
                 os.path.join("data", "MNIST")]:

    train_file=os.path.join(data_dir, "Train-28x28_cntk_text.txt")
    test_file=os.path.join(data_dir, "Test-28x28_cntk_text.txt")

    if os.path.isfile(train_file) and os.path.isfile(test_file):
        data_found=True
        break

if not data_found:
    raise ValueError("Please generate the data by completing CNTK 103 Part A")

print("Data directory is {0}".format(data_dir))
卷积神经网络模型创建
卷积神经网络也是一种由多个层级构成的前馈神经网络,前一层的输出会成为后一层的输入。在多层感知机神经网络中,所有输入的像素都连接到所有的输出节点中,所有的这种连接都会有一个权重,这导致有大量的参数需要被训练,也因此导致了过度拟合的可能性(原因参见我的Python与人工神经网络的第11期)。卷积层利用了像素空间排列和多滤波器的优势,能够显著减少需要训练的参数的个数,当然也因此引入了一个参数:滤波器个数。
在本节中,我们将介绍基础的卷积操作。虽然MNIST数据只有一个色彩通道,但下面的图片我们会以RGB图片为例。
卷积层
一个卷积层是一组滤波器,每个滤波器都由权重矩阵(W)和偏移量(b)定义。

滤波器扫描图片后对输入的值和权重进行点积运算,然后加上偏移量b值,最后想加起来,再使用一个激活函数映射成我们需要的输出值,过程如下图:
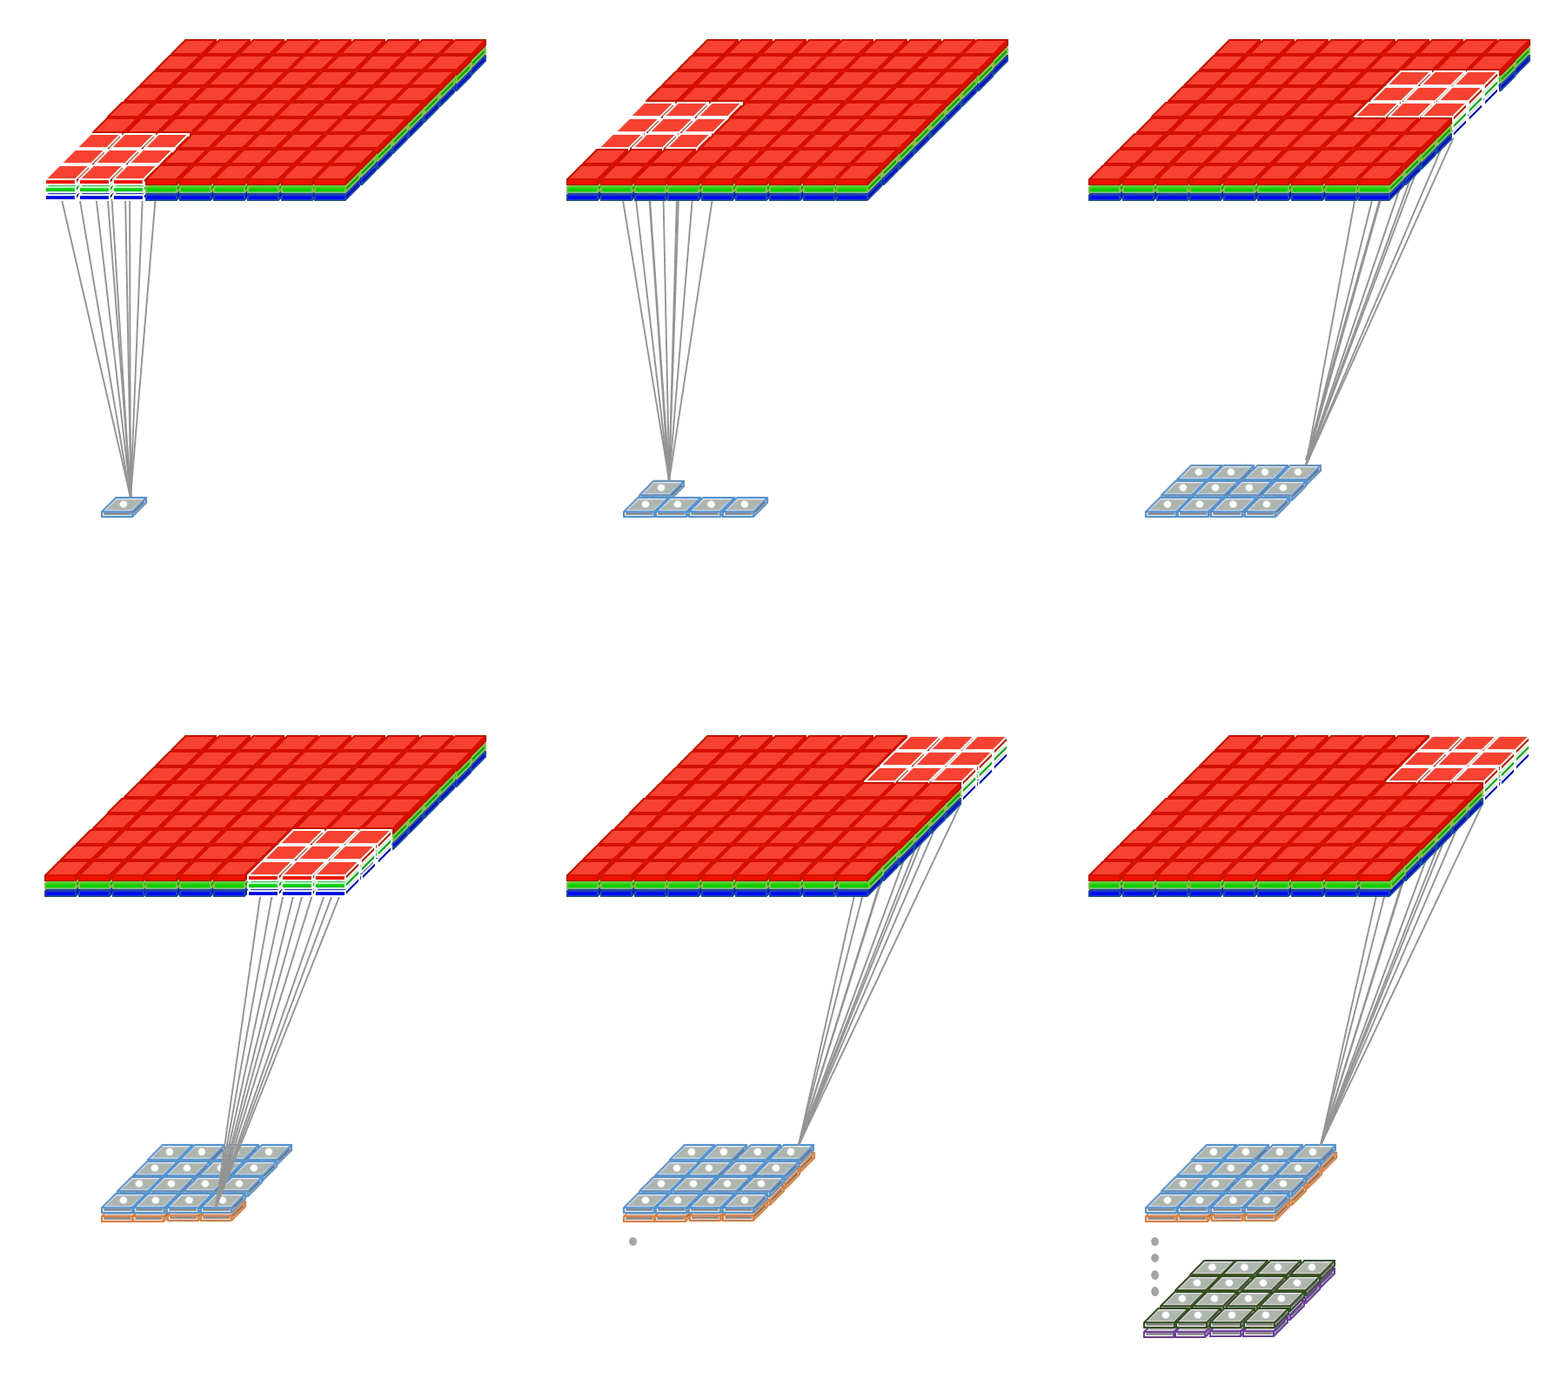
卷积层包含如下关键要素:
- 不同于全连接网络中每个输入节点都和输出节点相连,在卷积层中,每个卷积节点只和与他位置对应的部分区域节点的相连,这个区域也叫局部感受野。上图中的局部感受野就是一个3×3的渔区。在RGB图像中,局部感受野就成了三个3×3的区域了。
- 在全连接层中,一次运算的权重就是一个权重矩阵,但是在卷积层中,具有多重权重矩阵,通常一个色彩通道对应一个权重矩阵,这些个权重矩阵就是滤波器。每个滤波器检测他们所能扫描的所有的感受野的特征,最后输出n个下级层(如下图的动画),其中n就是滤波器的数量。
- 在生成下级层的过程中,与全连接层不同的是,不是每个输入节点都有一个权重,而是每次扫码的局部感受野内的节点共项权重,也就是生成下级层的过程中,下级层的每个节点只对应一个权重。这会减少参数数量,因此也会减少因此而来的过度拟合。这也为很多深度学习方面的问题打开了大门,而且已经有了比较使用的解决方案。
步幅参数和边界填充参数
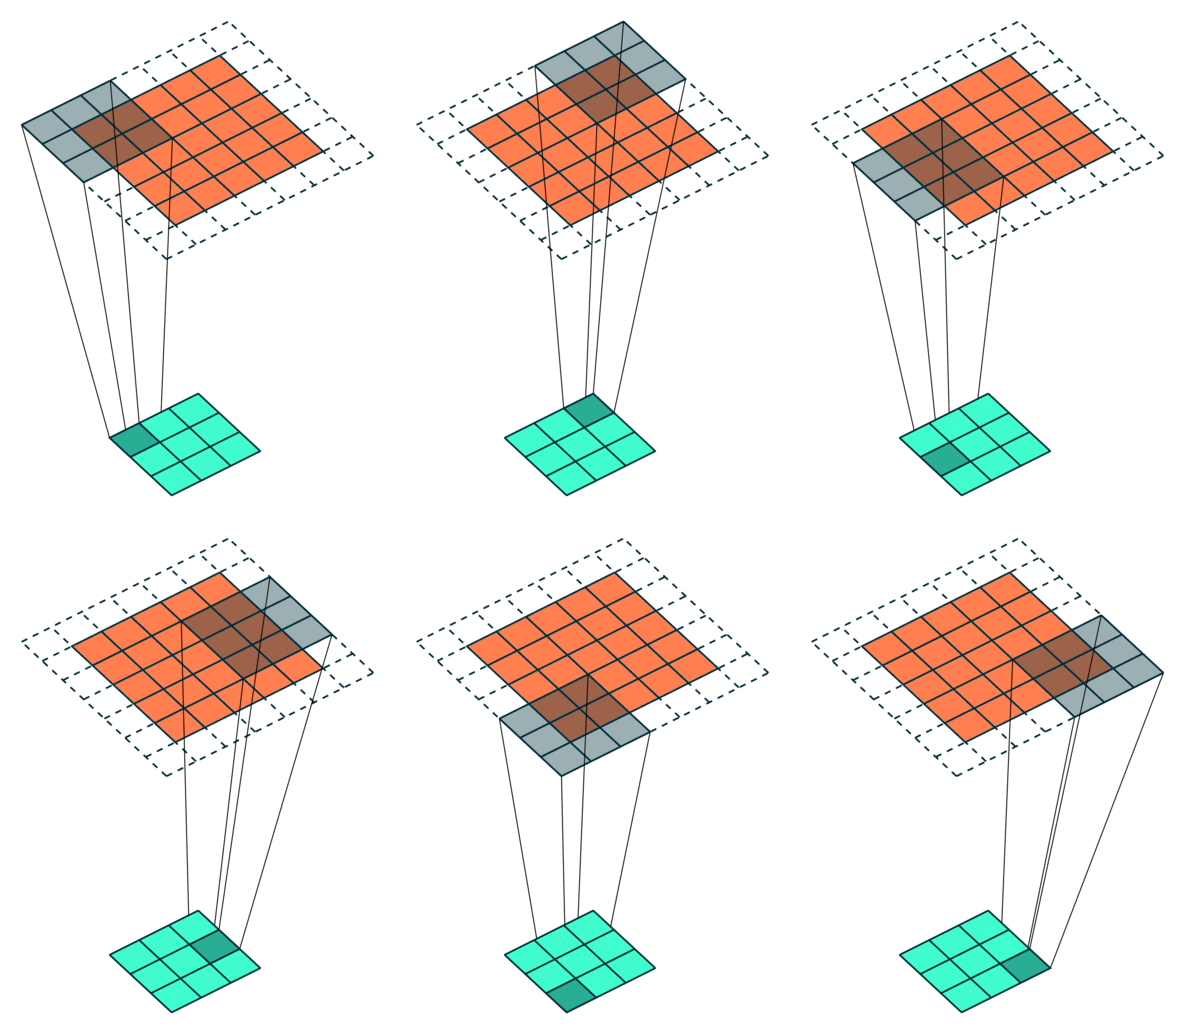
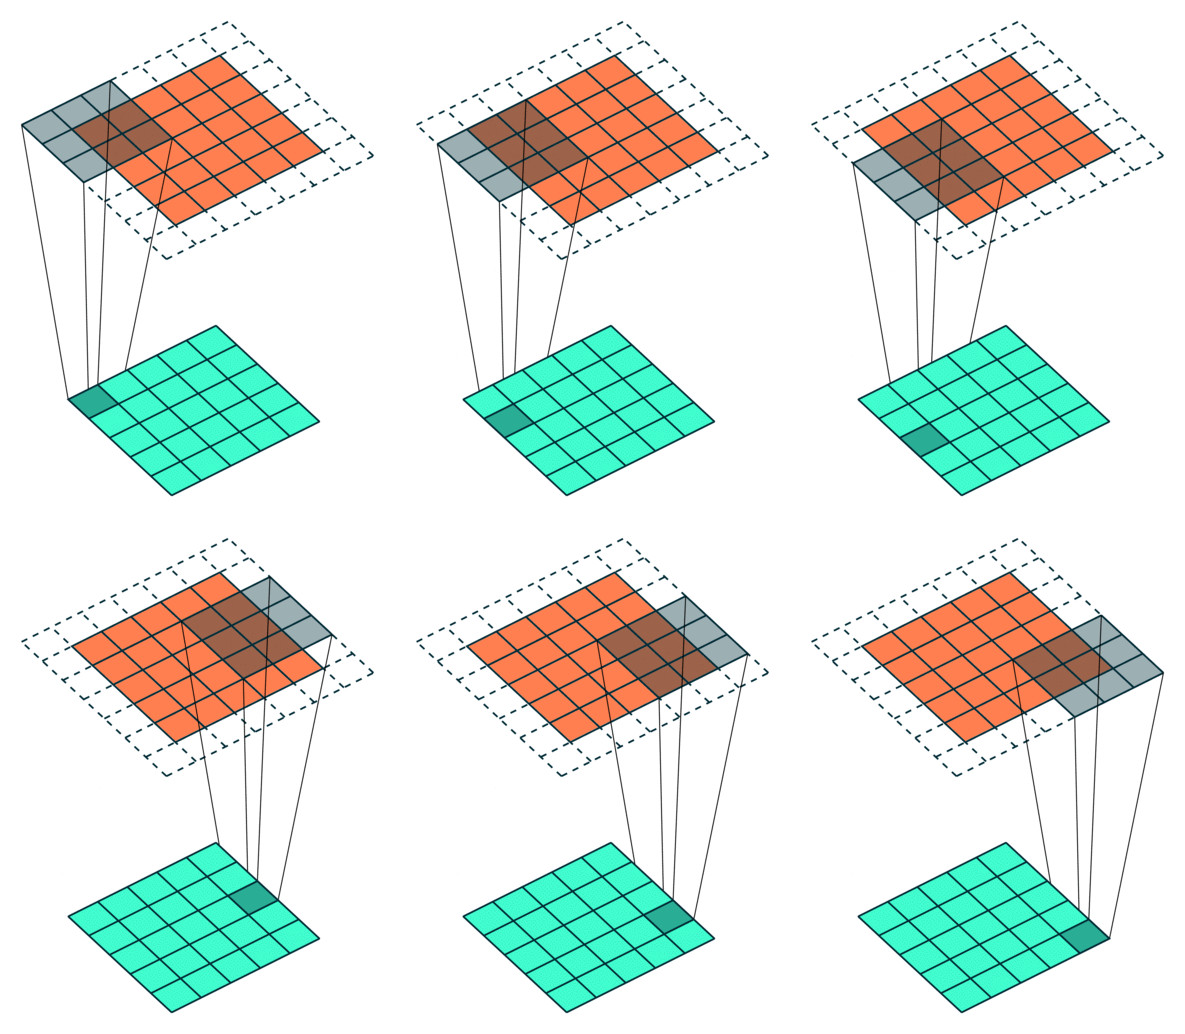
滤波器如何定位? 通常来说滤波器会重复扫描,从左到右,从上到下。在大多数的自然场景图像处理中,每个卷积层有一个filter_shape参数,制定滤波器的宽度和高度。然后还需要有个步幅参数(strides)来控制滤波器移动的幅度。最后还需要有一个布尔类型的参数pad,用于指示是否在输入图像的边界进行填充,以便于边界附近有一个完整的感受野。
上图的动画中展示了filter_shape = (3, 3), strides = (2, 2) 和 pad = False情况下的卷积层,下面两个图的动画中分别展示了pad=True的情况,第一幅图中 strides = (2, 2),第二幅图中strides = (1, 1)。注意:在strides设置为不同值时,输出层的大小是不同的,很多时候决定第二幅图中strides值和pad值是需要根据输出层大小的需求来定。
创建卷积神经网络模型
在本教程中,我们先定义两个变量,第一个是输入的MNIST图像,第二个人是与之对应的lable值,表明了图像对应的数字。当读取数据的时候,读取器自动的将每个图像的784个像素值映射成我们定义的输入数据大小的矩阵。在本例中我们定义的大小是(1,28,28)。
x = C.input_variable(input_dim_model)
y = C.input_variable(num_output_classes)
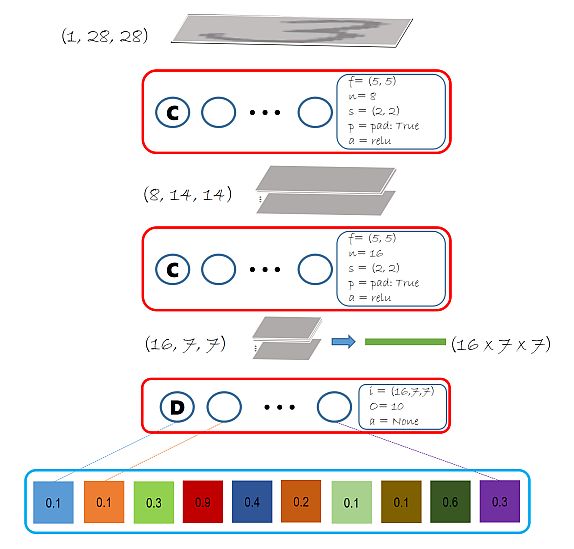
我们首先创建一个纯净的卷积神经网络模型。我们使用两个卷积层,任务是检测MNIST数据中的是个数字,网络的输出值应该是一个长度为10的矢量,一个要素对应一个数字,这步工作使用一个全连接层根据num_output_classes变量将最后一个卷积层的输出值映射出来。我们之前使用逻辑回归和多层感知机时都有用到。当然与之前一样,我们也会使用softmax操作和交叉熵成本函数来训练,最后一层也没有激活函数。
下图展示了我们将创建的模型。注意途中所示的模型参数都是已经经过验证的,这种参数被称为超参数(Hyperparameters)。滤波器大小增加会导致模型参数增加,进而导致运算次数增加,当然也会使模型更好的适应数据,不过也会带来过度拟合的风险。一般来说,深层的滤波器会比浅层的多,在此例中第一层选择了8,第二层选择了16。这些参数在模型创建时是需要被验证的。
# function to build model

def create_model(features):
    with C.layers.default_options(init=C.glorot_uniform(), activation=C.relu):
            h = features
            h = C.layers.Convolution2D(filter_shape=(5,5),
                                       num_filters=8,
                                       strides=(2,2),
                                       pad=True, name='first_conv')(h)
            h = C.layers.Convolution2D(filter_shape=(5,5),
                                       num_filters=16,
                                       strides=(2,2),
                                       pad=True, name='second_conv')(h)
            r = C.layers.Dense(num_output_classes, activation=None, name='classify')(h)
return r让我们创建一个模型的实例,然后观察这个模型的各个组件。我们使用z来表示神经网络的输出值。在本模型中,我们使用ReLU激活函数。注意:在代码中使用 C.layers.default_options是编写简单模型的优雅方式,是减少模型错误缩短调试时间的关键。
# Create the model
z = create_model(x)

# Print the output shapes / parameters of different components
print("Output Shape of the first convolution layer:", z.first_conv.shape)
print("Bias value of the last dense layer:", z.classify.b.value)
估算模型参数是深度学习的关键,因为需要的数据量和模型参数个数有着直接的关系。如果有很多的参数,你就需要有更多的数据来防止过度拟合。换句话说,如果你的数据量是一定的,那么就需要限制模型的参数个数。数据量和参数个数之间的关系没有一个万能公式,不过我们有一些方法通过扩充数据提高模型的训练效果。
# Number of parameters in the network
C.logging.log_number_of_parameters(z)
输出结果:Training 11274 parameters in 6 parameter tensors.
了解参数:
我们的模型有两个卷积层,每个都有权重和偏移量。这样加起来就是4个参数张量,然后再加上最后一个全连接层的权重和偏移量张量,合起来就是6个参数张量。
然后我们再来细数一下参数:
* 第一个卷积层。有8个滤波器,每个的大小是(1×5×5),加起来,权重矩阵就有200个值,8个偏移量。
* 第二个人卷积层。有16个滤波器,每个的大小是(8×5×5),其中8代表了第二层的输入数据的通道个数,也是第一层的输出数据的通道个数。这些数据加起,权重矩阵有3200个值,16个偏移量
* 最后的全连接层。有16×7×7个输入只,10个输出值,因此有16×7×7×10个权重值和10个偏移量。
这些全部加起来就是11274个参数。
训练模型参数
和以前的教程一样,我们使用softmax函数来把z映射成概率。
训练
和本教程的第三期一样,我们想方设法使网络的输出值和标签之际的交叉熵成本值减小:
def create_criterion_function(model, labels):
    loss = C.cross_entropy_with_softmax(model, labels)
    errs = C.classification_error(model, labels)
    return loss, errs # (model, labels) -> (loss, error metric)
然后我们需要定义一些辅助函数来将模型的训练过程可视化。
# Define a utility function to compute the moving average sum.
# A more efficient implementation is possible with np.cumsum() function
def moving_average(a, w=5):
    if len(a) < w:
        return a[:]    # Need to send a copy of the array
    return [val if idx < w else sum(a[(idx-w):idx])/w for idx, val in enumerate(a)]


# Defines a utility that prints the training progress
def print_training_progress(trainer, mb, frequency, verbose=1):
    training_loss = "NA"
    eval_error = "NA"

    if mb%frequency == 0:
        training_loss = trainer.previous_minibatch_loss_average
        eval_error = trainer.previous_minibatch_evaluation_average
        if verbose:
            print ("Minibatch: {0}, Loss: {1:.4f}, Error: {2:.2f}%".format(mb, training_loss, eval_error*100))

    return mb, training_loss, eval_error
配置模型参数
在以前的教程中我们有说过成本函数、优化器、训练器等机器学习相关的概念。在本期教程中我们将会把模型的训练和测试放在一个函数下面。
def train_test(train_reader, test_reader, model_func, num_sweeps_to_train_with=10):

    # Instantiate the model function; x is the input (feature) variable
    # We will scale the input image pixels within 0-1 range by dividing all input value by 255.
    model = model_func(x/255)

    # Instantiate the loss and error function
    loss, label_error = create_criterion_function(model, y)

    # Instantiate the trainer object to drive the model training
    learning_rate = 0.2
    lr_schedule = C.learning_rate_schedule(learning_rate, C.UnitType.minibatch)
    learner = C.sgd(z.parameters, lr_schedule)
    trainer = C.Trainer(z, (loss, label_error), [learner])

    # Initialize the parameters for the trainer
    minibatch_size = 64
    num_samples_per_sweep = 60000
    num_minibatches_to_train = (num_samples_per_sweep * num_sweeps_to_train_with) / minibatch_size

    # Map the data streams to the input and labels.
    input_map={
        y  : train_reader.streams.labels,
        x  : train_reader.streams.features
    }

    # Uncomment below for more detailed logging
    training_progress_output_freq = 500

    # Start a timer
    start = time.time()

    for i in range(0, int(num_minibatches_to_train)):
        # Read a mini batch from the training data file
        data=train_reader.next_minibatch(minibatch_size, input_map=input_map)
        trainer.train_minibatch(data)
        print_training_progress(trainer, i, training_progress_output_freq, verbose=1)

    # Print training time
    print("Training took {:.1f} sec".format(time.time() - start))

    # Test the model
    test_input_map = {
        y  : test_reader.streams.labels,
        x  : test_reader.streams.features
    }

    # Test data for trained model
    test_minibatch_size = 512
    num_samples = 10000
    num_minibatches_to_test = num_samples // test_minibatch_size

    test_result = 0.0

    for i in range(num_minibatches_to_test):

        # We are loading test data in batches specified by test_minibatch_size
        # Each data point in the minibatch is a MNIST digit image of 784 dimensions
        # with one pixel per dimension that we will encode / decode with the
        # trained model.
        data = test_reader.next_minibatch(test_minibatch_size, input_map=test_input_map)
        eval_error = trainer.test_minibatch(data)
        test_result = test_result + eval_error

    # Average of evaluation errors of all test minibatches
    print("Average test error: {0:.2f}%".format(test_result*100 / num_minibatches_to_test))
运行和测试模型
现在我们已经准备好了训练我们的卷积神经网络。
def do_train_test():
    global z
    z = create_model(x)
    reader_train = create_reader(train_file, True, input_dim, num_output_classes)
    reader_test = create_reader(test_file, False, input_dim, num_output_classes)
    train_test(reader_train, reader_test, z)

do_train_test()
结果
Minibatch: 0, Loss: 2.3132, Error: 87.50%
Minibatch: 500, Loss: 0.2041, Error: 10.94%
Minibatch: 1000, Loss: 0.1134, Error: 1.56%
Minibatch: 1500, Loss: 0.1540, Error: 3.12%
Minibatch: 2000, Loss: 0.0078, Error: 0.00%
Minibatch: 2500, Loss: 0.0240, Error: 1.56%
Minibatch: 3000, Loss: 0.0083, Error: 0.00%
Minibatch: 3500, Loss: 0.0581, Error: 3.12%
Minibatch: 4000, Loss: 0.0247, Error: 0.00%
Minibatch: 4500, Loss: 0.0389, Error: 1.56%
Minibatch: 5000, Loss: 0.0368, Error: 1.56%
Minibatch: 5500, Loss: 0.0015, Error: 0.00%
Minibatch: 6000, Loss: 0.0043, Error: 0.00%
Minibatch: 6500, Loss: 0.0120, Error: 0.00%
Minibatch: 7000, Loss: 0.0165, Error: 0.00%
Minibatch: 7500, Loss: 0.0097, Error: 0.00%
Minibatch: 8000, Loss: 0.0044, Error: 0.00%
Minibatch: 8500, Loss: 0.0037, Error: 0.00%
Minibatch: 9000, Loss: 0.0506, Error: 3.12%
Training took 30.4 sec
Average test error: 1.57%
注意测试平均差值和训练差值具有很好的可比性,这表示我们的模型对其他数据是否有比较好的适应性,这是避免过度拟合的关键。
让我们来看一些部分模型参数:我们奖看看全连接层的偏移量,在训练之前他们都是0,但现在他们都不是0了,表示这个模型参数在训练期间发生了改变。
print("Bias value of the last dense layer:", z.classify.b.value)输出结果:
Bias value of the last dense layer: [-0.03064867 -0.01484577 0.01883961 -0.27907506 0.10493447-0.08710711 0.00442157 -0.09873096 0.33425555 0.04781624]
评估/测试
我们到目前为止完成了差值的测算,让我们来获取个别数据的相关概率。eval函数返回每个样本对应分类的概率分布。训练出来的分类器就是根据这个10个类别来识别图像里面的数字的。首先我们需要将网络的输出值使用softmax函数映射成10个类别的概率值。
out = C.softmax(z)然后使用测试数据中的一小个取样包
# Read the data for evaluation
reader_eval=create_reader(test_file, False, input_dim, num_output_classes)

eval_minibatch_size = 25
eval_input_map = {x: reader_eval.streams.features, y:reader_eval.streams.labels}

data = reader_eval.next_minibatch(eval_minibatch_size, input_map=eval_input_map)

img_label = data[y].asarray()
img_data = data[x].asarray()

# reshape img_data to: M x 1 x 28 x 28 to be compatible with model
img_data = np.reshape(img_data, (eval_minibatch_size, 1, 28, 28))

predicted_label_prob = [out.eval(img_data[i]) for i in range(len(img_data))]

# Find the index with the maximum value for both predicted as well as the ground truth
pred = [np.argmax(predicted_label_prob[i]) for i in range(len(predicted_label_prob))]
gtlabel = [np.argmax(img_label[i]) for i in range(len(img_label))]

print("Label    :", gtlabel[:25])
print("Predicted:", pred)
输出结果:
Label : [7, 2, 1, 0, 4, 1, 4, 9, 5, 9, 0, 6, 9, 0, 1, 5, 9, 7, 3, 4, 9, 6, 6, 5, 4]
Predicted: [7, 2, 1, 0, 4, 1, 4, 9, 5, 9, 0, 6, 9, 0, 1, 5, 9, 7, 3, 4, 9, 6, 6, 5, 4]
池化层
通常来说,一个神经网络需要控制他参数的个数,特别是深度神经网络的时候。在每个卷积层输出时,都可以加一个池化层,池化层会在如下情况使用:
- 减少前一个层的大小(训练更快)
- 让模型在图片位置变化时具有更好的适应性。比如图片上的数字不在中间时
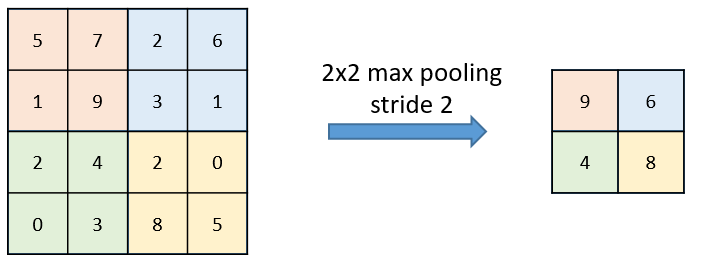
池化层节点上的计算要比普通前馈节点的计算简单得多,他没有权重,偏移量和激活函数,他使用一个简单的聚合函数(比如最大值函数、平均值函数)来求其输出值。其中最常用的就是最大值函数——输出所有对应位置输入值的最大值。下图就展示了一个4×4的区域,最大值池化窗口大小是2×2,在这个窗口内的最大值将会成为这个区域的输出值。每次窗口移动步幅参数指定的量并重复最大值池化操作。
池化层的另一个选择是平均值池化,输出窗口内的平均值而不是最大值,他们的不同点如下面两图。
典型卷积神经网络
一个典型的卷积神经网络包含了一系列交互出现的卷积层和池化层,然后跟着一个全连接输出层用来分类。你能找出大量使用这种结构的经典深度神经网络网络(VGG, AlexNet等等)
上图展示的是2D图片,CNTK组件能够操作任意维度的数据。上图展示的是2个卷积层和两个最大值池化层,常用的策略是提高滤波器的个数来减少中间层的大小。
任务:创建带有最大值池化层的神经网络
典型的卷积神经网络卷积层和池化层都是交替出现的,上面我们建立的模型只有卷积层,所以接下来我们创建的模型会如下图所示:
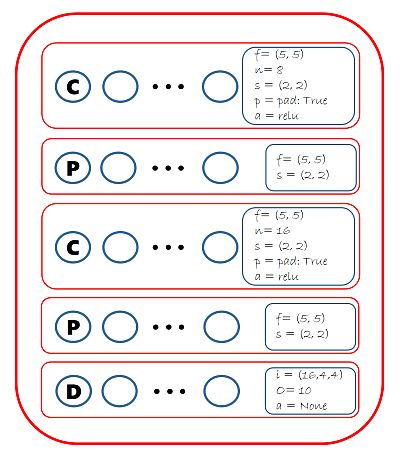
我们能使用CNTK的 MaxPooling来完成这个任务,代码如下:
# function to build model
def create_model(features):
    with C.layers.default_options(init = C.layers.glorot_uniform(), activation = C.relu):
            h = features

            h = C.layers.Convolution2D(filter_shape=(5,5),
                                       num_filters=8,
                                       strides=(1,1),
                                       pad=True, name="first_conv")(h)
            h = C.layers.MaxPooling(filter_shape=(2,2),
                                    strides=(2,2), name="first_max")(h)
            h = C.layers.Convolution2D(filter_shape=(5,5),
                                       num_filters=16,
                                       strides=(1,1),
                                       pad=True, name="second_conv")(h)
            h = C.layers.MaxPooling(filter_shape=(3,3),
                                    strides=(3,3), name="second_max")(h)
            r = C.layers.Dense(num_output_classes, activation = None, name="classify")(h)
            return r

do_train_test()
输出结果
Minibatch: 0, Loss: 2.3257, Error: 96.88%
Minibatch: 500, Loss: 0.0592, Error: 0.00%
Minibatch: 1000, Loss: 0.1007, Error: 3.12%
Minibatch: 1500, Loss: 0.1299, Error: 3.12%
Minibatch: 2000, Loss: 0.0077, Error: 0.00%
Minibatch: 2500, Loss: 0.0337, Error: 1.56%
Minibatch: 3000, Loss: 0.0038, Error: 0.00%
Minibatch: 3500, Loss: 0.0856, Error: 3.12%
Minibatch: 4000, Loss: 0.0052, Error: 0.00%
Minibatch: 4500, Loss: 0.0171, Error: 1.56%
Minibatch: 5000, Loss: 0.0266, Error: 1.56%
Minibatch: 5500, Loss: 0.0028, Error: 0.00%
Minibatch: 6000, Loss: 0.0070, Error: 0.00%
Minibatch: 6500, Loss: 0.0144, Error: 0.00%
Minibatch: 7000, Loss: 0.0083, Error: 0.00%
Minibatch: 7500, Loss: 0.0033, Error: 0.00%
Minibatch: 8000, Loss: 0.0114, Error: 0.00%
Minibatch: 8500, Loss: 0.0589, Error: 1.56%
Minibatch: 9000, Loss: 0.0186, Error: 1.56%
Training took 31.9 sec
Average test error: 1.05%
欢迎扫码关注我的微信公众号获取最新文章


