为什么用SpringBoot之初识SpringBoot
Spring Boot可以轻松创建独立的,生产级的基于Spring的应用程序,您可以“运行”。 我们对Spring平台和第三方库进行了自以为是的观点,因此您可以轻松上手。大多数Spring Boot应用程序只需要很少的Spring配置。(来自SpringBoot官网翻译)
SpringBoot-Demo
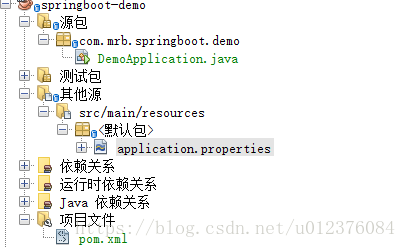
项目(Maven)结构,如下:
1.DemoApplication.java
package com.mrb.springboot.demo;

import org.springframework.boot.SpringApplication;
import org.springframework.boot.autoconfigure.SpringBootApplication;
import org.springframework.web.bind.annotation.RequestMapping;
import org.springframework.web.bind.annotation.RestController;

/**
 *
 * @author MRB
 */
@SpringBootApplication
public class DemoApplication {
    public static void main(String args[]){
        SpringApplication.run(DemoApplication.class, args);
    }

    @RestController
    static class DemoController{
        @RequestMapping("/demo")
        public String helloWord(){
            return "hello world";
        }
    }
}
2.、application.properties
server.port=80903、pom.xml
    4.0.0
    com.mrb
    springboot-demo
    1.0-SNAPSHOT
    jar


            org.springframework.boot
            spring-boot-starter-web
            1.5.15.RELEASE
运行结果,如下:
细看spring-boot-starter-web 这个包究竟包含了什么
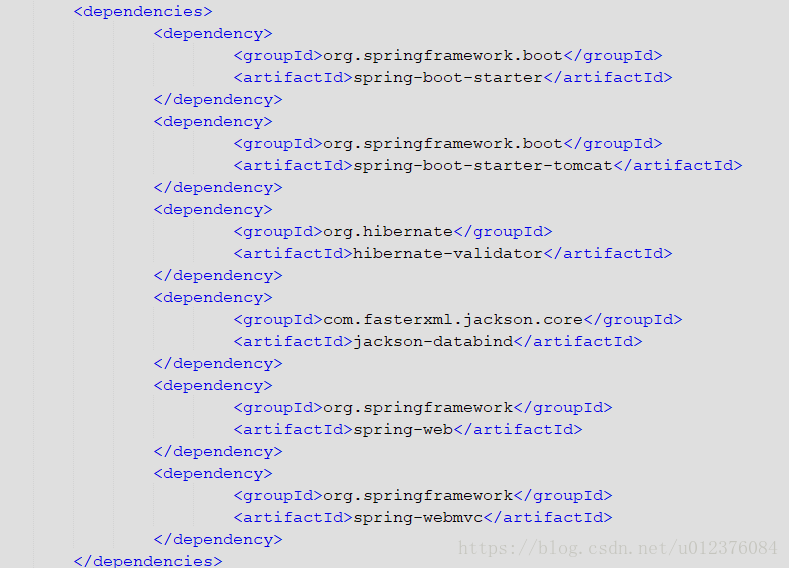
spring-boot-starter-web其依赖如下:
不难发现,它使用Spring构建Web,包括REST,应用程序MVC。使用Tomcat作为默认嵌入式容器。
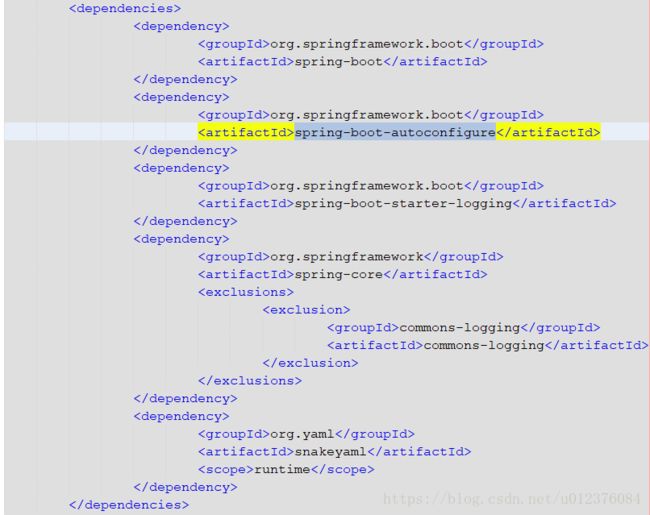
再看spring-boot-starter的依赖,如下:
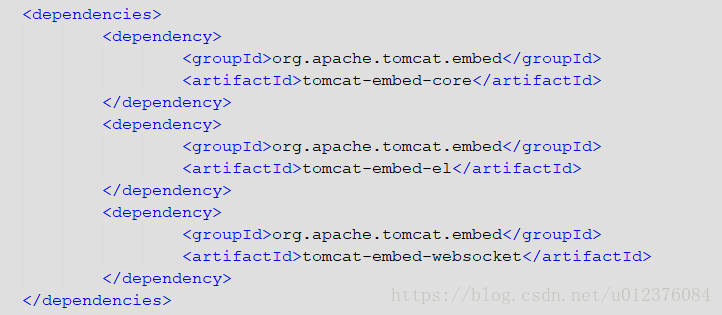
spring-boot-starter-tomcat的依赖:
上面几个依赖,主要是springboot便利的自动配置与嵌入tomcat。
如何快速方便的利用springboot嵌入其他套件呢
1.嵌入JPA,数据库用mysql
新建文件如下:
UserRespotory.java(这里不能写成内部类,所以新建了个子包respository,这样才能被spring扫描到)
package com.mrb.springboot.demo.respository;

import com.mrb.springboot.demo.DemoApplication;
import org.springframework.data.jpa.repository.JpaRepository;

/**
 *
 * @author MRB
 */
public interface UserRespotory extends JpaRepository{
}
DemoApplication.java
package com.mrb.springboot.demo;


import com.mrb.springboot.demo.respository.UserRespotory;
import javax.persistence.Column;
import org.springframework.boot.SpringApplication;
import org.springframework.boot.autoconfigure.SpringBootApplication;
import org.springframework.web.bind.annotation.RequestMapping;
import org.springframework.web.bind.annotation.RestController;
import javax.persistence.Entity;
import javax.persistence.Id;
import javax.persistence.Table;
import org.springframework.beans.factory.annotation.Autowired;
import lombok.Data;
/**
 *
 * @author MRB
 */
@SpringBootApplication
public class DemoApplication {
    public static void main(String args[]){
        SpringApplication.run(DemoApplication.class, args);
    }


    @RestController
    static class DemoController{
        @Autowired
        UserRespotory userRespotory;

        @RequestMapping("/demo")
        public String helloWord(){

            return userRespotory.getOne(1).toString();
        }
    }


    @Data
    @Entity
    @Table(name = "tb_user")
    public  static class User{
        @Id
        @Column(name="id")
        private Integer id;
        @Column(name="name")
        private String name;

    }
}
application.properties
server.port=8090
##数据库配置
spring.datasource.driverClassName=com.mysql.jdbc.Driver
spring.datasource.url=jdbc:mysql://localhost:3306/test?characterEncoding=UTF-8
spring.datasource.username=root
spring.datasource.password=root
pom.xml
    4.0.0
    com.mrb
    springboot-demo
    1.0-SNAPSHOT
    jar


            org.springframework.boot
            spring-boot-starter-web
            1.5.15.RELEASE


            org.springframework.boot
            spring-boot-starter-data-jpa
            1.5.15.RELEASE


            mysql
            mysql-connector-java
            5.1.47
            runtime


            org.eclipse.persistence
            javax.persistence
            2.1.0
            jar


            org.projectlombok
            lombok
            1.16.18
            jar
数据库
CREATE TABLE `tb_user` (
  `id` int(11) NOT NULL,
  `name` varchar(20) DEFAULT NULL,
  PRIMARY KEY (`id`)
) ENGINE=InnoDB DEFAULT CHARSET=utf8;
INSERT INTO `tb_user` (`id`, `name`) VALUES ('1', 'MRB');
效果:
2.嵌入redis
DemoApplication.java
  //之前的不变
    ...
    @RestController
    static class DemoController{
        //之前的不变
        ...

        @Autowired
        StringRedisTemplate stringRedisTemplate;

        @RequestMapping("/redis-get")
        public String redisCache(){
            return stringRedisTemplate.opsForValue().get("1");
        }
     }
//都不变
...
application.properties
...
# Redis数据库索引(默认为0)
spring.redis.database=0
spring.redis.host=localhost
spring.redis.port=6379
pom.xml
        ...


            org.projectlombok
            lombok
            1.16.18
            jar
用redis客户端添加数据
效果:


