启动第一个pod项目
1、拉取服务器上的代码
[root@master code]# svn checkout https://192.168.0.167/svn/front .2、编译代码
[root@master code]# mvn install
[INFO] Scanning for projects...
[WARNING]
。。。。。。。。。。。。。。。。。。。。。

[INFO] ------------------------------------------------------------------------
[INFO] BUILD SUCCESS
[INFO] ------------------------------------------------------------------------
[INFO] Total time: 26.383 s
[INFO] Finished at: 2020-08-27T17:12:31+08:00
[INFO] Final Memory: 38M/313M
[INFO] ------------------------------------------------------------------------
3、编写dockerfile文件,文件内容如下
[root@master images]# cat Dockerfile
FROM java:8

VOLUME /app

COPY gxzx_atc_web-0.0.1-SNAPSHOT.jar atc-web.jar

RUN ln -sf /usr/share/zoneinfo/Asia/Shanghai /etc/localtime
RUN echo 'Asia/Shanghai' >/etc/timezone

RUN bash -c "touch /atc-web.jar"
EXPOSE 8020
ENTRYPOINT ["java","-Djava.security.egd=file:/dev/./uranedom","-jar","-Dspring.config.location=/config","-Dspring.profiles.active=docker-linux", "-Duser.timezone=GMT+08", "/atc-web.jar"]
4、打镜像
[root@master images]# cp ../code/target/gxzx_atc_web-0.0.1-SNAPSHOT.jar .
[root@master images]# ls
Dockerfile  gxzx_atc_web-0.0.1-SNAPSHOT.jar
[root@master images]# docker build -t otc-web:v1.0.0 .
Sending build context to Docker daemon  75.54MB
Step 1/8 : FROM java:8
 ---> d23bdf5b1b1b
Step 2/8 : VOLUME /app
 ---> Using cache
 ---> 2ba1956e68fa
Step 3/8 : COPY gxzx_atc_web-0.0.1-SNAPSHOT.jar atc-web.jar
 ---> 10f349221863
Step 4/8 : RUN ln -sf /usr/share/zoneinfo/Asia/Shanghai /etc/localtime
 ---> Running in 0ac2e1fa8964
Removing intermediate container 0ac2e1fa8964
 ---> 0bf04c5387e1
Step 5/8 : RUN echo 'Asia/Shanghai' >/etc/timezone
 ---> Running in 8d5255c8389e
Removing intermediate container 8d5255c8389e
 ---> f0e71e60e60e
Step 6/8 : RUN bash -c "touch /atc-web.jar"
 ---> Running in 34db7c3b465d
Removing intermediate container 34db7c3b465d
 ---> 443d43a1954a
Step 7/8 : EXPOSE 8020
 ---> Running in a6198a8a161e
Removing intermediate container a6198a8a161e
 ---> 9f5952689cf6
Step 8/8 : ENTRYPOINT ["java","-Djava.security.egd=file:/dev/./uranedom","-jar","-Dspring.config.location=/config","-Dspring.profiles.active=docker-linux", "-Duser.timezone=GMT+08", "/atc-web.jar"]
 ---> Running in 8831b9203e22
Removing intermediate container 8831b9203e22
 ---> 9bc59d6ad830
Successfully built 9bc59d6ad830
Successfully tagged atc-web:v1.0.0

[root@master images]# docker images |grep atc-web
atc-web                                                                        v1.0.0              9bc59d6ad830        2 minutes ago       794MB
5、将我们的image推送到自己搭建的harbor上
(如果不推送的话记得将镜像上传到其他的两个节点机器上防止本地没有镜像而报错)
[root@master images]# docker tag atc-web:v1.0.0 registry.yunson.com/gridcloud/atc-web:v1.0.0
[root@master images]# docker push registry.yunson.com/gridcloud/atc-web:v1.0.0
The push refers to repository [registry.yunson.com/gridcloud/atc-web]
9f5f06fbe50a: Pushed
00c9bd7ec6d8: Pushed
5b0c841d680a: Pushed
453108b1435e: Pushed
35c20f26d188: Mounted from gridcloud/organization
c3fe59dd9556: Mounted from gridcloud/organization
6ed1a81ba5b6: Mounted from gridcloud/organization
a3483ce177ce: Mounted from gridcloud/organization
ce6c8756685b: Mounted from gridcloud/organization
30339f20ced0: Mounted from gridcloud/organization
0eb22bfb707d: Mounted from gridcloud/organization
a2ae92ffcd29: Mounted from gridcloud/organization
v1.0.0: digest: sha256:aa7b08765923c7d9dc9cff2822cba9a0f93074d13ad96562d46bb18f4d7b6939 size: 2838
6、使用目录方式创建configmap
[root@master atc-config]# ls
application.yml
[root@master atc-config]# kubectl create configmap atc-config --from-file=/root/atc/images/atc-config/
configmap/atc-config created

[root@master otc-config]# kubectl get cm|grep atc
atc-config                  1      15s
7、编写项目yaml文件
apiVersion: apps/v1
kind: Deployment
metadata:
  name: atc-web
  labels:
    name: atc-web

spec:
  replicas: 1
  selector:
    matchLabels:
      app: atc-web
  template:
    metadata:
      labels:
        app: atc-web
    spec:
      containers:
        - name: atc-web
          image: registry.yunson.com/gridcloud/atc-web:v1.0.0
          #imagePullPolicy: Never
          imagePullPolicy: IfNotPresent
          ports:
            - containerPort: 8080
              protocol: TCP
          volumeMounts:
          - name: tz-config
            mountPath: /etc/localtime
          - name: atc-web-config
            mountPath: /config

      volumes:
      - name: tz-config
        hostPath:
          path: /usr/share/zoneinfo/Asia/Shanghai
      - name: atc-web-config
        configMap:
          name: atc-config          #定义configmap名称

---
kind: Service
apiVersion: v1
metadata:
  name: atc-web-service
spec:
  selector:
    app: atc-web # 这个地方是app名称而不是node
  ports:
    - port: 8080
      targetPort: 8080
      nodePort: 31079
  type: NodePort
8、创建第一个pod
[root@master images]# kubectl create  -f atc-web.yaml
deployment.apps/atc-web created
service/atc-web-service created
如上没有推送镜像到镜像仓库的配置yaml文件查出结果出现如下
[root@master images]# kubectl get pods |grep atc
atc-web-775598dc6c-jfgtr             0/1     ErrImageNeverPull   0          40s
解决问题方法:
将imagePullPolicy的值改成 IfNotPresent然后将镜像推送到我们的镜像仓库
imagePullPolicy: IfNotPresent然后再重启pod
[root@master images]# kubectl replace --force -f atc-web.yaml
deployment.apps "atc-web" deleted
service "atc-web-service" deleted
deployment.apps/atc-web replaced
service/atc-web-service replaced
8.查看pod的状态
[root@master images]# kubectl get pod -o wide
NAME                      READY   STATUS        RESTARTS   AGE   IP            NODE    NOMINATED NODE   READINESS GATES
atc-web-bd44d94f8-l7t6d   1/1     Running       0          14m   10.244.1.81   node1
9、查询deployment的状态
[root@master images]# kubectl get deployment -o wide
NAME      READY   UP-TO-DATE   AVAILABLE   AGE   CONTAINERS   IMAGES                                         SELECTOR
atc-web   1/1     1            1           15m   atc-web      registry.yunson.com/gridcloud/otc-web:v1.1.1   app=atc-web
10、查询服务状态
[root@master images]# kubectl get svc -o wide |grep atc
atc-web-service             NodePort    10.109.32.158           8080:31079/TCP   12m    node=atc-web
11、查询pod的状态信息
[root@master images]# kubectl describe pod atc-web-bd44d94f8-l7t6d
Name:         atc-web-bd44d94f8-l7t6d
Namespace:    default
Priority:     0
Node:         node1/192.168.0.154
Start Time:   Fri, 28 Aug 2020 20:48:28 +0800
Labels:       app=otc-web
              pod-template-hash=bd44d94f8
Annotations:
Status:       Running
IP:           10.244.1.81
IPs:
  IP:           10.244.1.81
Controlled By:  ReplicaSet/otc-web-bd44d94f8
Containers:
  otc-web:
    Container ID:   docker://1f37aa82169f3e5e11f1302228c65867cebdcdee0264a8c43268181d317ac345
    Image:          registry.yunson.com/gridcloud/otc-web:v1.1.1
    Image ID:       docker-pullable://registry.yunson.com/gridcloud/otc-web@sha256:010a554294bc82dbc30ef8a27d2220cfb5b9dd16c657d44e229bf28fd44768ed
    Port:           8080/TCP
    Host Port:      0/TCP
    State:          Running
      Started:      Fri, 28 Aug 2020 20:48:30 +0800
    Ready:          True
    Restart Count:  0
    Environment:
    Mounts:
      /config/ from otc-web-config (rw)
      /etc/localtime from tz-config (rw)
      /var/run/secrets/kubernetes.io/serviceaccount from default-token-lvzkd (ro)
Conditions:
  Type              Status
  Initialized       True
  Ready             True
  ContainersReady   True
  PodScheduled      True
Volumes:
  tz-config:
    Type:          HostPath (bare host directory volume)
    Path:          /usr/share/zoneinfo/Asia/Shanghai
    HostPathType:
  atc-web-config:
    Type:      ConfigMap (a volume populated by a ConfigMap)
    Name:      atc-config
    Optional:  false
  default-token-lvzkd:
    Type:        Secret (a volume populated by a Secret)
    SecretName:  default-token-lvzkd
    Optional:    false
QoS Class:       BestEffort
Node-Selectors:
Tolerations:     node.kubernetes.io/not-ready:NoExecute for 300s
                 node.kubernetes.io/unreachable:NoExecute for 300s
Events:
  Type    Reason     Age   From               Message
  ----    ------     ----  ----               -------
  Normal  Scheduled  14m   default-scheduler  Successfully assigned default/atc-web-bd44d94f8-l7t6d to node1
  Normal  Pulled     14m   kubelet, node1     Container image "registry.yunson.com/gridcloud/atc-web:v1.1.1" already present on machine
  Normal  Created    14m   kubelet, node1     Created container atc-web
  Normal  Started    14m   kubelet, node1     Started container atc-web
12、查询服务信息
[root@master images]# kubectl describe svc atc-web
Name:                     atc-web-service
Namespace:                default
Labels:
Annotations:
Selector:                 node=atc-web
Type:                     NodePort
IP:                       10.109.32.158
Port:                       8080/TCP
TargetPort:               8080/TCP
NodePort:                   31079/TCP
Endpoints:
Session Affinity:         None
External Traffic Policy:  Cluster
Events:
13、注意一个问题,出现问题情况,我们通过内网可以访问
curl http://10.244.1.81:8080/swagger-ui.html,但是当我们使用服务器IP地址访问时我们则无法访问
出现问题的原因是因为我们在编写yaml文件时的ENDPOINTS对应的值为空
[root@master ~]# kubectl get endpoints
NAME                        ENDPOINTS            AGE
kubernetes                  192.168.0.155:6443   127d
atc-web-service                            74s
解决办法:
修改我们的yaml配置文件service部分,下面注释部分是我们编写错误的部分
kind: Service
apiVersion: v1
metadata:
  name: atc-web-service
spec:
  selector:
   #node: atc-web
    app: atc-web
重启我们的pod
[root@master images]# kubectl replace --force -f atc-web.yaml
deployment.apps "atc-web" deleted
service "atc-web-service" deleted
deployment.apps/atc-web replaced
service/atc-web-service replaced
14、此时查看我们的endpoint结果如下
[root@master ~]# kubectl get endpoints
NAME                        ENDPOINTS            AGE
kubernetes                  192.168.0.155:6443   127d
atc-web-service             10.244.1.90:8080     3s
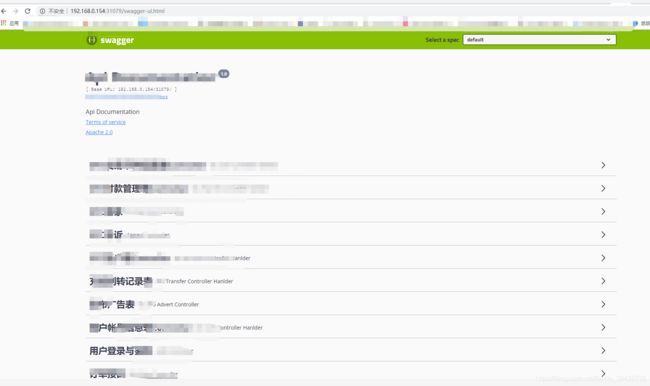
15、最后我们在外网使用服务器IP访问
至此我们的第一个pod已成功运转
当我们一次性启动两个pod时,我们可以查看相关的信息如下
[root@master ~]# kubectl get pod -o wide
NAME                                 READY   STATUS        RESTARTS   AGE     IP             NODE    NOMINATED NODE   READINESS GATES

atc-web-79df8c9bcb-hzzc9             1/1     Running       0          6s      10.244.2.133   node2
atc-web-79df8c9bcb-xcng8             1/1     Running       0          6s      10.244.1.91    node1


[root@master ~]# kubectl get endpoints
NAME                        ENDPOINTS                            AGE
kubernetes                  192.168.0.155:6443                   127d
atc-web-service             10.244.1.91:8080,10.244.2.133:8080   30s
16、将CLUSTER-IP换成固定的IP
更改service 的yaml文件如下
spec:
  clusterIP: 10.108.124.235
重启pod,如下我们可以看到我们的service
[root@master images]# kubectl get svc -o wide
NAME                        TYPE        CLUSTER-IP       EXTERNAL-IP   PORT(S)          AGE    SELECTOR
kubernetes                  ClusterIP   10.96.0.1                443/TCP          127d
atc-web-service             NodePort    10.108.124.235           8080:31079/TCP   5s     app=atc-web
