ffmpeg-virtual studio编译+MinGW编译
文章目录
- virtual studio编译
- 1.自动下载依赖库
- 2.下载汇编依赖库
- 3.其他手工下载依赖库
- 4.编译所有项目
- MinGW+MSYS编译
- 环境搭建
- msys操作说明
- 开始编译
- FFmpeg测试
- 验证FFmpeg的configuration
virtual studio编译
参考:https://github.com/ShiftMediaProject/FFmpeg
环境:win10 vs2013 update5
1.自动下载依赖库
先git clone下源码,然后切换到FFmpeg\SMP下,右击打开git bash,将project_get_dependencies.bat拖入到git bash并回车运行,运行后会自动把依赖库下载到FFmpeg文件夹的同一层目录。
hgy413@DESKTOP-KHL137I MINGW64 /g/音视频/Project/VSFFmpeg/VS/FFmpeg/SMP (master)
$ /g/音视频/Project/VSFFmpeg/VS/FFmpeg/SMP/project_get_dependencies.bat
bzip2: Existing folder not found. Cloning repository...

fontconfig: Existing folder not found. Cloning repository...
fontconfig: Found additional dependencies...

freetype2: Existing folder not found. Cloning repository...

libiconv: Existing folder not found. Cloning repository...
......
之后点击FFmpeg\SMP\ffmpeg_deps.sln打开工程,默认是使用vs2013。
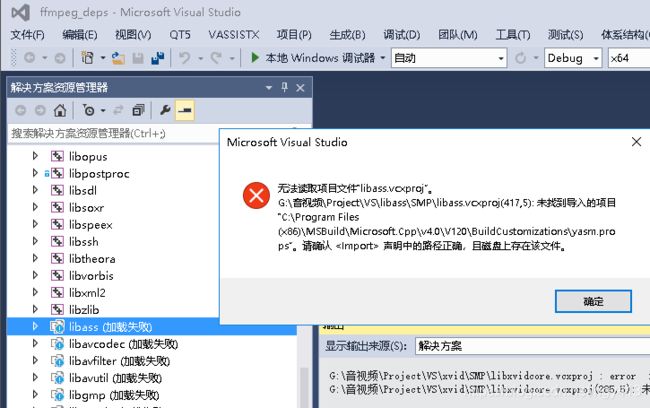
正常状态下,会显示部分工程项目加载失败(右键选择重新加载项目会出现如下弹框):
2.下载汇编依赖库
为了提高效率,ffmpeg作者使用了汇编指令,因此需要安装两个vs的扩展:
额外下载VSNASM和VSYASM到FFmpeg文件夹的同一层目录。
分别打开文件夹,以管理员权限在cmd下运行安装脚本install_script.bat,如下所示。
G:\音视频\Project\VSFFmpeg\VS\VSNASM>install_script.bat
Detected 64 bit system...
Visual Studio 2013 environment detected...
Installing build customisations...
Downloading required NASM release binary...
Installing required NASM release binary...
Finished Successfully
脚本会把生成的nasm.exe和yasm.exe剪切到C:\Program Files (x86)\Microsoft Visual Studio 12.0\VC\下。
再次点击FFmpeg\SMP\ffmpeg_deps.sln打开工程,所有工程均可以正常加载。
3.其他手工下载依赖库
根据FFmpeg\SMP\readme.txt的说明:
However the following is a list of extra dependency options that require external downloads:
    1) opengl (requires glext)
		a) Download glext.h and wglext.h from opengl.org.
		b) Save the header files into "OutputDir/include/gl/*".
    2) ffnvcodec (requires nv-codec-headers)
        a) Download the nv-codec-headers repository from https://github.com/FFmpeg/nv-codec-headers
        b) Save the contents of the nv-codec-headers repositories "include" folder into "OutputDir/include/*".
    3) AMF (requires Advanced Media Framework (AMF) SDK headers)
        a) Download the AMF repository from https://github.com/GPUOpen-LibrariesAndSDKs/AMF
        b) Save the contents of the AMF repositories "amf/public/include" into "OutputDir/include/AMF/*".

*OutputDir is the "Output Directory" specified in the project properties.
The default value of OutputDir is "..\..\msvc" relative to the FFmpeg source directory. An example of the expected
directory structure is:
    -  msvc          (OutputDir)
    -> source
        - FFmpeg
        - ..Any other libraries source code..
在FFmpeg的上层建一个msvc的文件夹
-
[opengl (requires glext)][提取码
rjfr]
提取glext.h和wglext.h文件放在msvc/include/gl/目录下 (在链接处右键下载保存即可)。 -
ffnvcodec
将nv-codec-headers\include\ffnvcodec文件夹放到msvc/include/目录下。 -
AMF
将AMF\amf\public\include下的全部内容拷贝到msvc/include/AMF目录下。
4.编译所有项目
全部编译,可能会有以下错误:
error C2054: 在“inline”之后应输入“(” (..\lib\driver\_cdio_generic.c
wikipedia解释:
C++,C99和GNU C都支持内联函数,然而1989 ANSI C,这个最被广泛使用的C标准却不支持inline。
解决方案:
1.在该头文件中加入
#if defined(WIN32) && !defined(__cplusplus)
#define inline __inline
#endif
2.将.c文件改名为.cpp文件。
3>libavfilterd.lib(nanoftp.obj) : error LNK2019: 无法解析的外部符号 snprintf,该符号在函数 xmlNanoFTPConnect 中被引用
解决方案:
在头文件中加入:
#if _MSC_VER < 1900
#define snprintf _snprintf
#endif
目前编译就遇到过此两个问题,至此,编译通过。
MinGW+MSYS编译
MinGW是Minimalist GNU for Windows的缩写,它提供了一系列的工具链来辅助编译Windows的本地化程序,它的详细介绍和安装方法可以参照http://www.mingw.org
MinGW-w64单独使用起来会比较麻烦,但是其可以与MSYS环境配合使用,MSYS是一个仿生UNIX环境的Windows工具集,它的详细介绍和使用方法可以参照http://www.mingw.org/wiki/MSYS。
环境搭建
(1).MinGW:(32位)(64位)下载并安装到C:\MinGW。使用32位的MinGW会最终生成32位的ffmpeg.exe
安装完后会弹出MinGW Installation Manager,这里选择Basic Setup中的所有项进行安装。
(2).由于打算用MSVC++编译程序,所以需要有.lib文件才能链接到FFmpeg的库,这些.lib文件可以使用微软的工具链中lib命令产生。为此,机器上必须已经安装了Visual Studio或是Visual C++。
进入mingw安装目录下:C:\MinGW\msys\1.0找到msys.bat文件,选择文本进行编辑,在最前边加上一行:
call "C:\Program Files (x86)\Microsoft Visual Studio 12.0\VC\bin\vcvars32.bat"
把路径替换成机器上vcvars32.bat实际存在的路径。
(3).执行完上面操作后,将MinGW和MSYS的bin目录添加到系统变量Path中:
打开cmd输入 gcc --version 测试是否配置OK:
C:\Users\hgy413>gcc --version
gcc (MinGW.org GCC-6.3.0-1) 6.3.0
Copyright (C) 2016 Free Software Foundation, Inc.
This is free software; see the source for copying conditions.  There is NO
warranty; not even for MERCHANTABILITY or FITNESS FOR A PARTICULAR PURPOSE.
(4).将 C:/MinGW/msys/1.0/bin/下的link.exe 删掉或者更改文件名,这里改为link-minggw.exe。
为了防止和vs自带的link冲突,编译完
FFMPEG之后,记得改回来,恢复为link.exe
(5).下载pkg-config-0.23-2.zip将pkg-config.exe复制到C:\MinGW\bin。下载glib_2.18.4-1_win32.zip ,将libglib-2.0-0.dll复制到C:\MinGW\bin。
(6).配置pkg-config,用notepad++打开C:\MinGW\msys\1.0\etc\profile文件.在
if [ $MSYSTEM == MINGW32 ]; then
.....
fi
后面添加下面的环境变量设置:
if [ -z "$PKG_CONFIG" ]; then
export PKG_CONFIG=C:/MinGW/bin/pkg-config.exe
fi

if [ -z "$PKG_CONFIG_PATH" ]; then
export PKG_CONFIG_PATH=MinGW/lib/pkgconfig:/usr/local/lib/pkgconfig
fi
这时,可以做以下测试:
$ echo $PKG_CONFIG
C:/MinGW/bin/pkg-config.exe
hgy413@YYINC ~
$ echo $PKG_CONFIG_PATH
MinGW/lib/pkgconfig:/usr/local/lib/pkgconfig
(7).默认编译FFmpeg的时候,需要用到yasm汇编器对FFmpeg中的汇编部分进行编译。可以使用--disable-yasm来取消yasm编译配置,不过这么做的话就不会编译FFmpeg的汇编代码部分,相关的优化也会少一些。如果需要支持汇编优化,那么可以通过安装yasm汇编器来解决:
YASM:http://yasm.tortall.net/Download.html
我本机为64位, 所以下载的是 Win64.exe (for general use on 64-bit Windows) 如果是32位系统请下载32位的程序。
将下载好的yasm-1.3.0-win64.exe 或者 yasm-1.3.0-win32.exe 修改为 yasm.exe,拷贝到MinGW下的bin目录下。
(8).支持旧版FFplay(新版可以忽略)
下载SDL用于支持FFPlay编译。
下载SDL的源码包,解压到E:\SDL-1.12.15目录,进入SDL目录,依次执行
./configure -–prefix=/usr/local/SDL
make
make install
编译结果在:C:\MinGW\msys\1.0\local 目录下。
也可以从SDL v1.2.15下载,选择SDL-devel-1.2.15-mingw32.tar.gz。
自己编译或直接使用编译好的都需要做下面的修改和拷贝工作:
1.打开C:\MinGW\msys\1.0\local\bin下的sdl-config文件,把prefix=/usr/local/SDL改成prefix=/c/mingw/。
2. 为了编译时msys能识别sdl并开启 SDL support yes 进行编译,执行以下拷贝:\local\SDL\include\SDL拷到C:\MinGW\include\SDL,local\SDL\lib拷到C:\MinGW\lib,local\SDL\bin拷到C:\MinGW\bin。
(9).支持新版FFplay(旧版可以忽略)
下载[SDL]
解压SDL2-devel-2.0.5-mingw.tar.gz,选择i686-w64-mingw32这个子目录下的。一定要选择的是i686的,而不是x86那个,否则ffplay就出不来。
1.为了编译时msys能识别sdl2执行以下拷贝:i686-w64-mingw32\include\SDL2拷到C:\MinGW\include\SDL2,i686-w64-mingw32\lib拷到C:\MinGW\lib,i686-w64-mingw32\bin拷到C:\MinGW\bin,i686-w64-mingw32\share\aclocal拷到C:\MinGW\share\aclocal。
2.把C:\MinGW\bin\sdl2-config以及C:\MinGW\lib\pkgconfig\sdl2.pc的头部改成:
#!/bin/sh
SDL_MAJOR_VERSION=2
SDL_MINOR_VERSION=0
SDL_PATCHLEVEL=5
prefix=/c/mingw/
exec_prefix=${prefix}
exec_prefix_set=no
libdir=${exec_prefix}/lib
includedir=${prefix}/include/SDL2
我们可以通过运行pkg-config --cflags --libs sdl2来检验sdl2.pc:
$ pkg-config --cflags --libs sdl2
-Dmain=SDL_main -IC:/MinGW/include/SDL2  -mwindows -LC:/MinGW/lib -lmingw32 -lSDL2main -lSDL2
因为ffplay在旧版本时依赖于SDL-1.2,而在新版本时依赖于SDL-2.0,需要安装对应的SDL才能生成ffplay。
在FFmpeg源码目录执行完./configure后,支持的选项可以在FFmpeg\config.h中查看,而错误可以在FFmpeg\ffbuild\config.log(Asii码)中查找,比如sdl2的错误:
No package 'sdl2' found
Package sdl2 was not found in the pkg-config search path.
Perhaps you should add the directory containing `sdl2.pc'
to the PKG_CONFIG_PATH environment variable
msys操作说明
双击C:\MinGW\msys\1.0\bin\msys.bat启动msys,这时会出现一个命令行窗口,它是一个运行着bash的rxvt程序.
使用这个shell时需要注意:
1.目录名使用正斜杠来分割,而不是Windows所使用的反斜杠(比如说要写成"D:/ffmpeg"而不是"D:\ffmpeg")。
2.盘符(例如"C:")可以从根目录处访问(像这样"/C/")。
3.文件名或目录名中如果带有空格,必须用双引号括起(例如这样"/C/Program Files",带有双引号)。
开始编译
注意使用原生的代码,使用 https://github.com/FFmpeg/FFmpeg 的代码。
1)进入FFmpeg源码目录,执行“./configure”,如果一切正常,我们会看到如下信息:
静态库:./configure --enable-static --toolchain=msvc --prefix=./vs2013_build
动态库:./configure --enable-shared --toolchain=msvc --prefix=./vs2013_build
hgy413@DESKTOP-KHL137I /G/MinGW/FFmpeg
$  ./configure --enable-static --toolchain=msvc --prefix=./vs2013_build
install prefix            ./vs2013_build
source path               .
C compiler                gcc
C library                 mingw32
ARCH                      x86 (generic)
.....
注意,这个命令回车后等待时间是很久的,要有耐心,另外要加上
--toolchain=msvc,我编译了两份,一份没有带--toolchain=msvc,结果下面的FFmpegTest总是报无法解析的外部符号 ___divdi3
其它配置选项参照./configure --help
之后执行make all,可能被提示以下错误:
错误1:
hgy413@YYINC /G/AudioX/Project/MinGWFFmpeg/FFmpeg
$ make all
ffbuild/common.mak:174: *** missing separator.  Stop.
在FFmpeg目录下打开GIT bash,执行:
hgy413@YYINC MINGW64 /g/AudioX/Project/MinGWFFmpeg/FFmpeg (master)
$ git config --global core.autocrlf false
.....
$ git rm --cached -r .
....
$ git reset --hard
错误2:
libavformat/os_support.c:194:10: error: 'ERROR_NOT_ENOUGH_MEMORY' undeclared (first use in this function)
参考文章 https://stackoverflow.com/questions/49572350/a-strange-error-undeclared-error-not-enough-memory-occurred-while-i-compling 解决,内容如下:
In win10, many error code definitions, include ERROR_NOT_ENOUGH_MEMORY, are written in winerror.h.
Add winerror.h header in your os_support.h will solve the problem..
也就是在FFmpeg\libavformat\os_support.h的开始加上#include "winerror.h"即可。
最后执行 make install , 会把相关文件拷贝到FFmpeg\vs2013_build文件夹中。
FFmpeg测试
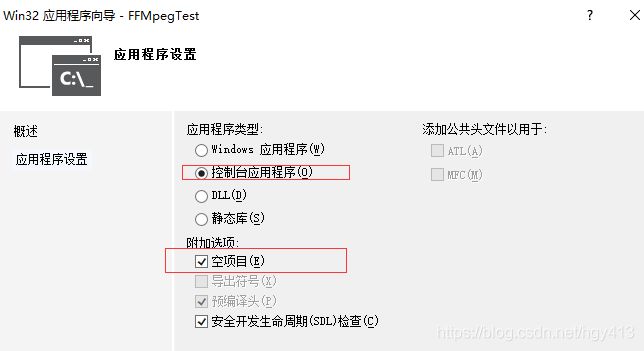
我们来用vs2013建立一个win32测试工程,就叫FFmpegTest,空项目
- 建一个
Main.cpp,将FFmpeg\doc\examples\metadata.c的内容拷贝到Main.cpp。 - 在
C\C++》常规》附加包含目录中填入G:\MinGW\FFmpeg\vs2013_build\include(前面指定的–prefix=./vs2013_build)。 - 在
链接器》常规》附加库目录中填入G:\MinGW\FFmpeg\vs2013_build\lib(同2) - 因为是.c文件转到.cpp文件,所以
#include
#include
改为
extern "C"{
#include
#include
}
- 此时编译会提示错误:
无法解析的外部符号 _av_dict_get无法解析的外部符号 _avformat_open_input,右击可以发现av_dict_get函数位于
同理分析avformat_open_input即在libavutil和libavformat文件夹下,即包含libavutil.a+libavformat.a文件。同时结合MSDN分析,我们在链接器》输入》附加依赖项中填入ws2_32.lib;Secur32.lib;Bcrypt.lib;libavcodec.a;libavdevice.a;libavfilter.a;libavformat.a;libavutil.a;libswresample.a;libswscale.a;
5.再次编译,会提示error LNK2005: __invoke_watson 已经在 MSVCRTD.lib(MSVCR120D.dll) 中定义
在链接器》输入》忽略特定默认库中填入msvcrtd.lib
编译通过,测试结果如下:
验证FFmpeg的configuration
./ffmpeg.exe -h
$ ./ffmpeg.exe -h
ffmpeg version 4.1.git Copyright (c) 2000-2018 the FFmpeg developers
  built with msvc
  configuration: --enable-gpl --enable-version3 --enable-bzlib --enable-iconv --enable-lzma --enable-sdl2
  --enable-zlib --enable-avisynth --enable-libmp3lame --enable-libvorbis --enable-libspeex --enable-libopus
  --enable-libilbc --enable-libtheora --enable-libx264 --enable-libx265 --enable-libxvid --enable-libvpx
  --enable-libgme --enable-libmodplug --enable-libsoxr --enable-libfreetype --enable-fontconfig
  --enable-libfribidi --enable-libass --enable-libxml2 --enable-gnutls --disable-schannel --enable-gcrypt
  --enable-libssh --enable-libcdio --enable-libbluray --enable-opengl --enable-libmfx --enable-ffnvcodec
  --enable-cuda --enable-amf --toolchain=msvc
  libavutil      56. 24.101 / 56. 24.101
  libavcodec     58. 41.102 / 58. 41.102
  libavformat    58. 23.102 / 58. 23.102
  libavdevice    58.  6.101 / 58.  6.101
  libavfilter     7. 46.101 /  7. 46.101
  libswscale      5.  4.100 /  5.  4.100
  libswresample   3.  4.100 /  3.  4.100
  libpostproc    55.  4.100 / 55.  4.100
参考:
https://blog.csdn.net/tanningzhong/article/details/76576647
https://blog.csdn.net/xinpo66/article/details/80616204
https://blog.csdn.net/qq_36113711/article/details/72778496
https://blog.csdn.net/L_Andy/article/details/78160676
https://blog.csdn.net/rOokieMonkey/article/details/78689728
https://blog.csdn.net/Rxiang12/article/details/83653239
https://www.cnblogs.com/dwdxdy/p/3625766.html
https://www.cnblogs.com/tocy/p/windows_mingw_compile_ffmpeg_with_ffplay.html
https://blog.csdn.net/leixiaohua1020/article/details/12755173
https://blog.csdn.net/qq_36113711/article/details/72778496


