基于airtest的安卓ui自动化实践
在tester home上初识airtest感觉很惊艳,最近想给组里的同学分享一下,仔细研究了一番。分享之后,发现他们练习做的还很不错。
莫非我真的有教书育人的能力?(天真脸)
分为四个部分讲解:airtest简介,airtest安卓上的应用(分airtest和poco),参考示例,ui自动化方案。
airtest简介
- 网易内部工具团队研发
- 跨平台ui自动化框架,适用游戏与app
- 基于图像识别和poco控件识别
支持
- web
- windows
- android
- ios
- 游戏
airtest在安卓上的应用
1.连接
airtest与手机连接有三种方式:USB,无线连接,代码连接
无线连接的步骤:
1.手机通过usb连接电脑,查看手机ip: adb shell ifconfig wlan0 或者直接在手机上看
2.指定tcpip端口号: adb tcpip 端口号 (端口号可随便定义,不冲突就行)
3.拔掉手机usb连接
4.在cmd命令行输入:adb connect 手机ip:端口号(刚才指定)
5.连接成功后,可输入adb devices 查看到
6.在airtest ide右侧远程连接中输入 adb connect 手机ip:端口号 ,然后在设备列表中,点击connect
代码连接的格式:
格式:connect_device("Android://")
括号中格式:Android://adbhost:adbport/serialno
如:connect_device("Android://127.0.0.1:5037/c78886cd")
2.airtest-android的常用方法
1)获取apk 包名
adb shell 或者 adb –s 设备号(通过adb devices可以看到的) shell
pm list packages
可加过滤 pm list packages |grep ala
2)打开apk
start_app('package_name')
3)关闭apk
stop_app('package_name')
4)touch
按压,对象可以是图片或者坐标,参数可根据需要修改,默认一次,相当于点击

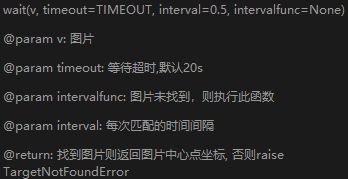
5)wait
对象是图片,等待某图片出现。找到图片则返回图片中心点坐标,否则超时后抛出异常
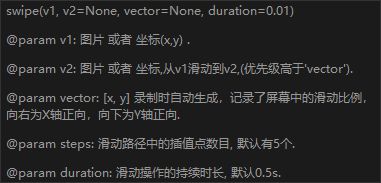
6)swip
滑动,对象为两个,分别是滑动起点和重点的图片或坐标,或者选用参数VECTOR
7)exists
对象是图片,判断图片是否存在,存在则返回图片中心点坐标,否则返回False

8)text
文本输入

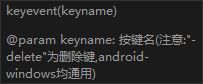
9)keyevent(这个是需要注意下的)
可输入,需要按下的键盘内容,与adb shell input keyevent的值一致
如:keyevent(“KEYCODE_3”) 输入数字3
https://blog.csdn.net/chen825919148/article/details/18732041
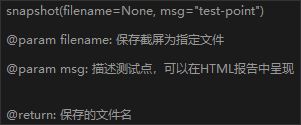
10)snapshot 截图
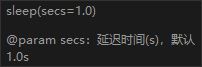
11)sleep
延迟时间,默认1秒
12)assert_exists
对象为图片,判定图片存在,如果存在则返回图片中心点坐标,否则抛出异常

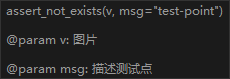
13)assert_not_exists
判定图片不存在,断言失败时抛出异常
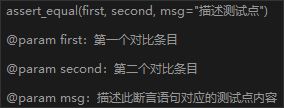
14)assert_equal
断言两个值相同
15)assert_not_equal
断言两个值不相同

以上的这部分是图形识别airtest的部分,下面部分是poco-android部分
POCO
1.Poco是一款基于UI控件搜索的自动化框架,与基于图像识别的Airtest不同的是,
Poco可以使用类似 poco("OK").click() 的方式来获取并操作节点。
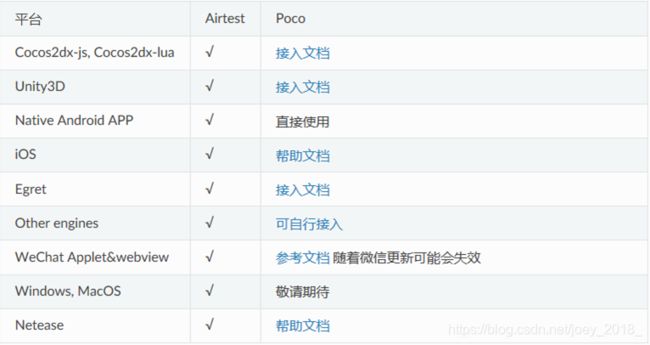
2. Poco在大多数平台中,需要 事先接入Poco-SDK才可正常使用 ,在少数平台
(如Android原生APP)可直接使用Poco,目前支持平台如下:
POCO-ANDROID如何使用?
1.在Poco辅助窗选择android
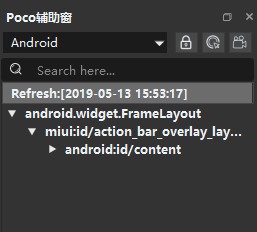
2.弹框提示,选择yes

from poco.drivers.android.uiautomation import AndroidUiautomationPoco
poco = AndroidUiautomationPoco(use_airtest_input=True, screenshot_each_action=False)
3.抓取控件

4.自动生成的语句可能效果并不太理想,通常情况下,我们需要编写一些更复杂的
语句、以及更精确的UI控件选择语句。
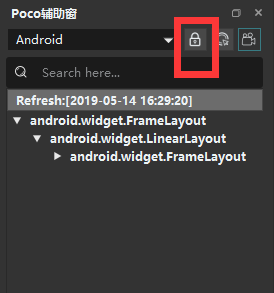
在AirtestIDE中,我们可以通过暂停功能,冻结当前的UI树形结构来精确地检视UI控件;
双击UI树上的节点能自动插入Poco语句,对它们进行更精确的调整可以进一步提升我们脚本的可读性和运行成功率
POCO-ANDROID-UI选择对象
1.基本选择器
在poco实例后加一对括号就可以进行UI选择了。选择器会遍历所有UI,将满足给定条件的UI都
选出来并返回
通过节点名字选择
poco("android.widget.ImageView")
通过名字与属性选择(官网复制Unity3D)
poco('bg_mission', type='Button')
poco(textMatches='^据点.*$', type='Button', enable=True)
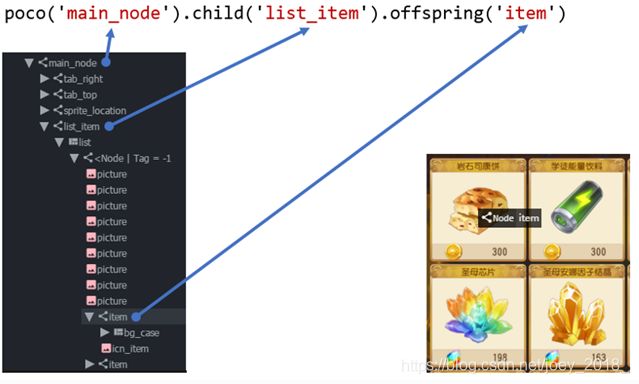
2.相对选择器
直接用节点属性没法选出你所想要的UI时,还可以通过UI之间的渲染层级关系进行选择,例如
父子关系、兄弟关系、祖先后代关系。官网上的截图,这里补充下兄弟选择是sibling,直系是child,其余是后台offspring
poco('main_node').child('list_item').offspring('item')
3.空间顺序选择器
按照序号进行选择总是根据空间排布顺序,先从左到右,再一行一行从上到下。

dl = poco("com.alashow.live:id/rv_video").offspring("android.view.ViewGroup") #这里是一个list,视频列表
dl[1].click()
4.迭代一组对象(还是上面那个视频列表)
dl = poco("com.alashow.live:id/rv_video").offspring("android.view.ViewGroup")
for i in dl:
i.click()
sleep()
poco("com.alashow.live:id/iv_back").click()
POCO-ANDROID操作UI对象的方法
其实与airtest的方法是相似的,只不过前面需要加上poco对象
可参考官方文档:
官方文档:https://poco-chinese.readthedocs.io/zh_CN/latest/source/README.html#tutorials-and-examples
1.Click
poco(text="首页").click()
2.Swipe
joystick = poco('movetouch_panel').child('point_img')
joystick.swipe('up')
joystick.swipe([0.2, -0.2]) 正负代表方向,数值代表幅度
3. Drag_to
与 swipe 不同的是, darg 是从一个UI拖到另一个UI,而 swipe 是将一个UI朝某个方向拖动。
下面例子展示如何使用 drag_to 方法
poco(text='突破芯片').drag_to(poco(text='岩石司康饼'))
4.局部定位
所有UI相关的操作都默认以UI的 anchorPoint 为操作点,如果想自定义一个点那么可以使用
focus 方法。可参考官方文档:坐标系与度量空间
scrollView = poco(type='ScollView')
scrollView.focus([0.5, 0.8]).drag_to(scrollView.focus([0.5, 0.2]))
5.Wait
在给定时间内等待一个UI出现并返回这个UI,如果已经存在画面中了那就直接返回这个UI。
如果超时了还没有出现,同样也会返回,但是调用这个UI的操作时会报错。
类似的操作还有,见 wait_for_appearance
poco('bg_mission').wait(5).click() # wait 5 seconds at most,click once the object appears
poco('bg_mission').wait(5).exists() # wait 5 seconds at most,return Exists or Not Exists
参考示例
1.编写ui自动化脚本时,应保证打开app和关闭app成对使用,这样不会对下一个脚本
产生影响
start_app('com.alashow.live')
stop_app('com.alashow.live')
2.未登录时,打开直播app后,有可能进入两个页面之一:1)直播首页 2)登录页
如何根据进入的不同页面进行相应操作

可观察页面特征,如果底部状态栏存在就是进入了直播首页,
执行操作点击我的,进入登录页,执行后续操作
可以直接使用airtest脚本实现不解释,原理一样poco实现如下
tmp = poco("com.alashow.live:id/view_bottom_bar").exists()
if tmp:
poco("com.alashow.live:id/view_tab_me").click()
3.执行操作验证结果
如执行搜索主播的操作,对结果进行校验

对结果的验证,可以有两种方式:
1.根据封面对某个主播进行验证,利用assert_exists
2.判断搜索出的主播中是否包含搜索的字

第二种方法略微麻烦一点,需结合循环,滑动验证
poco(“com.alashow.live:id/iv_live_rank”).sibling(“android.widget.ImageView”).click() #点击搜索按钮
poco(“com.alashow.live:id/search_src_text”).click() #在搜索栏点击
text(“喵”) #输入需要搜索的”喵”
sleep(3)
#判断没有更多主播啦字样出现
tmp = False
while not tmp:
livelist = poco(“com.alashow.live:id/rv_live_search”).offspring(“com.alashow.live:id/tv_user_name”) #搜索结果直播间列表
for i in livelist: #搜索结果中主播直播间列表
name = i.get_text() #获得主播的昵称
if “喵” in name: #判断”喵”在昵称中则正确
assert_equal(True, True, "名字里含有喵.")
else: #如果”喵”不在昵称中却搜索出来则不正确
assert_equal(False, True, “名字里出现了不含有喵的结果.")
flag = poco(“com.alashow.live:id/rv_live_search”).sibling(“android.widget.TextView”).exists() #判断底部控件
if flag:
tips = poco("com.alashow.live:id/rv_live_search").sibling("android.widget.TextView").get_text()
if “没有更多主播” in tips: #如果是没有更多主播啦则结束
tmp = True
poco("com.alashow.live:id/rv_live_search").swipe([0,-0.6])
sleep(2)
4.验证数值的正确性
送礼后验证1.送礼跑道,2.送礼后扣费

start_app('com.alashow.live')
sleep(10)
#验证送礼
#获得直播间列表
liveroom = poco("com.alashow.live:id/rv_live_home").child("android.widget.FrameLayout")
#选择第一个直播间进入,直播间需要判断是开播状态,还是休息中
state = liveroom[0].offspring("com.alashow.live:id/tv_sentiment").get_text()
if state == "休息中":
liveroom[0].click()
sleep()
poco("com.alashow.live:id/tv_live_remain").click()
else:
liveroom[0].click()
sleep(2)
#打开礼物面板
poco("com.alashow.live:id/iv_live_gift").click()
#选择礼物
poco("android.support.v7.widget.RecyclerView").child("com.alashow.live:id/cl_gift_bg")[0].click()
giftprice = poco("android.support.v7.widget.RecyclerView").offspring("com.alashow.live:id/tv_gift_gold").get_text()
goldnum = poco("com.alashow.live:id/tv_gold_num").get_text()
remaingold = str(int(goldnum) - int(giftprice))
print(remaingold)
#送礼
poco("com.alashow.live:id/tv_gift_send").click()
#验证1送礼出现跑道(从airtest里面复制到这里后就变代码了)
wait(Template(r"tpl1557971798350.png", record_pos=(-0.06, 0.005), resolution=(1080, 2248)))

#验证2金钱计算
#获取当前的金钱
goldnum2 = poco("com.alashow.live:id/tv_gold_num").get_text()
#将当前金钱与送礼后的金钱对比,如果相同则通过
assert_equal(goldnum2, remaingold, "送礼扣钱正确.")
sleep(5)
stop_app('com.alashow.live')
UI自动化编写规范(纯属个人瞎编,不喜勿喷)
1.保证操作前与操作后不会对后续产生影响
如(编写前应先思考):
start_app('com.alashow.live')
stop_app('com.alashow.live')
2.Airtest与poco 都可以使用,看个人习惯,应养成写注释的习惯
如:此脚本的用途,目的(这里需要进行断言,会体现到测试报告中)
常用:
Wait,assert_exists, assert_not_exists, assert_equal, assert_not_equal
3.使用poco编写脚本时,尽量学会优化脚本(建立在看懂控件树的基础上)
如:
poco("android.widget.LinearLayout").offspring("android:id/content").offspring("com.alashow.live:id/content").
child("android.widget.FrameLayout").child("com.alashow.live:id/view_pager").child("android.view.ViewGroup").o
ffspring("com.alashow.live:id/fl_content").offspring("com.alashow.live:id/refresh").
offspring("com.alashow.live:id/rv_live_home").child("android.widget.FrameLayout")[0].
child("android.view.ViewGroup").click()
可简化为:
poco("com.alashow.live:id/rv_live_home").child("android.widget.FrameLayout").click()
4.一份自动化的脚本尽量保证只验证一个功能
5.利用自动化脚本做UI遍历(验证流程)时,应对过程中的数据(如图片或者数值)进行验证
6.涉及到一个操作出现多种可能的情况时,应使用判断校验
如:之前例子中的打开app,出现在登录页或者首页的现象
7.建议书写自动化脚本之前,先画好(随便什么方式能看懂就行)一个流程,以及需要验证的东东
8. 想到什么再说吧!
写在尾声:
单个自动化的用例会编写了,那如何集成到一起呢?难不成我跑用例的时候要一个一个手动跑。
请参考https://blog.csdn.net/u010127154/article/details/83375659
可以实现统一管理用例,输出报告
哈哈,写的有点乱,原本写在ppt里面的,懒得重新整理啦