使用sphinx快速为你python注释生成API(html)文档
sphinx简介
sphinx是一种基于Python的文档工具,它可以令人轻松的撰写出清晰且优美的文档,由Georg Brandl在BSD许可证下开发。新版的Python3文档就是由sphinx生成的,并且它已成为Python项目首选的文档工具,同时它对C/C++项目也有很好的支持。更多详细特性请参考sphinx官方文档本篇博客主要介绍如何快速为你的Python注释生成API文档。
环境
- ubuntu 16.04
- python 3.7
pip3 install sphinx
#pip3是给python3安装,如果是python2 pip安装即可。
实例
1. 新建一个项目
项目路径:

即:

目录结构如上图所示,doc目录使用来存放API(html)文档,src目录是用来存放项目的源码。
2. src目录下的源码
demo1.py
#!/usr/bin/env python
# -*- coding: utf-8 -*-
# @Time    : 2/4/20 5:51 PM
# @Author  : Jing Bai
# @File    : demo1.py
# @Software: PyCharm
#coding=UTF-8
class Demo1():
    """类的功能说明"""

    def add(self,a,b):
        """两个数字相加,并返回结果"""
        return a+b

    def google_style(arg1, arg2):
        """函数功能.

        函数功能说明.

        Args:
            arg1 (int): arg1的参数说明
            arg2 (str): arg2的参数说明

        Returns:
            bool: 返回值说明

        """
        return True

    def numpy_style(arg1, arg2):
        """函数功能.

        函数功能说明.

        Parameters
        ----------
        arg1 : int
            arg1的参数说明
        arg2 : str
            arg2的参数说明

        Returns
        -------
        bool
            返回值说明

        """
        return True
demo1文件,主要使用了两种不同的Python注释分格。
对于简单的例子和简单的函数以及文档说明,使用google style显得更为简洁。
demo2,而对于比较复杂详细的文档说明numpy style更为流行,。
demo2.py
#!/usr/bin/env python
# -*- coding: utf-8 -*-
# @Time    : 2/4/20 5:51 PM
# @Author  : Jing Bai
# @File    : demo2.py
# @Software: PyCharm
#coding=UTF-8

def my_function(a, b):
    """函数功能说明

     >>> my_function(2, 3)
     6
     >>> my_function('a', 3)
     'aaa'

    """
    return a * b
demo2文件的注释看起来像Python命令行输入的文档字符串,
主要是用来检查命令输出是否匹配下行的内容,
它允许开发人员在源码中嵌入真实的示例和函数的用法,
还能确保代码被测试和工作。
3. 使用sphinx建立API文档项目
- 进入到doc目录下
cd 项目路径/doc
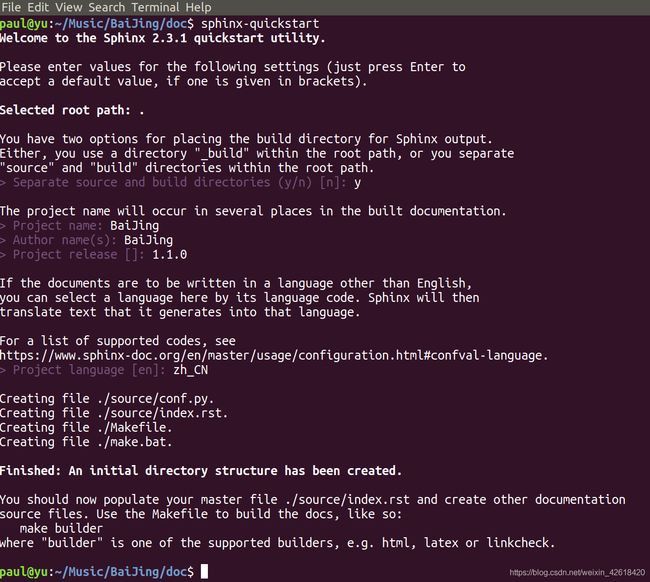
sphinx-quickstart
或者在doc文件夹下打开终端,
再输入sphinx-quickstart
如下图:

按照下图将提示补充完整

说明:
Project name: BaiJing #这里可以写项目的名字
Author name(s): BaiJing #项目的开发人员
Project release []: 1.1.0 #项目更新的第几个版本
Project language [en]: zh_CN #生成API文档的语言,这里写的是zh_CN代表中文。
此时项目目录如下:

需要修改配置,选项在source/conf.py文件中修改即可。
将extensions = [ ]改为
extensions = ['sphinx.ext.autodoc',
    'sphinx.ext.doctest',
    'sphinx.ext.intersphinx',
    'sphinx.ext.todo',
    'sphinx.ext.coverage',
    'sphinx.ext.mathjax'
    ]
4. 为源码生成html文件
- 修改source/conf.py文件的19-21行
import os
import sys
sys.path.insert(0, os.path.abspath('../../src'))#指向src目录
修改后的source/conf.py如下:
# Configuration file for the Sphinx documentation builder.
#
# This file only contains a selection of the most common options. For a full
# list see the documentation:
# https://www.sphinx-doc.org/en/master/usage/configuration.html

# -- Path setup --------------------------------------------------------------

# If extensions (or modules to document with autodoc) are in another directory,
# add these directories to sys.path here. If the directory is relative to the
# documentation root, use os.path.abspath to make it absolute, like shown here.
#
import os
import sys
sys.path.insert(0, os.path.abspath('../../src'))


# -- Project information -----------------------------------------------------

project = 'BaiJing'
copyright = '2020, BaiJing'
author = 'BaiJing'

# The full version, including alpha/beta/rc tags
release = '1.1.0'


# -- General configuration ---------------------------------------------------

# Add any Sphinx extension module names here, as strings. They can be
# extensions coming with Sphinx (named 'sphinx.ext.*') or your custom
# ones.
extensions = ['sphinx.ext.autodoc',
    'sphinx.ext.doctest',
    'sphinx.ext.intersphinx',
    'sphinx.ext.todo',
    'sphinx.ext.coverage',
    'sphinx.ext.mathjax']


# Add any paths that contain templates here, relative to this directory.
templates_path = ['_templates']

# The language for content autogenerated by Sphinx. Refer to documentation
# for a list of supported languages.
#
# This is also used if you do content translation via gettext catalogs.
# Usually you set "language" from the command line for these cases.
language = 'zh_CN'

# List of patterns, relative to source directory, that match files and
# directories to ignore when looking for source files.
# This pattern also affects html_static_path and html_extra_path.
exclude_patterns = []


# -- Options for HTML output -------------------------------------------------

# The theme to use for HTML and HTML Help pages.  See the documentation for
# a list of builtin themes.
#
html_theme = 'alabaster'

# Add any paths that contain custom static files (such as style sheets) here,
# relative to this directory. They are copied after the builtin static files,
# so a file named "default.css" will overwrite the builtin "default.css".
html_static_path = ['_static']
- 将命令行切换到doc目录下,执行以下命令
sphinx-apidoc -o ./source ../src/
**5. 设置目录树:**主要是将doc/source/modules.rst 文件添加到 index.rst中,同时maxdepth把index.html页中目录的标题显示深度限制设为10。
修改后index.rst的内容为:
.. BaiJing documentation master file, created by
   sphinx-quickstart on Tue Feb  4 22:13:49 2020.
   You can adapt this file completely to your liking, but it should at least
   contain the root `toctree` directive.

Welcome to BaiJing's documentation!
===================================

.. toctree::
   :maxdepth: 10
   :caption: Contents:

   modules.rst


Indices and tables
==================

* :ref:`genindex`
* :ref:`modindex`
* :ref:`search`
6. 生成html注释文档:在doc目录下执行以下两个命令
make clean (删除doc/build下面的所有内容)和make html(生成html文件)
已经生成注释文档后,如果配置文件或项目源码注释有改动, 需要先执行make clean, 再执行make html
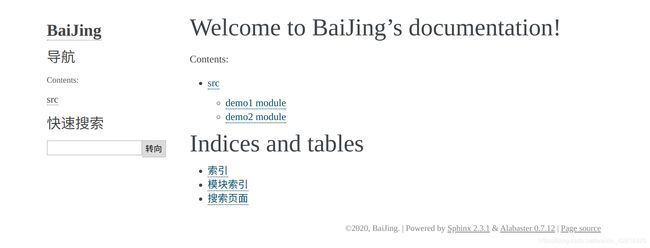
效果如下:


7. 注释文档效果展示


