Android第四讲——常用的基本控件(三)Toast、Dialog、PopupWindows、Notification(通知)、ViewPager
目录
Toast
Dialog
PopupWindows
Notification
ViewPager
shape 形状
属性:
solid:颜色
边框 stroke 要给宽度
角度(圆角)corners
gradient 渐变色 type linear(线性渐变) 要有angle
Toast
用来提示信息 没有焦点且现实的时间有限
不会打断用户当前的操作
不能与用户交互
普通的Toast
    /**
     * 普通的Toast
     */
    private void normalToast() {
        Toast toast = Toast.makeText(getApplicationContext(), "我是一个Toast", Toast.LENGTH_LONG);
        toast.setGravity(Gravity.LEFT, 0, 0);//改变位置
        toast.show();
        return;
    }
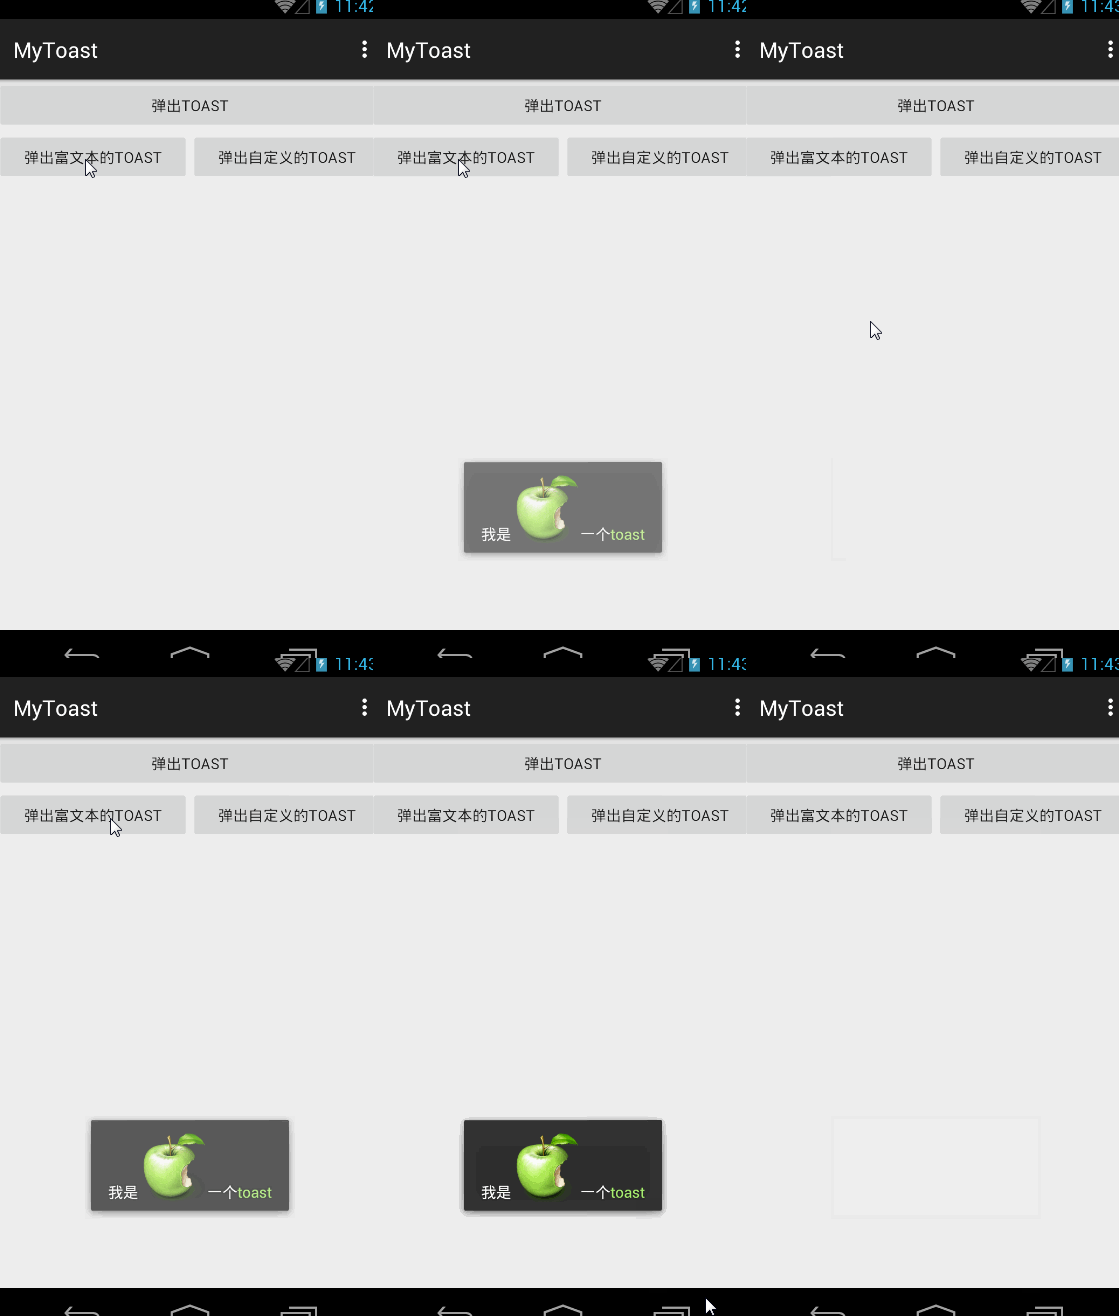
含富文本的Toast
/**
* 含富文本的Toast
*/
private void fuWenBenToast() {
Toast toast2 = Toast.makeText(getApplicationContext(), "我是一个Toast", Toast.LENGTH_LONG);//先创建一个Toast
Spanned spanned = Html.fromHtml("我是![]() 一个toast", new Html.ImageGetter() {
@Override
public Drawable getDrawable(String source) {
Drawable drawable = getResources().getDrawable(R.mipmap.apple);
drawable.setBounds(0, 0, drawable.getIntrinsicWidth(), drawable.getIntrinsicHeight());//一定要记得设置宽高
return drawable;
}
}, null);
toast2.setText(spanned);
toast2.show();
}
一个toast", new Html.ImageGetter() {
@Override
public Drawable getDrawable(String source) {
Drawable drawable = getResources().getDrawable(R.mipmap.apple);
drawable.setBounds(0, 0, drawable.getIntrinsicWidth(), drawable.getIntrinsicHeight());//一定要记得设置宽高
return drawable;
}
}, null);
toast2.setText(spanned);
toast2.show();
}
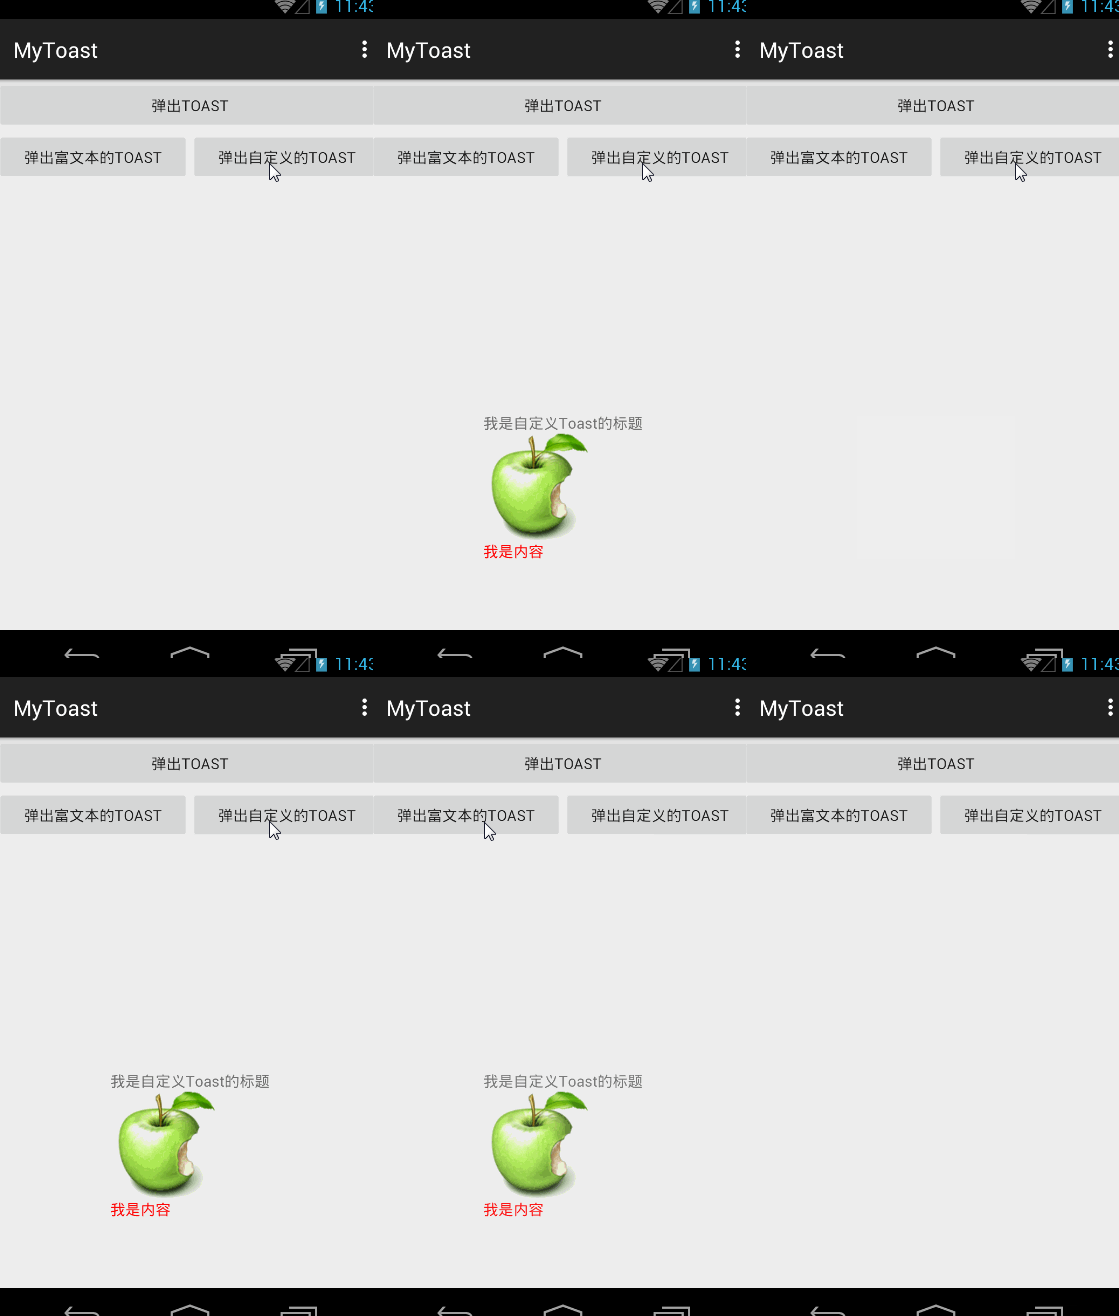
自定义的Toast
1.首先自己写一个xml表示toast的内容格式:
<LinearLayout xmlns:android="http://schemas.android.com/apk/res/android"
    android:orientation="vertical" android:layout_width="match_parent"
    android:layout_height="match_parent">
    <TextView
        android:id="@+id/textview_title"
        android:layout_width="wrap_content"
        android:layout_height="wrap_content" />
    <ImageView
        android:id="@+id/imageview"
        android:layout_width="100dp"
        android:layout_height="100dp"
        android:src="@mipmap/apple"/>
    <TextView
        android:id="@+id/textview_content"
        android:layout_width="wrap_content"
        android:layout_height="wrap_content"
        android:text="我是内容"
        android:textColor="#ff0000"/>
LinearLayout>
2.java文件中:
 /**
     * 自定义Toast
     * i 写一个layout
     * ii 创建一个toast   Toast toast3 = new Toast(getApplicationContext());
     * iii 通过LayoutInfalter找到一个View:toastview
     * iv 一定要将自定义的toastView通过setView添加到toast上
     */
    private void doMyToast() {
        Toast toast3 = new Toast(getApplicationContext());
        //自定义Toast,首先通过LayoutInfalter找到一个View:toastview
        LayoutInflater inflater = getLayoutInflater();
        View toastview = inflater.inflate(R.layout.toastview, null);
        //通过findViewById找到View上的TextView控件
        TextView textView_Title = (TextView) toastview.findViewById(R.id.textview_title);
        textView_Title.setText("我是自定义Toast的标题");
        ImageView imageView = (ImageView) toastview.findViewById(R.id.imageview);
        imageView.setImageResource(R.mipmap.apple);
        toast3.setView(toastview);//一定要将自定义的toastView通过setView添加到toast上
        toast3.setDuration(Toast.LENGTH_LONG);
        toast3.show();
    }
Dialog (弹出窗,可交互的)
普通的Dialog:
需要先建立AlertDialog.Builder Context必须是基于Activity的 点击事件必须继承DialogInterface.OnClickListener()
再建立AlertDialog (builer.create())
最后show()
1.简单的Dialog
    /**
     * 简单的Dialog
     */
    private void simpleDialog() {
        AlertDialog.Builder builder = new AlertDialog.Builder(MainActivity.this);//这里的Context只能用Activity的
        builder.setIcon(R.mipmap.ic_launcher).setTitle("我是Dialog的标题").setMessage("我是内容").setNegativeButton("NegeativeButton",new DialogInterface.OnClickListener(){

            @Override
            public void onClick(DialogInterface dialog, int which) {
                Toast.makeText(getApplicationContext(), "NegeativeButton", Toast.LENGTH_SHORT).show();
            }
        }).setNeutralButton("NeutralButton",new DialogInterface.OnClickListener(){

            @Override
            public void onClick(DialogInterface dialog, int which) {
                Toast.makeText(getApplicationContext(),"NeutralButton",Toast.LENGTH_SHORT).show();
            }
        }).setPositiveButton("PositiveButton",new DialogInterface.OnClickListener(){

            @Override
            public void onClick(DialogInterface dialog, int which) {
                Toast.makeText(getApplicationContext(),"PositiveButton",Toast.LENGTH_SHORT).show();
            }
        });
        AlertDialog dialog = builder.create();//一定要记得create
        dialog.show();
    }
2.有选择的Dialog(只带选择)
//数据
private String[] mData = {"第一条数据","第二条数据","第三条数据","第四条数据","第五条数据"};
    /**
     * 带选择的Dialog
     */
    private void chooseDialog() {
        //带选择的Dialog
        AlertDialog.Builder builder1 = new AlertDialog.Builder(MainActivity.this);
        builder1.setTitle("dialog的标题");
        builder1.setItems(mData, new DialogInterface.OnClickListener() {

            @Override
            public void onClick(DialogInterface dialog, int which) {
                Toast.makeText(getApplicationContext(), "这是第" + which + "条数据", Toast.LENGTH_SHORT).show();
            }
        });
        Dialog dialog1 = builder1.create();
        dialog1.show();
    }
3.带单选的Dialog
//数据
private String[] mSexs = {"男","女","其他"};
    /**
     * 带单选的Dialog
     */
    private void singleChooseDialog() {
        AlertDialog.Builder builder1 = new AlertDialog.Builder(MainActivity.this);
        builder1.setSingleChoiceItems(mSexs, 0, new DialogInterface.OnClickListener() {
            @Override
            public void onClick(DialogInterface dialog, int which) {
                sex = mSexs[which];
                Toast.makeText(getApplicationContext(), "你的性别是" + mSexs[which], Toast.LENGTH_SHORT).show();
            }
        });
        builder1.setPositiveButton("确定", new DialogInterface.OnClickListener() {
            @Override
            public void onClick(DialogInterface dialog, int which) {
                mBtnDialog3.setText("你的性别"+sex);
            }
        });
        builder1.setNegativeButton("取消", new DialogInterface.OnClickListener() {
            @Override
            public void onClick(DialogInterface dialog, int which) {
            }
        });
        AlertDialog dialog = builder1.create();
        dialog.show();
    }
4.带多选框的Dialog
//数据
 private String[] mHobbys = {"吃","睡","健身","LOL","游泳","篮球"};
 private boolean[] mIsChecked = new boolean[mHobbys.length];//表示是否选择的管理   boolean型
private StringBuffer buffer;//表示如果选中后添加到buffer中

    /**
     * 带多选框的Dialog
     */
    private void someChooseDialog() {
        buffer = new StringBuffer();
        AlertDialog.Builder builder = new AlertDialog.Builder(MainActivity.this);
        builder.setMultiChoiceItems(mHobbys, mIsChecked, new DialogInterface.OnMultiChoiceClickListener() {
            @Override
            public void onClick(DialogInterface dialog, int which, boolean isChecked) {
                mIsChecked[which] = isChecked;
            }
        });
        builder.setPositiveButton("确定", new DialogInterface.OnClickListener() {
            @Override
            public void onClick(DialogInterface dialog, int which) {
for (int i =0;i5.自定义的Dialog
i首先写一个style,替换系统自带的style
<style parent="@android:Theme.Dialog" name="NoDialogTitle">
<item name="android:windowFrame">@null
- "android:windowNoTitle"
>true
- "android:windowBackground"
>@android:color/transparent
- "android:windowIsFloating">true
- "android:windowContentOverlay">@null
style>ii
    /**
     * 自定义的Dialog
     */
    private void myDialog() {
        dialog = new Dialog(MainActivity.this, R.style.DialogBackgroundNoTitle);
        LayoutInflater inflater = getLayoutInflater();
        View dialogview = inflater.inflate(R.layout.my_dialog, null);//自定义Dialog需要用dialog加载一个View
        TextView textView_title = (TextView) dialogview.findViewById(R.id.textview_title);
        TextView textView_message = (TextView) dialogview.findViewById(R.id.textview_message);
        Button button_cancal = (Button) dialogview.findViewById(R.id.button_cancal);
        Button button_ok = (Button) dialogview.findViewById(R.id.button_ok);
        button_cancal.setOnClickListener(new View.OnClickListener() {
            @Override
            public void onClick(View v) {
                dialog.dismiss();//表示Dialog消失
            }
        });
        button_ok.setOnClickListener(new View.OnClickListener() {
            @Override
            public void onClick(View v) {
                Toast.makeText(getApplicationContext(), "点击了确定键", Toast.LENGTH_SHORT).show();
                dialog.dismiss();
            }
        });
//                dialog.requestWindowFeature(Window.FEATURE_NO_TITLE);//设置为无标题
        dialog.setContentView(dialogview);
        dialog.show();
    }
6.带Date(日期)的Dialog DatePickerDialog
    /**
     * 展示日期的Dialog  年 月 日
     */
    private void showDatePickerDialog() {
        final Calendar calendar = Calendar.getInstance();
        DatePickerDialog datePickerDialog = new DatePickerDialog(MainActivity.this, new DatePickerDialog.OnDateSetListener() {
            @Override
            public void onDateSet(DatePicker view, int year, int monthOfYear, int dayOfMonth) {
                calendar.set(year, monthOfYear, dayOfMonth);
                SimpleDateFormat format = new SimpleDateFormat("yyyy-MM-dd");//设置日期显示的格式SimpleDateFormat
                //format.format(calendar.getTime())
                Toast.makeText(getApplicationContext(), "设置的日期是" + format.format(calendar.getTime()), Toast.LENGTH_SHORT).show();
            }
        }, calendar.get(Calendar.YEAR), calendar.get(Calendar.MONTH), calendar.get(Calendar.DAY_OF_MONTH));
        datePickerDialog.show();
    }
7.带Time(时间)的Dialog TimePickerDialog
    /**
     * 显示时间的Dialog  小时 分钟
     */
    private void showTimePickerDialog() {
        final Calendar calendar = Calendar.getInstance();
        TimePickerDialog timePickerDialog = new TimePickerDialog(MainActivity.this, new TimePickerDialog.OnTimeSetListener() {
            @Override
            public void onTimeSet(TimePicker view, int hourOfDay, int minute) {
                calendar.set(Calendar.HOUR,hourOfDay);
                calendar.set(Calendar.MINUTE,minute);
                SimpleDateFormat format = new SimpleDateFormat("这是yyyy年MM月dd日HH:mm");
                Toast.makeText(getApplicationContext(),format.format(calendar.getTime()), Toast.LENGTH_SHORT).show();
            }
        },calendar.get(Calendar.HOUR),calendar.get(Calendar.MINUTE),true);
        timePickerDialog.show();
    }
PopupWindows
必须有自己的View
必须设置宽和高
i定义一个布局(即Popupwindows自己的View)(测试中View:含有两个Imageview)
<LinearLayout xmlns:android="http://schemas.android.com/apk/res/android"
    android:layout_width="match_parent"
    android:layout_height="match_parent"
    android:orientation="vertical"
    android:background="@drawable/popupwindow_background">
    <ImageView
        android:id="@+id/imageview1"
        android:layout_width="wrap_content"
        android:layout_height="wrap_content"
        android:src="@mipmap/apple"
        android:padding="10dp"
        android:layout_gravity="center"/>
    <ImageView
        android:id="@+id/imageview2"
        android:layout_width="wrap_content"
        android:layout_height="wrap_content"
        android:src="@mipmap/grape"
        android:padding="10dp"
        android:layout_gravity="center"/>
LinearLayout>
/**
* 设置一个PopupWindows
*/
private void createPopupWindows() {
View view = getLayoutInflater().inflate(R.layout.my_popupwindow, null);
mPopupWindow = new PopupWindow(MainActivity.this);
mPopupWindow.setWidth(ViewGroup.LayoutParams.MATCH_PARENT);//设置popupwindow的宽
mPopupWindow.setHeight(ViewGroup.LayoutParams.WRAP_CONTENT);
mPopupWindow.setContentView(view);//将view设置在popupwindow上
mPopupWindow.setOutsideTouchable(true);//在popupwindow外边可以点击
mPopupWindow.showAsDropDown(mBtn1);
}
/**
* 点击"返回键"使popupwindow关闭,而Activity不关闭
* @param keyCode
* @param event
* @return
*/
@Override
public boolean onKeyDown(int keyCode, KeyEvent event) {
if (keyCode == KeyEvent.KEYCODE_BACK) {
if (mPopupWindow != null && mPopupWindow.isShowing()) {
mPopupWindow.dismiss();
return true;//记得return ture
}
}
return super.onKeyDown(keyCode, event);
}
Notification 通知(在通知栏显示)
PendingIntent 具有延时性
自定义的Notification 换成RemoteView可序列化的View可放TextView 、Imageview、LinearLayout 、progressView(进度条)
首先先创建一个NotificationManager,用于管理notification
mNotificationManager = (NotificationManager) getSystemService(Context.NOTIFICATION_SERVICE);//初始化NotificationManager,用于管理notification
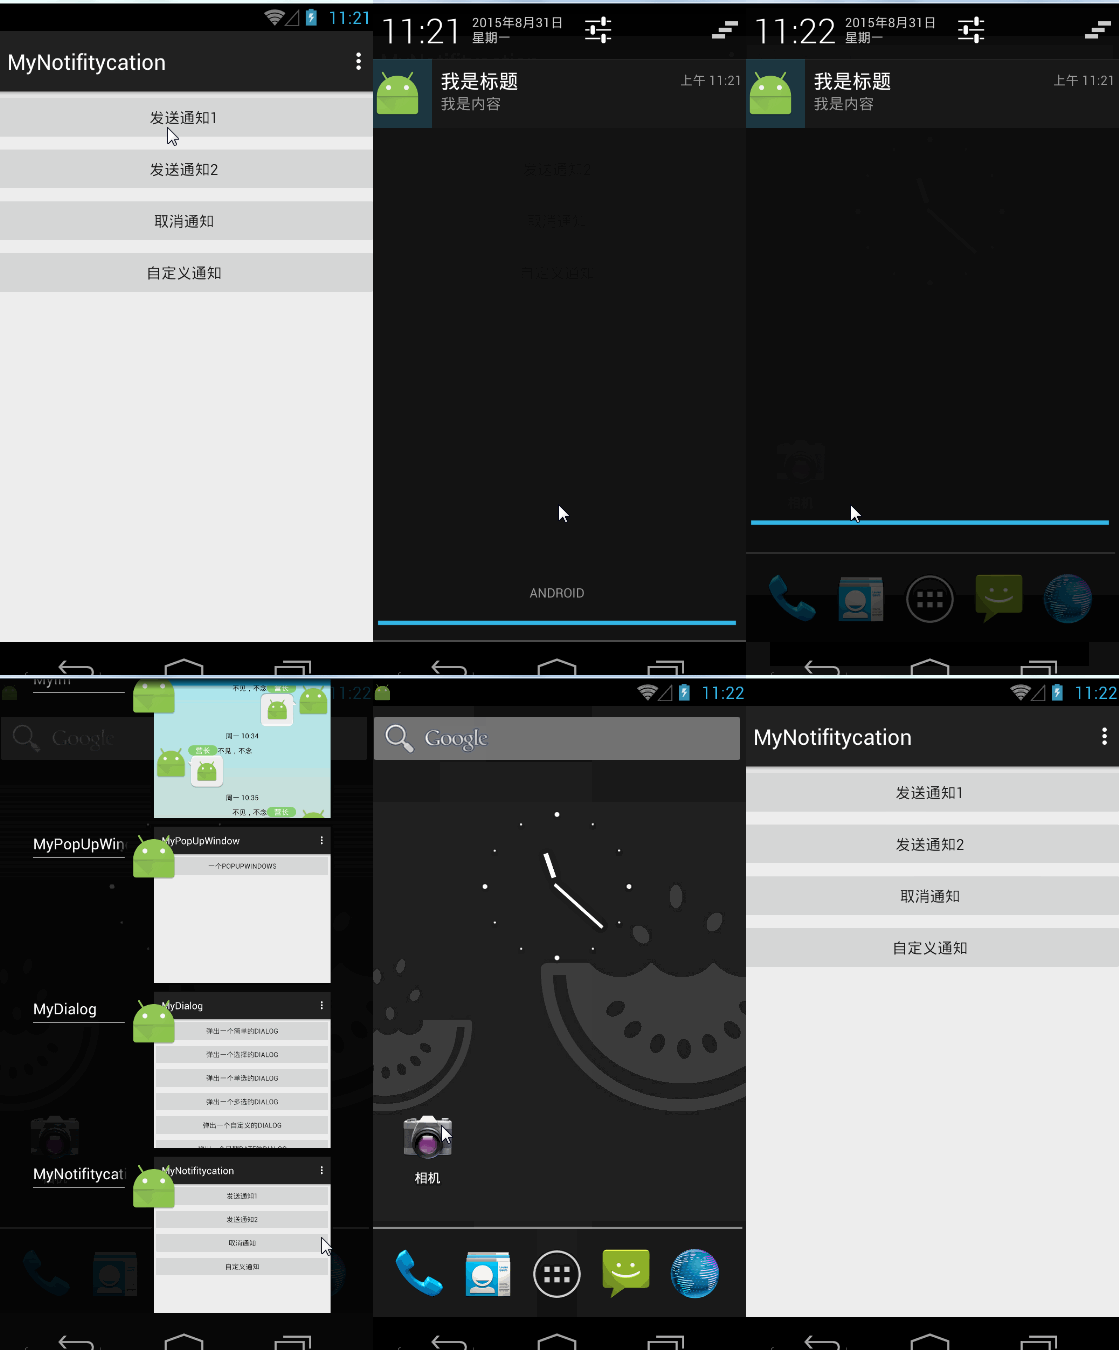
one.以前的方法 用notification去设置图标内容等等
     /**
     * 以前的方法 用notification去设置图标内容等等
     */
    private void createNotification1() {
        Notification notification = new Notification();//初始化notification
        notification.icon = R.mipmap.ic_launcher;//设置通知在状态栏的图标
        notification.tickerText = "我是一个通知";//设置通知在状态栏的提示信息
        notification.flags = Notification.FLAG_AUTO_CANCEL;//设置为可以自动取消
        Intent intent = new Intent(this, MainActivity.class);//要启动的Activity
        PendingIntent pending = PendingIntent.getActivity(getApplicationContext(), 1, intent, PendingIntent.FLAG_ONE_SHOT);//设置PendingIntent的显示方式
        notification.setLatestEventInfo(getApplicationContext(), "我是标题", "我是内容", pending);//设置pending显示的内容
        notification.when = System.currentTimeMillis();//Calendar.getInstance.getTimeInMillis();
        mNotificationManager.notify(1, notification);//notification管理者唤醒它
    }
tow. 4.X后用Notification.Builder().set….来创建一个notification
 @TargetApi(Build.VERSION_CODES.JELLY_BEAN)
    private void createNotification2() {
        Intent intent = new Intent(this, MainActivity.class);
        PendingIntent pending = PendingIntent.getActivity(getApplicationContext(), 1, intent, PendingIntent.FLAG_ONE_SHOT);
        Notification notification = new Notification.Builder(getApplicationContext()).setSmallIcon(R.mipmap.ic_launcher).
                setTicker("我是一则通知").setContentTitle("我是标题").setContentText("我是文本").setContentInfo("我是内容").
                setAutoCancel(true).setContentIntent(pending).setWhen(System.currentTimeMillis()).build();
        mNotificationManager.notify(1, notification);
    }
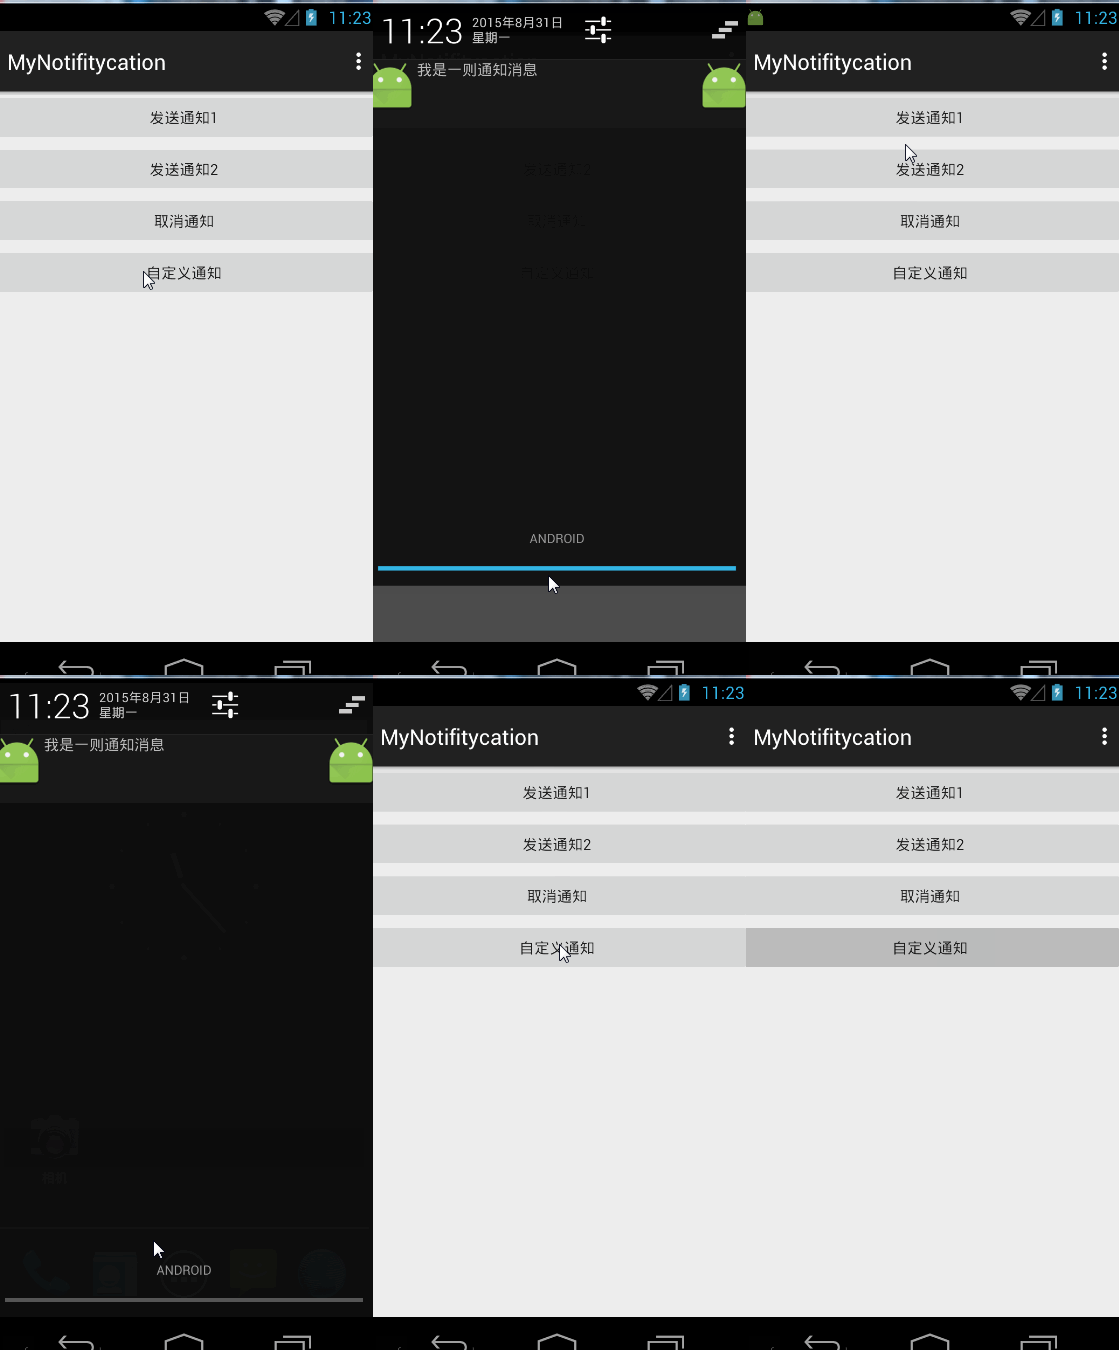
three. 自定义的Notification,需要自己创建一个View
自写一个notification_test.xml
<LinearLayout xmlns:android="http://schemas.android.com/apk/res/android"
    android:orientation="horizontal" android:layout_width="match_parent"
    android:layout_height="match_parent">
    <ImageView
        android:id="@+id/imageview_left"
        android:layout_width="50dp"
        android:layout_height="50dp"
        android:src="@mipmap/ic_launcher"/>
    <TextView
        android:id="@+id/textview_content"
        android:layout_width="0dp"
        android:layout_weight="1"
        android:layout_height="wrap_content"
        android:text="我是一则通知消息"/>
    <ImageView
        android:id="@+id/imageview_right"
        android:layout_width="50dp"
        android:layout_height="50dp"
        android:src="@mipmap/ic_launcher"/>
LinearLayout>
private void createMyNotifcation() {
//自定义的Notification
RemoteViews re = new RemoteViews(getPackageName(), R.layout.notification_test);//生成一个RemoteViews布局
Intent intent = new Intent(this, MainActivity.class);
PendingIntent pending = PendingIntent.getActivity(getApplicationContext(), 1, intent, PendingIntent.FLAG_ONE_SHOT);
//将RemoteView通过setContent设置到Notification上
Notification notification = new Notification.Builder(getApplicationContext()).setContentIntent(pending).
setSmallIcon(R.mipmap.ic_launcher).setContent(re).setContentText("我是文本").setTicker("我是则通知").
setContentTitle("我是标题").setContentInfo("我是内容").setAutoCancel(true).setWhen(System.currentTimeMillis()).build();
mNotificationManager.notify(1, notification);
}
ViewPager
ViewPager可滑动的ViewGroup 不属于Google源码 需要引入jar包 android.support.v4
继承PagerAdapter要实现4个方法
有个生成itemview的instantiateItem
有个销毁itemview的destroyItem
1、在activity_mian.xml中添加:
<RelativeLayout xmlns:android="http://schemas.android.com/apk/res/android"
    xmlns:tools="http://schemas.android.com/tools"
    android:layout_width="match_parent"
    android:layout_height="match_parent"
    tools:context=".MainActivity">

    <android.support.v4.view.ViewPager
        android:id="@+id/viewpager"
        android:layout_width="match_parent"
        android:layout_height="match_parent">

        <android.support.v4.view.PagerTabStrip
            android:id="@+id/pagertab"
            android:layout_width="wrap_content"
            android:layout_height="wrap_content"
            android:layout_gravity="bottom">

        android.support.v4.view.PagerTabStrip>
    android.support.v4.view.ViewPager>

    <LinearLayout
        android:id="@+id/linearlayout_point"
        android:layout_width="match_parent"
        android:layout_height="wrap_content"
        android:layout_alignParentBottom="true"
        android:layout_marginBottom="20dp"
        android:gravity="center"
        android:orientation="horizontal">LinearLayout>
RelativeLayout>
其中:添加Tab的
        <android.support.v4.view.PagerTabStrip
            android:id="@+id/pagertab"
            android:layout_width="wrap_content"
            android:layout_height="wrap_content"
            android:layout_gravity="bottom">
ViewPager滑动时动态小圆点的所在布局
<LinearLayout
        android:id="@+id/linearlayout_point"
        android:layout_width="match_parent"
        android:layout_height="wrap_content"
        android:layout_alignParentBottom="true"
        android:layout_marginBottom="20dp"
        android:gravity="center"
        android:orientation="horizontal">LinearLayout>
2、新建3个xml,表示3个要显示的View
viewpager_item1.xml
<LinearLayout xmlns:android="http://schemas.android.com/apk/res/android"
    android:orientation="vertical" android:layout_width="match_parent"
    android:layout_height="match_parent">
    <ImageView
        android:id="@+id/imageview"
        android:layout_width="match_parent"
        android:layout_height="match_parent"
        android:scaleType="centerCrop"
        android:src="@mipmap/ty"/>
LinearLayout>
viewpager_item2.xml
<LinearLayout xmlns:android="http://schemas.android.com/apk/res/android"
    android:orientation="vertical" android:layout_width="match_parent"
    android:layout_height="match_parent">
    <TextView
        android:id="@+id/textview"
        android:layout_width="wrap_content"
        android:layout_height="wrap_content"
        android:text="我是第二个界面"/>
LinearLayout>
viewpager_item3.xml
<LinearLayout xmlns:android="http://schemas.android.com/apk/res/android"
    android:orientation="vertical" android:layout_width="match_parent"
    android:layout_height="match_parent">
    <Button
        android:id="@+id/button"
        android:layout_width="wrap_content"
        android:layout_height="wrap_content"
        android:text="第三个界面"/>
LinearLayout>3、新建一个包adapter,在包中创建一个ViewPagerAdapter继承于PagerAdapter,实现了4个方法,此为添加了循环 与Tab 的
/**
 * Created by Administrator on 2015/9/1.
 */
public class ViewPagerAdapter extends PagerAdapter{
    private List mViews;
    String[] titles = {"标题一","标题二","标题三"};

    public ViewPagerAdapter(List mViews) {
        this.mViews = mViews;
    }

    @Override
    public int getCount() {
//        return mViews.size();
        return Integer.MAX_VALUE;//循环时修改
    }

    @Override
    public void destroyItem(ViewGroup container, int position, Object object) {
//        循环时View向左滑动需要屏蔽掉removeView
//        container.removeView(mViews.get(position));

    }

    //返回标题
    @Override
    public CharSequence getPageTitle(int position) {
        return titles[position%titles.length];
    }

    @Override
    public Object instantiateItem(ViewGroup container, int position) {
        //ViewPager的循环
        View view = mViews.get(position%mViews.size());
        if (view.getParent() !=null){
            container.removeView(view);//如果前边有View的话,需要先removeView掉View然后再add上
        }
        container.addView(view);
        return view;
    }

    @Override
    public boolean isViewFromObject(View view, Object object) {
        return view == object;
    }
}
4、在MainActivity中修改,由于是动态添加圆点,那么需要根据ViewPager中的个数确定圆点的个数,故用一个List
public class MainActivity extends AppCompatActivity {
    private ViewPager mViewPager;
    private List mViews;
    private LayoutInflater mInflater;
    private ViewPagerAdapter mAdapter;
    private List mImageViews;
    private LinearLayout mLinearLayoutPoint;
    private PagerTabStrip mPagerTab;

    @Override
    protected void onCreate(Bundle savedInstanceState) {
        super.onCreate(savedInstanceState);
        setContentView(R.layout.activity_main);
        mViewPager = (ViewPager) findViewById(R.id.viewpager);
        mLinearLayoutPoint = (LinearLayout) findViewById(R.id.linearlayout_point);
        mPagerTab = (PagerTabStrip) findViewById(R.id.pagertab);
        mInflater = getLayoutInflater();
        View view1 = mInflater.inflate(R.layout.viewpager_item1, null);
        View view2 = mInflater.inflate(R.layout.viewpager_item2, null);
        View view3 = mInflater.inflate(R.layout.viewpager_item3, null);
        mViews = new ArrayList<>();
        mViews.add(view1);
        mViews.add(view2);
        mViews.add(view3);
        mPagerTab.setBackgroundColor(Color.GRAY);//设置PagerTab的背景色
        mPagerTab.setTextColor(Color.GREEN);
//        mPagerTab.setGravity(Gravity.BOTTOM);//设置文本的位置

        mImageViews = new ArrayList<>();
        for (int i = 0; i < mViews.size(); i++) {
            ImageView iv = new ImageView(this);
//            LinearLayout.LayoutParams params = new LinearLayout.LayoutParams(ViewGroup.LayoutParams.WRAP_CONTENT, ViewGroup.LayoutParams.WRAP_CONTENT);
            iv.setLayoutParams(new ViewGroup.LayoutParams(ViewGroup.LayoutParams.WRAP_CONTENT, ViewGroup.LayoutParams.WRAP_CONTENT));//设置View的宽和高
            iv.setImageResource(R.mipmap.point_normal);
            iv.setPadding(20, 20, 20, 20);
            mImageViews.add(iv);
            mLinearLayoutPoint.addView(iv);//将ImageView放在LinearLayout布局上
        }
        mImageViews.get(0).setImageResource(R.mipmap.point_select);//将一开始的页面的圆点设置成橙色
        mAdapter = new ViewPagerAdapter(mViews);
        mViewPager.setAdapter(mAdapter);
        mViewPager.addOnPageChangeListener(new ViewPager.OnPageChangeListener() {
            //当页面滑动时
            @Override
            public void onPageScrolled(int position, float positionOffset, int positionOffsetPixels) {

            }

            //当页面选中时  即当前页面
            @Override
            public void onPageSelected(int position) {
                //先将所有的ImageView设置成灰色
                for (ImageView iv : mImageViews) {
                    iv.setImageResource(R.mipmap.point_normal);
                }
                //再将所选中的页面的圆点设置成橙色
                mImageViews.get(position % mViews.size()).setImageResource(R.mipmap.point_select);
            }

            @Override
            public void onPageScrollStateChanged(int state) {

            }
        });
        //设置一开始View位于中间值位置,左右都可以滑动,并且为了使它一开始在第一张图片,需要View的总数对最大值的一半取模
        mViewPager.setCurrentItem(Integer.MAX_VALUE / 2 - Integer.MAX_VALUE / 2 % mViews.size());
    }
}
        //设置一开始View位于中间值位置,左右都可以滑动,并且为了使它一开始在第一张图片,需要View的总数对最大值的一半取模
        mViewPager.setCurrentItem(Integer.MAX_VALUE / 2 - Integer.MAX_VALUE / 2 % mViews.size());


