基于Jenkins+SonarQube+Nosetests+Coverage的Python项目持续集成
前言
本文从一个规范的Python项目目录结构开始,介绍了一个Python项目应该遵序的一些编码规范,以及与持续集成相关的工具使用。由于网上众多Python项目是使用TravisCI进行持续集成,跟使用Jenkins+SonarQube方案不一样,所以我们重新研究了如何整合这些内容。
- 基于Jenkins进行集成
- 基于Nosetests进行自动化测试
- 基于coverage.py进行代码覆盖率检查
另外为了进一步解决自动化测试、开发过程的种种问题,我们也对以下工具进行了研究。
- 基于virtualenv进行测试环境隔离的,它的目标很简单:如果你的一台机子中有很多Python项目,每个都有不同的依赖(可能相同的包,但是依赖不同的版本),仅仅在一个Python安装环境中管理这些依赖几乎是不可能的
- 基于Sphinx生成Python代码文档,Sphinx是已经被用来生成Python官方文档和大多数流行的Python项目文档的工具。
部分参考Open Sourcing a Python Project the Right Way
1. Python项目的目录结构
一个完整的Python项目,可以参考gitlab上的python-ci-demo项目的目录结构
$ tree
.
|- README.md
|- docs //文档
|- requirements.txt //
|- python_ci_demo
|   |-- __init__.py
|   |-- Mymath.py
|   |-- test_case
|       |-- testDemo.py
|       |-- nosetests.xml
|       |-- coverage.xml
|- setup.py
2. setuptools 和 setup.py文件
2.1 setuptools的安装
2.1.1 REQUIREMENTS
请确保你有python环境
python --version如果是在Ipython或者是jupyter notebook中,你可尝试“!”

请确保你有pip命令行环境
pip --version如若没有,请自行安装
请确保pip,setuptools,wheel是最新的;可用以下命令更新:
python -m pip install --upgrade pip setuptools wheel你也可以给你的项目创建虚拟环境:
Optionally, create a virtual environment
See section below for details, but here’s the basic venv[3] command to use on a typical Linux system:
python3 -m venv tutorial_env
source tutorial_env/bin/activate
This will create a new virtual environment in the tutorial_env subdirectory, and configure the current shell to use it as the default python environment.
温馨提示:如果你的python环境是3.4以上,可用直接使用
python -m venv tutorial_env2.1.2 INSTALLING
可以直接使用pip来安装:
![]()
以下是一些关于pip安装命令的用法:
To install the latest version of “SomeProject”:(默认安装最新版本)
pip install 'SomeProject'To install a specific version:(安装指定版本)
pip install 'SomeProject==1.4'To install greater than or equal to one version and less than another:(安装高于某版本,低于某版本)
pip install 'SomeProject>=1,<2'To install a version that’s “compatible” with a certain version: [4](安装1.4.*版本,且大于或等于1.4.2)
pip install 'SomeProject~=1.4.2'In this case, this means to install any version “==1.4.*” version that’s also “>=1.4.2”.
更多的安装方式以及参数说明,请参考:https://packaging.python.org/tutorials/installing-packages/
2.2 setup.py文件的编写
2.2.1 作用
setup.py is a python file, which usually tells you that the module/package you are about to install has been packaged and distributed with Distutils, which is the standard for distributing Python Modules.
This allows you to easily install Python packages.
事实上,setup.py就是让你在克隆别人的项目,或者是发布,部署项目的时候,更容易,更准确地安装相关的packages
2.2.2 如何使用?
例如,本次demo(也就是python_ci_demo)的目录结构如下:

我们只需要进入到该目录下,运行以下命令:
python setup.py install2.2.3 如何编写?
If you have your package tree like,
foo
├── foo
│   ├── data_struct.py
│   ├── __init__.py
│   └── internals.py
├── README
├── requirements.txt
└── setup.py
Then, you do the following in your setup.py script so that it can be installed on some machine:
from setuptools import setup

setup(
   name='foo',
   version='1.0',
   description='A useful module',
   author='Man Foo',
   author_email='[email protected]',
   packages=['foo'],  #same as name
   install_requires=['bar', 'greek'], #external packages as dependencies
)
Instead, if your package tree is more complex like the one below:
foo
├── foo
│   ├── data_struct.py
│   ├── __init__.py
│   └── internals.py
├── README
├── requirements.txt
├── scripts
│   ├── cool
│   └── skype
└── setup.py
Then, your setup.py in this case would be like:
from setuptools import setup

setup(
   name='foo',
   version='1.0',
   description='A useful module',
   author='Man Foo',
   author_email='[email protected]',
   packages=['foo'],  #same as name
   install_requires=['bar', 'greek'], #external packages as dependencies
   scripts=[
            'scripts/cool',
            'scripts/skype',
           ]
)
Add more stuff to (setup.py) & make it decent:
from setuptools import setup

with open("README", 'r') as f:
    long_description = f.read()

setup(
   name='foo',
   version='1.0',
   description='A useful module',
   license="MIT",
   long_description=long_description,
   author='Man Foo',
   author_email='[email protected]',
   url="http://www.foopackage.com/",
   packages=['foo'],  #same as name
   install_requires=['bar', 'greek'], #external packages as dependencies
   scripts=[
            'scripts/cool',
            'scripts/skype',
           ]
)
这是本次demo的setup.py
setup(
    name='python-ci-demo',
    version=python-ci-demo.__version__,
    url='http://192.168.6.126/incubator/python-ci-demo.git',
    license='Apache Software License',
    author='qinxin',
    tests_require=['nose'],
    install_requires=['nose>=1.3.7',
                    'coverage>=4.5.1',
                    ],
    cmdclass={'test': PyTest},
    author_email='[email protected]',
    description='Automated REST APIs demo for python nose Automated Test framework',
    long_description=long_description,
    packages=['python-ci-demo'],
    include_package_data=True,
    platforms='any',
    test_suite='python-ci-demo.python-ci-demo.test_case',
    classifiers = [
        'Programming Language :: Python',
        'Development Status :: 4 - Beta',
        'Natural Language :: English',
        'Environment :: jenkins+python',
        'Intended Audience :: Developers',
        'License :: OSI Approved :: Apache Software License',
        'Operating System :: OS Independent',
        'Topic :: Software Development :: Libraries :: Python Modules',
        'Topic :: Software Development :: Libraries :: Application Frameworks',
        'Topic :: Internet :: WWW/HTTP :: Dynamic Content',
        ]
)
更多代码,百度:incubator/python-ci-demo.git
更多setup.py的信息,请访问:https://stackoverflow.com/questions/1471994/what-is-setup-py
3. requirement.txt
alabaster==0.7.10
anaconda-client==1.6.5
anaconda-navigator==1.6.9
anaconda-project==0.8.0
asn1crypto==0.22.0
astroid==1.5.3
astropy==2.0.2
babel==2.5.0
backports.shutil-get-terminal-size==1.0.0
beautifulsoup4==4.6.0
bit-array==0.1.0
bitarray==0.8.1
bkcharts==0.2
blaze==0.11.3
bleach==2.0.0
bokeh==0.12.10
boto==2.48.0
Bottleneck==1.2.1
CacheControl==0.12.3
certifi==2018.4.16
cffi==1.10.0
chardet==3.0.4
click==6.7
cloudpickle==0.4.0
clyent==1.2.2
colorama==0.3.9
comtypes==1.1.2
conda==4.5.8
conda-build==3.0.27
conda-verify==2.0.0
contextlib2==0.5.5
coverage==4.5.1
cryptography==2.0.3
cycler==0.10.0
Cython==0.26.1
cytoolz==0.8.2
dash==0.19.0
dash-core-components==0.16.0
dash-html-components==0.8.0
dash-renderer==0.11.1
dask==0.15.3
datashape==0.5.4
decorator==4.2.1
distlib==0.2.5
distributed==1.19.1
Django==2.0.5
djangorestframework==3.8.2
docutils==0.14
entrypoints==0.2.3
et-xmlfile==1.0.1
extras==1.0.0
fastcache==1.0.2
filelock==2.0.12
fixtures==3.0.0
Flask==0.12.2
Flask-Compress==1.4.0
Flask-Cors==3.0.3
future==0.16.0
gevent==1.2.2
glob2==0.5
greenlet==0.4.12
h5py==2.7.0
happybase==1.1.0
heapdict==1.0.0
html5lib==0.999999999
idna==2.6
imageio==2.2.0
imagesize==0.7.1
impala==0.2
impyla==0.14.1
ipykernel==4.6.1
ipython==6.1.0
ipython-genutils==0.2.0
ipywidgets==7.0.0
isort==4.2.15
itchat==1.2.32
itsdangerous==0.24
jdcal==1.3
jedi==0.10.2
Jinja2==2.9.6
jsonschema==2.6.0
jupyter-client==5.1.0
jupyter-console==5.2.0
jupyter-core==4.4.0
jupyter-pip==0.3.1
jupyterlab==0.27.0
jupyterlab-launcher==0.4.0
lazy-object-proxy==1.3.1
lightgbm==2.1.2
linecache2==1.0.0
llvmlite==0.20.0
locket==0.2.0
lockfile==0.12.2
lxml==4.1.0
Markdown==2.6.11
MarkupSafe==1.0
matplotlib==2.1.0
mccabe==0.6.1
menuinst==1.4.10
mistune==0.7.4
mpmath==0.19
msgpack-python==0.4.8
multipledispatch==0.4.9
navigator-updater==0.1.0
nbconvert==5.3.1
nbformat==4.4.0
networkx==2.0
nltk==3.2.4
nose==1.3.7
notebook==5.0.0
numba==0.35.0+10.g143f70e
numexpr==2.6.2
numpy==1.13.3
numpydoc==0.7.0
odo==0.5.1
olefile==0.44
openpyxl==2.4.8
packaging==16.8
pandas==0.20.3
pandas-datareader==0.5.0
pandocfilters==1.4.2
partd==0.3.8
path.py==10.3.1
pathlib2==2.3.0
patsy==0.4.1
pbr==4.2.0
pep8==1.7.0
pickleshare==0.7.4
Pillow==5.0.0
pkginfo==1.4.1
plotly==2.2.3
ply==3.10
progress==1.3
prompt-toolkit==1.0.15
psutil==5.4.0
pure-sasl==0.5.1
py==1.4.34
pycodestyle==2.3.1
pycosat==0.6.3
pycparser==2.18
pycrypto==2.6.1
pycurl==7.43.0
pyecharts==0.3.1
pyflakes==1.6.0
Pygments==2.2.0
pylint==1.7.4
PyMySQL==0.8.0
pyodbc==4.0.17
pyOpenSSL==17.2.0
pyparsing==2.2.0
pypng==0.0.18
PyQRCode==1.2.1
PyRRD==0.0.7
PySocks==1.6.7
pytesseract==0.2.0
pytest==3.2.1
python-dateutil==2.6.1
python-mimeparse==1.6.0
pytz==2017.3
PyWavelets==0.5.2
pywin32==221
PyYAML==3.12
pyzmq==16.0.2
qgrid==1.0.5
QtAwesome==0.4.4
qtconsole==4.3.1
QtPy==1.3.1
requests==2.18.4
requests-file==1.4.3
requests-ftp==0.3.1
rope==0.10.5
ruamel-yaml==0.11.14
scikit-image==0.13.0
scikit-learn==0.19.1
scipy==0.19.1
seaborn==0.8
selenium==3.11.0
simplegeneric==0.8.1
singledispatch==3.4.0.3
six==1.11.0
snowballstemmer==1.2.1
sortedcollections==0.5.3
sortedcontainers==1.5.7
Sphinx==1.6.3
sphinxcontrib-websupport==1.0.1
spyder==3.2.4
SQLAlchemy==1.1.13
statsmodels==0.8.0
sympy==1.1.1
tables==3.4.2
tblib==1.3.2
testpath==0.3.1
testtools==2.3.0
thrift==0.11.0
thrift-sasl==0.3.0
thriftpy==0.3.9
toolz==0.8.2
tornado==4.5.2
traceback2==1.4.0
traitlets==4.3.2
typing==3.6.2
unicodecsv==0.14.1
unittest2==1.1.0
urllib3==1.22
wcwidth==0.1.7
webencodings==0.5.1
wechat-sender==0.1.4
Werkzeug==0.12.2
widgetsnbextension==3.0.2
win-inet-pton==1.0.1
win-unicode-console==0.5
wincertstore==0.2
wrapt==1.10.11
wxpy==0.3.9.8
xlrd==1.1.0
XlsxWriter==1.0.2
xlwings==0.11.4
xlwt==1.3.0
zict==0.1.3
4. SonarQube
SonarQube的使用需要分为两部分
- Sonar Scanner, 这是一个Java工具,用于对代码进行扫描。被扫描的代码不限于Java,还有Python,Javascript等各种语言
- SonarQube,这是一个包含界面的服务端,用于把Sonar Scanner生成的报告进行分析和展示

5. 自动化测试框架
本python demo使用的测试框架为nose自动化测试框架,以下是nose自动化测试框架的一些简单介绍以及使用
By default, nose will run tests in files or directories under the current working directory whose names include “test” or “Test” at a word boundary (like “test_this” or “functional_test” or “TestClass” but not “libtest”). Test output is similar to that of unittest, but also includes captured stdout output from failing tests, for easy print-style debugging.
正如您所见,nose会测试当前工作目录下带有test或Test的文件,事实上,这有一个正则表达式的匹配:【(?:\b\_)[Tt]est】;其输出类似于单元测试的输出,并会带有测试失败的输出信息
快速安装
On most UNIX-like systems, you’ll probably need to run these commands as root or using sudo.(请提供root权限)Install nose using setuptools/distribute:
easy_install noseOr pip:
pip install nose(如果我们有python的pip命令环境,可以用这种方式安装nose;但是,如果我们有setuptools/distribute插件的时候,可以使用easy_install nose命令安装)Or, if you don’t have setuptools/distribute installed, use the download link at right to download the source package, and install it in the normal fashion: Ungzip and untar the source package, cd to the new directory, and:
python setup.py installHowever, please note that without setuptools/distribute installed, you will not be able to use third-party nose plugins.(请注意,如果我们没有setuptools/distribute插件的话,我们也不能使用很多nose的第三方插件)
This will install the nose libraries, as well as the nosetests script, which you can use to automatically discover and run tests. 以下是利用nose运行我们的项目的一个简单示例
Now you can run tests for your project:
cd path/to/project
nosetests
You should see output something like this:

Indicating that nose found and ran your tests.For help with nosetests’ many command-line options, try:
nosetest -hor visit the usage documentation.
基本用法
nose自动化测试框架(以下简称nose)有好几种种使用方式
1、nosetests script(此方式要求必须已经安装setuptools)
nosetests [ option ] [ (optional) test files or directories ]2、test script
import nose
nose.main()
但是以上使用方式,在运行nose.main()之后会退出python环境:

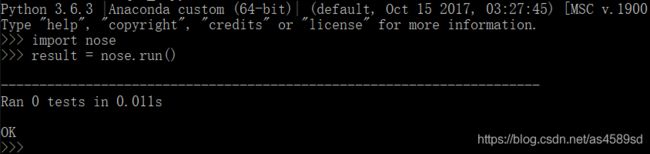
建议使用nose.run()替代
import nose
result = nose.run()
result在测试结果为成功时,返回True;在测试失败或报一个未捕获异常时,返回FALSE
In addition to passing command-line options, you may also put configuration options in a .noserc or nose.cfg file in your home directory. These are standard .ini-style config files. Put your nosetests configuration in a [nosetests] section, with the – prefix removed:
[nosetests]
verbosity=3
with-doctest=1
我们可以在home(或者是项目的根目录下)编写.noserc或者是nose.cfg文件,用以在【nosetests】标签下编写我们的配置选项;标准配置文件样式如上所示。
It is important to note that the default behavior of nose is to not include tests from files which are executable. To include tests from such files, remove their executable bit or use the –exe flag (另外,值得注意的是,nose默认并不会测试.exe的可执行文件,如果要包含该类文件,需要移除可执行字节或使用【-exe标志】)
我们可以以下的形式使用nose测试文件:
nosetests your_file.py测试整一个文件夹或模块:
- nosetests test.module 【模块测试】
- nosetests another.test:TestCase.test_method 【模块下的某个方法】
- nosetests a.test:TestCase 【模块下的类】
- nosetests /path/to/test/file.py:test_function 【绝对文件路径下的函数】
使用【-w】改变路径
nosetests -w /path/to/tests更多参数选项:nose_option.txt
-V, --version
Output nose version and exit
-p, --plugins
Output list of available plugins and exit. Combine with higher verbosity for greater detail
-v=DEFAULT, --verbose=DEFAULT
Be more verbose. [NOSE_VERBOSE]
--verbosity=VERBOSITY
Set verbosity; –verbosity=2 is the same as -v
-q=DEFAULT, --quiet=DEFAULT
Be less verbose
-c=FILES, --config=FILES
Load configuration from config file(s). May be specified multiple times; in that case, all config files will be loaded and combined
-w=WHERE, --where=WHERE
Look for tests in this directory. May be specified multiple times. The first directory passed will be used as the working directory, in place of the current working directory, which is the default. Others will be added to the list of tests to execute. [NOSE_WHERE]
--py3where=PY3WHERE
Look for tests in this directory under Python 3.x. Functions the same as ‘where’, but only applies if running under Python 3.x or above. Note that, if present under 3.x, this option completely replaces any directories specified with ‘where’, so the ‘where’ option becomes ineffective. [NOSE_PY3WHERE]
-m=REGEX, --match=REGEX, --testmatch=REGEX
Files, directories, function names, and class names that match this regular expression are considered tests. Default: (?:\b|_)[Tt]est [NOSE_TESTMATCH]
--tests=NAMES
Run these tests (comma-separated list). This argument is useful mainly from configuration files; on the command line, just pass the tests to run as additional arguments with no switch.
-l=DEFAULT, --debug=DEFAULT
Activate debug logging for one or more systems. Available debug loggers: nose, nose.importer, nose.inspector, nose.plugins, nose.result and nose.selector. Separate multiple names with a comma.
--debug-log=FILE
Log debug messages to this file (default: sys.stderr)
--logging-config=FILE, --log-config=FILE
Load logging config from this file – bypasses all other logging config settings.
-I=REGEX, --ignore-files=REGEX
Completely ignore any file that matches this regular expression. Takes precedence over any other settings or plugins. Specifying this option will replace the default setting. Specify this option multiple times to add more regular expressions [NOSE_IGNORE_FILES]
-e=REGEX, --exclude=REGEX
Don’t run tests that match regular expression [NOSE_EXCLUDE]
-i=REGEX, --include=REGEX
This regular expression will be applied to files, directories, function names, and class names for a chance to include additional tests that do not match TESTMATCH. Specify this option multiple times to add more regular expressions [NOSE_INCLUDE]
-x, --stop
Stop running tests after the first error or failure
-P, --no-path-adjustment
Don’t make any changes to sys.path when loading tests [NOSE_NOPATH]
--exe
Look for tests in python modules that are executable. Normal behavior is to exclude executable modules, since they may not be import-safe [NOSE_INCLUDE_EXE]
--noexe
DO NOT look for tests in python modules that are executable. (The default on the windows platform is to do so.)
--traverse-namespace
Traverse through all path entries of a namespace package
--first-package-wins, --first-pkg-wins, --1st-pkg-wins
nose’s importer will normally evict a package from sys.modules if it sees a package with the same name in a different location. Set this option to disable that behavior.
--no-byte-compile
Prevent nose from byte-compiling the source into .pyc files while nose is scanning for and running tests.
-a=ATTR, --attr=ATTR
Run only tests that have attributes specified by ATTR [NOSE_ATTR]
-A=EXPR, --eval-attr=EXPR
Run only tests for whose attributes the Python expression EXPR evaluates to True [NOSE_EVAL_ATTR]
-s, --nocapture
Don’t capture stdout (any stdout output will be printed immediately) [NOSE_NOCAPTURE]
--nologcapture
Disable logging capture plugin. Logging configuration will be left intact. [NOSE_NOLOGCAPTURE]
--logging-format=FORMAT
Specify custom format to print statements. Uses the same format as used by standard logging handlers. [NOSE_LOGFORMAT]
--logging-datefmt=FORMAT
Specify custom date/time format to print statements. Uses the same format as used by standard logging handlers. [NOSE_LOGDATEFMT]
--logging-filter=FILTER
Specify which statements to filter in/out. By default, everything is captured. If the output is too verbose, use this option to filter out needless output. Example: filter=foo will capture statements issued ONLY to foo or foo.what.ever.sub but not foobar or other logger. Specify multiple loggers with comma: filter=foo,bar,baz. If any logger name is prefixed with a minus, eg filter=-foo, it will be excluded rather than included. Default: exclude logging messages from nose itself (-nose). [NOSE_LOGFILTER]
--logging-clear-handlers
Clear all other logging handlers
--logging-level=DEFAULT
Set the log level to capture
--with-coverage
Enable plugin Coverage: Activate a coverage report using Ned Batchelder’s coverage module. [NOSE_WITH_COVERAGE]
--cover-package=PACKAGE
Restrict coverage output to selected packages [NOSE_COVER_PACKAGE]
--cover-erase
Erase previously collected coverage statistics before run
--cover-tests
Include test modules in coverage report [NOSE_COVER_TESTS]
--cover-min-percentage=DEFAULT
Minimum percentage of coverage for tests to pass [NOSE_COVER_MIN_PERCENTAGE]
--cover-inclusive
Include all python files under working directory in coverage report. Useful for discovering holes in test coverage if not all files are imported by the test suite. [NOSE_COVER_INCLUSIVE]
--cover-html
Produce HTML coverage information
--cover-html-dir=DIR
Produce HTML coverage information in dir
--cover-branches
Include branch coverage in coverage report [NOSE_COVER_BRANCHES]
--cover-xml
Produce XML coverage information
--cover-xml-file=FILE
Produce XML coverage information in file
--cover-config-file=DEFAULT
Location of coverage config file [NOSE_COVER_CONFIG_FILE]
--cover-no-print
Suppress printing of coverage information
--pdb
Drop into debugger on failures or errors
--pdb-failures
Drop into debugger on failures
--pdb-errors
Drop into debugger on errors
--no-deprecated
Disable special handling of DeprecatedTest exceptions.
--with-doctest
Enable plugin Doctest: Activate doctest plugin to find and run doctests in non-test modules. [NOSE_WITH_DOCTEST]
--doctest-tests
Also look for doctests in test modules. Note that classes, methods and functions should have either doctests or non-doctest tests, not both. [NOSE_DOCTEST_TESTS]
--doctest-extension=EXT
Also look for doctests in files with this extension [NOSE_DOCTEST_EXTENSION]
--doctest-result-variable=VAR
Change the variable name set to the result of the last interpreter command from the default ‘_’. Can be used to avoid conflicts with the _() function used for text translation. [NOSE_DOCTEST_RESULT_VAR]
--doctest-fixtures=SUFFIX
Find fixtures for a doctest file in module with this name appended to the base name of the doctest file
--doctest-options=OPTIONS
Specify options to pass to doctest. Eg. ‘+ELLIPSIS,+NORMALIZE_WHITESPACE’
--with-isolation
Enable plugin IsolationPlugin: Activate the isolation plugin to isolate changes to external modules to a single test module or package. The isolation plugin resets the contents of sys.modules after each test module or package runs to its state before the test. PLEASE NOTE that this plugin should not be used with the coverage plugin, or in any other case where module reloading may produce undesirable side-effects. [NOSE_WITH_ISOLATION]
-d, --detailed-errors, --failure-detail
Add detail to error output by attempting to evaluate failed asserts [NOSE_DETAILED_ERRORS]
--with-profile
Enable plugin Profile: Use this plugin to run tests using the hotshot profiler. [NOSE_WITH_PROFILE]
--profile-sort=SORT
Set sort order for profiler output
--profile-stats-file=FILE
Profiler stats file; default is a new temp file on each run
--profile-restrict=RESTRICT
Restrict profiler output. See help for pstats.Stats for details
--no-skip
Disable special handling of SkipTest exceptions.
--with-id
Enable plugin TestId: Activate to add a test id (like #1) to each test name output. Activate with –failed to rerun failing tests only. [NOSE_WITH_ID]
--id-file=FILE
Store test ids found in test runs in this file. Default is the file .noseids in the working directory.
--failed
Run the tests that failed in the last test run.
--processes=NUM
Spread test run among this many processes. Set a number equal to the number of processors or cores in your machine for best results. Pass a negative number to have the number of processes automatically set to the number of cores. Passing 0 means to disable parallel testing. Default is 0 unless NOSE_PROCESSES is set. [NOSE_PROCESSES]
--process-timeout=SECONDS
Set timeout for return of results from each test runner process. Default is 10. [NOSE_PROCESS_TIMEOUT]
--process-restartworker
If set, will restart each worker process once their tests are done, this helps control memory leaks from killing the system. [NOSE_PROCESS_RESTARTWORKER]
--with-xunit
Enable plugin Xunit: This plugin provides test results in the standard XUnit XML format. [NOSE_WITH_XUNIT]
--xunit-file=FILE
Path to xml file to store the xunit report in. Default is nosetests.xml in the working directory [NOSE_XUNIT_FILE]
--xunit-testsuite-name=PACKAGE
Name of the testsuite in the xunit xml, generated by plugin. Default test suite name is nosetests.
--xunit-prefix-with-testsuite-name
Whether to prefix the class name under test with testsuite name. Defaults to false.
--all-modules
Enable plugin AllModules: Collect tests from all python modules. [NOSE_ALL_MODULES]
--collect-only
Enable collect-only: Collect and output test names only, don’t run any tests. [COLLECT_ONLY]
更详细的信息请参考:https://nose.readthedocs.io/en/latest/usage.html
6. 完整代码示例
完整代码请百度:incubator/python-ci-demo.git
7. Jenkins设置
【execute shell】
ls -l
#!/bin/bash -ilex
source /etc/profile
cd ENV/Scripts
activate.bat
cd ../../
cd python_ci_demo/test_case
#coverage run TestDemo.py
nosetests --with-xunit --with-coverage TestDemo.py
coverage xml -i
# Below is to fix the warning message "The resource for xxxxxx is not found, drilling down to the details of this test won t be possible"
# Reference: https://stackoverflow.com/questions/41987620/number-of-unit-test-using-nosetests-is-not-reflecting-in-sonar-report-for-python
sed -i 's/classname="/classname="python_ci_demo.test_case./g' $WORKSPACE/python_ci_demo/test_case/nosetests.xml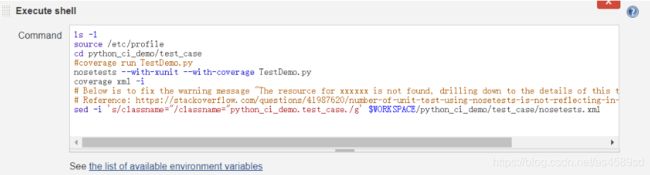
【Execute SonarQube Scanner】
sonar.projectKey=python_ci_demo
sonar.projectName=python_ci_demo
sonar.projectVersion=1.0
sonar.languarge
sonar.python.coverage.reportPath=./python_ci_demo/test_case/coverage.xml
sonar.python.xunit.reportPath=./python_ci_demo/test_case/nosetests.xml
sonar.sources=./python_ci_demo
#sonar.exclusions=python_ci_demo/test_case/*
#sonar.tests=

8. python虚拟环境--virtualenv
virtualenv is a tool to create isolated Python environments.
解决的基本问题是依赖和版本之一,以及间接权限。
假设您有一个需要版本1的应用程序,但是另一个应用程序需要版本2。如何使用这两个应用程序?如果您将所有内容都安装到/usr/lib/python2.7/site-packages中(或者无论平台的标准位置是什么),那么很容易导致意外升级不应该升级的应用程序。或者更一般地说,如果你想安装一个应用程序,然后留下它呢?如果应用程序工作,则其库或这些库的版本中的任何更改都会破坏应用程序。
另外,如果无法将包安装到全局站点包目录中呢?例如,在共享主机上。在所有这些情况下,VielalEnV可以帮助你。它创建一个具有自己的安装目录的环境,该环境不与其他virtualenv环境共享库(并且可选地也不访问全局安装的库)。
8.1 安装
官网上给出了3个Warning,我在这里理解为建议:
- We advise installing virtualenv-1.9 or greater. Prior to version 1.9, the pip included in virtualenv did not download from PyPI over SSL. (建议安装1.9版本或1.9版本以上)
- When using pip to install virtualenv, we advise using pip 1.3 or greater. Prior to version 1.3, pip did not download from PyPI over SSL.(建议pip的版本在1.3或以上)
- We advise against using easy_install to install virtualenv when using setuptools < 0.9.7, because easy_install didn’t download from PyPI over SSL and was broken in some subtle ways.(在使用setuptools版本小于0.9.7区安装virtualenv时,不建议使用easy_install)
安装方式:
- 1、使用pip安装
pip install virtualenv - 2、从GitHub上安装最新的版本
pip install https://github.com/pypa/virtualenv/tarball/master- 3、下载tar.gz文件进行安装
$ curl -O https://pypi.python.org/packages/source/v/virtualenv/virtualenv-X.X.tar.gz $ tar xvfz virtualenv-X.X.tar.gz $ cd virtualenv-X.X
$ [sudo] python setup.py install
注意:无论使用哪种方式进行安装,请提供root权限!
- 4、如若不提供root/管理员权限,会有如下报错(本人的环境是Windows10,Linux环境下也会有相应的报错)

8.2 使用virtualenv
创建虚拟环境
virtualenv ENV运行以上命令后,会在当前目录,(请注意,是当前目录!)生成放置新的虚拟环境的目录ENV

以上分别为Windows环境和Linux(centos7)上的虚拟环境目录结构,我们看下官网怎么说:
ENV/lib/ and ENV/include/ are created, containing supporting library files for a new virtualenv python. Packages installed in this environment will live under ENV/lib/pythonX.X/site-packages/.
ENV/bin is created, where executables live - noticeably a new python. Thus running a script with #! /path/to/ENV/bin/python would run that script under this virtualenv’s python.
The crucial packages pip and setuptools are installed, which allow other packages to be easily installed to the environment. This associated pip can be run from ENV/bin/pip.
显然,官网上给出的是Linux下的目录结构说明:首先,lib/include目录包含的是支持一个新的python虚拟环境所需的library,新安装的包会放在ENV/lib/pythonX.X/site-packages/目录下;
另外,ENV/bin目录是可执行文件存在的目录;并且,pip 和 setuptools包都已经安装好了
在Windows下,您可以将Scripts包看成是Linux下的bin目录。
activate script(激活)
linux
$ source bin/activate![]()
windows
/your_project/env/Scripts/activate
在这个时候,您就可以像平常一样去安装相应的依赖包了,当前的python环境是完全独立的
The python in your new virtualenv is effectively isolated from the python that was used to create it.
如果你想要退出当前的虚拟环境,只需要:
deactivate如果你想要删除该虚拟环境,只需要退出当前虚拟环境,然后删除当前虚拟环境的根目录所在文件即可
9. sphinx生成api文档
Sphinx是一个可以用于Python的自动文档生成工具,可以自动的把docstring转换为文档,并支持多种输出格式包括html,latex,pdf等
安装
pip install sphinx 包结构为:
![]()
另外还会安装一系列相关依赖包:

使用
在项目中新建doc文件夹,运行以下命令:
sphinx-quickstart
这时候,会有一系列的配置需要我们确定,我们先确定【autodoc】为yes,其他默认:
![]()
这时候,会在目录下该目录下生成一下文件目录结构:

其中,build文件夹存放生成的文档;source存放sphinx工程源码
在source中有两个最主要的文件,分别是:index.rst 和 conf.py
.rst是reStructuredText,和Markdown一样是一种标记语言,具体的语法可以看这里 reStructuredText Primer。 实际上,我们在使用Sphinx的过程中最主要就是对这些rst文件进行修改,而Sphinx所做的事情就是读取这些rst文件,并转换为特定格式的文档
而conf.py则是运行sphinx生成文档时会加载的配置,你可以通过对它进行修改来改变生成文档的行为。
进入source目录,打开index.rst
- 将index.rst 修改为如下,实际上这里面可以写任何满足rst规范的内容
Welcome to demo's API Documentation ======================================

.. toctree::
 :maxdepth: 2
 :caption: Contents:

Introduction ============
This is the introduction of demo。

API ===
.. automodule:: run
 :members:

Indices and tables ==================
* :ref:`genindex`
* :ref:`modindex`
* :ref:`search`
这个是用于自动从模块读取docstring的语句,可以自动从run模块读取文档
.. automodule:: python_ci_demo
:members:但是现在还差一步,如果你现在直接生成文档,会告诉你找不到python_ci_demo模块,因为Sphinx默认只会从sys.path里加载模块,所以需要将demo目录加入sys.path,所以现在打开conf.py,添加如下内容
import os
import sys
sys.path.insert(0, os.path.abspath('../..'))3
运行Sphinx生成html文档
sphinx-build -b html source build make html 现在,打开build/html/index.html就可以看到如下界面了

10. Jenkins构建错误信息及其参考
10.1 File can't be indexed twice
Jenkins Error Message
20:11:05.300 INFO: ------------------------------------------------------------------------
20:11:05.300 INFO: EXECUTION FAILURE
20:11:05.300 INFO: ------------------------------------------------------------------------
20:11:05.300 INFO: Total time: 3.763s
20:11:05.422 INFO: Final Memory: 51M/640M
20:11:05.422 INFO: ------------------------------------------------------------------------
20:11:05.422 ERROR: Error during SonarQube Scanner execution
File python_ci_demo/test_case/nosetests.xml can't be indexed twice. Please check that inclusion/exclusion patterns produce disjoint sets for main and test files
WARN: Unable to locate 'report-task.txt' in the workspace. Did the SonarScanner succedeed?
ERROR: SonarQube scanner exited with non-zero code: 1
Finished: FAILURE
解决方式:删除Jenkins上SonarQube Scanner步骤中的‘Analysis properties’中的sonar.test属性
参考: https://stackoverflow.com/questions/45638477/sonar-fails-with-cant-be-indexed-twice-please-check-that-inclusion-exclusion-p?rq=1
10.2 files ... none found
解决方法:请确认代码目录是否正确
11. 参考文章
以正确的方式开源 Python 项目
- https://packaging.python.org/tutorials/installing-packages/
- http://192.168.56.126/incubator/python-ci-demo.git
- https://stackoverflow.com/questions/1471994/what-is-setup-py
- https://nose.readthedocs.io/en/latest/usage.html
- https://nose.readthedocs.io/en/latest/index.html
- http://192.168.6.96:8082/jenkins/job/python-ci-demo/configure
- https://stackoverflow.com/questions/45638477/sonar-fails-with-cant-be-indexed-twice-please-check-that-inclusion-exclusion-p?rq=1