linux下gcc编程10-clion编译调试nginx
文章目录
- 1。clion简介
-
- 1.1 clion安装
-
- 1.1.1 centos
- 1.1.1 win10
-
- 1.1.1.1 cygwin安装
- 1.1.1.1 clion配置
- 2. nginx开发
-
- 2.1 nginx编译
- 2.2 转换cmake
- 2.3 nginx调试
- 2.4 nginx模块开发
- 3. window下nginx开发
-
- 3.1 nginx编译
- 3.1 手工添加handler
1。clion简介
CLion是Jetbrains公司旗下新推出的一款专为开发C/C++所设计的跨平台IDE,它是以IntelliJ为基础设计的,同时还包含了许多智能功能来提高开发人员的生产力。
同样支持python哦,相信使用过IntelliJ idea开发过java的盆友都很清楚该IDE的强大,所以做为Jetbrains旗下的c/c++开发工具CLion同样包含了许多智能功能来提高开发人员的生产力,提高开发人员的工作效率
1.1 clion安装
1.1.1 centos
clion内置使用cmake来管理编译c/c++项目,linux环境可以先按照开发工具包
yum groupinstall Development Tools
window请安装Cygwin 和MinGW,window安装教程参考其他博客。
下载你想要任何版本的clion,下载地址
下载tar.gz版本服务器解压:
tar -zxvf CLion-2019.2.1.tar.gz
假设解压地址:/soft/clion-2019.2.1,可执行文件位于:/soft/clion-2019.2.1/bin/clion.sh
桌面新建一个快捷方式 ,如桌面新建一个clion.desktop 内容:
[Desktop Entry]
Name=clion
Exec=/soft/clion-2019.2.1/bin/clion.sh
Type=Application
Icon=/soft/clion-2019.2.1/bin/clion.png
Terminal=false
1.1.1 win10
clion安装通centos一致,解压即可使用,linux本身不支持gcc和linux命令需要模拟环境。
1.1.1.1 cygwin安装
linux支持两款模拟linux编译环境,cygwin和mingw,比较两个差异。
1、从目标上说MinGW 是让Windows 用户可以用上GNU 工具,比如GCC。Cygwin 提供完整的类Unix 环境,Windows 用户不仅可以使用GNU 工具,理论上Linux 上的程序只要用Cygwin 重新编译,就可以在Windows 上运行。
2、从能力上说如果程序只用到C/C++ 标准库,可以用MinGW 或Cygwin 编译。如果程序还用到了POSIX API,则只能用Cygwin 编译。
3、从依赖上说程序经MinGW 编译后可以直接在Windows 上面运行。程序经Cygwin 编译后运行,需要依赖安装时附带的cygwin1.dll。
并且cygwin是个完全模拟unix,unix相关库都可以直接通过管理工具下载安装,如gcc,pcre,zlib,无需重复编译。
安装包下载:https://cygwin.com/install.html,64位管理工具
点击安装工具,步骤中选择163或者aliyun私服

对于新手来说,需安装Base,Devel,Libs,Net,System,Utils几个模块
- Base中安装shell,core包,sed,tar,which等模块
- Devel中安装auomake,gcc,git,gdb,make,mingw,其他源码包等模块。
- Net中安装包含网络(nfs,ftp,http),openss等模块。
- System中安装系统相关,包括:usb驱动,ext2文件系统,监控等模块
- Utils中安装时间,hash,文件归档等帮助相关模块。
安装完大概占用系统空间 18G (注意选择磁盘空间)。
如果发现某些包忘记安装,可重新打开管理工具安装。
安装完成后,cygwin在桌面上新增了一个 Cygwin64 Terminal工具,用于直接打开shell窗口。
该工具[/根目录]位于你安装的cygwin64根目录,工作目录:/home/window用户名。
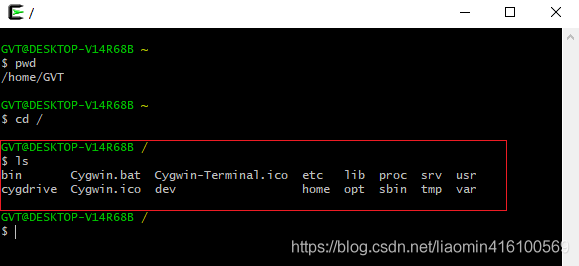
其他盘符目录格式为:
GVT@DESKTOP-V14R68B /
$ cd f:/
GVT@DESKTOP-V14R68B /cygdrive/f
如果需要在clion或者shell中引用其他盘,需要路径为:/cygdrive/f (表示f盘)
1.1.1.1 clion配置
clion选择 File-Setting-Build,Execution,Deployment-Toolchains选择cygwin-选择目录
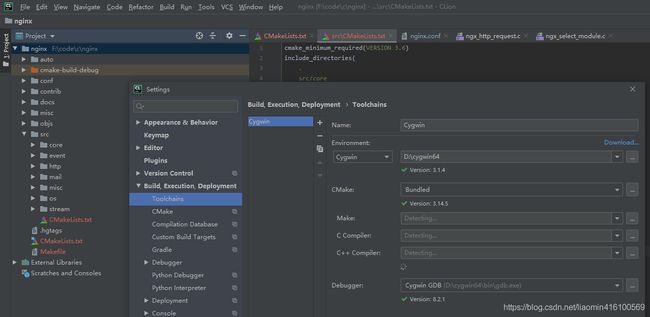
此时可以新建c语言项目进行开发调试了。
2. nginx开发
2.1 nginx编译
下载nginx源码
git clone https://github.com/nginx/nginx.git
nginx使用automake编译源码,clion使用cmake编译源码,可喜的是最终两种编译方式最终都会生成makefile,可以理解技术是相通的,在automake执行时可以让其生成cmakelist.txt或者将生成的makefile转换成cmakelist.xt。
完全懂cmake和make和automake技术的同学,转换不是难事,不懂的就麻烦,不过有用心的同学已经提供了这样的脚本,这里就不自己去编写了,参考:nginx_cmake
2.2 转换cmake
针对该脚本和clion和cmakelist.txt位置问题,步骤尚未调整
1.将src中的cmake复制进nginx/auto里边
修改cmake文件(两处#********部分)
#!/usr/bin/env bash
#NGX_CMAKE_FILE=$NGX_OBJS/CMakeLists.txt
#********此处生成到项目跟目录,修改$NGX_OBJS/CMakeLists.txt为CMakeLists.txt
NGX_CMAKE_FILE=CMakeLists.txt
NGX_CMAKE_TMP=$NGX_OBJS/tmp

#output includes
cmake_ngx_incs=`echo $CORE_INCS $NGX_OBJS $HTTP_INCS $MAIL_INCS\
             | sed -e "s/  *\([^ ][^ ]*\)/$ngx_regex_cont\1/g" \
                   -e "s/\//$ngx_regex_dirsep/g"`
cat << END                                  > $NGX_CMAKE_TMP
cmake_minimum_required(VERSION 3.6)
include_directories(
    .
    $cmake_ngx_incs)
END

#output src
cmake_ngx_src="$CORE_SRCS $HTTP_SRCS $MAIL_SRCS $NGX_MISC_SRCS $NGX_ADDON_SRCS $NGX_SHARED_SRCS"

cmake_ngx_src=`echo $cmake_ngx_src | sed -e "s/  *\([^ ][^ ]*\)/$ngx_regex_cont\1/g"\
                             -e "s/\//$ngx_regex_dirsep/g"`

#******** 次数将ngx_modules.c修改为$NGX_OBJS/ngx_modules.c
cat << END                                    >> $NGX_CMAKE_TMP
set(SOURCE_FILES
    $NGX_OBJS/ngx_modules.c
    $cmake_ngx_src)
END

#output target
cat << END                                   >> $NGX_CMAKE_TMP
add_executable(nginx \${SOURCE_FILES})
END


#output lib
echo ${CORE_LIBS}
CMAKE_CORE_LIBS=`echo ${CORE_LIBS} | sed -e "s/-l//g"`

cat << END                                   >> $NGX_CMAKE_TMP
target_link_libraries(nginx $CMAKE_CORE_LIBS)
END

if [ -f $NGX_CMAKE_TMP ]
then
    (cat $NGX_CMAKE_TMP | sed -e "s/\\\//g") > $NGX_CMAKE_FILE
    rm $NGX_CMAKE_TMP
fi

这个ngx_modules.c是nginx编译后记录所有模块的字典文件,nginx就是根据这个文件知道要执行哪些模块,所有通过./auto/configure --add-module=/root/CLionProjects/nginx/src/http/mymodule的所有模块都被会生成写入到这个文件。
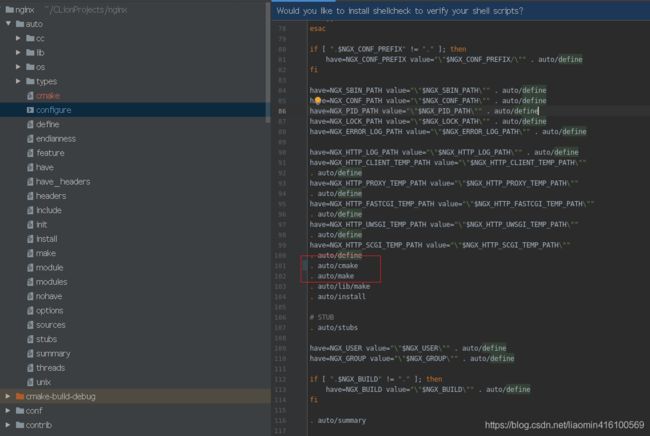
2.将nginx/auto/configure中的. auto/make内容上加上. auto/cmake
3.正常编译Nginx(若没有指定目录,则相关文件在objs/下)
clion打开teminal窗口 执行命令:
./auto/configure
nginx默认需要依赖的pcre,zlib等需要安装devel库 参考博文:
https://blog.csdn.net/liaomin416100569/article/details/72897641
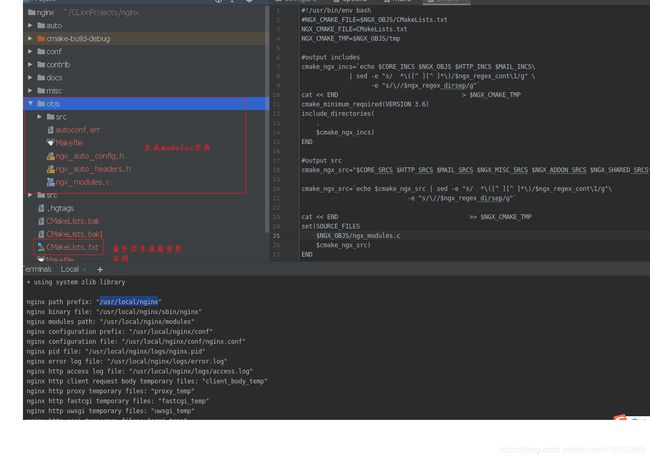
这里./configure目录就是检查依赖关系,最终生成ngx_modules.c,最终编译还得靠CmakeLists.txt。
ok到这里编译基本可以通过了 ,此时可以打开main方法的类:src/core/nginx.c运行了。
点击修改运行配置将配置文件指向当前项目conf/nginx.conf方便调试:
Program arguments中设置
 -c  /root/CLionProjects/nginx/conf/nginx.conf

此时运行可能会报错 ,缺少/usr/local/nginx或者/usr/local/nginx/logs目录,这是因为你配置时未指定prefix默认启动的日志和进程等运行时信息都会写入这个目录,新建这两个目录即可。
mkdir -p /usr/local/nginx/logs
2.3 nginx调试
经过上述转换过程基本可以启动nginx了,并且可通过命令查看到nginx进程了,但是进程在clion中一启用就自动结束了,但是系统中有进程,细心的就知道了,这是因为daemon引起的。
nginx.conf中取消daemon:
daemon off;
修改后发现进程虽然不自动关闭,但是关闭clion进程,linux还是存在worker进程,细心的就知道了停止的是master进程,这是master-worker进程模式引起的,此时因为取消master模式:
master_process off;
此时就可以愉快的在clion中断点任意调试,方便代码阅读和确认。
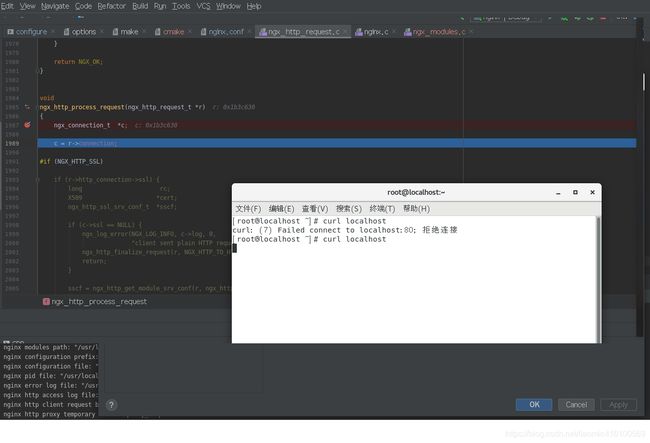
比如在src/http/ngx_http_connection.c方法ngx_http_process_request中下断点,所有请求都被被这个函数处理,通过curl访问:
curl localhost
2.4 nginx模块开发
关于nginx模块开发建议参考tengine开发人员编写的 《nginx开发从入门到精通》,实在是经典阿,4个小时阅读完成并完成helloworld,感谢。
- 首先阅读下nginx架构和nginx封装的数据结构
http://tengine.taobao.org/book/chapter_02.html - 接下来阅读handler模块(这篇读完基本可以开发指令了)
http://tengine.taobao.org/book/chapter_03.html
接下来我编写一个say指令位于location指令下,访问时输出say内容.
src/http/下新增一个mymodule目录:新建文件ngx_http_helloworld_module.c文件,内容:
/*
 * Copyright (C) Igor Sysoev
 * Copyright (C) Nginx, Inc.
 */


#include
#include
#include
/**
 * 定义一个结构体用于接受配置
 */
typedef struct
{
    ngx_str_t hello_string;
}ngx_http_hello_loc_conf_t;

/**
 *
 * @param cf 该参数里面保存从配置文件读取到的原始字符串以及相关的一些信息。特别注意的是这个参数的args字段是一个ngx_str_t类型的数组,
 *          该数组的首个元素是这个配置指令本身,第二个元素是指令的第一个参数,第三个元素是第二个参数,依次类推。
 * @param cmd 这个配置指令对应的ngx_command_t结构。
 * @param conf 就是定义的存储这个配置值的结构体,比如在上面展示的那个ngx_http_hello_loc_conf_t。当解析这个hello_string变量的时候,
 *          传入的conf就指向一个ngx_http_hello_loc_conf_t类型的变量。用户在处理的时候可以使用类型转换,转换成自己知道的类型,再进行字段的赋值。
 * @return 处理成功时,返回NGX_OK,否则返回NGX_CONF_ERROR或者是一个自定义的错误信息的字符串。
 */
static char *ngx_http_hello_string(ngx_conf_t *cf, ngx_command_t *cmd,
                                   void *conf);
/**
 * 调用该函数创建本模块位于location block的配置信息存储结构。每个在配置中指明的location创建一个。该函数执行成功,返回创建的配置对象。失败的话,返回NULL。
 * @param cf
 * @return
 */
static void *ngx_http_hello_create_loc_conf(ngx_conf_t *cf);

static ngx_int_t
ngx_http_hello_init(ngx_conf_t *cf);

/**
 * say指令默认没有值使用默认值
 */
static u_char ngx_hello_default_string[] = "Hello, world!";


/**
 * 参数1:定义指令名称
 * 参数2:指令位置 接受一个参数或者没有参数
 * 参数3:这是一个函数指针,当nginx在解析配置的时候,如果遇到这个配置指令,将会把读取到的值传递给这个函数进行分解处理。因为具体每个配置指令的值如何处理,只
 *  有定义这个配置指令的人是最清楚的。来看一下这个函数指针要求的函数原型。
 */
static ngx_command_t ngx_http_hello_commands[] = {
        {
                ngx_string("say"),
                NGX_HTTP_LOC_CONF|NGX_CONF_NOARGS|NGX_CONF_TAKE1,
                ngx_http_hello_string,
                NGX_HTTP_LOC_CONF_OFFSET,
                offsetof(ngx_http_hello_loc_conf_t, hello_string),
                NULL },

        ngx_null_command
};

/**
 * nginx加载模块时生命周期函数定义 ,other :http://tengine.taobao.org/book/chapter_03.html
 * 这是一个ngx_http_module_t类型的静态变量。这个变量实际上是提供一组回调函数指针,这些函数有在创建存储配置信息的对象的函数,也有在创建前和创建后会调用的函数。这些函数都将被nginx在合适的时间进行调用。
 *  preconfiguration:
 	    在创建和读取该模块的配置信息之前被调用。
    postconfiguration:
        在创建和读取该模块的配置信息之后被调用。
 */
static ngx_http_module_t ngx_http_hello_module_ctx = {
        NULL,                          /* preconfiguration */
        ngx_http_hello_init,           /* postconfiguration */

        NULL,                          /* create main configuration */
        NULL,                          /* init main configuration */

        NULL,                          /* create server configuration */
        NULL,                          /* merge server configuration */

        ngx_http_hello_create_loc_conf, /* create location configuration */
        NULL                            /* merge location configuration */
};

ngx_module_t ngx_http_hello_module = {
        NGX_MODULE_V1,
        &ngx_http_hello_module_ctx,    /* module context */
        ngx_http_hello_commands,       /* module directives */
        NGX_HTTP_MODULE,               /* module type */
        NULL,                          /* init master */
        NULL,                          /* init module */
        NULL,                          /* init process */
        NULL,                          /* init thread */
        NULL,                          /* exit thread */
        NULL,                          /* exit process */
        NULL,                          /* exit master */
        NGX_MODULE_V1_PADDING
};


static void *ngx_http_hello_create_loc_conf(ngx_conf_t *cf)
{
    ngx_http_hello_loc_conf_t* local_conf = NULL;
    local_conf = ngx_pcalloc(cf->pool, sizeof(ngx_http_hello_loc_conf_t));
    if (local_conf == NULL)
    {
        return NULL;
    }

    ngx_str_null(&local_conf->hello_string);

    return local_conf;
}
/**
 *
 * @param cf 该参数里面保存从配置文件读取到的原始字符串以及相关的一些信息。特别注意的是这个参数的args字段是一个ngx_str_t类型的数组,
 *          该数组的首个元素是这个配置指令本身,第二个元素是指令的第一个参数,第三个元素是第二个参数,依次类推。
 * @param cmd 这个配置指令对应的ngx_command_t结构。
 * @param conf 就是定义的存储这个配置值的结构体,比如在上面展示的那个ngx_http_hello_loc_conf_t。当解析这个hello_string变量的时候,
 *          传入的conf就指向一个ngx_http_hello_loc_conf_t类型的变量。用户在处理的时候可以使用类型转换,转换成自己知道的类型,再进行字段的赋值。
 * @return 处理成功时,返回NGX_OK,否则返回NGX_CONF_ERROR或者是一个自定义的错误信息的字符串。
 */
static char *
ngx_http_hello_string(ngx_conf_t *cf, ngx_command_t *cmd, void *conf)
{

    ngx_http_hello_loc_conf_t* local_conf;


    local_conf = conf;
    char* rv = ngx_conf_set_str_slot(cf, cmd, conf);

    ngx_conf_log_error(NGX_LOG_EMERG, cf, 0, "hello_string:%s", local_conf->hello_string.data);

    return rv;
}


static ngx_int_t
ngx_http_hello_handler(ngx_http_request_t *r)
{
    ngx_int_t    rc;
    ngx_buf_t   *b;
    ngx_chain_t  out;
    ngx_http_hello_loc_conf_t* my_conf;
    u_char ngx_hello_string[1024] = {0};
    ngx_uint_t content_length = 0;

    ngx_log_error(NGX_LOG_EMERG, r->connection->log, 0, "ngx_http_hello_handler is called!");

    my_conf = ngx_http_get_module_loc_conf(r, ngx_http_hello_module);
    if (my_conf->hello_string.len == 0 )
    {
        ngx_log_error(NGX_LOG_EMERG, r->connection->log, 0, "hello_string is empty!");
        return NGX_DECLINED;
    }
    ngx_sprintf(ngx_hello_string, "%s", my_conf->hello_string.data);

    ngx_log_error(NGX_LOG_EMERG, r->connection->log, 0, "hello_string:%s", ngx_hello_string);
    content_length = ngx_strlen(ngx_hello_string);

    /* we response to 'GET' and 'HEAD' requests only */
    if (!(r->method & (NGX_HTTP_GET|NGX_HTTP_HEAD))) {
        return NGX_HTTP_NOT_ALLOWED;
    }

    /* discard request body, since we don't need it here */
    rc = ngx_http_discard_request_body(r);

    if (rc != NGX_OK) {
        return rc;
    }

    /* set the 'Content-type' header */
    /*
     *r->headers_out.content_type.len = sizeof("text/html") - 1;
     *r->headers_out.content_type.data = (u_char *)"text/html";
     */
    ngx_str_set(&r->headers_out.content_type, "text/html");


    /* send the header only, if the request type is http 'HEAD' */
    if (r->method == NGX_HTTP_HEAD) {
        r->headers_out.status = NGX_HTTP_OK;
        r->headers_out.content_length_n = content_length;

        return ngx_http_send_header(r);
    }

    /* allocate a buffer for your response body */
    b = ngx_pcalloc(r->pool, sizeof(ngx_buf_t));
    if (b == NULL) {
        return NGX_HTTP_INTERNAL_SERVER_ERROR;
    }

    /* attach this buffer to the buffer chain */
    out.buf = b;
    out.next = NULL;

    /* adjust the pointers of the buffer */
    b->pos = ngx_hello_string;
    b->last = ngx_hello_string + content_length;
    b->memory = 1;    /* this buffer is in memory */
    b->last_buf = 1;  /* this is the last buffer in the buffer chain */

    /* set the status line */
    r->headers_out.status = NGX_HTTP_OK;
    r->headers_out.content_length_n = content_length;

    /* send the headers of your response */
    rc = ngx_http_send_header(r);

    if (rc == NGX_ERROR || rc > NGX_OK || r->header_only) {
        return rc;
    }

    /* send the buffer chain of your response */
    return ngx_http_output_filter(r, &out);
}
/**
 * 配置文件读取完毕后需要去挂载handler
 * 为了更精细地控制对于客户端请求的处理过程,nginx把这个处理过程划分成了11个阶段。他们从前到后
 *  NGX_HTTP_POST_READ_PHASE:
 	读取请求内容阶段
    NGX_HTTP_SERVER_REWRITE_PHASE:
        Server请求地址重写阶段
    NGX_HTTP_FIND_CONFIG_PHASE:
        配置查找阶段:
    NGX_HTTP_REWRITE_PHASE:
        Location请求地址重写阶段
    NGX_HTTP_POST_REWRITE_PHASE:
        请求地址重写提交阶段
    NGX_HTTP_PREACCESS_PHASE:
        访问权限检查准备阶段
    NGX_HTTP_ACCESS_PHASE:
        访问权限检查阶段
    NGX_HTTP_POST_ACCESS_PHASE:
        访问权限检查提交阶段
    NGX_HTTP_TRY_FILES_PHASE:
        配置项try_files处理阶段
    NGX_HTTP_CONTENT_PHASE:
        内容产生阶段
    NGX_HTTP_LOG_PHASE:
        日志模块处理阶段
 * 一般情况下,我们自定义的模块,大多数是挂载在NGX_HTTP_CONTENT_PHASE阶段的。挂载的动作一般是在模块上下文调用的postconfiguration函数中。
 * @param cf
 * @return
 */
static ngx_int_t
ngx_http_hello_init(ngx_conf_t *cf)
{
    ngx_http_handler_pt        *h;
    ngx_http_core_main_conf_t  *cmcf;

    cmcf = ngx_http_conf_get_module_main_conf(cf, ngx_http_core_module);

    h = ngx_array_push(&cmcf->phases[NGX_HTTP_CONTENT_PHASE].handlers);
    if (h == NULL) {
        return NGX_ERROR;
    }

    *h = ngx_http_hello_handler;

    return NGX_OK;
}
源代码同目录新增config文件
ngx_addon_name=ngx_http_hello_module
HTTP_MODULES="$HTTP_MODULES ngx_http_hello_module"
NGX_ADDON_SRCS="$NGX_ADDON_SRCS $ngx_addon_dir/ngx_http_helloworld_module.c"
重新configure生成新ngx_module.c
./auto/configure --add-module=/root/CLionProjects/nginx/src/http/mymodule

conf/nginx.conf中添加say:helloworld
       location / {
            say   "helloworld";
            root   html;
            index  index.html index.htm;
        }
3. window下nginx开发
3.1 nginx编译
如果直接使用linux下编译的CMakeLists.txt,则会出现
[ 10%] Building C object CMakeFiles/nginx.dir/src/os/unix/ngx_linux_init.c.o
/cygdrive/f/code/c/nginx/src/os/unix/ngx_linux_init.c: In function 'ngx_os_specific_init':
/cygdrive/f/code/c/nginx/src/os/unix/ngx_linux_init.c:36:21: error: storage size of 'u' isn't known
   36 |     struct utsname  u;
      |                     ^
/cygdrive/f/code/c/nginx/src/os/unix/ngx_linux_init.c:38:9: warning: implicit declaration of function 'uname'; did you mean 'rename'? [-Wimplicit-function-declaration]
   38 |     if (uname(&u) == -1) {
      |         ^~~~~
      |         rename
make[3]: *** [CMakeFiles/nginx.dir/build.make:908: CMakeFiles/nginx.dir/src/os/unix/ngx_linux_init.c.o] Error 1
实际上是因为cmakelist.txt文件以下三行引起:
	src/os/unix/ngx_linux_init.c
	src/event/modules/ngx_epoll_module.c
	src/os/unix/ngx_linux_sendfile_chain.c
替换成:
	event/modules/ngx_select_module.c
	event/modules/ngx_poll_module.c
如果不想替换,可以直接使用之间的2.2转换cmake后,使用cygwin直接编译生成的cmakelist.txt自然就是我所讲的没换内容。
打开Cygwin64 Terminal
GVT@DESKTOP-V14R68B /cygdrive/f/code/c/nginx
$ pwd
/cygdrive/f/code/c/nginx

GVT@DESKTOP-V14R68B /cygdrive/f/code/c/nginx
$ ./auto/configure

同nginx设置当前项目nginx.conf,比如代码在f:/code/c/nginx/conf/nginx.conf,指定必须按照cygwin路径来指定: -c /cygdrive/f/code/c/nginx/conf/nginx.conf。
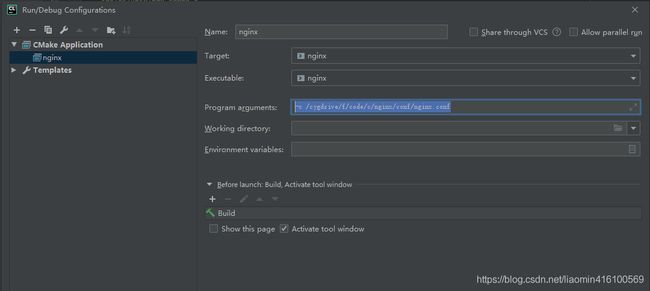
打开Cygwin64 Terminal,创建目录/usr/local/nginx/logs。
接下来直接运行,报错:
F:\code\c\nginx\cmake-build-debug\nginx.exe -c /cygdrive/f/code/c/nginx/conf/nginx.conf
nginx: [emerg] the maximum number of files supported by select() is 64
通过搜索源码:the maximum number of files 发现416行逻辑,调试下断点:

发现nginx.conf配置的连接数不能大于FD_SETSIZE对应的64,将
events {

    worker_connections  1024;
}
修改为小于64将不会出现这个问题。
3.1 手工添加handler
由于开发一个handler,configure在window的速度太慢所有直接手工修改ngx_modules.c和CmakeLists.txt。
- ngx_modules.c 用于指定所有存在的模块信息(这个必须要configure一次才有)。
- CmakeLists.txt 需要应用模块信息对应的c文件。
ngx_modules.c修改:
- 添加模块外部定义应用。
extern ngx_module_t ngx_http_hello_module;
- 添加到nginx模块数组,将来nginx直接从这拿。
ngx_modules[]={

 。。。
 &ngx_http_hello_module,
 NULL
}
- 添加到nginx模块名称数组,将来nginx直接从这拿。
char *ngx_module_names[] = {

 。。。
 "ngx_http_hello_module",
 NULL
}
- nginx.conf配置指令say
        location / {

            say   "helloworld";
            root   html;
            index  index.html index.htm;
        }
启动:curl localhost,打印:helloworld。

