Chinese-whisper:一种简洁的分类方法
写在前面
近来利用神经网络提取人脸特征的方法越来越多,人脸相似性匹配准确度也越来越高。但仍然没有找到一种适合于未知类别数量,自动划分的方法,而k-means等聚类方法均是要预先设定分类数量后再开始进行聚类操作。
在博客的介绍下,了解了一种比较简单的无监督分类方法,chinese-whisper。
现将具体实验总结如下
CW-算法
【适用场景】
未知具体分类数量,自动查找类别个数并进行快速聚类。
【算法核心】
初始化
构建无向图,以每个节点为一个类别,不同节点之间计算相似度,当相似度超过threshold,将两个节点相连形成关联边,权重为相似度。
迭代
1.随机选取一个节点i开始,在其邻居中选取边权重最大者j,并将该点归为节点j类(若邻居中有多个节点(j,k,l)属于同一类,则将这些节点权重相加再参与比较)。
2.遍历所有节点后,重复迭代至满足迭代次数。
【算法分析】
1.特征向量高要求
从算法介绍可以看出,该算法即是对两两匹配的升级。因而该算法一个很大影响因素即为门限threshold的选取。
算法的准确度又会回归到神经网络的核心要求,增大类间间距,减小类内间距。另外,该算法对于类别数较多的情况下,可能会有较差的结果,即类别越多,当前空间下的特征向量区分性越差。
2.随机性较大
该算法的一个重大缺陷在于其随机性较大。究其原因,每次迭代会随机选取开始节点,因而对于模糊节点而言,不同遍历次序会使该节点被归在不同类别中。

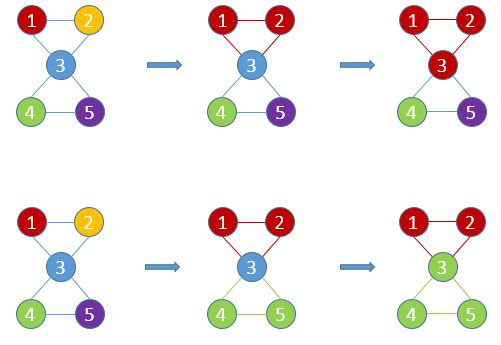
对于上图,正确分类为{1,2},{3,4,5}。然而由于特征向量表现度不够,3节点归类较为模糊。
若遍历次序为1→2→3,节点{1,2}会优先归在同一类,导致3节点有更大可能性被归属于{1,2,3},因为此时{4},{5}仍是独立类别。
若遍历次序为4→5→3,节点{4,5}会优先归在同一类,导致3节点有更大可能性被归属于{3,4,5},因为此时{1},{2}仍是独立类别。
算法测试
【测试来源】
数据集为提取的lfw人脸最多的前19种,网络模型为mtcnn+resnet11。
【测试步骤】
分别选取2,3,4,5类用于分类情况测试,考虑到随机性,每个类别各测试5次。
【详细性能】
测试结果如下图,图中分类错误已用红笔圈出。
2-class
采用2个分类集时,样本数量一共119张,其中0-76属于第一类,77-118属于第二类。

准确率–100%
说明:由于5次测试结果相同,这里不再添加。
3-class
采用3个分类集时,样本数量一共355张,其中0-76属于第一类,77-118属于第二类,119-354属于第三类。

准确率–2个错误
说明:由于5次测试结果相同,这里不再添加。
4-class
采用4个分类集时,样本数量一共476张,其中0-76属于第一类,77-118属于第二类,119-354属于第三类,355-475属于第四类。
准确率–无法恒定。出现2中分类情况,见下图

第一种情况,只分出了3个类别,错误将第四类归在图中第二类

第二种情况,成功区分4个类别。准确率–6个错误
5-class
采用5个分类集时,样本数量一共1006张,其中0-76属于第一类,77-118属于第二类,119-354属于第三类,355-475属于第四类,476-1005属于第五类。
准确率–很差。见下图

除了119-354分类准确,其他全部归为了图中第0类。
5-class
采用5个分类集,每40张一类。出现随机现象。

类别划分正确,错误率较低
![]()
只划分出3种类别

划分出4中类别
【详细代码】
# -*-coding:utf-8 -*-
def face_distance(face_encodings, face_to_compare):
    """
    计算一组特征值与带比较特征值之间的距离,默认采用欧氏距离
    参数配置
    face_encodings:一组特征值,包含多个
    face_to_compare:待比较特征值,只有一个
    return:返回不同特征向量之间距离的数组矩阵
    """
    import numpy as np
    if len(face_encodings) == 0:
        return np.empty((0))
    '''
    利用numpy包进行距离估量
    http://blog.csdn.net/u013749540/article/details/51813922
    '''
    dist=[]

    """
    # 欧氏距离,考虑后续邻接边选择weight较大者,此处选取余弦相似度
    for i in range(0,len(face_encodings)):
        #sim = 1.0/(1.0+np.linalg.norm(face_encodings[i]-face_to_compare))
        sim=np.linalg.norm(face_encodings[i]-face_to_compare)
        dist.append(sim)
    """
    # 余弦相似度
    for i in range(0, len(face_encodings)):
        num=np.dot(face_encodings[i],face_to_compare)
        cos=num/(np.linalg.norm(face_encodings[i])*np.linalg.norm(face_to_compare))
        sim=0.5+0.5*cos # 归一化
        dist.append(sim)
    return dist

def find_all_index(arr,item):
    '''获取list中相同元素的索引
    输入:
        arr:待求取list
        item:待获取元素

    输出:
        相同元素索引,格式为list'''
    return [i for i, a in enumerate(arr) if a==item]

def _chinese_whispers(threshold=0.675, iterations=10):
    """ Chinese Whisper Algorithm
    算法概要
        1.初始化每个节点为一个类
        2.选取任意节点开始迭代
            选择该节点邻居中边权重最大者,将两则归为一类;若邻居中有2者以上属于同一类,将这些类权重相加进行比较

    输入:
        encoding_list:待分类的特征向量组
        threshold:判断门限,判断两个向量是否相关
        iteration:迭代次数

    输出:
        sorted_clusters:一组分类结果,按从大到小排列
    """

    from random import shuffle
    import networkx as nx
    import numpy as np
    import re
    # Create graph
    nodes = []
    edges = []

    #encoding_list格式为
    #[(path1,encode1),(path2,encode2),(path3,encode3)]
    #image_paths, encodings = zip(*encoding_list)
    feature_matrix=np.loadtxt(r'F:\5.txt')
    encodings=[]
    #image_paths=[]
    for i in range(0,len(feature_matrix)):
        encodings.append(feature_matrix[i,:])
        #image_paths.append(r'F:\outCluster\%d\\' %i)

    if len(encodings) <= 1:
        print ("No enough encodings to cluster!")
        return []

    '''
    节点初始化:
        1.将每个特征向量设为一个类
        2.计算每个特征向量之间的距离,并根据门限判定是否构成邻接边
    '''
    for idx, face_encoding_to_check in enumerate(encodings):
        # Adding node of facial encoding
        node_id = idx

        # 节点属性包括
        # node_id:节点id,(0,n-1)
        # label:节点类别,初始化每个节点一个类别
        # path:节点导出路径,用于图片分类导出
        node = (node_id, {'label':idx})
        #node = (node_id, {'label': idx, 'path': image_paths[idx]})
        nodes.append(node)

        # Facial encodings to compare
        if (idx+1) >= len(encodings):
            # Node is last element, don't create edge
            break

        #构造比较向量组
        #若当前向量为i,则比较向量组为[i+1:n]
        compare_encodings = encodings[idx+1:]
        distances = face_distance(compare_encodings, face_encoding_to_check)
        encoding_edges = []
        for i, distance in enumerate(distances):
            # 若人脸特征匹配,则在这两个节点间添加关联边
            if distance >= threshold:
                #edge_id:与node_id相连接的节点的node_id
                edge_id = idx+i+1
                encoding_edges.append((node_id, edge_id, {'weight': distance}))

        edges = edges + encoding_edges

    G = nx.Graph()
    G.add_nodes_from(nodes)
    G.add_edges_from(edges)

    '''
    迭代过程

    '''
    for _ in range(0, iterations):
        cluster_nodes = list(G.nodes()) #返回节点id
        shuffle(cluster_nodes)# 随机选取一个开始节点
        for node in cluster_nodes:
            # 当前节点的所有邻接边,如节点4邻接边为(4,5,weight=8)(4,8,weight=10)
            # 则G[4]返回值为AtlasView({5:{'weight':8}, 8:{'weight':10}})
            neighbors = G[node]
            # cluster形式
            # {'cluster_path':weight}   其中cluster_paht=node属性的cluster值
            labels = {}

            for ne in neighbors: # ne即为当前节点邻接的节点id
                if isinstance(ne, int):
                    '''
                    判断该邻居的类别是否在其他邻居中存在
                        若存在,则将相同类别的权重相加。
                    '''
                    if G.node[ne]['label'] in labels:#G.node[ne]['label']即为id=ne节点的label属性
                        labels[G.node[ne]['label']] += G[node][ne]['weight']#将这条邻接边(node,ne)的weight属性赋值给cluster[节点ne的cluster]
                    else:
                        labels[G.node[ne]['label']] = G[node][ne]['weight']

            # find the class with the highest edge weight sum
            edge_weight_sum = 0
            max_cluster = 0
            #将邻居节点的权重最大值对应的文件路径给到当前节点
            #这里cluster即为path
            for id in labels:
                if labels[id] > edge_weight_sum:
                    edge_weight_sum = labels[id]
                    max_cluster = id

            # set the class of target node to the winning local class
            #print('node %s was clustered in %s' %(node, max_cluster))
            G.node[node]['label'] = max_cluster
    list_label_out = []
    for i in range(len(encodings)):
        list_label_out.append(G.node[i]['label'])
    #print(list_label_out)

    '''

    统计分类错误数量=新类别中不属于原类别的数量      eg: list_label_out=[1,3,4,2,2,4,3,1]
    # group_all 返回最终类别标签                     group_all=[1,2,3,4]
    # group_num 最终分类数量                        group_num=4
    # group_cluster: list,返回相同标签的节点id       group_cluster=[[0,7],[3,4],[1,6],[2,5]]
    '''
    group_all = set(list_label_out)
    group_num = len(group_all)
    group_cluster = []

    for item in group_all:
        group_cluster.append(find_all_index(list_label_out,item))

    print('最终分类数量:%s' %group_num)
    for i in range(0,group_num):
        print('第%d类:%s'%(i,group_cluster[i]))


if __name__ == '__main__':
    _chinese_whispers()