LNMP环境搭建
目录
1.准备安装环境
2.编译安装nginx
3.二进制包安装mysql
4.编译安装PHP
5.nginx与php建立连接关系
6.测试php与数据库的连通性
7.下载部署Wordpress博客
1.准备安装环境
1.1检查软件安装的系统环境
[root@www ~]# cat /etc/redhat-release
CentOS release 6.6 (Final)
[root@www ~]# uname -r
2.6.32-504.el6.x86_64
1.2在安装前,先关闭防火墙和selinux
永久关闭
service iptables stop
[root@www ~]# chkconfig iptables --list
iptables 0:off 1:off 2:on 3:on 4:on 5:on 6:off
[root@www ~]# chkconfig iptables off
[root@www ~]# chkconfig iptables --list
iptables 0:off 1:off 2:off 3:off 4:off 5:off 6:off[root@www ~]# vim /etc/selinux/config
SELINUX=disabled
临时关闭
service iptables stop
setenforce 0
2.编译安装nginx
2.1安装前准备
安装nginx的依赖包
[root@www ~]# yum install pcre-devel openssl-devel -y
下载nginx软件包
[root@www ~]# wget http://nginx.org/download/nginx-1.10.2.tar.gz
解压软件包
[root@www tools]# tar xf nginx-1.10.2.tar.gz
创建nginx管理用户www
[root@www]# useradd -M -s /sbin/nologin www
[root@www ]# tail -1 /etc/passwd
www:x:500:500::/home/www:/sbin/nologin
2.2编译安装软件
在解压目录中配置文件
[root@www tools]# cd nginx-1.10.2
[root@www nginx-1.10.2]# ./configure --prefix=/usr/local/nginx-1.10.2 --user=www --group=www --with-http_stub_status_module --with-http_ssl_module
通过查看返回值,确认配置是否正确。
[root@www nginx-1.10.2]# echo $?
0--prefix 表示指定软件安装在哪个目录中,目录不存在会自动创建。
--user/--grup nginx进程由哪个用户运行管理
--with-http_stub_status_module 启动nginx状态模块功能
--with-http_ssl_module 启动https功能模块
编译软件
[root@www nginx-1.10.2]# make
编译安装
[root@www nginx-1.10.2]# make install
2.3进行配置
创建软链接
[root@www ~]# ln -sv /usr/local/nginx-1.10.2 /usr/local/nginx
`/usr/local/nginx' -> `/usr/local/nginx-1.10.2'
精简化nginx.conf主配置文件内容,使我们能更加理解。
[root@www conf]# egrep -v "#|^$" nginx.conf.default >nginx.conf 使nginx.conf.default#开头和空行去掉的内容输入到nginx.conf
检查nginx配置文件是否有语法错误
/usr/local/nginx/sbin/nginx -t
启动程序
[root@www ]# /usr/local/nginx/sbin/nginx
检查是否启动
[root@www ]# ps -ef | grep nginx
root 37632 1 0 20:57 ? 00:00:00 nginx: master process /usr/local/nginx/sbin/nginx
www 37633 37632 0 20:57 ? 00:00:00 nginx: worker process
root 37635 32746 0 20:58 pts/1 00:00:00 grep nginx[root@www ]# netstat -lntup | grep 80
tcp 0 0 0.0.0.0:80 0.0.0.0:* LISTEN 37632/nginx
2.4修改hosts解析文件
服务端
[root@www ~]# vim /etc/hosts
192.168.231.144 blog.test.com 添加
客户端
在hosts文件中添加
192.168.231.144 blog.test.com
访问验证:
3.二进制包安装mysql
3.1下载及解压
这里使用MariaDB,获取MariaDB二进制包
[root@www tools]# wget https://downloads.mariadb.org/interstitial/mariadb-5.5.61/source/mariadb-5.5.61.tar.gz/from/http://mirrors.neusoft.edu.cn/mariadb/
解压二进制源码包
[root@www tools]# tar xf mariadb-5.5.61-linux-x86_64.tar.gz
3.2进行配置
添加mysql启动用户mysql
[root@www tools]# useradd -M -s /sbin/nologin mysql
[root@www tools]# tail -1 /etc/passwd
mysql:x:501:501::/home/mysql:/sbin/nologin
将解压后的二进制包放置到程序目录中
[root@www tools]# mv mariadb-5.5.61-linux-x86_64 /usr/local/mysql-5.5.61
创建软链接
[root@www ]# ln -sv /usr/local/mysql-5.5.61 /usr/local/mysql
`/usr/local/mysql' -> `/usr/local/mysql-5.5.61'
把mysql目录中所有文件的属主改为root,属组改为mysql:
[root@www mysql]# chown -R root.mysql ./*
初始化数据库服务
[root@www mysql]# /usr/local/mysql/scripts/mysql_install_db --user=mysql --datadir=/mydata/data --basedir=/usr/local/mysql
--basedir 数据库软件命令,软件安装在哪
--datadir 数据库存放目录,数据存放在哪里
--user 管理mysql的用户,mysql的使用用户
启动mysql,复制support-files/my.server /etc/rc.d/init.d/mysqld
[root@www mysql]# cp support-files/mysql.server /etc/rc.d/init.d/mysqld
[root@www mysql]# chkconfig --add mysqld
3.3设置 mysql服务配置文件
[root@www mysql]# cp support-files/my-huge.cnf /etc/mysql/my.cnf
vim my.cnf 添加
datadir = /mydata/data 数据存放位置
innodb_file_per_table= on
skip_name_resolve= on mysql每次启动都会进行IP到域名的解析,跳过地址反解,提高速度。 mysql每次启动都会进行IP到域名的解析,跳过地址反解,提高速度。启动mysql
service mysqld start
进入mysql
[root@www ~]# mysql -u root
-bash: mysql: command not found
出现错误:
原因:因为系统默认会查找/usr/bin下的命令,由于mysql没有在这个目录下,所以出现not found。因此需要做一个软连接到/usr/bin目录下。
执行命令: ln -s /usr/local/mysql/bin/mysql /usr/bin
3.4mysql安全初始化
[root@www mysql]# bin/mysql_secure_installation
bin/mysql_secure_installation: line 393: find_mysql_client: command not foundNOTE: RUNNING ALL PARTS OF THIS SCRIPT IS RECOMMENDED FOR ALL MariaDB
SERVERS IN PRODUCTION USE! PLEASE READ EACH STEP CAREFULLY!In order to log into MariaDB to secure it, we'll need the current
password for the root user. If you've just installed MariaDB, and
you haven't set the root password yet, the password will be blank,
so you should just press enter here.Enter current password for root (enter for none):
OK, successfully used password, moving on...Setting the root password ensures that nobody can log into the MariaDB
root user without the proper authorisation.Set root password? [Y/n] y
New password:
Re-enter new password:
Password updated successfully!
Reloading privilege tables..
... Success!
By default, a MariaDB installation has an anonymous user, allowing anyone
to log into MariaDB without having to have a user account created for
them. This is intended only for testing, and to make the installation
go a bit smoother. You should remove them before moving into a
production environment.Remove anonymous users? [Y/n] y
... Success!Normally, root should only be allowed to connect from 'localhost'. This
ensures that someone cannot guess at the root password from the network.Disallow root login remotely? [Y/n] y
... Success!By default, MariaDB comes with a database named 'test' that anyone can
access. This is also intended only for testing, and should be removed
before moving into a production environment.Remove test database and access to it? [Y/n] n
... skipping.Reloading the privilege tables will ensure that all changes made so far
will take effect immediately.Reload privilege tables now? [Y/n] y
... Success!Cleaning up...
All done! If you've completed all of the above steps, your MariaDB
installation should now be secure.Thanks for using MariaDB!
4.编译安装PHP
4.1解决PHP软件的依赖关系(14个依赖包)
[root@www ~]# yum install zlib-devel libxml2-devel libjpeg-devel libjpeg-turbo-devel libiconv-devel freetype-devel libpng-devel gd-devel libcurl-devel libxslt-devel libxslt-devel -y
libconv软件yum安装不上,单独安装
#wget http://ftp.gnu.org/pub/gnu/libiconv/libiconv-1.14.tar.gz
tar zxf libiconv-1.14.tar.gz
cd libiconv-1.14
./configure --prefix=/usr/local/libiconv
make
make install
4.2安装加密相关依赖软件
[root@www ~]# yum -y install libmcrypt-devel mhash mcrypt
Loaded plugins: fastestmirror, security
Setting up Install Process
Loading mirror speeds from cached hostfile
* base: mirrors.shu.edu.cn
* extras: mirrors.shu.edu.cn
* updates: mirrors.shu.edu.cn
No package libmcrypt-devel available.
No package mhash available.
No package mcrypt available.
Error: Nothing to do
可能会出错,解决方案:
yum install epel-release -y //扩展更新包
yum update //更新yum源
更新后,即可安装:
yum -y install libmcrypt-devel mhash mcrypt
[root@www ~]# rpm -qa libmcrypt-devel mhash mcrypt
libmcrypt-devel-2.5.8-9.el6.x86_64
mhash-0.9.9.9-3.el6.x86_64
mcrypt-2.6.8-10.el6.x86_64
4.3编译安装PHP
tar xf php-5.6.38.tar.gz
cd php-5.6.38.tar.gz
./configure \
--prefix=/usr/local/php-5.6.38 \
--with-mysql=/usr/local/mysql \
--with-pdo-mysql=/usr/local/mysql \
--with-iconv-dir=/usr/local/libiconv \
--with-freetype-dir \
--with-jpeg-dir \
--with-png-dir \
--with-zlib \
--with-libxml-dir=/usr/include/libxml2 \
--enable-xml \
--disable-rpath \
--enable-bcmath \
--enable-shmop \
--enable-sysvsem \
--enable-inline-optimization \
--with-curl \
--enable-mbregex \
--enable-fpm \
--enable-mbstring \
--with-mcrypt \
--with-gd \
--enable-gd-native-ttf \
--with-openssl \
--with-mhash \
--enable-pcntl \
--enable-sockets \
--with-xmlrpc \
--enable-soap \
--enable-short-tags \
--enable-static \
--with-xsl \
--with-fpm-user=apache \
--with-fpm-group=apache \
--enable-ftp \
--enable-opcache=no输出信息
......
Generating files
configure: creating ./config.status
creating main/internal_functions.c
creating main/internal_functions_cli.c
+--------------------------------------------------------------------+
| License: |
| This software is subject to the PHP License, available in this |
| distribution in the file LICENSE. By continuing this installation |
| process, you are bound by the terms of this license agreement. |
| If you do not agree with the terms of this license, you must abort |
| the installation process at this point. |
+--------------------------------------------------------------------+Thank you for using PHP.
......
编译参数详解
/configure 编译参数
–prefix=/usr/local/php5.3.27 指定php的安装路径为/usr/local/php5.3.27
–with-mysql=/usr/local/mysql/
–with-mysql=mysqlnd替代–with-mysql=/usr/local/mysql
–with-iconv-dir=/usr/local/libiconv libiconv库,各种字符集间的转换
–with-freetype-dir 打开对freetype字体库支持
–with-jpeg-dir 打开对jpeg图片的支持
–with-png-dir 打开对png图片的支持–with-zlib 打开zlib库的支持,用于http压缩传输
–with-libxml-dir=/usr 打开libxml2库的支持
–enable-xml
–disable-rpath 关闭额外的运行库文件
–enable-safe-mode 打开安全模式
–enable-bcmath 打开图片大小调整,用zabbix监控时会用到该模块
–enable-shmop
–enable-sysvsem 使用sysv信号机制,则打开此选项
–enable-inline-optimization 优化线程–with-curl 打开curl浏览工具的支持
–with-curlwrappers 运维curl工具打开url流
–enable-mbregex
–enable-mbstring 支持mbstring
–with-mcrypt 编码函数库
–with-gd 打开gd库的支持
–enable-gd-native-ttf 支持TrueType字符串函数库
–with-openl openl的支持,加密传输时用到
–with-mhash mhash算法的扩展
–enable-pcntl freeTDS需要用到,可能是链接mql
–enable-sockets 打开sockets支持
–with-xmlrpc 打开xml-rpc的c语言
–enable-zip 打开对zip的支持
–enable-soap soap模块的扩展
–enable-short-tags 开始和标记函数
–enable-zend-multibyte 支持zend的多字节
–enable-static 生成静态链接库
–enable-ftp 打开ftp的支持
–with-xsl 打开XSLT文件支持,扩展libXML2库,需要libxslt软件
–enable-fpm 表示激活PHP-FPM方式服务,即FactCGI方式运行PHP服务。
–with-fpm-user=www 指定PHP-FPM进程管理的用户为www,此处最好和Nginx服务用户统一。
–with-fpm-group=www 指定PHP-FPM进程管理用户组为www
防止出错
ln -s /usr/local/mysql/lib/libmysqlclient.so.18  /usr/lib64/
touch ext/phar/phar.phar
编译&编译安装
make & make install
创建软链接
[root@www php-5.6.38]# ln -s /usr/local/php-5.6.38 /usr/local/php
4.4配置php解析文件和php-fpm配置文件
[root@www php-5.6.38]# ll php.ini*
-rw-r--r-- 1 1000 1000 73654 Sep 12 06:12 php.ini-development 开发人员调试的配置文件
-rw-r--r-- 1 1000 1000 73685 Sep 12 06:12 php.ini-production 生产常见的配置文件
复制配置文件
cd /tools/php-5.6.38
[root@www php-5.6.38]# cp php.ini-production /usr/local/php/bin/php.ini
cd /usr/loacl/php/etc/
[root@www etc]# cp php-fpm.conf.default php-fpm.conf
启动php-fpm程序
[root@www etc]# /usr/local/php/sbin/php-fpm
[16-Sep-2018 16:53:56] ERROR: [pool www] cannot get uid for user 'apache'
[16-Sep-2018 16:53:56] ERROR: FPM initialization failed
出现错误,解决方案:
修改/usr/loacl/php/etc/php-fpm文件,可以用nginx的用户www
user = www
group = www
查看php使用端口
[root@www etc]# netstat -lntup | grep 9000
tcp 0 0 127.0.0.1:9000 0.0.0.0:* LISTEN 10928/php-fpm
5.nginx与php建立连接关系
5.1修改ngxin配置文件
在http中添加如下内容,并在/etc/hosts中添加192.168.231.144 blog.test.com,客户端也要修改hosts文件
[root@www conf]# vim nginx.conf
server {
listen 80;
server_name blog.test.com;
location / {
root html;
index index.php index.html index.htm;
}
location ~* .*\.(php|php5)?$ {
root html;
fastcgi_pass 127.0.0.1:9000;
fastcgi_index index.php;
include fastcgi.conf;
}
}
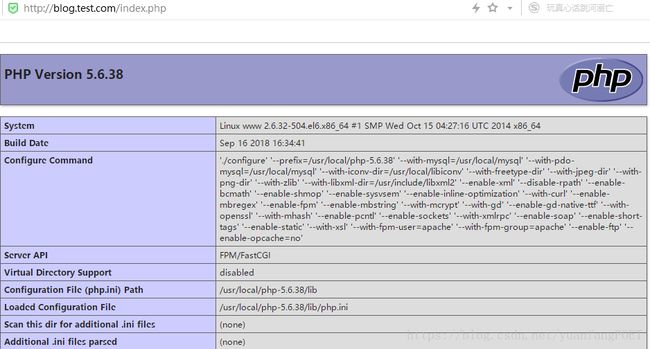
在/usr/local/nginx/html中创建一个index.php文件,并输入如下内容测试:
phpinfo();
?>
修改nginx.conf文件后重启服务:
[root@www html]# /usr/local/nginx/sbin/nginx -t 检查nginx.conf文件是否有语法错误
nginx: the configuration file /usr/local/nginx-1.10.2/conf/nginx.conf syntax is ok
nginx: configuration file /usr/local/nginx-1.10.2/conf/nginx.conf test is successful
[root@www html]# /usr/local/nginx/sbin/nginx -s reload 重启nginx服务
访问效果如下:
6.测试php与数据库的连通性
mysql -u root -p
show databases;
create database wordpress; #创建数据库
grant all on wordpress.* to 'wordpress'@'localhost' identified by '123456';#为wordpress库的所有表授权所有权,用户,地址,密码。
flush privileges; # 刷新数据库。
select user,host from mysql.user;
+-----------+---------------+
| user | host |
+-----------+---------------+
| root | 127.0.0.1 |
| wordpress | localhost |
| root | ::1 |
| root | localhost |/usr/local/nginx/html
[root@www html]# vim index.php
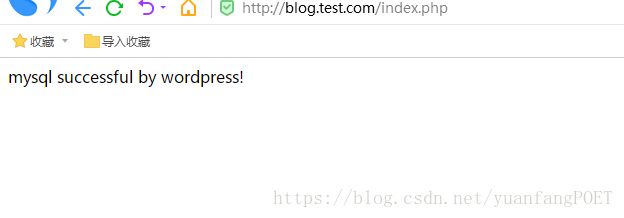
$link_id=mysql_connect('localhost','wordpress','123456') or mysql_error();
if($link_id){
echo "mysql successful by wordpress!\n";
}else{
echo mysql_error();
}
?>
连接成功!
7.下载部署Wordpress博客
[root@www tools]# wget https://cn.wordpress.org/wordpress-4.9.4-zh_CN.tar.gz
[root@www tools]# tar xf wordpress-4.9.4-zh_CN.tar.gz
[root@www tools]# mv wordpress/* /usr/local/nginx/html/blog
相应的,也得修改nginx.conf,如下:
server {
listen 80;
server_name blog.test.com;
location / {
root html/blog;
index index.php index.html index.htm;
}
location ~* .*\.(php|php5)?$ {
root html/blog;
fastcgi_pass 127.0.0.1:9000;
fastcgi_index index.php;
include fastcgi.conf;
}
}
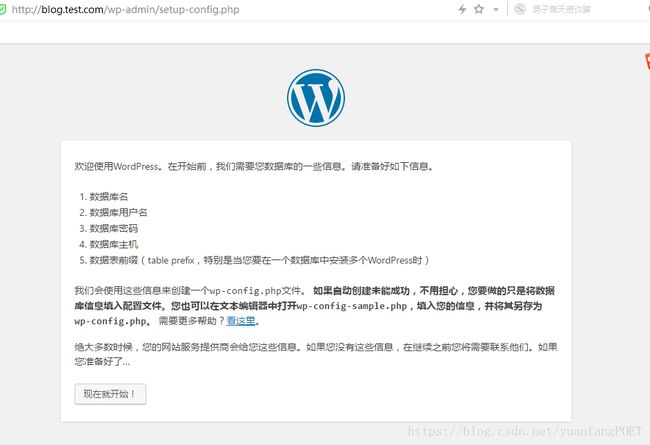
然后进行访问:http://blog.test.com/
可以在页面上进行设置,也可以在配置文件中进行设置,这里在文件中进行配置:
[root@www blog]# cp -p wp-config-sample.php wp-config.php
[root@www blog]# vim wp-config.php
define('DB_NAME', 'wordpress');
/** MySQL数据库用户名 */
define('DB_USER', 'wordpress');/** MySQL数据库密码 */
define('DB_PASSWORD', '123456');/** MySQL主机 */
define('DB_HOST', 'localhost');/** 创建数据表时默认的文字编码 */
define('DB_CHARSET', 'utf8');/** 数据库整理类型。如不确定请勿更改 */
define('DB_COLLATE', '');
修改完成后,进行访问,在安装后如下:
哦了个K。


