为什么80%的码农都做不了架构师?>>> ![]()
前言
前面用vue开发了三四个组件了,都是H5的,现在来看看PC是如何玩转组件的?其实和H5相同,样式不同而已。
相关推荐
《VUE开发一个组件——日历选择控件》 《VUE开发一个组件——移动端弹出层(IOS版)》 《VUE开发一个组件——Vue tree树形结构》
都提供源码,可以去github上面获取。
城市控件
开始今天的课题,制作一个PC版的城市选择控件。
样式制作
    {{title}}


        城市控件
通过focus获取焦点事件,控制组件的显示,blur失去焦点事件,控制组件的隐藏
export default {
  name: 'app',
  data () {
    return {
      title: 'web秀 - VUE开发一个组件——Vue PC城市选择',
      showCity: false
    }
  },
  methods: {
    hideCityDialog(){
      this.showCity = false;
    },
    showCityDialog(){
      this.showCity = true;
    }
  }
}
css布局,外层用相对位置,里层用绝对位置,让城市组件.city-components跟着input的位置,这里用box-shadow来凸显组件。
.city{
  position:relative;
  .city-components{
	position: absolute;
    width: 400px;
    height: 200px;
    box-shadow: 0 0 4px 0 rgba(117,117,117,0.5);
    border-radius: 2px;
    padding: 20px 21px;
  }
}
数据部分
[
  {
    "airportCode": "PEK",
    "cityInfo": "BJ-北京-PEK",
    "cityName": "北京",
    "airportName": "首都",
    "status": 1,
    "lat": 40.0881944004,
    "lng": 116.6033998315
  },
  {
    "airportCode": "YIE",
    "cityInfo": "AES-阿尔山-YIE",
    "cityName": "阿尔山市",
    "airportName": "伊尔施",
    "status": 0,
    "lat": 47.3155940318,
    "lng": 119.9293992017
  },
  {
    "airportCode": "AKU",
    "cityInfo": "AKS-阿克苏-AKU",
    "cityName": "阿克苏地区",
    "airportName": "阿克苏",
    "status": 0,
    "lat": 41.2657516858,
    "lng": 80.3049157658
  },
  {
    "airportCode": "NGQ",
    "cityInfo": "AL-阿里-NGQ",
    "cityName": "阿里地区",
    "airportName": "昆莎",
    "status": 0,
    "lat": 32.1081287447,
    "lng": 80.0637591367
  },
  {
    "airportCode": "ALA",
    "cityInfo": "ALMT-阿尔玛塔-ALA",
    "cityName": "阿拉木图",
    "airportName": "阿尔玛塔",
    "status": 0
  },
  {
    "airportCode": "RHT",
    "cityInfo": "ALSYQ-阿拉善右旗-RHT",
    "cityName": "阿拉善右旗",
    "airportName": "阿拉善右旗",
    "status": 0,
    "lat": 39.2338594871,
    "lng": 101.449757309
  },
  {
    "airportCode": "YIW",
    "cityInfo": "YW-义乌-YIW",
    "cityName": "义乌市",
    "airportName": "义乌",
    "status": 0,
    "lat": 29.3464578386,
    "lng": 120.0389750211
  },
  {
    "airportCode": "ZQZ",
    "cityInfo": "ZJK-张家口-ZQZ",
    "cityName": "张家口",
    "airportName": "张家口",
    "status": 0,
    "lat": 40.7461174707,
    "lng": 114.9436254875
  },
  {
    "airportCode": "HSN",
    "cityInfo": "ZS-舟山-HSN",
    "cityName": "舟山",
    "airportName": "普陀山",
    "status": 0,
    "lat": 29.9396135515,
    "lng": 122.3683649114
  },
  {
    "airportCode": "CGO",
    "cityInfo": "ZZ-郑州-CGO",
    "cityName": "郑州",
    "airportName": "新郑",
    "status": 1,
    "lat": 34.5308189222,
    "lng": 113.8526878594
  }
  ...
]
这里只有部分数据,主要是给大家看看结构,数组里面包含对象,对象包含多个字段,下面我们将用airportCode字段的首字母来分组,排序等。
相关推荐《js数据如何分组排序?》
分组
这里的this.dataList就是数据源
let map = {}; // 处理过后的数据对象
let temps = []; // 临时变量
this.dataList.map(item=>{
  if(item.airportCode){
	  let ekey = item.airportCode.charAt(0).toUpperCase(); // 根据key值的第一个字母分组,并且转换成大写
	  temps = map[ekey] || []; // 如果map里面有这个key了,就取,没有就是空数组
	  temps.push({
		  airportCode: item.airportCode,
		  airportName: item.cityName
	  });
	  map[ekey] = temps;
  }
})
console.log(map);
打印map值
可以看到已经分组成功,但是这样的数据结构在页面遍历不好处理,我们进一步处理数据
格式化
这里的map就是上面得出的结果
let list = [];
for(let gkey in map) {
  list.push({
	  ckey: gkey,
	  cityList: map[gkey]
  })
}

list = list.sort((li1, li2)=> li1.ckey.charCodeAt(0) - li2.ckey.charCodeAt(0));
console.log(list);
处理后的数据是不是看起来更容易理解了?数组包含23的对象,A-Z(中间个别没有),对象两个字段,一个是首字母key,另外一个对象cityList是数组,包含A(Z)的所有机场城市。
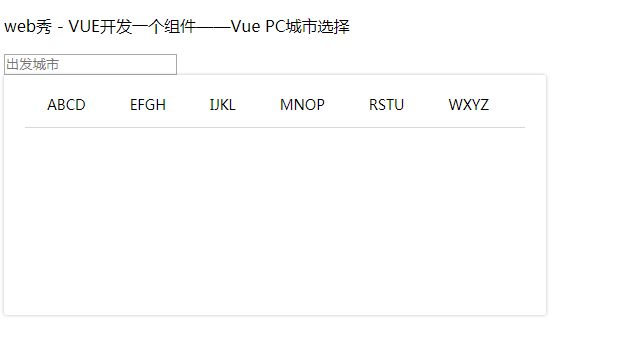
这时候的结果是不是我们想要的了?请看第一张图,好像是每4个字母一组,同时我们把分组的key也用一个数组存起来,这时候还得重新分组。
let chunk = 4;
let result =[];
for (var i = 0, j = list.length; i < j; i += chunk) {
  result.push(list.slice(i, i + chunk));
}
console.log(result);

let cityListKey = [];
result.map(item=>{
  let ckeys  = '';
  item.map(ritem=>{
	  ckeys += ritem.ckey;
  })
  cityListKey.push(ckeys);
})
console.log(cityListKey);
终于数据是我们要的了,这时候直接将数据渲染到页面即可。(当然如果后台能直接给你这样的数据结构,你就感觉感谢吧)
数据渲染
先把cityListKey渲染出来,并添加样式
.clearfix{
  &:after{
	content: '';
	display: block;
	clear: both;
  }
}
li{
  list-style: none;
}
ul{
  padding: 0;
  margin: 0;
}
.filter-tabar{
  border-bottom: 1px solid #d7d7d7;
  cursor: pointer;
  li{
	text-align: center;
	padding: 0 14px;
	float: left;
	padding-bottom: 14px;
	font-size: 14px;
	margin: 0 8px;
	margin-bottom: -1px;
	position: relative;
	&.active{
	  border-bottom: 1px solid #ff7362;
	}
  }
}
Ok,继续把下面的数据渲染,这时候就需要事件处理,手势滑动到哪里,就展示那块的数据(比如鼠标知道EFGH,这时候就只能展示EFGH字母开头的数据)。前面做了那么多工作,这里就很好解决了,这里的cityListKey本身就是从分好组的数据里面提取的,所以知道下标就可以得到想要的数据了。
所以upCityListKey方法传入index下标。来取对应数据。
upCityListKey(index){
	this.upCityListIndex = index;
	this.upCityList = this.cityList[index];
}
这里用upCityListIndex存入下标,用来添加鼠标划入的高亮样式,用upCityList存需要展示的城市数据。然后将upCityList渲染到页面
- {{ritem.airportName}}
.city-content{
  max-height: 500px;
  overflow-y: auto;
  overflow-x: hidden;
  padding: 10px 13px 0 13px;
  label{
	display: block;
	margin-bottom: 5px !important;
	font-size: 20px !important;
	margin-left: 0 !important;
	color: #5f5f5f !important;
	margin-top: 5px;
  }
  li{
	padding: 6px 0 6px;
	float: left;
	text-align: left;
	font-size: 14px;
	min-width: 56px;
	margin-right: 24px;
	cursor: pointer;
  }
}
同时去掉..city-components的height样式。
.city-components{
	position: absolute;
	width: 400px;
	// height: 200px;
	box-shadow: 0 0 4px 0 rgba(117,117,117,0.5);
	border-radius: 2px;
	padding: 20px 21px;
}
完成效果
源码地址: vue-c-city


