Spark Streaming 两种方式连接 Flume
Spark Streaming 通过 Push 和 Pull 两种方式对接 Flume 数据源。以 Spark Streaming 的角度来看,Push 方式属于推送(由 Flume 向 Spark 推送);而 Pull 属于拉取(Spark 拉取 Flume 的输出)。
不论以何种方式,开发过程类似,都是由 Spark Streaming 对接 Flume 数据流,Flume 做为 Spark Streaming 的数据源。Push 和 Pull 两者的差别主要体现在Flume Sink 的不同,而 Flume Source 与 Channel 不会受影响。在演示示例时,Flume Source 以 nectcat 为例,Channel 为 memory,重点关注 Sink 的变化。在下文中也是如此。
添加额外依赖包,spark的依赖包我就不介绍了。
<dependency>
     <groupId>org.apache.spark</groupId>
     <artifactId>spark-streaming-flume_2.11</artifactId>
     <version>2.2.0</version>
</dependency>
Push 方式
当采用 Push 方式时,Flume 架构为:netcat->memory->avro。
这里的 avro sink 需要指定 avro 服务地址,容易混淆的是 avro 服务由 Flume还是 Spark 启动问题。要搞清楚这个问题,首先看 Push 方式在 Spark 端如何实现。如下代码所示。
object FlumePushWordCount {
def main(args: Array[String]) {
if (args.length < 2) {
System.err.println(
"Usage: FlumePushWordCount " )
System.exit(1)
}
val Array(hostname, port) = args
val sparkConf = new SparkConf()
.setAppName("FlumePushWordCount").setMaster("local[2]")
val ssc = new StreamingContext(sparkConf, Seconds(5))
//推送方式:flume 向 spark 发送数据
val flumeStream = FlumeUtils.createStream(ssc, hostname, port.toInt,
StorageLevel.MEMORY_ONLY_SER_2)
//flume 中的数据通过 event.getBody()才能拿到真正的内容
flumeStream.map(x =>new String(x.event.getBody.array()).trim)
.flatMap(_.split(" "))
.map(word => (word, 1)) // 每个单词映射成一个 pair
.reduceByKey(_ + _) // 根据每个 key 进行累加
.print() // 打印前 10 个数据
ssc.start()
ssc.awaitTermination()
}
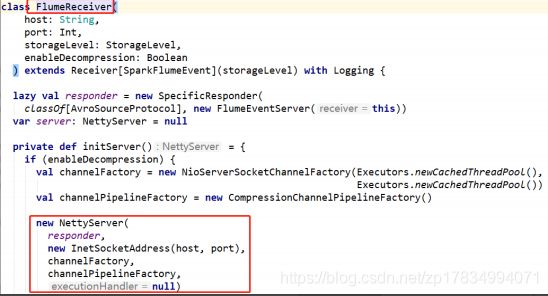
}跟踪 FlumeUtils.createStream()源码如下图所示:
FlumeUtils.createStream()会创建一个 FlumeReceiver 用于接收 Flume 的数据。实际上是创建了一个 avro 服务(org.apache.avro.ipc.NettyServer)。
现在可以得出结论,该 avro 服务应该由 Spark 启动,所以在 Flume集成Spark,
在 Pull 方式下对接运行时,必须先启动 Spark 流应用程序。否则报错如下图所示:
对于主要代码的编写比较简单,相对麻烦的是测试代码的过程。归纳测试运行过程步骤如下:
- 编写 Pull 方式获取 Inut DSt代码(如上述代码)并打包。
- 编写 Flume 配置文件。如下面 flume_push_streaming.conf 所示:
agent.sources = s1
agent.channels = c1
agent.sinks = sk0 sk1


#设置 Source 的类型为 netcat,使用的 channel 为 c1
agent.sources.s1.type = netcat
agent.sources.s1.bind = localhost
agent.sources.s1.port = 44444
agent.sources.s1.channels = c1


#设置 Sink 为 logger 模式,使用的 channel 为 c1
agent.sinks.sk0.type=logger
agent.sinks.sk0.channel=c1


#AvroSink 向 Spark(41414)推送数据
agent.sinks.sk1.type=avro
agent.sinks.sk1.hostname=hadoop101
agent.sinks.sk1.port=5555
agent.sinks.sk1.channel = c1


#设置 channel 信息
#内存模式
agent.channels.c1.type = memory
agent.channels.c1.capacity = 1000 - 启动 Spark 流应用程序。如下面 spark-submit.flume_push_streaming 所示:
其中 flume-ng-sdk 为 Flume 自带组件,spark-streaming-flume 为 Flume 与 SparkStreaming 集成组件,scala-demo1-1.0-SNAPSHOT.jar 是第一步的打包结果,需要 提前准备这些jar包,并根据实际情况调整下面代码中的目录信息。
# spark-submit.flume_push_streaming


spark-submit --class cn.comp.spark.streaming.FlumePushWordCount \

--jars ./jars/flume-ng-sdk-1.6.0-cdh5.5.0.jar, \

jars/spark-streaming-flume_2.11-2.2.0.jar \

scala-demo1-1.0-SNAPSHOT.jar localhost 41414- 启动 Flume Agent。如下面 flume_push_streaming-start.sh 所示:
#flume_push_streaming-start.sh 视实际 Flume 安装目录修改


flume-ng agent \
--name agent \

--conf-file ./flume_push_streaming.conf \

-Dflume.root.logger=INFO,console- 启动 nc 或者 Telnet 连接 Socket,向 Flume nectcat Source 发送数据,并在Spark 流应用程序中观察结果。如下二图所示:
Pull 方式
当采用 Pull 方式时,Flume 架构为:netcat->memory->SparkSink。
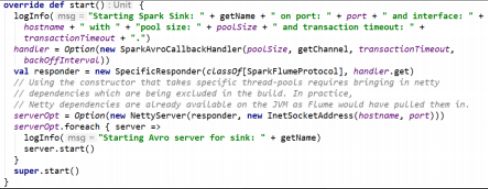
此 Sink 全类名为 org.apache.spark.streaming.flume.sink.SparkSink,需要在Flume “.conf”文件中使用,该类包含在 spark-streaming-flume-sink 组件中。所以还需要将此组件放在$FLUME_HOME/lib 下。具体源码如下图所示:

SparkSink 由 Flume 启动 avro 服务,所以本质上仍然是 avro Sink,如下图所示:
然后由 Spark 连接后轮循数据,意味着 Flume Agent 应该先启动。

这也是为什么在使用 Pull 方式时,Flume 需要 spark-streaming-flume-sink 组件的原因。
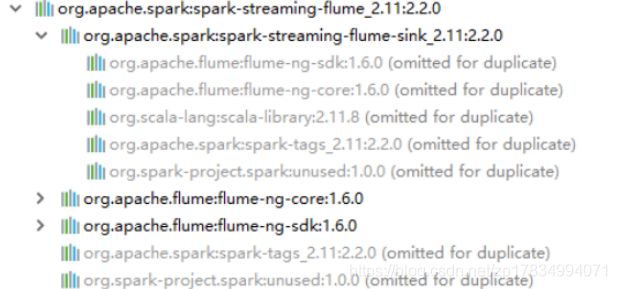
该Sink继承了Flume的抽象类AbstractSink,意味着在使用spark-submit提交 Spark 流应用程序时也需要 flume-ng-sdk 组件。如下面组件依赖层次图所示:

具体运行步骤如下:
1.编写 Pull 方式获取 Input DStream 代码并打包。
object FlumePullWordCount {
def main(args: Array[String]) {
if (args.length < 2) {
System.err.println(
"Usage: FlumePushWordCount " )
System.exit(1)
}
val Array(hostname, port) = args
val sparkConf = new SparkConf()
.setAppName("FlumePullWordCount").setMaster("local[2]")
val ssc = new StreamingContext(sparkConf, Seconds(5))
//获取 flume 数据
val flumeStream = FlumeUtils.createPollingStream(ssc,
hostname,port.toInt,StorageLevel.MEMORY_ONLY_SER_2)
flumeStream.map(x => new String(x.event.getBody.array()).trim)
.flatMap(_.split(" "))
.map(word => (word, 1)) // 每个单词映射成一个 pair
.reduceByKey(_ + _) // 根据每个 key 进行累加
.print() // 打印前 10 个数据
ssc.start()
ssc.awaitTermination()
}
}2.编写 Flume 配置文件。如下面 streaming_pull_flume.conf 所示:
#streaming_pull_flume.conf
agent.sources = s1
agent.channels = c1
agent.sinks = sk1


#设置 Source 的内省为 netcat,使用的 channel 为 c1
agent.sources.s1.type = netcat
agent.sources.s1.bind = localhost
agent.sources.s1.port = 44444
agent.sources.s1.channels = c1


#设置 Sink 为 logger 模式,使用的 channel 为 c1
agent.sinks.sk0.type=logger
agent.sinks.sk0.channel=c1


#SparkSink,要求 flume lib 目录存在 spark-streaming-flume-sink_2.11-x.x.x.jar
agent.sinks.sk1.type=org.apache.spark.streaming.flume.sink.SparkSink
agent.sinks.sk1.hostname=localhost
agent.sinks.sk1.port=41414
agent.sinks.sk1.channel = c1


#设置 channel 信息
#内存模式
agent.channels.c1.type = memory
agent.channels.c1.capacity = 1000
3.启动 Flume Agent。如下面 streaming_pull_flume-start.sh 所示:
flume-ng agent \

--name agent \
--conf-file ./streaming_pull_flume.conf \

-Dflume.root.logger=INFO,console
4.启动 Spark 流应用程序。如下面 spark-submit.streaming_pull_flume 所示:
spark-submit --class cn.comp.spark.streaming.FlumePullWordCount \
--jars ./jars/flume-ng-sdk-1.6.0-cdh5.5.0.jar,\


jars/spark-streaming-flume_2.11-2.2.0.jar,\
jars/spark-streaming-flume-sink_2.11-2.2.0.jar \

scala-demo1-1.0-SNAPSHOT.jar localhost 41414
5.启动 nc 或者 Telnet 连接 Socket,向 Flume nectcat Source 发送数据,并在Spark 流应用程序中观察结果。
如下二图所示:
总结
两种方式进行对比如下:
- 对第三方 jar 的依赖:Pull 方式时 Flume 需要调用 Spark 实现的 Sink,所 以多依赖一个spark-streaming-flume-sink,Flume 与 Spark 两边同时依赖。
- 启动顺序:Push 方式时 Flume 虽然不依赖 Spark,但 avro sink 需要一个 avro服务,这个服务应该先启动。所以 Spark 应先启动。而 Pull 则与之相反。用一个比喻形容便是:谁主动干活就可以不用启动 avro 服务,并且 avro 服务必须先运行。


