linux学习之nginx+tomcat+memcache高可用web服务器
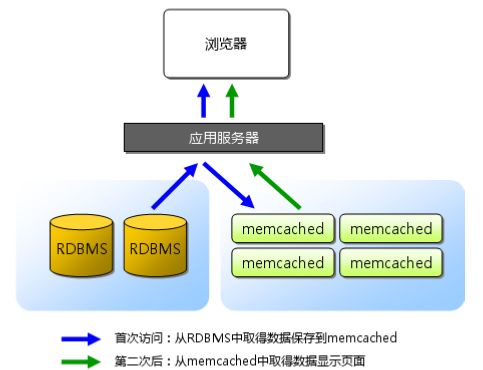
memcached 是高性能的分布式内存缓存服务器。一般的使用目的是,通过缓存数据库查询结果,减少数据库访问次数,以提高动态 Web 应用的速度、提高可扩展性。
实验环境:本机ip-192.168.0.142,真机用来访问测试,另一台192.168.0.143虚拟机做均衡。
1、memchached的安装
[root@lnmp ~]# yum install memcached -y
[root@lnmp ~]# yum install telnet -y
[root@lnmp ~]# /etc/init.d/memcached start
[root@lnmp ~]# telnet localhost 11211
set user 0 0 5
12345
STORED
get user
VALUE user 0 5
12345
END
2、增加php的memcache模块
lftp i:/> get pub/docs/memcached/memcache-2.2.5.tgz
[root@lnmp ~]# tar zxf memcache-2.2.5.tgz
[root@lnmp memcache-2.2.5]# phpize 如果没有。在~/.bash_profile中加入/usr/local/lnmp/php/bin,然后source .bash_profile
[root@lnmp memcache-2.2.5]# ./configure --with-php-config=/usr/local/lnmp/php/bin/php-config --enable-memcache
[root@lnmp memcache-2.2.5]# make && make install
[root@lnmp ~]# vim /usr/local/lnmp/php/etc/php.ini 加入
854 extension=memcache.so
[root@lnmp ~]# /etc/init.d/php-fpm reload
编辑memcache统计页面
[root@lnmp ~]# cd memcache-2.2.5
[root@lnmp memcache-2.2.5]# cp memcache.php /usr/local/lnmp/nginx/html/
[root@lnmp memcache-2.2.5]# vim /usr/local/lnmp/nginx/html/memcache.php 修改
define('ADMIN_PASSWORD','westos'); // Admin Password
$MEMCACHE_SERVERS[] = '192.168.0.142:11211'; // add more as an array
#$MEMCACHE_SERVERS[] = 'mymemcache-server2:11211'; // add more as an array
编辑测试页面
[root@lnmp memcache-2.2.5]# vim /usr/local/lnmp/nginx/html/test.php
$memcache = new Memcache;
$memcache->connect('127.0.0.1', 11211) or die ("Could not connect");
$version = $memcache->getVersion();
echo "Server's version: ".$version."\n";
$tmp_object = new stdClass;
$tmp_object->str_attr = 'test';
$tmp_object->int_attr = 123;
$memcache->set('key', $tmp_object, false, 10) or die ("Failed to save data at the
server");
echo "Store data in the cache (data will expire in 10 seconds)\n";
$get_result = $memcache->get('key');
echo "Data from the cache:\n";
var_dump($get_result);
?>
分别访问192.168.0.142/memcache.php和192.168.0.142/test.php,刷新test,再刷新memcache,命中率会提高。
3、java配置
lftp i:~> mget pub/docs/java/jdk-6u32-linux-x64.bin pub/docs/java/apache-tomcat-7.0.37.tar.gz
[root@lnmp ~]# sh jdk-6u32-linux-x64.bin
[root@lnmp ~]# mv jdk1.6.0_32/ /usr/local/lnmp/jdk
[root@lnmp ~]# vim /etc/profile
export JAVA_HOME=/usr/local/lnmp/jdk
export CLASSPATH=.:$JAVA_HOME/lib:$JAVA_HOME/jre/lib
export PATH=$PATH:$JAVA_HOME/bin
[root@lnmp ~]# source /etc/profile
[root@lnmp ~]# vim test.java
public class test{
public static void main(String[] arge)
{
System.out.println("Hello World!!!!");
}
}
[root@lnmp ~]# javac test.java
[root@lnmp ~]# java test
Hello World!!!!
4、tomcat的安装
[root@lnmp ~]# tar zxf apache-tomcat-7.0.37.tar.gz
[root@lnmp ~]# mv apache-tomcat-7.0.37 /usr/local/lnmp/
[root@lnmp ~]# cd /usr/local/lnmp/
[root@lnmp lnmp]# ln -s apache-tomcat-7.0.37/ tomcat
[root@lnmp lnmp]# cd tomcat/bin/
[root@lnmp bin]# ./startup.sh
访问http://192.168.0.142:8080/
[root@lnmp bin]# cd ../webapps/ROOT/
[root@lnmp ROOT]# vim test.jsp
system time is: <%=new java.util.Date()%>
访问http://192.168.0.142:8080/test.jsp
[root@lnmp ROOT]# vim /usr/local/lnmp/nginx/conf/nginx.conf
location ~ \.jsp$ {
proxy_pass http://127.0.0.1:8080;
}
# pass the PHP scripts to FastCGI server listening on 127.0.0.1:9000
#
#location ~ \.php$ {
# root html;
# fastcgi_pass 127.0.0.1:9000;
# fastcgi_index index.php;
# fastcgi_param SCRIPT_FILENAME /scripts$fastcgi_script_name;
# include fastcgi.conf;
#}
[root@lnmp ROOT]# nginx -t
[root@lnmp ROOT]# nginx -s reload
访问http://192.168.0.142/test.jsp,直接跳到8080端口
5、tomcat的负载均衡
使142和143具有tomcat和memcache环境,即nginx+tomcat+memcache服务器和另一台tomcat+memcache服务器
[root@lnmp lnmp]# scp -r apache-tomcat-7.0.37/ jdk/ 192.168.0.143:/usr/local/
[root@lnmp lnmp]# vim nginx/conf/nginx.conf修改
upstream westos {
server 192.168.0.142:8080;
server 192.168.0.143:8080;
}
#location ~ \.jsp$ {
# proxy_pass http://westos;
#}
[root@lnmp lnmp]# nginx -s reload
[root@lnmp lnmp]# vim tomcat/webapps/ROOT/test.jsp
142 system time is: <%=new java.util.Date()%>
开启虚拟机test,就是上次做负载均衡的虚拟机
[root@test ~]# yum install openssh-clients.x86_64 -y
[root@test ~]# vim /etc/profile
export JAVA_HOME=/usr/local/jdk
export CLASSPATH=.:$JAVA_HOME/lib:$JAVA_HOME/jre/lib
export PATH=$PATH:$JAVA_HOME/bin
[root@test ~]# source /etc/profile
[root@test ~]# cd /usr/local/
[root@test local]# ln -s apache-tomcat-7.0.37/ tomcat
[root@test local]# cd tomcat/bin/
[root@test bin]# ./startup.sh
修改test.jsp
143 system time is: <%=new java.util.Date()%>
之后浏览器访问http://www.westos.org/test.jsp,就会有142,143轮询。
6、nginx升级,支持一个ip一个地址,保持会话,防止跳来跳去
由于nginx是静态编译安装,所以添加模块需要重新编译安装。
lftp i:~> get pub/docs/lamp/update/lnmp/nginx-1.4.2.tar.gz
lftp i:/> get pub/docs/java/nginx-sticky-module-1.0.tar.gz
[root@lnmp ~]# tar zxf nginx-1.4.2.tar.gz
[root@lnmp ~]# tar zxf nginx-sticky-module-1.0.tar.gz
[root@lnmp ~]# vim nginx-1.4.2/src/core/nginx.h
#define NGINX_VER "nginx/"
[root@lnmp nginx-1.4.2]# vim auto/cc/gcc
# debug
#CFLAGS="$CFLAGS -g"
[root@lnmp nginx-1.4.2]# ./configure --prefix=/usr/local/lnmp/nginx/ --with-http_ssl_module --with-http_stub_status_module --add-module=/root/nginx-sticky-module-1.0
[root@lnmp nginx-1.4.2]# nginx -s stop
[root@lnmp nginx-1.4.2]# vim /usr/local/lnmp/nginx/conf/nginx.conf
upstream westos {
sticky;
server 192.168.0.142:8080;
server 192.168.0.143:8080;
}
[root@lnmp nginx-1.4.2]# make && make install
未升级-t失败,升级后成功。
之后就每个IP一个服务器地址,也实现了负载均衡,更加合理。
7、结合memcache使得系统具有高可用性
参考网站code.google.com/p/memcached-session-manager/wiki/SetupAndConfiguration
sessions共享,交叉存储,防止因为连接中断,字段信息认证信息丢失。
142 143
. X .
. / \ .
192.168.0.142配置如下:
[root@lnmp ~]# cd /usr/local/lnmp/tomcat/lib/
lftp i:~> mget pub/docs/java/jar/update/*
[root@lnmp lib]# rm -f memcached-session-manager-tc6-1.6.3.jar
[root@lnmp lib]# vim ../conf/context.xml 倒数第二行加入
failoverNodes="n1"
requestUriIgnorePattern=".*\.(ico|png|gif|jpg|css|js)$"
transcoderFactoryClass="de.javakaffee.web.msm.serializer.kryo.KryoTranscoderFactory"
/>
192.168.0.143和配置如下:
[root@test ~]# yum install memcached -y
[root@test ~]# /etc/init.d/memcached start
[root@test ~]# cd /usr/local/tomcat/lib/
lftp i:~> mget pub/docs/java/jar/update/*
[root@test lib]# rm -f memcached-session-manager-tc6-1.6.3.jar
[root@test lib]# vim ../conf/context.xml 倒数第二行加入
failoverNodes="n2"
requestUriIgnorePattern=".*\.(ico|png|gif|jpg|css|js)$"
transcoderFactoryClass="de.javakaffee.web.msm.serializer.kryo.KryoTranscoderFactory"
/>
开启142和143的memcached
[root@test tomcat]# ./bin/startup.sh 开启tomcat
在主机142,143的tomcat/webapps/ROOT/test.jsp写入测试页面
<%@ page contentType="text/html; charset=GBK" %>
<%@ page import="java.util.*" %>
Server Info:
<%
out.println(request.getLocalAddr() + " : " + request.getLocalPort()+"
");%>
<%
out.println("
ID " + session.getId()+"
");
String dataName = request.getParameter("dataName");
if (dataName != null && dataName.length() > 0) {
String dataValue = request.getParameter("dataValue");
session.setAttribute(dataName, dataValue);
}
out.print("Session list");
Enumeration e = session.getAttributeNames();
while (e.hasMoreElements()) {
String name = (String)e.nextElement();
String value = session.getAttribute(name).toString();
out.println( name + " = " + value+"
");
System.out.println( name + " = " + value);
}%>
name:
key:
访问http://www.westos.org/test.jsp
测试结果:
1先存,在2上telnet localhost 11211,get查看
再尝试关掉1的tomcat,再存,是否会跳到2,在2上telnet查看
关掉1的memchche,再使用2的memcache测试
开启1的tomcat,关闭2的tomcat测试
开启1的memcache,关闭2的memcache测试
如果正在使用同一个机器的t1和m1,只能一个一个关闭,数据才会转移,一下全关数据就没了。
这里能自动恢复就好了,1检测2的m,如果好了,就立马转移,否则1的t和1的m再同时关掉,数据就没了。
总之,只要2个t有一个在,就访问没问题,m在的话,表单数据始终不会丢失。
