linux系统中python的模块 || python的文件操作
一.模块:itchat微信登陆
1.模块:在 Python 中,一个.py文件就称之为一个模块(Module)。
•大大提高了代码的可维护性;
•编写代码不必从零开始。当一个模块编写完毕,就可以被其
他地方引用;
2.包:如果不同的人编写的模块名相同怎么办?为了避免模块名
冲突,Python 又引入了按目录来组织模块的方法,称为包(Package)
3.创建包的步骤:
(1)创建一目录为包名;
(2)在该文件夹下创建__init__.py文件存放包的信息,该文件可以为空;
(3)根据需要存放脚本文件,已编译的扩展及子包;
(4)可以用import,import as,from import等语句导入模块和包;
1.安装第三方模块: itchat
1.yum search ssl | grep devel           #查找ssl安装包
2. yum install openssl-devel.x86_64 -y  #安装软件
3.cd  /opt/Python-3.6.4                 #进入目录
4../configure --prefix=/usr/local/python3
--with-ssl                              #编译
5.make && make install                  #重新安装
6.cd /usr/local/python3/bin/            #进入目录
7../pip3 install itchat                 #安装itchat
2.登陆发送消息
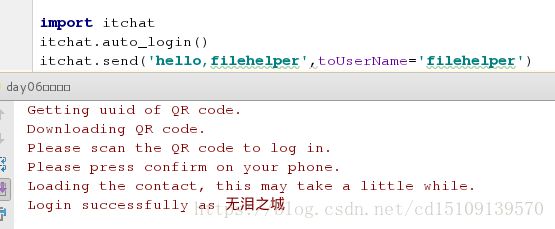
1.登陆给文件助手发送消息:
import itchat         #导入模块
itchat.auto_login()   #登陆
itchat.send('hello,filehelper',    #发送消息给文件助手
toUserName='filehelper')2.获取所有的好友信息, 包括自己的;第一个索引就是用户自己的信息;
返回的是列表里面嵌套字典;
info = itchat.get_friends()
my_name = info[0]['NickName']
print("%s的好友人数为:%d" %(my_name, len(info)-1))
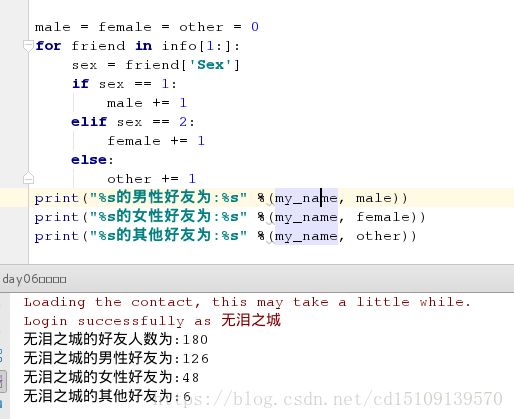
3.男女各有多少人?
male = female = other = 0
for friend in info[1:]:
sex = friend['Sex']
if sex == 1:
male += 1
elif sex == 2:
female += 1
else:
other += 1
print("%s的男性好友为:%s" %(my_name, male))
print("%s的女性好友为:%s" %(my_name, female))
print("%s的其他好友为:%s" %(my_name, other))3.给指定好友发送消息
# 微信登陆给指定好友发送消息:
import itchat
import time
itchat.auto_login(hotReload=True)
name = itchat.search_friends('赵明')[0]['UserName']
print(name)
while True:
    time.sleep(1)
    itchat.send("%s,赶紧来上课!" %('赵明'),toUserName=name)
    print("发送中...")
4.包的操作
包中的__init__.py:
    - 初始化包时,会被加载;
    - 包里面可以定义子包;
1.自定义模块:hello
def add(x=1,y=2):
    return x + y


def mypower(x=1,y=2):
    return x**y

if __name__ == '__main__':  # 判断的是这个脚本内容是否为被导入的模块内容
    print(add(1,3))
    print(mypower(2,3))


2.导入模块:
import pack01.hello     #从pack01中导入hello模块
print(pack01.hello.add(2,3))
print(pack01.hello.mypower(3,4))


from pack01.hello import add
#从pack01的hello模块中导入add函数
from pack01.hello import mypower
#从pack01的hello模块中导入mypower函数
print(add(2,3))
print(mypower(3,4))5. 装饰器:微信聊天机器人
# 装饰器:微信聊天机器人
import itchat
@itchat.msg_register(itchat.content.TEXT)
def hello(msg):
    print(msg)
    text = msg['Text']
    fromUser = msg['FromUserName']
    if '在吗' in text:
        res = '在'
    elif '在干嘛' in text:
        res = '上课!'
    elif '年龄' in text:
        res = '18!'
    else:
        res = ''
    itchat.send(res, toUserName=fromUser)
itchat.auto_login()
itchat.run()
# 发送的图片,视频下载:
import itchat
@itchat.msg_register([itchat.content.PICTURE,itchat.content.VIDEO])
def file_download(msg):
msg.download(msg.filename)
itchat.auto_login(hotReload=True)
itchat.run()
二.文件操作
1. 文件的读写
文件的读写:
• Python 内置了读写文件的函数,用法和 C 是兼容的。
• 操作系统不允许普通的程序直接操作磁盘,所以,读写文件就是请求操
作系统打开一个文件对象(又称文件描述符),然后,通过操作系统提供的
接口从这个文件对象操作;
f.read():
#如果文件打开成功,接下来,调用 read() 方法可以一次读取文件的
全部内容;
f.close():
#文件使用完毕后必须关闭,因为文件对象会占用操作系统的资源
2. read方法
# read方法:
f = open('/tmp/passwd')
# print(f.read())       #读取文件的所有行
print(f.readline())     #读取文件的一行,默认从第一行开始
print(f.readlines())    #以列表的形式读取所有行(有'\n'符号)
print([line.strip() for  line in f.readlines()])
# 批量去掉‘\n
f.close()               #关闭文件
3.with方法
• python2.5以后加入了安全上下文管理器with语句;
• with语句执行结束,会自动清理和关闭文件对象。
with open('/tmp/passwd') as f:
    print("with语句中:", f.closed)
    f.read()
4.open函数的模式
文件操作:
1.r模式:只读
    - 文件不存在, 则报错;
    - 文件内容不会变化;
    - 文件只能读不能写入;
2.r+模式:读写
    - 文件不存在, 则报错;
    - 定位到文件开头;
    - 写入内容到文件的开头;
3.w模式:写
    - 文件不存在,则自动创建;
    - 只能写不能读取文件;
    - 文件内容会被覆盖掉;当文件以'w'的方式打开, 默认会清空文件内容;
4.w+模式:写
    - 文件不存在,则自动创建;
    - 定位到文件开头,只能写,不能读;
    - 打开文件的时候会清空文件的内容;
5.a模式:写
    - 文件不存在,则自动创建;
    - 只能写不能读取文件;
    - 定位到文件的末尾,是一个追加的操作;
6.a+模式:读写
    - 文件不存在,则自动创建;
    - 以读写的方式打开;
    - 定位到文件的末尾,追加的方式;
5.文件指针移动
1.二进制文件
f = open('img01.jpg', 'rb')
res = f.read()
print(res)
f.close()

f1 = open('copy.jpg', 'wb') #将图片的内容写入新的文件,即复制图片
f1.write(res)
f1.close()
print("write success")
2.指针移动
f.seek(offset,whence)
# offset: 偏移量
# whence:0:移动指针到文件最开始; 1: 不移动指针,2:移动到文件最后
f.seek(4,0)    #指针移动到文件最开始第四个字节
f.seek(0,0)    #指针移动到文件最开始
f.seek(0,1)    #指针在当前位置不移动
f.seek(0,2)    #指针移动到文件最后

print(f.readline())  #测试,查看结果和指针位置
f.tell()       #查看当去ian指针位置,字节数
3.字符编码
字符编码:
要读取非 ASCII 编码的文本文件,就必须以二进制模式打开,再解
码,Python 还提供了一个 codecs 模块帮我们在读文件时自动转
换编码,直接读出 unicode。
import codecs     #导入模块
with codecs.open('/Users/michael/gbk.txt', 'r', 'gbk') as f:
f.read() # u'\u6d4b\u8bd5'
示例:
ip日志文件,每一行为一个ip,要求找出日志文件中出现次数
最多的前10个ip。
方法一:
第一步:生成ip列表
import random    #导入模块
def create_ip_life(count,logfile):
    #生成ip的列表:
    ips = ['172.25.254.' + str(host) for host in range(1,255)]
    #写入文件:
    with open(logfile,'w') as f:
        for i in range(count):
            f.write(random.choice(ips) + '\n')

create_ip_life(12000,'ips.log')
print("日志文件生成成功!")
第二步:chu找出文件中出现次数最多的10个ip
# 1.用字典存放:
# 2.对字典排序,拿出前十个ip;
def sorted_by_ip(filename,count):
    #创建一个存储ip的字典:
    ips_dict = dict()
    #读取文件:
    with open(filename) as f:
        for ip in f:
           #去掉ip后面的空格(\n)
            ip = ip.strip()
            if ip in ips_dict:
                ips_dict[ip] +=1
            else:
                ips_dict[ip] = 1
    return sorted(ips_dict.items(),key=lambda item:item[1],
                  reverse=True)[:count]
print(sorted_by_ip('ips.log',count=10))
方法二:采用封装好的函数
第一步:生成ip列表
import random    #导入模块
def create_ip_life(count,logfile):
    #生成ip的列表:
    ips = ['172.25.254.' + str(host) for host in range(1,255)]
    #写入文件:
    with open(logfile,'w') as f:
        for i in range(count):
            f.write(random.choice(ips) + '\n')

create_ip_life(12000,'ips.log')
print("日志文件生成成功!")
第二步:chu找出文件中出现次数最多的10个ip
# 1.用字典存放:
# 2.对字典排序,拿出前十个ip;
from collections import Counter   #导入模块:计算次数
def new_sorted_by_ip(filename,count):
    with open(filename) as f:
        ipcount = Counter(f)
    return ipcount.most_common(count)
print(new_sorted_by_ip('ips.log',count=10))


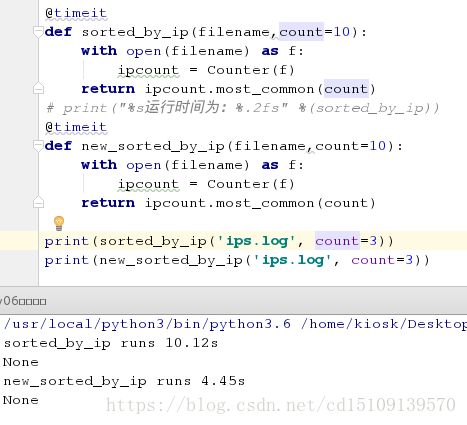
对于new_sorted_by_ip和sorted_by_ip的运行时间进行对比!
测试函数运行时间的装饰器:timeit
import time        #导入计算时间模块
def timeit(fun):   #定义函数
    def wrapper(*args,**kwargs):
        start = time.time()
        res = fun(*args,**kwargs)
        end = time.time()
        print("%s runs %.2fs" %(fun.__name__,end-start))
    return wrapper
@timeit
def sorted_by_ip(filename,count=10):
    with open(filename) as f:
        ipcount = Counter(f)
    return ipcount.most_common(count)
@timeit
def new_sorted_by_ip(filename,count=10):
    with open(filename) as f:
        ipcount = Counter(f)
    return ipcount.most_common(count)
print(sorted_by_ip('ips.log', count=3))
print(new_sorted_by_ip('ips.log', count=3))
6.os模块对文件的操作
1.对文件和目录的操作
import os    #导入os模块
os.mknod('hello.py',0o600)   #建立文件,并设定权限为600
os.remove('hello.py')        #删除文件
os.makedirs('hello/linux/python')
#创建目录,相当于mkdir hello/linux/python -p上层目录不存在自动建立
os.removedirs('hello/linux/python') #删除目录
os.rename('hello.py','westos')      #重命名
2.对命令的操作
os.listdir('/etc')    #列出/etc下的文件,返回是列表
os.system('ls')       #执行shell中的ls命令
os.popen('hostname')  #执行shell中的hostname命令
os.uname()  #查看主机的相关信息,包括主机名、内核版本、设备信息等
3. os.path的命令
os.path.isfile('/tmp/passwd')  ##判断是否为文件
os.path.exists('/tmp/fstab')   ##判断文件是否存在
os.path.ismount('/mnt')        ##判断目录是否挂载
os.path.split('/var/log/messages')     ##目录与文件分离
os.path.basename('/var/log/messages')  ##拿出目录名
os.path.dirname('/var/log/messages')   ##拿出文件名
os.path.splitext('os_operation.py')    ##文件名与后缀分离
os.path.sep            ##Linux系统的'/',Window系统的'\\'
示例:
修改指定的后缀名:
import os
#定义函数:(目录名称,就文件的结尾,新文件的结尾)
def rename_suffix(dirname,old_suffix,new_suffix):

    #判断目录是否以'/'结尾,不是自动添加
    if not dirname.endswith('/'):
        dirname = dirname + '/'

    #目标分隔符
    sep = os.path.sep
    if not dirname.endswith(sep):   #判断后缀,自动添加'.'
        dirname = dirname + sep

    #如果后缀名不是以'.'结尾的自动添加
    if not old_suffix.startswith('.'):
        old_suffix = '.' + old_suffix
    if not new_suffix.startswith('.'):
        new_suffix = '.' + new_suffix

    if os.path.exists(dirname):     #判断目录是否存在
        #判断目录的后缀是否以old_suffix结尾
        suffix_list = [filename for filename in os.listdir(dirname)
                       if filename.endswith(old_suffix)]

        #依次遍历文件列表,分离文件名和后缀名,拿出文件名
        basename_list = [os.path.splitext(file)[0] for file in suffix_list]

        # 批量修改后缀名:(重命名)
        #list = [os.rename(dirname + file + old_suffix,dirname + file + new_suffix)
        #        for file in basename_list]
        for file in basename_list:
            old_suffix = dirname + file + old_suffix
            new_suffix = dirname + file + new_suffix

            #重命名,将旧的名字改为新的名字,这里的文件是相对路径
            os.rename(old_suffix,new_suffix)
            print("%s重命名为%s成功" %(old_suffix,new_suffix))
        else:
            print("%s目录不存在" %(dirname))

import sys
if len(sys.argv) == 4:
    dirname = sys.argv[1]
    old_suffix = sys.argv[2]
    new_suffix = sys.argv[3]
    rename_suffix(dirname,old_suffix,new_suffix)
else:
    print("""
    Usage: command dirname old_suffix new_suffix
    """)

rename_suffix('img' ,'jpg','png')
在命令行执行:


