Spring Boot第八章-非关系型数据库(MongoDB,Redis)
Spring Boot第八章-非关系型数据库
目录
1.MongoDB
1.1 介绍
1.2 Spring的支持
1.2.1 Object/Document 映射注解支持
1.2.2 MongoTemplate
1.2.3 Repository的支持
1.3 Spring Boot的支持
1.4 Spring Boot Mongo实战
1.4.1 MongoDB安装
1.4.2 搭建Spring Boot项目
1.4.3 主要代码
1.4.4 测试结果
2 redis
2.1 Spring的支持
2.1.1 配置
2.1.2 使用
2.1.3 定义Serializer
2.2 Spring Boot的支持
2.3 Spring Boot Redis实战
2.3.1 安装Redis
2.3.2 增加依赖
2.3.3 主要代码
2.3.4 测试结果
项目地址
3.redis的发布订阅
3.1 redis发布订阅原理
3.2 测试例子
3.3 测试结果
1.MongoDB
1.1 介绍
MongoDB是一个是一个基于文档(Document)的存储型数据库,使用面向对象的思想,每一条数据文档的对象。来自菜鸟教程的解释是:
MongoDB 是一个基于分布式文件存储的数据库。由 C++ 语言编写。旨在为 WEB 应用提供可扩展的高性能数据存储解决方案。
MongoDB 是一个介于关系数据库和非关系数据库之间的产品,是非关系数据库当中功能最丰富,最像关系数据库的。
1.2 Spring的支持
1.2.1 Object/Document 映射注解支持
JPA提供了一套Object/Relation映射的注解(如@Entity,@Id),而Spring Data MongoDB也提供了一套注解:
@Document:映射领域对象与MongoDB的一个文档,类似于hibernate的@Entity注解
@Id:主键,不可重复,自带索引
@Field:为文档的属性定义名称
@Indexed: 为该字段加索引
@CompoundIndex:符合索引
@DBRef:关联另一个document对象,但不会级联表
1.2.2 MongoTemplate
类似于jdbcTemplate
1.2.3 Repository的支持
和Spring Data JPA的使用方式一样,需要在配置类上加上@EnableMongoRepositories注解
1.3 Spring Boot的支持
Spring Boot对MongoDB的支持,位于:org.springframework.boot.autoconfigure.mongo
在配置文件中,以"spring.data.mongodb"为前缀的属性配置MongoDB的信息
Spring Boot提供了一些默认属性以及自动配置,默认端口27017,host为localhost,数据库为test
1.4 Spring Boot Mongo实战
1.4.1 MongoDB安装
虚拟机内docker安装MongoDB,直接安装官方的
- docker search mongo 查看官方mongo
- docker pull mongo 拉取mongo镜像
- docker images mongo 查看mongo镜像
- docker run -p 27017:27017 -v $PWD/db:/data/db -d mongo:3.2
可视化工具Robo 3T,增加用户,查看,管理Mongo数据内容非常方便,已上传到百度网盘,
链接: https://pan.baidu.com/s/1oRRftXKtgdAJewFF3v0sAg 密码: yy84
1.4.2 搭建Spring Boot项目
新建Spring Boot项目,依赖spring-boot-starter-data-mongodb和spring-boot-starter-web
我的配置信息,虚拟机上安装的Mongo,ip是虚拟机的ip:
#mongodb的配置,springboot已经给我们做了很多默认配置,配置自己需要修改的地方就行了
#默认localhost
spring.data.mongodb.host=192.168.4.219
spring.data.mongodb.port=27017

#connection url 默认数据库为test
#spring.data.mongodb.uri=mongodb://192.168.4.219/test
#spring.data.mongodb.database=test
#spring.data.mongodb.authentication-database=test
#spring.data.mongodb.username=admin
#spring.data.mongodb.password=123456
##默认开启
#spring.data.mongodb.repositories.enabled=true
1.4.3 主要代码
领域模型:
package com.just.springbootnosql.domain;

import org.springframework.data.annotation.Id;
import org.springframework.data.mongodb.core.mapping.Document;
import org.springframework.data.mongodb.core.mapping.Field;

import java.util.Collection;

@Document  //映射领域模型和mongoDB的文档
public class Person {
    @Id
    private String id;
    private String name;
    private Integer age;
    @Field("locs") //此属性在文档中的名字是locs,locations属性将以数组形式存在当前数据记录中
    private Collection locations;

    public String getId() {
        return id;
    }

    public void setId(String id) {
        this.id = id;
    }

    public String getName() {
        return name;
    }

    public void setName(String name) {
        this.name = name;
    }

    public Integer getAge() {
        return age;
    }

    public void setAge(Integer age) {
        this.age = age;
    }

    public Collection getLocations() {
        return locations;
    }

    public void setLocations(Collection locations) {
        this.locations = locations;
    }
}
Location
package com.just.springbootnosql.domain;

public class Location {
    private String place;
    private String year;

    public Location(String place, String year) {
        this.place = place;
        this.year = year;
    }

    public String getPlace() {
        return place;
    }

    public void setPlace(String place) {
        this.place = place;
    }

    public String getYear() {
        return year;
    }

    public void setYear(String year) {
        this.year = year;
    }
}
数据访问:
package com.just.springbootnosql.dao;

import com.just.springbootnosql.domain.Person;
import org.springframework.data.mongodb.repository.MongoRepository;
import org.springframework.data.mongodb.repository.Query;

import java.util.List;

public interface PersonRepository extends MongoRepository {
    //支持方法名查询
    Person findByName(String name);

    //支持@Query查询,查询参数构造JSON字符串即可
    @Query("{'age':?0}")
    List withQueryByAge(Integer age);
}
控制器:
package com.just.springbootnosql.controller;

import com.just.springbootnosql.dao.PersonRepository;
import com.just.springbootnosql.domain.Location;
import com.just.springbootnosql.domain.Person;
import org.springframework.beans.factory.annotation.Autowired;
import org.springframework.web.bind.annotation.*;

import java.util.Collection;
import java.util.LinkedHashSet;
import java.util.List;

@RestController
@RequestMapping("/person")
public class PersonController {
    @Autowired
    private PersonRepository personRepository;
    @PostMapping("/save")
    public Person save(@RequestBody Person person){
        Collection locations=new LinkedHashSet<>();
        Location location1=new Location("南京","2016");
        Location location2=new Location("常州","2016");
        Location location3=new Location("上海","2017");
        Location location4=new Location("上海","2018");
        locations.add(location1);
        locations.add(location2);
        locations.add(location3);
        locations.add(location4);
        person.setLocations(locations);
        return personRepository.save(person);
    }
    @GetMapping("/findByName")
    public Person findByName(String name){
        return personRepository.findByName(name);
    }
    @GetMapping("/findByAge")
    public List findByAge(Integer age){
        return personRepository.withQueryByAge(age);
    }
}
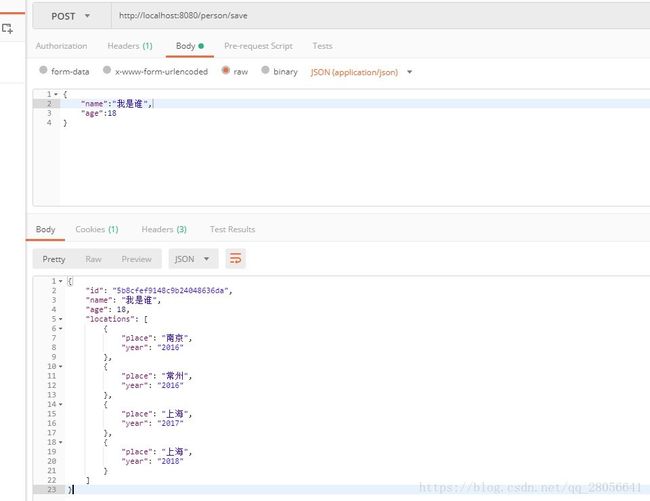
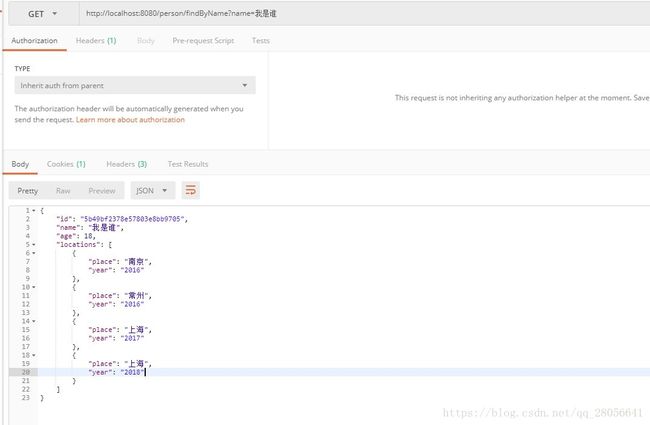
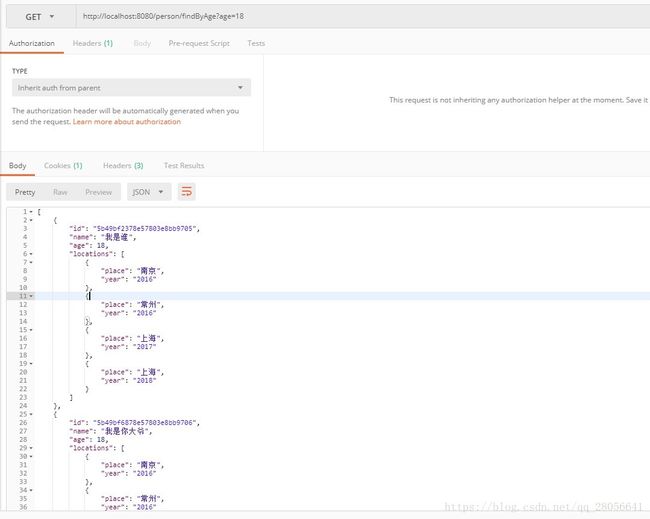
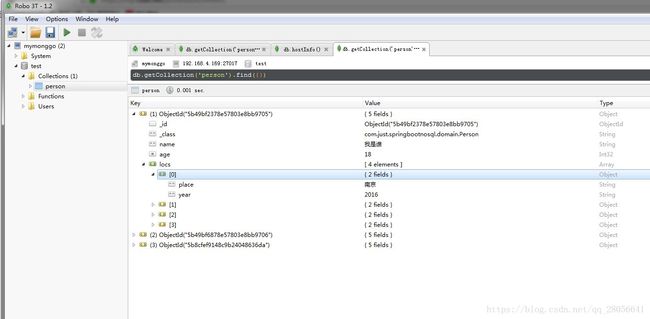
1.4.4 测试结果
controller测试结果:
mongodb数据:
2 redis
Redis是一个基于键值对的开源内存数据存储
2.1 Spring的支持
2.1.1 配置
Spring对Redis的支持也是通过Spring Data Redis来实现的。
根据Redis的不同的Java客户端,Spring Data Redis提供了以下的ConnectionFactory,可以在
org.springframework.data.redis.connection 这个目录下找到各种ConnectionFactory:
JedisConnectionFactory,JredisConnectionFactory,LettuceConnectionFactory等等
2.1.2 使用
Spring Data Redis提供了RedisTemplate和StringRedisTemplate两个模板进行数据操作,其中StringRedisTemplate只针对键值都是字符串的数据类型进行操作
常用的数据访问方法:
opsForValue(): 简单属性
opsForList(): 操作含有list的数据
opsForSet(): 操作含有set的数据
opsForZSet(): 操作含有ZSet(有序的set)的数据
opsForHash(): 操作含有hash的数据
具体的操作将在持续更新的代码中体现
2.1.3 定义Serializer
定义键值序列化方式,Spring Data JPA提供了好几种序列化方式,RedisTemplate默认使用的是JdkSerializationSerializer。其他常用的具体详见代码
2.2 Spring Boot的支持
Spring Boot对Redis做了自动配置,org.springframework.boot.autoconfigure.data.redis.RedisAutoConfiguration。
Spring Boot配置文件"spring.redis"为前缀的可以配置redis相关参数
2.3 Spring Boot Redis实战
2.3.1 安装Redis
docker安装redis,类似于mongoDB的安装,直接关键步骤就行了
- docker pull redis
- docker run redis --name redis -p 6379:6379 -d redis-server
windows上redis的安装教程很多,自行查找吧
redis的可视化工具:redis desktop manager,已放到百度网盘:
链接: https://pan.baidu.com/s/1SkIXmn1IkGrz-lUokzhyhA 密码: brui
2.3.2 增加依赖
            org.springframework.boot
            spring-boot-starter-data-redis
配置信息:
# Redis服务器地址
spring.redis.host=192.168.4.219
# Redis服务器连接端口
spring.redis.port=6379
# Redis服务器连接密码(默认为空)
spring.redis.password=
2.3.3 主要代码
新建一个user类:
package com.just.springbootnosql.domain;

import java.io.Serializable;

public class User implements Serializable {
    private static final long serialVersionUID=1L;
    private String id;
    private String name;
    private Integer age;

    public User(){
        super();
    }
    public User(String id, String name, Integer age) {
        this.id = id;
        this.name = name;
        this.age = age;
    }
    /**省略setter和getter**/
}
service层,用redisTemplate操作
redis有五种数据类型,redisTemplate对其的操作做了封装,可以在实际中看看他们的用法,这里只是测试常用的方法,每一种都有好多方法,可以自己去测试。
/**
* 结构类型 结构存储的值 结构的读写能力
* String 可以是字符串、整数或者浮点数 对整个字符串或者字符串的其中一部分执行操作;对象和浮点数执行自增(increment)或者自减(decrement)
* List 一个链表,链表上的每个节点都包含了一个字符串 从链表的两端推入或者弹出元素;根据偏移量对链表进行修剪(trim);读取单个或者多个元素;根据值来查找或者移除元素
* Set 包含字符串的无序收集器(unorderedcollection),并且被包含的每个字符串都是独一无二的、各不相同 添加、获取、移除单个元素;检查一个元素是否存在于某个集合中;计算交集、并集、差集;从集合里卖弄随机获取元素
* Hash 包含键值对的无序散列表 添加、获取、移除单个键值对;获取所有键值对
* Zset 字符串成员(member)与浮点数分值(score)之间的有序映射,元素的排列顺序由分值的大小决定 添加、获取、删除单个元素;根据分值范围(range)或者成员来获取元素
*/
package com.just.springbootnosql.service;
import com.just.springbootnosql.domain.User;
import org.springframework.beans.factory.annotation.Autowired;
import org.springframework.data.redis.core.DefaultTypedTuple;
import org.springframework.data.redis.core.ListOperations;
import org.springframework.data.redis.core.RedisTemplate;
import org.springframework.data.redis.core.ZSetOperations;
import org.springframework.stereotype.Service;
import java.util.*;
import java.util.concurrent.TimeUnit;
/**
* 结构类型 结构存储的值 结构的读写能力
* String 可以是字符串、整数或者浮点数 对整个字符串或者字符串的其中一部分执行操作;对象和浮点数执行自增(increment)或者自减(decrement)
* List 一个链表,链表上的每个节点都包含了一个字符串 从链表的两端推入或者弹出元素;根据偏移量对链表进行修剪(trim);读取单个或者多个元素;根据值来查找或者移除元素
* Set 包含字符串的无序收集器(unorderedcollection),并且被包含的每个字符串都是独一无二的、各不相同 添加、获取、移除单个元素;检查一个元素是否存在于某个集合中;计算交集、并集、差集;从集合里卖弄随机获取元素
* Hash 包含键值对的无序散列表 添加、获取、移除单个键值对;获取所有键值对
* Zset 字符串成员(member)与浮点数分值(score)之间的有序映射,元素的排列顺序由分值的大小决定 添加、获取、删除单个元素;根据分值范围(range)或者成员来获取元素
*/
@Service
@SuppressWarnings("unchecked")
public class UserServiceImpl implements UserService{
// @Autowired
// private JedisCluster jedisCluster;
@Autowired
private RedisTemplate redisTemplate;
@Override
public String findRedis() {
redisTemplate.opsForValue().set("userName","呵呵哒");
return redisTemplate.opsForValue().get("userName").toString();
}
@Override
public List cacheUsers() {
List users=new ArrayList<>();
User user1=new User("1","阿西吧",12);
User user2=new User("2","阿西九",20);
User user3=new User("3","阿西十",18);
users.add(user1);
users.add(user2);
users.add(user3);
redisTemplate.opsForList().leftPush("user.list",user1);
redisTemplate.opsForList().leftPush("user.list",user2);
redisTemplate.opsForList().leftPush("user.list",user3);
//第二种方式
//redisTemplate.delete("users.list");
//redisTemplate.opsForList().leftPushAll("user.list",users);
redisTemplate.expire("user.list",30,TimeUnit.SECONDS);
return redisTemplate.opsForList().range("user.list",0L,-1L);
}
@Override
public Map cacheUserMap() {
User user=new User("4","测试hash",66);
User user1=new User("6","测试hash",67);
User user2=new User("7","测试hash",68);
User user3=new User("8","测试hash",69);
Map map=new HashMap<>();
map.put(user1.getId(),user1);
map.put(user2.getId(),user2);
map.put(user3.getId(),user3);
//第一种方式,单个加入
redisTemplate.opsForHash().put("user.map","4",user);
//第二种方式,整个map加入
redisTemplate.opsForHash().putAll("user.map",map);
return redisTemplate.opsForHash().entries("user.map");
}
@Override
public User findUser(String id) {
return (User) redisTemplate.opsForHash().get("user.map",id);
}
@Override
public Set cacheUserSet() {
Set userSet=new HashSet<>();
User user1=new User("10","测试set",20);
User user2=new User("11","测试set",21);
User user3=new User("12","测试set",22);
userSet.add(user1);
userSet.add(user2);
userSet.add(user3);
//只能一个一个放进去。。。
redisTemplate.opsForSet().add("user.set",user1,user2,user3);
return redisTemplate.opsForSet().members("user.set");
}
/**
* zSet:字符串成员(member)与浮点数分值(score)之间的有序映射,元素的排列顺序由分值的大小决定
*/
@Override
public Set cacheUserZSet() {
User user=new User("20","测试zset",13);
User user1=new User("21","测试zset",14);
User user2=new User("22","测试zset",15);
User user3=new User("23","测试zset",16);
redisTemplate.opsForZSet().add("user.zset",user,1.0);
ZSetOperations.TypedTuple controller层,来测试redis各种数据结构效果
package com.just.springbootnosql.controller;

import com.just.springbootnosql.dao.UserDao;
import com.just.springbootnosql.domain.User;
import com.just.springbootnosql.service.UserService;
import org.springframework.beans.factory.annotation.Autowired;
import org.springframework.web.bind.annotation.GetMapping;
import org.springframework.web.bind.annotation.RequestMapping;
import org.springframework.web.bind.annotation.RestController;

import java.util.List;
import java.util.Map;
import java.util.Set;

@RestController
@RequestMapping("/user")
public class UserController {
    @Autowired
    UserDao userDao;
    @Autowired
    UserService userService;
    @RequestMapping("/save")
    public User saveUser(){
        User user=new User("1","哈哈哈",11);
        userDao.save(user);
        userDao.stringRedisTemplateDemo();
        return user;
    }
    @GetMapping("/getString")
    public String getString(){
       return userDao.getString();
    }

    @GetMapping("/getUser")
    public User getUser(){
        return userDao.getUser("1");
    }
    @GetMapping("/findRedis")
    public String findRedis(){
        return userService.findRedis();
    }
    @GetMapping("/testList")
    public List findList(){
        return userService.cacheUsers();
    }
    @GetMapping("/map")
    public Map findMap(){
        return userService.cacheUserMap();
    }
    @GetMapping("/getFromMap")
    public User findOneFromMap(String id){
        return userService.findUser(id);
    }
    @GetMapping("/set")
    public Set findFromSet(){
        return userService.cacheUserSet();
    }
    @GetMapping("/zset")
    public Set findFromZSet(){
        return userService.cacheUserZSet();
    }
}
2.3.4 测试结果
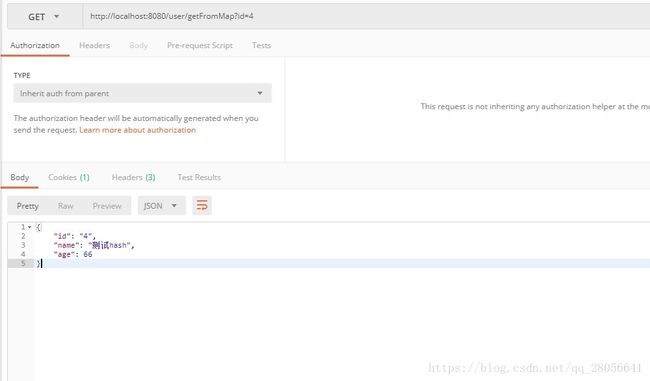
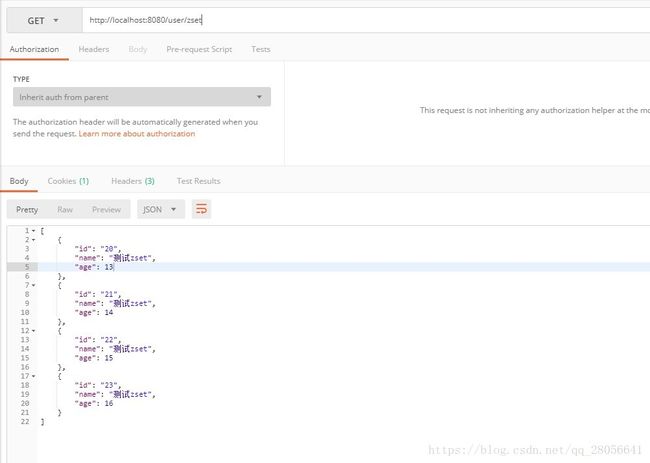
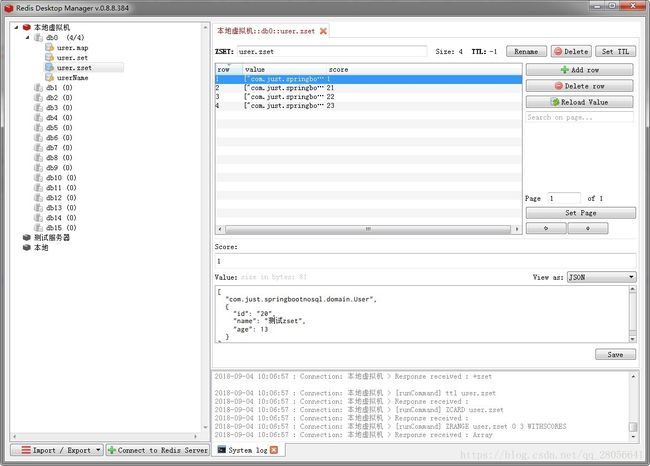
展示不同数据类型接口的测试结果
项目地址
https://gitee.com/yuanhan93/springbootnosql
补充内容:
3.redis的发布订阅
3.1 redis发布订阅原理
参考:https://blog.csdn.net/clh604/article/details/19754939
3.2 测试例子
新建一个接收类:
package com.just.springbootnosql;

import com.fasterxml.jackson.annotation.JsonAutoDetect;
import com.fasterxml.jackson.annotation.PropertyAccessor;
import com.fasterxml.jackson.databind.ObjectMapper;
import com.just.springbootnosql.domain.User;
import org.slf4j.Logger;
import org.slf4j.LoggerFactory;
import org.springframework.beans.factory.annotation.Autowired;
import org.springframework.data.redis.serializer.GenericJackson2JsonRedisSerializer;

import java.io.IOException;
import java.util.concurrent.CountDownLatch;
public class Receiver {
    private static final Logger logger=LoggerFactory.getLogger(Receiver.class);
    private CountDownLatch latch;
    //我们给Receiver的构造函数通过@AutoWired标注注入了一个CountDownLatch实例,当接收到消息时,调用cutDown()方法。
    @Autowired
    public Receiver(CountDownLatch latch){
        this.latch=latch;
    }

    public void receiveMessage(String message){
        logger.info("receive message:"+message);
        latch.countDown();
    }

    public void receiveJsonMessage(String message){
        logger.info("receive json message:"+message);
        ObjectMapper mapper=new ObjectMapper();
        mapper.setVisibility(PropertyAccessor.ALL,JsonAutoDetect.Visibility.ANY);
        mapper.enableDefaultTyping(ObjectMapper.DefaultTyping.NON_FINAL);
        //GenericJackson2JsonRedisSerializer 里会有class的类路径,可以直接反序列化
        //GenericJackson2JsonRedisSerializer g=new GenericJackson2JsonRedisSerializer();
        try {
            User user=mapper.readValue(message,User.class);
            //User user=(User) g.deserialize(message.getBytes());
            logger.info("反序列化为user成功,userId:"+user.getId());
        } catch (Exception e) {
            logger.info("这不是user");
        }
        latch.countDown();
    }

}
在这个接受类中加入了CountDownLatch,为了在下面的测试代码中运行,能看到接收的效果,因为发送消息是异步的,在test代码中如果不用这个就看不到打印的效果。CountDownLatch能够使一个线程在等待另外一些线程完成各自工作之后,再继续执行。使用一个计数器进行实现。
CountDownLatch不是必要加的,只是为了测试方便!
在这个类里面有两个接收方法,一个是普通的string类型,另一个是json字符串,可以反序列化为对象
redis监听器配置:
package com.just.springbootnosql;
import org.springframework.context.annotation.Bean;
import org.springframework.context.annotation.Configuration;
import org.springframework.data.redis.connection.RedisConnectionFactory;
import org.springframework.data.redis.listener.PatternTopic;
import org.springframework.data.redis.listener.RedisMessageListenerContainer;
import org.springframework.data.redis.listener.adapter.MessageListenerAdapter;

import java.util.concurrent.CountDownLatch;

@Configuration
public class RedisListenerConfig {
    /**
     * redis监听容器
     */
    @Bean
    RedisMessageListenerContainer container(RedisConnectionFactory connectionFactory,
                                            MessageListenerAdapter listenerAdapter,
                                            MessageListenerAdapter listenerJsonAdapter) {
        RedisMessageListenerContainer container = new RedisMessageListenerContainer();
        container.setConnectionFactory(connectionFactory);
        container.addMessageListener(listenerAdapter, new PatternTopic("p_topic"));
        container.addMessageListener(listenerJsonAdapter, new PatternTopic("p_topic_json"));
        return container;
    }

    @Bean
    MessageListenerAdapter listenerAdapter(Receiver receiver) {
        return new MessageListenerAdapter(receiver, "receiveMessage");
    }

    /**
     * 在redisTemplate的配置中已经是json的序列化方式,这里不需要再进行序列化了
     */
    @Bean
    MessageListenerAdapter listenerJsonAdapter(Receiver receiver) {
        MessageListenerAdapter messageListenerAdapter=new MessageListenerAdapter(receiver, "receiveJsonMessage");
        return messageListenerAdapter;
    }

    @Bean
    Receiver receiver(CountDownLatch latch) {
        return new Receiver(latch);
    }

    @Bean
    CountDownLatch latch() {
        return new CountDownLatch(1);
    }


}
配置两个频道,并且配置两个频道的监听方法。由于redis的配置中已经对消息进行了序列化方式的处理,这里就不用再次序列化了。
测试:
package com.just.springbootnosql;

import com.just.springbootnosql.domain.User;
import org.json.JSONException;
import org.json.JSONObject;
import org.junit.Test;
import org.junit.runner.RunWith;
import org.springframework.beans.factory.annotation.Autowired;
import org.springframework.boot.test.context.SpringBootTest;
import org.springframework.data.redis.core.RedisTemplate;
import org.springframework.data.redis.core.StringRedisTemplate;
import org.springframework.test.context.junit4.SpringRunner;

@RunWith(SpringRunner.class)
@SpringBootTest
public class SpringbootnosqlApplicationTests {
    @Autowired
    private RedisTemplate redisTemplate;
    @Test
    public void testRedisPub() throws JSONException {
        JSONObject jsonObject=new JSONObject();
        jsonObject.put("name","小李子");
        jsonObject.put("age",18);
        User user=new User();
        user.setId("1");
        user.setName("超级用户");
        user.setAge(0);
        redisTemplate.convertAndSend("p_topic","我来啦,呵呵哒");
        redisTemplate.convertAndSend("p_topic_json",jsonObject);
        redisTemplate.convertAndSend("p_topic_json",user);
    }

}
3.3 测试结果
不启动项目,直接test,testRedisPub()方法测试结果:
2018-09-05 10:55:03.557  INFO 15196 --- [    container-2] com.just.springbootnosql.Receiver        : receive message:"我来啦,呵呵哒"
2018-09-05 10:55:03.634  INFO 15196 --- [    container-3] com.just.springbootnosql.Receiver        : receive json message:["org.json.JSONObject",{"nameValuePairs":["java.util.HashMap",{"name":"小李子","age":18}]}]
2018-09-05 10:55:03.664  INFO 15196 --- [    container-4] com.just.springbootnosql.Receiver        : receive json message:["com.just.springbootnosql.domain.User",{"id":"1","name":"超级用户","age":0}]
2018-09-05 10:55:03.700  INFO 15196 --- [    container-3] com.just.springbootnosql.Receiver        : 这不是user
2018-09-05 10:55:03.703  INFO 15196 --- [    container-4] com.just.springbootnosql.Receiver        : 反序列化为user成功,userId:1
2018-09-05 10:55:03.714  INFO 15196 --- [       Thread-2] o.s.w.c.s.GenericWebApplicationContext   : Closing org.springframework.web.context.support.GenericWebApplicationContext@4758820d: startup date [Wed Sep 05 10:54:58 CST 2018]; root of context hierarchy
2018-09-05 10:55:03.716  INFO 15196 --- [       Thread-2] o.s.c.support.DefaultLifecycleProcessor  : Stopping beans in phase 2147483647
Disconnected from the target VM, address: '127.0.0.1:50580', transport: 'socket'

Process finished with exit code 0
启动项目,用redis客户端写语句发布消息测试:
2018-09-05 14:40:40.854 INFO 12656 --- [ container-2] com.just.springbootnosql.Receiver : receive message:我来自客户端
