一般涉及到后台管理系统,就少不了富文本编辑器,这个可以图,文,视频混排的高级工具,笔者通过对比,发现目前市场上最好的三方库还当属百度的 ueditor
近年来 SpringBoot 框架可谓越来越火,可是笔者发现 ueditor 只提供了对于 JSP 的版本,网上能找到很多继承的案列,但是大部分都是修改源码,或者
自己去实现上传文件的接口这使得一些功能不能被使用或者需要花大量的时间去实现上传文件的方法,通过权衡,还是 springboot + jsp + ueditor 的方式最为简单
虽然 jsp 不是 springboot 官方推荐的模板引擎,但是 jsp 毕竟活跃了这么多年,很多三方库都是基于它的,所以现在我们就开始吧!
1,创建一个 jar 类型的 springboot 2.0 以上版本的项目(网上流传的只有war包才能运行 jsp 的纯属谣言)
2,在 pom 文件中添加如下
xml version="1.0" encoding="UTF-8"?>
<project
    xmlns="http://maven.apache.org/POM/4.0.0"
    xmlns:xsi="http://www.w3.org/2001/XMLSchema-instance"
    xsi:schemaLocation="http://maven.apache.org/POM/4.0.0
    http://maven.apache.org/xsd/maven-4.0.0.xsd"
>
    <modelVersion>4.0.0modelVersion>
    <groupId>com.hwqgroupId>
    <artifactId>jspartifactId>
    <version>0.0.1-SNAPSHOTversion>
    <packaging>jarpackaging>
    <name>jspname>
    <description>整合 JSP 页面description>

    <parent>
        <groupId>org.springframework.bootgroupId>
        <artifactId>spring-boot-starter-parentartifactId>
        <version>2.0.6.RELEASEversion>
        <relativePath/>
    parent>

    <properties>
        <project.build.sourceEncoding>UTF-8project.build.sourceEncoding>
        <project.reporting.outputEncoding>UTF-8project.reporting.outputEncoding>
        <java.version>1.8java.version>
        <maven.compiler.source>1.8maven.compiler.source>
        <maven.compiler.target>1.8maven.compiler.target>
        <maven.compiler.compilerVersion>1.8maven.compiler.compilerVersion>
    properties>

    <dependencies>

        <dependency>
            <groupId>org.springframework.bootgroupId>
            <artifactId>spring-boot-starter-webartifactId>
        dependency>

        <dependency>
            <groupId>javax.servletgroupId>
            <artifactId>javax.servlet-apiartifactId>
        dependency>

        <dependency>
            <groupId>javax.servletgroupId>
            <artifactId>jstlartifactId>
        dependency>

        <dependency>
            <groupId>org.apache.tomcat.embedgroupId>
            <artifactId>tomcat-embed-jasperartifactId>
        dependency>

        <dependency>
            <groupId>com.gitee.qdbp.thirdpartygroupId>
            <artifactId>ueditorartifactId>
            <version>1.4.3.3version>
        dependency>

        <dependency>
            <groupId>org.springframework.bootgroupId>
            <artifactId>spring-boot-starter-testartifactId>
            <scope>testscope>
        dependency>
    dependencies>

    <build>
        <plugins>

            <plugin>
                <groupId>org.springframework.bootgroupId>
                <artifactId>spring-boot-maven-pluginartifactId>
                <version>1.4.2.RELEASEversion>
            plugin>
        plugins>
        <resources>

            <resource>
                <directory>src/main/webappdirectory>
                <targetPath>META-INF/resourcestargetPath>
                <includes>
                    <include>**/**include>
                includes>
            resource>

            <resource>
                <directory>src/main/resourcesdirectory>
                <includes>
                    <include>**/**include>
                includes>
                <filtering>falsefiltering>
            resource>
        resources>
    build>
project>
3,dependencies 中是一些基本依赖,JSP依赖和 Ueditor 的依赖,build 中的是打包配置,如果没有必要,直接复制就行
4,在 src/main 目录下创建 webapp 目录,在 webapp 目录下随便写一个 jsp 页面
5,在配置文件(application.properties)中添加如下配置,第一个配置项就是你 jsp 页面所存放的相对 webapp 的位置
server.port=80
(如果不想要控制器中转,只是想直接访问 jsp 页面,可以省略下面的配置)
spring.mvc.view.prefix=/
spring.mvc.view.suffix=.jsp
6,书写项目启动类
package com.hwq.jsp;

import org.springframework.boot.SpringApplication;
import org.springframework.boot.autoconfigure.SpringBootApplication;
import org.springframework.boot.builder.SpringApplicationBuilder;
import org.springframework.boot.web.servlet.support.SpringBootServletInitializer;

/**
 * 想要集成 JSP 页面,启动类需要继承 SpringBootServletInitializer
 * 需要重写 configure 方法
 * 测试阶段要把启动方式的工作环境调成当前模块,否则多模块下回找不到视图页面
 */
@SpringBootApplication
public class JspApplication extends SpringBootServletInitializer {

    @Override
    protected SpringApplicationBuilder configure(SpringApplicationBuilder application) {
        return application.sources(JspApplication.class);
    }

    public static void main(String[] args) {
        SpringApplication.run(JspApplication.class, args);
    }
}
7,如果使用的是 idea 编辑器,在同时打开多个模块的时候,会出现路径找不到的情况,这时候我们需要将工作路径指向模块路径
8,编辑启动类
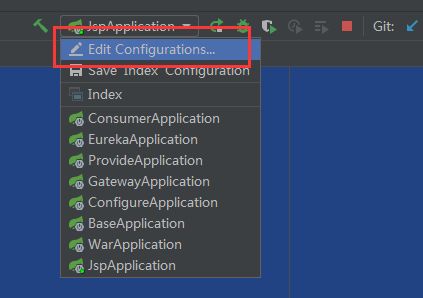
9,如下图,选择项目的启动类,修改工作目录为 模块路径

10,保存之后启动,在地址栏 输入 localhost:8080/index.jsp 就能访问到刚刚书写的 jsp 页面了

11,做到这里,我们就整合完了 JSP 模板,接下来去官网下载 jsp 版本的 ueditor
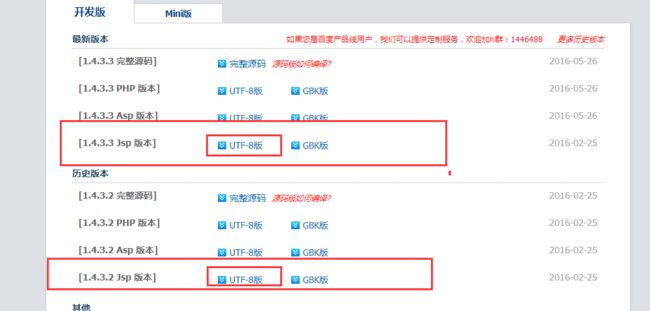
12,解压之后,将压缩包解压并重命名为 ueditor,并将这个目录方法 webapp 路径下
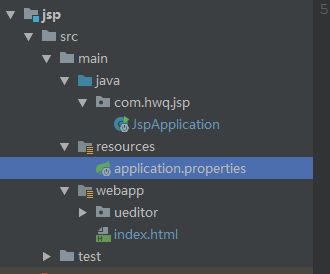
13,将 ueditor 目录里面的 index.html 复制到webapp下(注意修改 js 的引入路径)
14,启动项目,我们在地址栏输入 localhost 就能访问到 ueditor 的页面了

15,做到这里,我们基本就完成了 ueditor 整个项目的整合,但是由于最后要打成 jar 包,我们可以发现,编辑器的文件是保存在
ueditor/jsp/upload/ 目录下的,打成 jar 包之后无法在上传到这个路径,我们需要修改这个路径(真的烦)
16,首先我们在硬盘上选择一个我们存放文件的地址,如 E:/AaaHwqCode/ZZZZ/upload/,我们在 该路径下创建 ueditor/jsp 目录
在将 config.json 剪切到 E:/AaaHwqCode/ZZZZ/upload/ueditor/jsp 目录下

17,为了能动态的修改这个存放文件的地址,也为了让上传的文件可以被访问,我们一般选择在配置文件(application.properties)
中添加以下配置,注意这里的 静态资源路径的绝对路径必须使用 file 协议
spring.mvc.static-path-pattern=/**
spring.resources.static-locations=file:///e:/AaaHwqCode/ZZZZ/upload
ueditor.path=E:/AaaHwqCode/ZZZZ/upload/
18,书写一个控制器用于读取文件保存地址和中转请求
package com.hwq.jsp.controller;

import org.springframework.beans.factory.annotation.Value;
import org.springframework.stereotype.Controller;
import org.springframework.web.bind.annotation.RequestMapping;

import javax.servlet.http.HttpServletRequest;

@Controller
public class UeditorController {

    @Value("${ueditor.path}")
    private String ueditorUrl;

    @RequestMapping("/ueditor/jsp/controller")
    public String action(HttpServletRequest request) {
        // 将读取出来的文件保存地址保存到 request 中
        request.setAttribute("path", ueditorUrl);
        return "ueditor/jsp/controller";
    }
}
19,我们修改项目中 ueditor/jsp/controller.jsp 页面如下
<%@ page language="java" contentType="text/html; charset=UTF-8"
    import="com.baidu.ueditor.ActionEnter"
    pageEncoding="UTF-8"%>
<%@ page trimDirectiveWhitespaces="true" %>
<%
    request.setCharacterEncoding( "utf-8" );
    response.setHeader("Content-Type" , "text/html");

    // 获取在控制器中赋值的 ueditor 上传文件的外置存放地址
    String rootPath = (String) request.getAttribute("path");
    String action = request.getParameter("action");
    String result = new ActionEnter(request, rootPath ).exec();

    // 这里修复 ueditor 本身的 bug, (获取图片列表和文件列表的时候,会出现绝对路径的情况)
    if (action != null && (action.equals("listfile") || action.equals("listimage"))) {
        result = result.replaceAll(rootPath, "/");
    }
    out.write( result );
%>
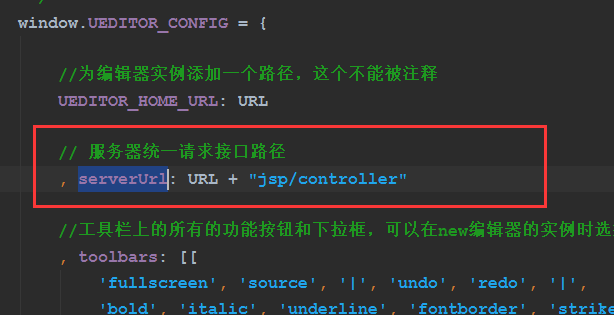
20,修改 ueditor/ueditor.config.js 文件,将 serverlUrl 的请求指向上面编写的控制器
21,启动项目,检测编辑器的所有功能是否正常
22,注意,此时生效的配置文件是 E:/AaaHwqCode/ZZZZ/upload 目录下 jsp/config.json,并不是项目中的
为了防止搞错,建议将项目中的 udditor/jsp 目录下的除了 controller.jsp 文件之外的所有文件删除
23,接下来使用 idea 的功能打包,双击如下这个选项,等待一会便可获得一个 JAR 包

24,最后总结一下需要注意的几个点
24.1,JSP 模板的一些依赖,springboot 内置的 tomcat 对于 jsp支持性不好,需要引入一些外部依赖
24.2,打包时需要将 webapp 目录的内容打包到 META-INF/resources 路径下(打包插件一定要配置好)
25.3,项目打成 JAR 包之后,文件不能上传到项目内,需要去修改文件的保存路径 rootPath(重中之重)
26.4,需要将外部选定的存放文件的物理路径加入的项目的静态资源路径,否则文件无法被访问