windows下训练yolov2和yolov3
YOLO on windows
1.What do you need?
1.1 A compute with Nvidia Graphic Unit will speed the whole process a lot; else, it may take you several days to get your model well trained. Try yolo-tiny instead of yolov2 or yolov3 under the situation of no Nvidia Graphic card.
1.2 Install MSVS(MSVS 2015 and MSVS 2013 are recommended), CUDA, cuDNN(not necessary) and OpenCV. According to AlexeyAB’s advice in github, you should install MSVS before CUDA. MSVS 2013. Here are some referenced blogs, hope they can do some help. Blog 1, Blog 2.
Download MSVS 2015
Download CUDA
Download cuDNN
Download opencv (don’t forget to add its path after you install opencv)
Download Nvidia Driver
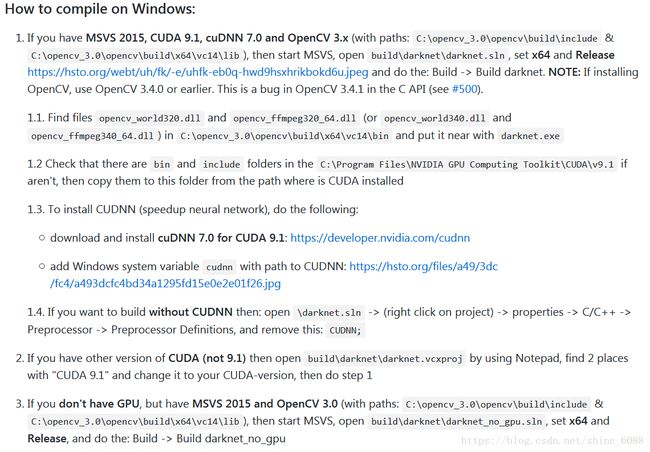
2.How to compile on windows?
After you set the environment, begin to compile darknet. Here are some useful references: Blog 1, Blog 2, and they are based on this.
After compiling, you’ll get darknet.exe (path ‘\darknet-master \build\darknet\x64’), then you can start to train your own data by yolo.
3 How to train YOLO
3.1 Prepare your pictures
Rename pictures in order by voc_label.py (path build\darknet\x64\data\\voc’), you can start from 0. In this way, you can divided data into train set and validation set easily later.
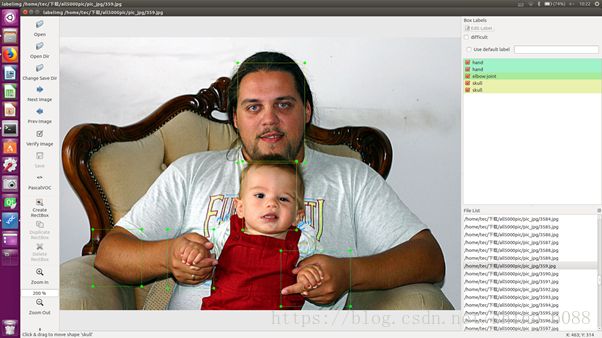
3.2 label pictures
I used a great tool to help me get this done, labelImg. If you don’t want to download a bunch of stuff and compile, click this link, password: cnn6. however, I’m not sure if the hot keys are aviliable in your computer, and you can only get .xml documentation by the linked versions until now(you can get .txt doc directly in the well installed version ).
Syntax below trans .xml doc to .txt doc.
import os

from os import listdir, getcwd

from os.path import join

if __name__ == '__main__':

    source_folder='JPEGImages/'

    dest='ImageSets/Main/train.txt'

    dest2='ImageSets/Main/val.txt'

    file_list=os.listdir(source_folder)

    train_file=open(dest,'a')

    val_file=open(dest2,'a')

    for file_obj in file_list:

        file_path=os.path.join(source_folder,file_obj)

        file_name,file_extend=os.path.splitext(file_obj)

        file_num=int(file_name)

        if(file_num<1800):#divided data into train set and validation set

            train_file.write(file_name+'\n')

        else :

            val_file.write(file_name+'\n')

    train_file.close()

    val_file.close()
3.2.2 Yolo mark
Windows & Linux GUI for marking bounded boxes of objects in images for training Yolo v3 and v2.To compile on Windows open yolo_mark.sln in MSVS2013/2015, compile it x64 & Release and run the file: x64/Release/yolo_mark.cmd. Change paths in yolo_mark.sln to the OpenCV 2.x/3.x installed on your computer:
- (right click on project) -> properties -> C/C++ -> General -> Additional Include Directories:
C:\opencv_3.0\opencv\build\include; - (right click on project) -> properties -> Linker -> General -> Additional Library Directories:
C:\opencv_3.0\opencv\build\x64\vc14\lib;
To test, simply run x64/Release/yolo_mark.cmd.
3.3 Change the config files
Two config files should be changed: cfg/voc.data, cfg/yolo-voc.cfg, and one should be created.
3.3.1data/voc.names
Write the objection names in this doc.
3.3.2 cfg/voc.data
Below are for reference:
3.3.3 cfg/yolo-voc.cfg(for yolov2)
Change the classes in [region] and the filters in the last [convolutional]:
class=3

filters=40 filters = classes+ coords+ 1)* (NUM)=(1+4+1)×5=30  ,5表示每个grid cell预测的bounding box的数量
cfg/yolov3.cfg(for yolov3)
filters = (classes+ 5)* 3, in this case filters=(3+5)*3=24
If the video memory is very small, set random = 0 to turn off multiscale training, else, set random=1.
[net]

# Testing

# batch=1

# subdivisions=1

# Training

batch=64

subdivisions=8


......


[convolutional]

size=1

stride=1

pad=1

filters=24#filters = (classes+ 5)* 3

activation=linear


[yolo]

mask = 6,7,8

anchors = 10,13,  16,30,  33,23,  30,61,  62,45,  59,119,  116,90,  156,198,  373,326

classes=3

num=9

jitter=.3

ignore_thresh = .5

truth_thresh = 1

random=0 #If the video memory is very small, set random = 0 ato turn off multiscale training, else set random=1.

......


[convolutional]

size=1

stride=1

pad=1

filters=24 #filters = (classes+ 5)* 3

activation=linear


[yolo]

mask = 3,4,5

anchors = 10,13,  16,30,  33,23,  30,61,  62,45,  59,119,  116,90,  156,198,  373,326

classes=3###20

num=9

jitter=.3

ignore_thresh = .5

truth_thresh = 1

random=0###1

......


[convolutional]

size=1

stride=1

pad=1

filters=24 #filters = (classes+ 5)* 3

activation=linear


[yolo]

mask = 0,1,2

anchors = 10,13,  16,30,  33,23,  30,61,  62,45,  59,119,  116,90,  156,198,  373,326

classes=3

num=9

jitter=.3

ignore_thresh = .5

truth_thresh = 1

random=0###1
3.4 Start to train
Download the pre-trained weights : yolov2.weights; yolov3.weights, put to the directory build\darknet\x64.
Start training by using the command line:
Yolov2
darknet.exe detector train data/voc.data yolo-voc.cfg darknet19_448.conv.23 Yolov3
darknet.exe detector train data/voc.data yolov3.cfg yolov3.weights
Trained weights will be saved in the directory build\darknet\x64\backup, and if your training is interrupted, changed the weights doc inthe syntax above so you can continue.
4. Test your model
Yolov2
For images:
darknet.exe detector test data/voc.data yolo-voc.cfg yolo-voc.weights then input the path of picture
For real-time object detection:
darknet.exe detector demo data/voc.data yolo-voc.cfg yolo-voc.weights
Yolov3
For images:
darknet.exe detector test data/coco.data yolov3.cfg yolov3.weights -thresh 0.25then input the path of picture
For real-time object detection:
darknet.exe detector demo data/voc.data yolov3.cfg yolov3.weights 


