Ubuntu16.04+CUDA8.0+Theano-0.8安装教程
Ubuntu16.04+CUDA8.0+Theano-0.8安装教程
Theano的安装真的是一部血泪史,花费了一个多星期的时间,终于在win7下和Ubuntu下安装theano成功,并且安装cuda、配置GPU工作。期间排了N多的坑,在这先说一下注意事项(避免各种坑):
如果选择在Ubuntu下安装Theano。使用系统自带的python=2.7版本。最需要注意的是Theano的版本,切记不要选择Theano的最新版本(Theano-1.0),因为Theano从0.9版本开始使用GPUBackend的安装方法,需要安装pygpu,并且如果自己的显卡计算能力低于3.0的话,device=cuda。同时,安装pygpu的话会有很多兼容性问题,很容易出错。所以在这里选择Theano-0.8的稳定版本。
如果选择在Windows下安装Theano,请参考另一篇博文:https://blog.csdn.net/hczhcz0905/article/details/80422169
操作系统:Ubuntu16.04LTS
显卡:NVIDIA GeForce 610M
步骤如下:
(1):检查自己的显卡信息,检查GPU是否支持CUDA
终端输入:lspci | grep -i VGA
然后去cuda官网查看自己的GPU版本是否在CUDA 的支持列表中。
(2)检查gcc版本,终端输入gcc --version
可以看到gcc版本高于5.0,由于cuda8.0版本以后已经支持了gcc高于5,如果选择安装cuda7.5或更低的话,需要降低gcc的版本。
(3)安装NVIDIA驱动,由于cuda自带的驱动可能无法定位内核信息,所以先安装驱动程序。
先卸载之前的驱动程序:$ sudo apt remove --purge nvidia*
添加Graphic Drivers PPA
$ sudo add-apt-repository ppa:graphics-drivers/ppa
$ sudo apt-get update
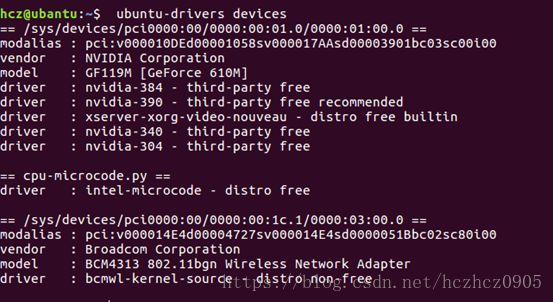
寻找合适的驱动版本:$ ubuntu-drivers devices
可以看到建议安装的驱动是390版本。
安装nvidia driver:sudo apt-get install nvidia-390
安装完毕重启电脑:重启后终端输入:nvidia-smi
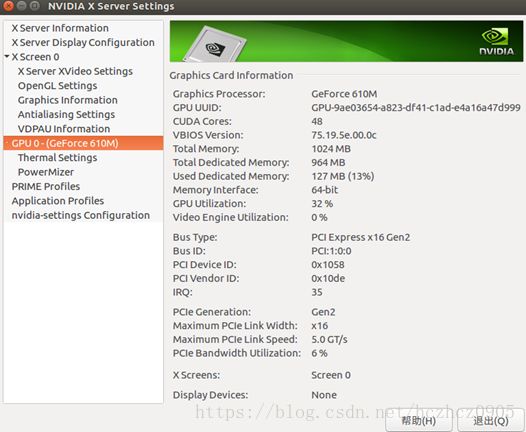
接着输入:nvidia-settings
如果出现以上信息,则nvidia的驱动程序安装成功。
(4)安装cuda
去cuda官网下载和自己系统对应的cuda版本,这里下载cuda_8.0.44_linux.run文件。
然后将该安装包设置为可执行文件:
chmod u+x cuda_8.0.44_linux.run
进入安装包所在目录,执行安装程序:sudo./cuda_8.0.44_linux.run
在这里运行安装程序之前,要关闭Xserver。
如果是远程连接的Linux机器,可以使用:sudo init 3
如果在自己的双系统下:首先按Ctrl+Alt+F1进入字符终端界面,然后关闭Xserver,使用:sudo service lightdm stop,重启的话使用 sudo servicelightdm start ,再按Ctrl+Alt+F7返回图形化界面。
在字符终端界面关闭X server后,执行安装程序,当要选则是否安装驱动程序时,选择no,其他可以默认。安装完成后,会提示缺少一些库,自己安装就行。
(5)测试cuda是否安装成功
首先在系统环境里设置cuda路径:
vim ~/.bashrc
export LD_LIBRARY_PATH=/usr/local/cuda-8.0/lib64:/usr/local/cuda-8.0/extras/CUPTI/lib64:$LD_LIBRARY_PATH
export CUDA_HOME=/usr/local/cuda-8.0
export PATH=/usr/local/cuda-8.0/bin:$PATH
然后,输入:source ~/.bashrc 使其生效。
测试cuda:
终端输入:nvcc -V
最后,尝试编译cuda提供的例子:
cd /home/user_name/NVIDIA_CUDA-8.0_Samples
make
系统会自动编译,需要等待一段时间,如果出错系统会停止,然后查看 错误信息,不行的话重新安装。
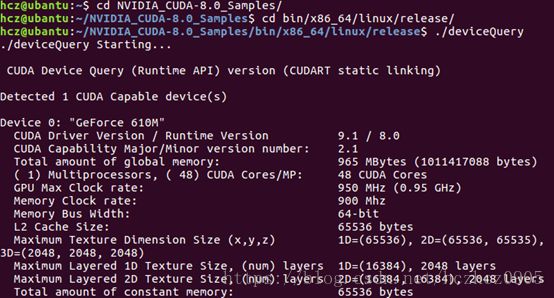
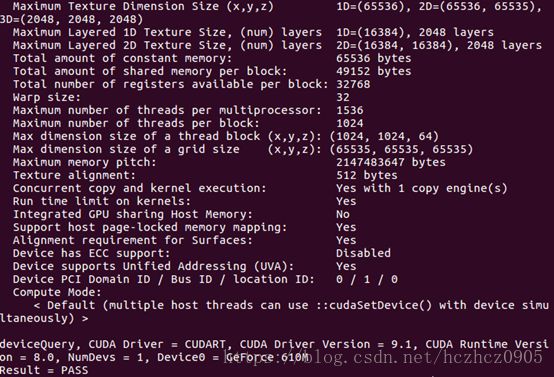
如果无错,运行编译生成的二进制文件,
至此,cuda安装成功。
(6)安装Theano-0.8版本
a:安装各种依赖包:
sudo apt-get update
sudo apt-getinstall gfortran 后面编译会用到
sudo apt-getinstall libopenblas-dev
sudo apt-getinstall liblapack-dev
sudo apt-getinstall libatlas-base-dev
使用pip安装numpy和scipy
sudo apt-getinstall python-pip
sudo pipinstall numpy
测试numpy,测试通过才能进行下一步,测试不通过重新安装
python -c “importnumpy;numpy.test()”
sudo pipinstall scipy
python -c “importscipy;scipy.test()”
在安装theano之前,还要安装
sudo apt-getinstall python-dev python-nose g++ git
安装theano:sudo pipinstall theano==0.8
(7)测试theano在gpu下运行
编辑theano配置文件
sudo gedit~/.theanorc
[global]
floatX=float32
device=gpu
[cuda]
root=/usr/local/cuda-8.0
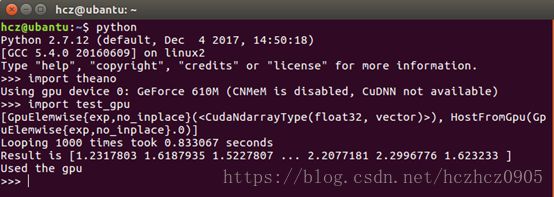
然后运行官方测试gpu的例子:
from theano importfunction, config, shared, tensor
import numpy
import time
vlen = 10 * 30 *768 # 10 x #cores x # threads per core
iters = 1000
rng =numpy.random.RandomState(22)
x =shared(numpy.asarray(rng.rand(vlen), config.floatX))
f = function([],tensor.exp(x))
print(f.maker.fgraph.toposort())
t0 = time.time()
for i inrange(iters):
r = f()
t1 = time.time()
print("Looping%d times took %f seconds" % (iters, t1 - t0))
print("Resultis %s" % (r,))
ifnumpy.any([isinstance(x.op, tensor.Elemwise) and
('Gpu' not intype(x.op).__name__)
for x inf.maker.fgraph.toposort()]):
print('Used the cpu')
else:
print('Used the gpu')
至此,theano安装成功。theano.test()测试的话,如果有错可以忽略。


