机器学习——KNN、SVM、MLP、CNN实现cifar100
机器学习——KNN、SVM、MLP、CNN实现cifar100
- 1.KNN-cifar100
-
- 1.1KNN实验结果
- 1.2KNN实验代码
- 2.SVM-cifar100
-
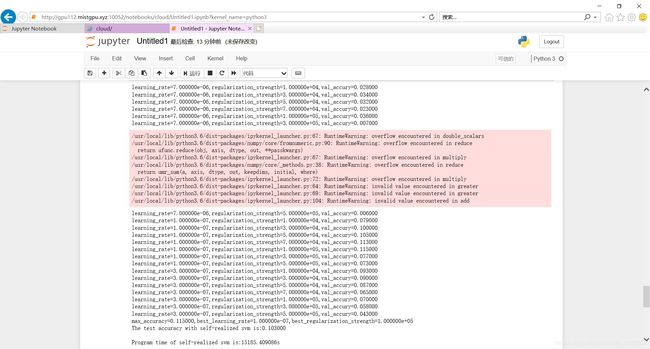
- 2.1 SVM实验结果
- 2.2 SVM实验代码
- 3.MLP-cifar100
-
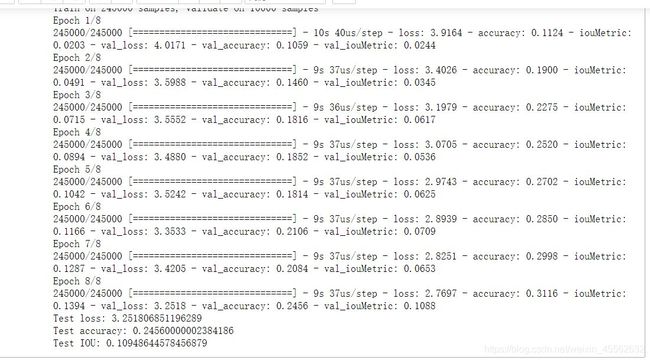
- 3.1 MLP实验结果
- 3.2 MLP实验代码
- 4.CNN-cifar100
-
- 4.1 CNN实验结果
- 4.2 CNN实验代码
本文是为期一周的实验课,要求用KNN、SVM、MLP和CNN分别实现cifar100数据集的分类。该实验的目的在于对机器学习有一个直观的感受,且对前段时间所学python基础语法课、机器学习100天(前8天)做个复习。
在网上找到很多资料都是cifar10的实验。本文主要介绍实验代码和实验结果及一些分析,不讲述基础原理。代码的参考链接写在代码头部 ,本文的代码是在原来代码的基础上,将cifar10数据集加载改为cifar100。其中一些语言注释并没有改正。
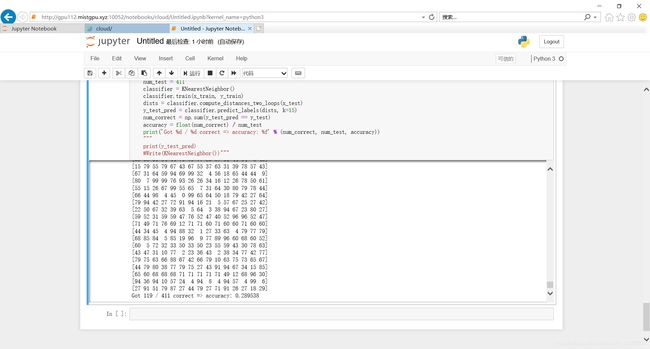
实验结果:KNN准确率正常29%。SVM准确率非常低10%不正常,原因在于核函数的设置。MLP准确率也非常低25%不正常,原因在于直接使用了优化器,没有学习率,模型欠拟合。CNN运行5小时没结果。
注意:本文使用的标签是直接将100个子类标签拿出来用,更精确的做法是将10个大类标签和对应的子类标签组合起来,做成新的100个标签。否则子类之间可能有重叠。
1.KNN-cifar100
1.1KNN实验结果
1.2KNN实验代码
KNN 代码:
# https://github.com/luxiaohao/KNN/blob/master/datasets/data_utils.py
# python+cifar10


import os
import numpy as np
import matplotlib.pyplot as plt
from PIL import Image
from sklearn import svm as s
import time
def unpickle(file):
    """
    功能:将CIFAR10中的数据转化为字典形式
    (1)加载data_batch_i(i=1,2,3,4,5)和test_batch文件返回的字典格式为:
    dict_keys([b'filenames', b'data', b'labels', b'batch_label'])
    其中每一个batch中:
    dict[b'data']为(10000,3072)的numpy array
    dict[b'labels']为长度为10000的list
    (2)加载batchs.meta文件返回的字典格式为:
    dict_keys([b'num_cases_per_batch', b'num_vis', b'label_names'])
    其中dict[b'label_names']为一个list,记录了0-9对应的类别为:
    [b'airplane', b'automobile', b'bird', b'cat', b'deer', b'dog', b'frog', b'horse', b'ship', b'truck']
    """
    import pickle
    with open(file, 'rb') as fo:
        dict = pickle.load(fo, encoding='bytes')
    return dict
# file =''r'D:\cifar-100-python\train'
# dict=unpickle(file)
# print(dict.keys())
# 运行文件可知dict_keys([b'filenames', b'batch_label', b'fine_labels', b'coarse_labels', b'data'])
def load_CIFAR10():
    """
    功能:从当前路径下读取CIFAR10数据
    输出:
    -x_train:(numpy array)训练样本数据(N,D)
    -y_train:(numpy array)训练样本数标签(N,)
    -x_test:(numpy array)测试样本数据(N,D)
    -y_test:(numpy array)测试样本数标签(N,)
    """
    x_t = []
    y_t = []
    for i in range(1, 6):
        # path_train = os.path.join('cifar-10-batches-py', 'data_batch_%d' % (i))
        path_train =''r'D:\cifar-100-python\train'
        data_dict = unpickle(path_train)
        x = data_dict[b'data'].astype('float32')
        y = np.array(data_dict[b'fine_labels'])
        x_t.append(x)
        y_t.append(y)
    # 将数据按列堆叠进行合并,默认按列进行堆叠
    x_train = np.concatenate(x_t)
    y_train = np.concatenate(y_t)
    # path_test = os.path.join('cifar-10-batches-py', 'test_batch')
    path_test = ''r'D:\cifar-100-python\test'
    data_dict = unpickle(path_test)
    x_test = data_dict[b'data'].astype('float32')
    y_test = np.array(data_dict[b'fine_labels'])
    return x_train, y_train, x_test, y_test
def data_processing():
    """
    功能:进行数据预处理
    输出:
    x_tr:(numpy array)训练集数据
    y_tr:(numpy array)训练集标签
    x_val:(numpy array)验证集数据
    y_val:(numpy array)验证集标签
    x_te:(numpy array)测试集数据
    y_te:(numpy array)测试集标签
    x_check:(numpy array)用于梯度检查的子训练集数据
    y_check:(numpy array)用于梯度检查的子训练集标签
    """
    # 加载数据
    x_train, y_train, x_test, y_test = load_CIFAR10()
    num_train = 10000
    num_test = 1000
    num_val = 1000
    num_check = 100
    # 创建训练样本
    x_tr = x_train[0:num_train]
    y_tr = y_train[0:num_train]
    # 创建验证样本
    x_val = x_train[num_train:(num_train + num_val)]
    y_val = y_train[num_train:(num_train + num_val)]
    # 创建测试样本
    x_te = x_test[0:num_test]
    y_te = y_test[0:num_test]
    # 从训练样本中取出一个子集作为梯度检查的数据
    mask = np.random.choice(num_train, num_check, replace=False)
    x_check = x_tr[mask]
    y_check = y_tr[mask]
    # 计算训练样本中图片的均值
    mean_img = np.mean(x_tr, axis=0)
    # 所有数据都减去均值做预处理
    x_tr += -mean_img
    x_val += -mean_img
    x_te += -mean_img
    x_check += -mean_img
    # 加上偏置项变成(N,3073)
    # np.hstack((a,b))等价于np.concatenate((a,b),axis=1),在横向合并
    # np.vstack((a,b))等价于np.concatenate((a,b),axis=0),在纵向合并
    x_tr = np.hstack((x_tr, np.ones((x_tr.shape[0], 1))))
    x_val = np.hstack((x_val, np.ones((x_val.shape[0], 1))))
    x_te = np.hstack((x_te, np.ones((x_te.shape[0], 1))))
    x_check = np.hstack((x_check, np.ones((x_check.shape[0], 1))))
    return x_tr, y_tr, x_val, y_val, x_te, y_te, x_check, y_check


from pandas import read_csv
import pandas as pd
import matplotlib.pyplot as plt
class KNearestNeighbor(object):
    """定义KNN分类器,用L1,L2距离计算"""
    def __init__(self):
        pass
    def train(self, X, y):
        """
        训练数据,k近邻算法训练过程只是保存训练数据。
        :param X: 输入是一个包含训练样本nun_train,和每个样本信息的维度D的二维数组
        :param y: 对应标签的一维向量,y[i] 是 X[i]的标签
        :return: 无
        """
        self.X_train = X
        self.y_train = y
    def predict(self, X, k=1, num_loops=0):
        """
        :param X:  训练数据输入值,一个二维数组
        :param k:  确定K值进行预测投票
        :param num_loops: 选择哪一种循环方式,计算训练数据和测试数据之间的距离
        :return: 返回一个测试数据预测的向量(num_test,),y[i] 是训练数据 X[i]的预测标签。
        """
        if num_loops == 0:
            dists = self.compute_distances_no_loops(X)
        elif num_loops == 1:
            dists = self.compute_distances_one_loop(X)
        elif num_loops == 2:
            dists = self.compute_distances_two_loops(X)
        else:
            raise ValueError('Invalid value %d for num_loops' % num_loops)
        return self.predict_labels(dists, k=k)
    def compute_distances_no_loops(self, X):
        """
        计算距离没有运用循环。
        只使用基本的数组操作来实现这个函数,特别是不使用SCIPY的函数。
        提示:尝试使用矩阵乘法和两个广播求和来制定L2距离。
        :param X: 输入是一个(num_test, D)的训练数据。
        :return: 返回值是一个(num_test, num_train)的二维数组,dists[i, j]对应相应位置测试数据和训练数据的距离。
        """
        num_test = X.shape[0]
        num_train = self.X_train.shape[0]
        dists = np.zeros((num_test, num_train))
        """
        M = np.dot(X, self.X_train.T)
        nrow = M.shape[0]
        ncol = M.shape[1]
        te = np.diag(np.dot(X, X.T))
        tr = np.diag(np.dot(self.X_train, self.X_train.T))
        te = np.reshape(np.repeat(te, ncol), M.shape)
        tr = np.reshape(np.repeat(tr, nrow), M.T.shape)
        sq = -2 * M + te + tr.T
        dists = np.sqrt(sq)
        #这里利用numpy的broadcasting性质,例如A = [1, 2], B = [[3], [4]], A + B = [[3 + 1, 3 + 2], [4 + 1, 4 + 2]]。
        #以及(a - b) ^ 2 = a ^ 2 + b ^ 2 - 2ab。
        """
        test_sum = np.sum(np.square(X), axis=1, keepdims=True)
        train_sum = np.sum(np.square(self.X_train), axis=1)
        test_mul_train = np.matmul(X, self.X_train.T)
        dists = test_sum + train_sum - 2 * test_mul_train
        return dists
    def compute_distances_one_loop(self, X):
        """
        应用1层循环的计算方式,计算测试数据和每个训练数据之间的距离。
        按训练数据的行索引计算,少了一个循环。
        :param X: 输入是一个(num_test, D)的训练数据。
        :return: 返回值是一个(num_test, num_train)的二维数组,dists[i, j]对应相应位置测试数据和训练数据的距离。
        """
        num_test = X.shape[0]
        num_train = self.X_train.shape[0]
        dists = np.zeros((num_test, num_train))
        for i in range(num_test):
            # axis = 1按每个行索引计算
            distances = np.sqrt(np.sum(np.square(self.X_train - X[i]), axis=1))
            # L1距离
            # distances = np.sum(np.abs(self.X_train - X[i, :]), axis=1)
            dists[i, :] = distances
        return dists
    def compute_distances_two_loops(self, X):
        '''
        应用2层循环(嵌套循环)的计算方式,计算测试数据和每个训练数据之间的距离。
        :param X: 输入是一个(num_test, D)的训练数据。
        :return: 返回值是一个(num_test, num_train)的二维数组,dists[i, j]对应相应位置测试数据和训练数据的距离。
        '''
        num_test = X.shape[0]
        num_train = self.X_train.shape[0]
        dists = np.zeros((num_test, num_train))
        for i in range(num_test):
            for j in range(num_train):
                # 应用L2距离求解每个对应测试集数据和训练集数据的距离,并放在dists数组中,两层循环时间复杂度高
                distances = np.sqrt(np.sum(np.square(self.X_train[j] - X[i])))
                dists[i, j] = distances
        return dists
    def predict_labels(self, dists, k=1):
        '''
        输入一个测试数据和训练数据的距离矩阵,预测训练数据的标签。
        :param dists: 距离矩阵(num_test, num_train) 对应dists[i, j]
                       给出第i个测试数据和第j个训练数据的距离。
        :param k: KNN算法超参数K
        :return:返回(num_test,)向量,y[i]是X[i]对应的预测标签。
        '''
        num_test = dists.shape[0]
        y_pred = np.zeros(num_test)
        """
        这一步,要做的是:用距离矩阵找到与测试集最近的K个训练数据的距离,
        并且找到他们对应的标签,存放在closest_y中。
        函数介绍:
        numpy.argsort(a, axis=-1, kind=’quicksort’, order=None)
        功能: 将矩阵a按照axis排序,并返回排序后的下标
        参数: a:输入矩阵, axis:需要排序的维度
        返回值: 输出排序后的下标,从小到大排
        """
        for i in range(num_test):
            # 创建一个长度为K的列表,用来存放与测试数据最近的K个训练数据的距离。
            closest_y = []
            distances = dists[i, :]
            indexes = np.argsort(distances)
            # 返回对应索引的标签值
            closest_y = self.y_train[indexes[: k]]
            """
            # 增加程序,解决维度过深问题,上面closest_y是2维
            if np.shape(np.shape(closest_y))[0] != 1:
                closest_y = np.squeeze(closest_y)
            """
            print(closest_y.astype(np.int))
            """
            通过上一步得到了最近的K个训练样本的标签,下一步就是找到其中最多的那个标签,
            并且把这个标签给预测值y_pred[i]。
            计算所有数字的出现次数
            numpy.bincount(x, weights=None, minlength=None)统计对应标签位置出现次数
            np.bincount(y_train.astype(np.int32))
            np.bincount(np.array([0, 1, 1, 3, 2, 1, 7]))
            array([1, 3, 1, 1, 0, 0, 0, 1], dtype=int32)
            分别统计0-7分别出现的次数
            """
            count = np.bincount(closest_y.astype(np.int))
            # 返回最大位置的索引
            y_pred[i] = np.argmax(count)
        return y_pred
def Write(KNN):
    # 字典中的key值即为csv中列名
    dataframe = pd.DataFrame({
     'K近邻': KNN})
    # 将DataFrame存储为csv,index表示是否显示行名,default=True
    dataframe.to_csv(''r'D:\cifar-100-python\分类结果_1112.csv', index=False, sep=',')


if __name__ == '__main__':
    # 进行数据预处理
    x_train, y_train, x_val, y_val, x_test, y_test, x_check, y_check = data_processing()
    classifier = KNearestNeighbor()
    classifier.train(x_train, y_train)
    dists = classifier.compute_distances_two_loops(x_test)
    print(dists.shape)
    plt.imshow(dists, interpolation='none')
    plt.show()
    num_test = 411
    classifier = KNearestNeighbor()
    classifier.train(x_train, y_train)
    dists = classifier.compute_distances_two_loops(x_test)
    y_test_pred = classifier.predict_labels(dists, k=15)
    num_correct = np.sum(y_test_pred == y_test)
    accuracy = float(num_correct) / num_test
    print('Got %d / %d correct => accuracy: %f' % (num_correct, num_test, accuracy))
    """
    print(y_test_pred)
    #Write(KNearestNeighbor())"""
2.SVM-cifar100
2.1 SVM实验结果
2.2 SVM实验代码
SVM代码如下:
# -*- coding: utf-8 -*-
# https://github.com/BetterBoyTph/SVM-CIFAR10/blob/master/SVM_CIFAR10.py
#好理解

class SVM(object):
    def __init__(self):
        # W为加上偏置的权重(D,num_class)
        self.W = None
    def svm_loss_naive(self, x, y, reg):
        """
        功能:非矢量化版本的损失函数
        输入:
        -x:(numpy array)样本数据(N,D)
        -y:(numpy array)标签(N,)
        -reg:(float)正则化强度
        输出:
        (float)损失函数值loss
        (numpy array)权重梯度dW
        """
        num_train = x.shape[0]
        num_class = self.W.shape[1]
        # 初始化
        loss = 0.0
        dW = np.zeros(self.W.shape)
        for i in range(num_train):
            scores = x[i].dot(self.W)
            # 计算边界,delta=1
            margin = scores - scores[y[i]] + 1
            # 把正确类别的归0
            margin[y[i]] = 0
            for j in range(num_class):
                # max操作
                if j == y[i]:
                    continue
                if margin[j] > 0:
                    loss += margin[j]
                    dW[:, y[i]] += -x[i]
                    dW[:, j] += x[i]
        # 要除以N
        loss /= num_train
        dW /= num_train
        # 加上正则项
        loss += 0.5 * reg * np.sum(self.W * self.W)
        dW += reg * self.W
        return loss, dW
    def svm_loss_vectorized(self, x, y, reg):
        """
        功能:矢量化版本的损失函数
        输入:
        -x:(numpy array)样本数据(N,D)
        -y:(numpy array)标签(N,)
        -reg:(float)正则化强度
        输出:
        (float)损失函数值loss
        (numpy array)权重梯度dW
        """
        loss = 0.0
        dW = np.zeros(self.W.shape)
        num_train = x.shape[0]
        scores = x.dot(self.W)
        margin = scores - scores[np.arange(num_train), y].reshape(num_train, 1) + 1
        margin[np.arange(num_train), y] = 0.0
        # max操作
        margin = (margin > 0) * margin
        loss += margin.sum() / num_train
        # 加上正则化项
        loss += 0.5 * reg * np.sum(self.W * self.W)
        # 计算梯度
        margin = (margin > 0) * 1
        row_sum = np.sum(margin, axis=1)
        margin[np.arange(num_train), y] = -row_sum
        dW = x.T.dot(margin) / num_train + reg * self.W
        return loss, dW
    def train(self, x, y, reg=1e-5, learning_rate=1e-3, num_iters=100, batch_size=200, verbose=False):
        """
        功能:使用随机梯度下降法训练SVM
        输入:
        -x:(numpy array)训练样本(N,D)
        -y:(numpy array)训练样本标签(N,)
        -reg:(float)正则化强度
        -learning_rate:(float)进行权重更新的学习率
        -num_iters:(int)优化的迭代次数
        -batch_size:(int)随机梯度下降法每次使用的梯度大小
        -verbose:(bool)取True时,打印输出loss的变化过程
        输出:-history_loss:(list)存储每次迭代后的loss值
        """
        num_train, dim = x.shape
        num_class = np.max(y) + 1
        # 初始化权重
        if self.W is None:
            self.W = 0.005 * np.random.randn(dim, num_class)
        batch_x = None
        batch_y = None
        history_loss = []
        # 随机梯度下降法优化权重
        for i in range(num_iters):
            # 从训练样本中随机取样作为更新权重的小批量样本
            mask = np.random.choice(num_train, batch_size, replace=False)
            batch_x = x[mask]
            batch_y = y[mask]
            # 计算loss和权重的梯度
            loss, grad = self.svm_loss_vectorized(batch_x, batch_y, reg)
            # 更新权重
            self.W += -learning_rate * grad
            history_loss.append(loss)
            # 打印loss的变化过程
            if verbose == True and i % 100 == 0:
                print("iteratons:%d/%d,loss:%f" % (i, num_iters, loss))
        return history_loss
    def predict(self, x):
        """
        功能:利用训练得到的最优权值预测分类结果
        输入:
        -x:(numpy array)待分类的样本(N,D)
        输出:y_pre(numpy array)预测的便签(N,)
        """
        y_pre = np.zeros(x.shape[0])
        scores = x.dot(self.W)
        y_pre = np.argmax(scores, axis=1)
        return y_pre


import os
import numpy as np
import matplotlib.pyplot as plt
from PIL import Image
from sklearn import svm as s
import time
def unpickle(file):
    """
    功能:将CIFAR10中的数据转化为字典形式
    (1)加载data_batch_i(i=1,2,3,4,5)和test_batch文件返回的字典格式为:
    dict_keys([b'filenames', b'data', b'labels', b'batch_label'])
    其中每一个batch中:
    dict[b'data']为(10000,3072)的numpy array
    dict[b'labels']为长度为10000的list
    (2)加载batchs.meta文件返回的字典格式为:
    dict_keys([b'num_cases_per_batch', b'num_vis', b'label_names'])
    其中dict[b'label_names']为一个list,记录了0-9对应的类别为:
    [b'airplane', b'automobile', b'bird', b'cat', b'deer', b'dog', b'frog', b'horse', b'ship', b'truck']
    """
    import pickle
    with open(file, 'rb') as fo:
        dict = pickle.load(fo, encoding='bytes')
    return dict
def load_CIFAR10():
    """
    功能:从当前路径下读取CIFAR10数据
    输出:
    -x_train:(numpy array)训练样本数据(N,D)
    -y_train:(numpy array)训练样本数标签(N,)
    -x_test:(numpy array)测试样本数据(N,D)
    -y_test:(numpy array)测试样本数标签(N,)
    """
    x_t = []
    y_t = []
    for i in range(1, 6):
        # path_train = os.path.join('cifar-10-batches-py', 'data_batch_%d' % (i))
        path_train =''r'D:\cifar-100-python\train'
        data_dict = unpickle(path_train)
        x = data_dict[b'data'].astype('float32')
        y = np.array(data_dict[b'fine_labels'])
        x_t.append(x)
        y_t.append(y)
    # 将数据按列堆叠进行合并,默认按列进行堆叠
    x_train = np.concatenate(x_t)
    y_train = np.concatenate(y_t)
    # path_test = os.path.join('cifar-10-batches-py', 'test_batch')
    path_test = ''r'D:\cifar-100-python\test'
    data_dict = unpickle(path_test)
    x_test = data_dict[b'data'].astype('float32')
    y_test = np.array(data_dict[b'fine_labels'])
    return x_train, y_train, x_test, y_test
def data_processing():
    """
    功能:进行数据预处理
    输出:
    x_tr:(numpy array)训练集数据
    y_tr:(numpy array)训练集标签
    x_val:(numpy array)验证集数据
    y_val:(numpy array)验证集标签
    x_te:(numpy array)测试集数据
    y_te:(numpy array)测试集标签
    x_check:(numpy array)用于梯度检查的子训练集数据
    y_check:(numpy array)用于梯度检查的子训练集标签
    """
    # 加载数据
    x_train, y_train, x_test, y_test = load_CIFAR10()
    num_train = 10000
    num_test = 1000
    num_val = 1000
    num_check = 100
    # 创建训练样本
    x_tr = x_train[0:num_train]
    y_tr = y_train[0:num_train]
    # 创建验证样本
    x_val = x_train[num_train:(num_train + num_val)]
    y_val = y_train[num_train:(num_train + num_val)]
    # 创建测试样本
    x_te = x_test[0:num_test]
    y_te = y_test[0:num_test]
    # 从训练样本中取出一个子集作为梯度检查的数据
    mask = np.random.choice(num_train, num_check, replace=False)
    x_check = x_tr[mask]
    y_check = y_tr[mask]
    # 计算训练样本中图片的均值
    mean_img = np.mean(x_tr, axis=0)
    # 所有数据都减去均值做预处理
    x_tr += -mean_img
    x_val += -mean_img
    x_te += -mean_img
    x_check += -mean_img
    # 加上偏置项变成(N,3073)
    # np.hstack((a,b))等价于np.concatenate((a,b),axis=1),在横向合并
    # np.vstack((a,b))等价于np.concatenate((a,b),axis=0),在纵向合并
    x_tr = np.hstack((x_tr, np.ones((x_tr.shape[0], 1))))
    x_val = np.hstack((x_val, np.ones((x_val.shape[0], 1))))
    x_te = np.hstack((x_te, np.ones((x_te.shape[0], 1))))
    x_check = np.hstack((x_check, np.ones((x_check.shape[0], 1))))
    return x_tr, y_tr, x_val, y_val, x_te, y_te, x_check, y_check

def VisualizeWeights(best_W):
    # 去除最后一行偏置项
    w = best_W[:-1, :]
    w = w.T
    w = np.reshape(w, [10, 3, 32, 32])
    # 对应类别
    # classes = ['airplane', 'automobile', 'bird', 'cat', 'deer', 'dog', 'frog', 'horse', 'ship', 'truck']
    classes=['beaver','dolphin','otter','seal','whale',
'aquariumfish','flatfish','ray','shark,''trout',
'orchids','poppies','roses','sunflowers','tulips',
'bottles','bowls','cans','cups','plates',
'apples','mushrooms','oranges','pears','sweetpeppers',
'clock','computerkeyboard','lamp','telephone','television',
'bed','chair','couch','table','wardrobe',
'bee','beetle','butterfly','caterpillar','cockroach',
'bear','leopard','lion','tiger','wolf',
'bridge','castle','house','road','skyscraper',
'cloud','forest','mountain','plain','sea',
'camel','cattle','chimpanzee','elephant','kangaroo',
'fox','porcupine','possum','raccoon','skunk',
'crab','lobster','snail','spider','worm',
'baby','boy','girl','man','woman',
'crocodile','dinosaur','lizard','snake','turtle',
'hamster','mouse','rabbit','shrew','squirrel',
'maple','oak','palm','pine','willow',
'bicycle','bus','motorcycle','pickuptruck','train',
'lawn-mower','rocket','streetcar','tank','tractor']
    num_classes = len(classes)
    plt.figure(figsize=(12, 8))
    for i in range(num_classes):
        plt.subplot(2, 5, i + 1)
        # 将图像拉伸到0-255
        x = w[i]
        minw, maxw = np.min(x), np.max(x)
        wimg = (255 * (x.squeeze() - minw) / (maxw - minw)).astype('uint8')
        r = Image.fromarray(wimg[0])
        g = Image.fromarray(wimg[1])
        b = Image.fromarray(wimg[2])
        # 合并三通道
        wimg = Image.merge("RGB", (r, g, b))
        #        wimg=np.array(wimg)
        plt.imshow(wimg)
        plt.axis('off')
        plt.title(classes[i])
# 主函数
if __name__ == '__main__':
    # 进行数据预处理
    x_train, y_train, x_val, y_val, x_test, y_test, x_check, y_check = data_processing()
    #    在进行交叉验证前要可视化损失函数值的变化过程,检验训练过程编程是否正确
    #    svm=SVM()
    #    history_loss=svm.train(x_train,y_train,reg=1e5,learning_rate=1e-7,num_iters=1500,batch_size=200,verbose=True)
    #    plt.figure(figsize=(12,8))
    #    plt.plot(history_loss)
    #    plt.xlabel('iteration')
    #    plt.ylabel('loss')
    #    plt.show()
    start = time.clock()
    # 使用验证集调参
    learning_rate = [7e-6, 1e-7, 3e-7]
    regularization_strength = [1e4, 3e4, 5e4, 7e4, 1e5, 3e5, 5e5]
    max_acc = -1.0
    for lr in learning_rate:
        for rs in regularization_strength:
            svm = SVM()
            # 训练
            history_loss = svm.train(x_train, y_train, reg=rs, learning_rate=lr, num_iters=2000)
            # 预测验证集类别
            y_pre = svm.predict(x_val)
            # 计算验证集精度
            acc = np.mean(y_pre == y_val)
            # 选取精度最大时的最优模型
            if (acc > max_acc):
                max_acc = acc
                best_learning_rate = lr
                best_regularization_strength = rs
                best_svm = svm
            print("learning_rate=%e,regularization_strength=%e,val_accury=%f" % (lr, rs, acc))
    print("max_accuracy=%f,best_learning_rate=%e,best_regularization_strength=%e" % (
    max_acc, best_learning_rate, best_regularization_strength))
    end = time.clock()
    # 用最优svm模型对测试集进行分类的精度
    # 预测测试集类别
    y_pre = best_svm.predict(x_test)
    # 计算测试集精度
    acc = np.mean(y_pre == y_test)
    print('The test accuracy with self-realized svm is:%f' % (acc))
    print("\nProgram time of self-realized svm is:%ss" % (str(end - start)))
    # 可视化学习到的权重
    VisualizeWeights(best_svm.W)
    # 使用自带的svm进行分类
    start = time.clock()
    lin_clf = s.LinearSVC()
    lin_clf.fit(x_train, y_train)
    y_pre = lin_clf.predict(x_test)
    acc = np.mean(y_pre == y_test)
    print("The test accuracy with svm.LinearSVC is:%f" % (acc))
    end = time.clock()
    print("Program time of svm.LinearSVC is:%ss" % (str(end - start)))
3.MLP-cifar100
3.1 MLP实验结果
3.2 MLP实验代码
MLP代码如下:
# https://blog.csdn.net/It_BeeCoder/article/details/85249757?ops_request_misc=%257B%2522request%255Fid%2522%253A%2522159602345719724839203246%2522%252C%2522scm%2522%253A%252220140713.130102334..%2522%257D&request_id=159602345719724839203246&biz_id=0&utm_medium=distribute.pc_search_result.none-task-blog-2~all~first_rank_ecpm_v3~pc_rank_v2-1-85249757.first_rank_ecpm_v3_pc_rank_v2&utm_term=MLP+cifar&spm=1018.2118.3001.4187

# 步骤1:加载CIFAR100数据库
import keras
import numpy as np
def unpickle(file):
    """
    功能:将CIFAR10中的数据转化为字典形式
    (1)加载data_batch_i(i=1,2,3,4,5)和test_batch文件返回的字典格式为:
    dict_keys([b'filenames', b'data', b'labels', b'batch_label'])
    其中每一个batch中:
    dict[b'data']为(10000,3072)的numpy array
    dict[b'labels']为长度为10000的list
    (2)加载batchs.meta文件返回的字典格式为:
    dict_keys([b'num_cases_per_batch', b'num_vis', b'label_names'])
    其中dict[b'label_names']为一个list,记录了0-9对应的类别为:
    [b'airplane', b'automobile', b'bird', b'cat', b'deer', b'dog', b'frog', b'horse', b'ship', b'truck']
    """
    import pickle
    with open(file, 'rb') as fo:
        dict = pickle.load(fo, encoding='bytes')
    return dict
def load_CIFAR100():
    """
    功能:从当前路径下读取CIFAR10数据
    输出:
    -x_train:(numpy array)训练样本数据(N,D)
    -y_train:(numpy array)训练样本数标签(N,)
    -x_test:(numpy array)测试样本数据(N,D)
    -y_test:(numpy array)测试样本数标签(N,)
    """
    x_t = []
    y_t = []
    for i in range(1, 6):
        # path_train = os.path.join('cifar-10-batches-py', 'data_batch_%d' % (i))
        path_train =''r'chengwenyan/cifar-100-python/train'
        data_dict = unpickle(path_train)
        x = data_dict[b'data'].astype('float32')
        y = np.array(data_dict[b'fine_labels'])
        x_t.append(x)
        y_t.append(y)
    # 将数据按列堆叠进行合并,默认按列进行堆叠
    x_train = np.concatenate(x_t)
    y_train = np.concatenate(y_t)
    # path_test = os.path.join('cifar-10-batches-py', 'test_batch')
    path_test = ''r'chengwenyan/cifar-100-python/test'
    data_dict = unpickle(path_test)
    x_test = data_dict[b'data'].astype('float32')
    y_test = np.array(data_dict[b'fine_labels'])
    return x_train, y_train, x_test, y_test
x_train, y_train, x_test, y_test = load_CIFAR100()
print(x_train.shape)
print(x_test.shape)


# # 步骤2:可视化前36幅图像
# import numpy as np
# import matplotlib.pyplot as plt
# % matplotlib
# inline
# fig = plt.figure(figsize=(20, 5))
# for i in range(36):
#     ax = fig.add_subplot(3, 12, i + 1, xticks=[], yticks=[])
#     ax.imshow(np.squeeze(x_train[i]))

# 步骤3:归一化
x_train = x_train.astype('float32')/255
x_test = x_test.astype('float32')/255

# 步骤4:切分训练集、验证集、测试集
from keras.utils import np_utils
num_classes = len(np.unique(y_train))
y_train = keras.utils.to_categorical(y_train, num_classes)
y_test = keras.utils.to_categorical(y_test, num_classes)
(x_train, x_valid) = x_train[5000:], x_train[:5000]
(y_train, y_valid) = y_train[5000:], y_train[:5000]
print('x_train shape:', x_train.shape)
print(x_train.shape[0], 'train examples')
print(x_valid.shape[0], 'valid examples')
print(x_test.shape[0], 'test examples')

# 步骤5:定义模型
from keras.models import Sequential
from keras.layers import Dense, Dropout, Flatten
# model = Sequential()
# model.add(Flatten(input_shape=x_train.shape[1:]))
# model.add(Dense(1000, activation='relu'))
# model.add(Dropout(0.2))
# model.add(Dense(512, activation='relu'))
# model.add(Dropout(0.2))
# model.add(Dense(num_classes, activation='softmax'))
# model.summary()

# https://github.com/xchen35/Cifar10-MLP/blob/master/part1/Cifar10%20with%20MLP.ipynb
model = Sequential()
act = keras.layers.ELU(alpha=1.0)
model.add(Dense(256, activation=act, input_shape=(32 * 32 * 3,)))
model.add(Dropout(0.2))
model.add(Dense(256, activation=act))
model.add(Dropout(0.2))
model.add(Dense(num_classes, activation='softmax'))
model.summary()

import keras.backend as K
from keras.optimizers import RMSprop
#SGD、
def iouMetric(y_true, y_pred):
    pred = K.cast(K.greater(y_pred, 0.5), K.floatx())
    union = K.cast(K.greater(y_true + pred, 0), K.floatx())
    intersec = y_true * pred
    iou = K.sum(intersec) / (K.sum(union) + K.epsilon())
    return iou
batch_size = 128
num_classes = 100
epochs = 32
model.compile(loss='categorical_crossentropy',
              optimizer=RMSprop(),
              metrics=['accuracy', iouMetric])
history = model.fit(x_train, y_train,
                    batch_size=batch_size,
                    epochs=epochs,
                    verbose=1,
                    validation_data=(x_test, y_test))
score = model.evaluate(x_test, y_test, verbose=0)
print('Test loss:', score[0])
print('Test accuracy:', score[1])
print('Test IOU:', score[2])


# # 步骤6:编译模型
# model.compile(loss='categorical_crossentropy', optimizer='rmsprop', metrics=['accuracy'])
#
# # 步骤7:训练模型
# from keras.callbacks import ModelCheckpoint
# checkpoint = ModelCheckpoint(filepath='MLP.weights.best.hdf5', verbose=1, save_best_only=True)
# hist = model.fit(x_train, y_train, batch_size=32, epochs=20, validation_data=(x_valid, y_valid), callbacks=[checkpoint],
#                  verbose=2, shuffle=True)
#
# # 步骤8 加载在验证集上分类正确率最高的一组模型参数
# model.load_weights('MLP.weights.best.hdf5')
#
# # 步骤9测试集上计算分类正确率
# score = model.evaluate(x_test, y_test, verbose=0)
# print('\n', 'Test accuracy:', score[1])
4.CNN-cifar100
4.1 CNN实验结果
实验进行了五个小时没有结果。可能是时间不够,可能是代码错误。## 4.1
4.2 CNN实验代码
CNN代码如下:
# https://blog.csdn.net/weixin_44140703/article/details/103406539?utm_medium=distribute.pc_relevant.none-task-blog-BlogCommendFromMachineLearnPai2-2.channel_param&depth_1-utm_source=distribute.pc_relevant.none-task-blog-BlogCommendFromMachineLearnPai2-2.channel_param

import numpy as np
import os
import tensorflow as tf
from tensorflow.keras import layers, optimizers, datasets, Sequential

os.environ["TF_CPP_MIN_LOG_LEVEL"] = "2"
tf.random.set_seed(2345)


conv_layers = [ # 5 units of conv + maxpooling    一般来说 让h 和 w 慢慢缩小,channel会慢慢增大,即位置信息逐渐消失,每个像素包含的信息量逐渐增加,把一些高层概念放到一个相应的单元中。
    # unit1   64: channel数量   kernel_size:卷积核大小  padding='same':自动填充 activation:激活函数
    layers.Conv2D(64, kernel_size=[3, 3], padding='same', activation=tf.nn.relu),
    layers.Conv2D(64, kernel_size=[3, 3], padding="same", activation=tf.nn.relu),
    layers.MaxPool2D(pool_size=[2, 2], strides=2, padding='same'),

    layers.Conv2D(128, kernel_size=[3, 3], padding='same', activation=tf.nn.relu),
    layers.Conv2D(128, kernel_size=[3, 3], padding='same', activation=tf.nn.relu),
    layers.MaxPool2D(pool_size=[2, 2], strides=2, padding='same'),

    layers.Conv2D(256, kernel_size=[3, 3], padding='same', activation=tf.nn.relu),
    layers.Conv2D(256, kernel_size=[3, 3], padding='same', activation=tf.nn.relu),
    layers.MaxPool2D(pool_size=[2, 2], strides=2, padding='same'),

    layers.Conv2D(512, kernel_size=[3, 3], padding='same', activation=tf.nn.relu),
    layers.Conv2D(512, kernel_size=[3, 3], padding='same', activation=tf.nn.relu),
    layers.MaxPool2D(pool_size=[2, 2], strides=2, padding='same'),

    layers.Conv2D(512, kernel_size=[3, 3], padding='same', activation=tf.nn.relu),
    layers.Conv2D(512, kernel_size=[3, 3], padding='same', activation=tf.nn.relu),
    layers.MaxPool2D(pool_size=[2, 2], strides=2, padding='same')
]

def unpickle(file):
    """
    功能:将CIFAR10中的数据转化为字典形式
    (1)加载data_batch_i(i=1,2,3,4,5)和test_batch文件返回的字典格式为:
    dict_keys([b'filenames', b'data', b'labels', b'batch_label'])
    其中每一个batch中:
    dict[b'data']为(10000,3072)的numpy array
    dict[b'labels']为长度为10000的list
    (2)加载batchs.meta文件返回的字典格式为:
    dict_keys([b'num_cases_per_batch', b'num_vis', b'label_names'])
    其中dict[b'label_names']为一个list,记录了0-9对应的类别为:
    [b'airplane', b'automobile', b'bird', b'cat', b'deer', b'dog', b'frog', b'horse', b'ship', b'truck']
    """
    import pickle
    with open(file, 'rb') as fo:
        dict = pickle.load(fo, encoding='bytes')
    return dict
def load_CIFAR100():
    """
    功能:从当前路径下读取CIFAR10数据
    输出:
    -x_train:(numpy array)训练样本数据(N,D)
    -y_train:(numpy array)训练样本数标签(N,)
    -x_test:(numpy array)测试样本数据(N,D)
    -y_test:(numpy array)测试样本数标签(N,)
    """
    x_t = []
    y_t = []
    for i in range(1, 6):
        # path_train = os.path.join('cifar-10-batches-py', 'data_batch_%d' % (i))
        path_train =''r'chengwenyan/cifar-100-python/train'
        data_dict = unpickle(path_train)
        x = data_dict[b'data'].astype('float32')
        y = np.array(data_dict[b'fine_labels'])
        x_t.append(x)
        y_t.append(y)
    # 将数据按列堆叠进行合并,默认按列进行堆叠
    x_train = np.concatenate(x_t)
    y_train = np.concatenate(y_t)
    # path_test = os.path.join('cifar-10-batches-py', 'test_batch')
    path_test = ''r'chengwenyan/cifar-100-python/test'
    data_dict = unpickle(path_test)
    x_test = data_dict[b'data'].astype('float32')
    y_test = np.array(data_dict[b'fine_labels'])
    return x_train, y_train, x_test, y_test

x_train, y_train, x_test, y_test = load_CIFAR100()

def preprocess(x_train, y_train):
    # 预处理 x转化到[0,1] 之间  y转化为int类型
    x_train = tf.cast(x_train, dtype=tf.float32) / 255.
    y_train = tf.cast(y_train, dtype=tf.int32)
    return x_train, y_train

# 加载cifar100数据 如果本地没有,会自动下载。
# (x, y), (x_test, y_test) = datasets.cifar100.load_data()
# print(x.shape, y.shape, x_test.shape, y_test.shape)
# 形状:(50000, 32, 32, 3) (50000, 1)这里要注意,y的形状,后面要去掉为1的维度  (10000, 32, 32, 3) (10000, 1)

y_train = tf.squeeze(y_train, axis=1)           # 去掉为1 的维度 [50000, 1] => [5000]
y_test = tf.squeeze(y_test, axis=1) # 去掉为1 的维度 [50000, 1] => [5000]
print(x_train.shape,y_train.shape,x_test.shape,y_test.shape)

# 加载数据集
train_db = tf.data.Dataset.from_tensor_slices((x_train, y_train))
# 对数据的处理       打乱数据;;;;;;;      批预处理         设置batch大小
train_db = train_db.shuffle(10000).map(preprocess).batch(64)
test_db = tf.data.Dataset.from_tensor_slices((x_test, y_test))
test_db = test_db.map(preprocess).batch(64)

# 这里只是为了查看数据形状,在整个程序中并无意义
sample = next(iter(train_db))
print("sample:", sample[0].shape, sample[1].shape, tf.reduce_min(sample[0]), tf.reduce_max(sample[0]))


def main():

    # 构建卷积网络
    conv_net = Sequential(conv_layers)

    # 此处是为了测试卷积网络,看输出数据形状
    # x = tf.random.normal([4, 32, 32, 3])
    # out = conv_net(x)
    # print(out.shape)

    # 构建全连接网络
    fc_net = Sequential([
        layers.Dense(256, activation=tf.nn.relu),
        layers.Dense(128, activation=tf.nn.relu),
        layers.Dense(100, activation=None)
    ])

    # build()
    conv_net.build(input_shape=[None, 32, 32, 3])
    fc_net.build(input_shape=[None, 512])

    # 优化器:Adam
    optimizer = optimizers.Adam(lr=1e-4)

    # variables: 卷积网络和全连接网络的所有参数
    variables = conv_net.trainable_variables + fc_net.trainable_variables

    # 训练流程:
    for epoch in range(50):

        for step, (x, y) in enumerate(train_db):

            # 从数据进入网络,到计算损失函数,都要放到with tf.GradientTape() as tape: 中,方便计算梯度
            with tf.GradientTape() as tape:
                # 数据进入卷积网络[64, 32, 32, 3] => [64, 1,1, 512]
                out = conv_net(x)
                # 变形[64, 1,1, 512] => [b, 512]
                out = tf.reshape(out, [-1, 512])
                # 数据进入全连接层[b, 512] => [b, 100]
                logits = fc_net(out)
                # 对y做one_hot处理 [b] => [b, 100]
                y_one_hot = tf.one_hot(y, depth=100)
                # 计算损失函数     交叉熵损失函数        one_hot之后的y  输出结果  这里要设置为True
                loss = tf.losses.categorical_crossentropy(y_one_hot, logits, from_logits=True)
                loss = tf.reduce_mean(loss)

            # 计算梯度  variables:所有变量
            grads = tape.gradient(loss, variables)
            # 反向传播计算 grads 要和 变量一一对应,所以用zip
            optimizer.apply_gradients(zip(grads, variables))

            if step % 100 == 0:
                print(epoch, step, "loss:", float(loss))


        # 以下是测试部分--
        # 测试流程:
        # 1、数据放入网络得到数据。
        # 2、 softmax得到概率。
        # 3、 argmax 得到最大值的位置。
        # 4、equal 与最大值比较, 得到True False。 cast转化为int格式(0, 1)
        # 5、reduce_sum 计算预测正确的数量
        # 6、计算总的预测正确的数量(每个batch预测正确的相加) 和 总的数据数量(每个batch的总数量)
        # 7、计算准确率 acc
        total_num = 0
        total_correct = 0
        for x, y in test_db:

            # 数据放入网络,得到输出 [b, 100]
            out = conv_net(x)
            out = tf.reshape(out, [-1, 512])
            logits = fc_net(out)

            # softmax 处理 每个数据处理成概率
            prob = tf.nn.softmax(logits, axis=1)
            # argmax 返回指定维度的最大值的位置 int64类型
            pred = tf.argmax(prob, axis=1)
            # 转化数据格式 int64 -> int32
            pred = tf.cast(pred, dtype=tf.int32)

            # tf.cast:把true False转化成 int格式:0或者1   tf.equal: 比较预测值和真实值,结果是True或者False
            correct = tf.cast(tf.equal(pred, y), dtype=tf.int32)
            # 计算所有正确的总数(在上一步,预测正确的已经转化为1)
            correct = tf.reduce_sum(correct)

            # 总数量,是把每一批的数量加起来
            total_num += x.shape[0]
            # 预测正确的总数量,把每次预测正确的总数量加起来
            total_correct += int(correct)

        # 计算准确率
        acc = total_correct / total_num
        print(epoch, 'acc:', acc)


if __name__ == '__main__':
    main()


