【JDK专题】——JDK数据结构——HashMap源码剖析(系列)
本篇文章没有过多介绍二进制运算、求模运算、哈希图,将到下一篇HashMap源码剖析(补充)中叙说
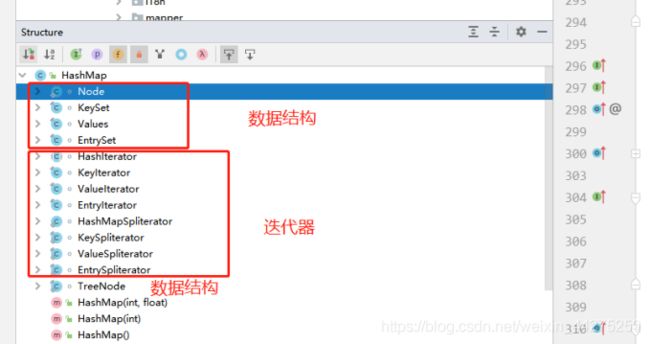
HashMap内部的类
HashMap静态常量
public class HashMap{

	static final int DEFAULT_INITIAL_CAPACITY = 1 << 4; // 默认容量;默认初始化的容量时16,必须是2的幂次方。
	static final int MAXIMUM_CAPACITY = 1 << 30;//最大容量,最大的容量是2^30
	static final float DEFAULT_LOAD_FACTOR = 0.75f;//默认负载因子,0.75就扩容
	static final int TREEIFY_THRESHOLD = 8;//链表变红黑树的阈值
	static final int UNTREEIFY_THRESHOLD = 6;//红黑树退回链表的阀值:
	static final int MIN_TREEIFY_CAPACITY = 64;//最小红黑树的容量
}```

## HashMap关键数据

```java
public class HashMap{

	transient Node<K,V>[] table;//table是一个用于存放键值对的数组,核心所在;第一次使用(插入元素)时被初始化,根据需要可以重新分配空间
	transient int size;//该值用于存放Map中键值对的个数
	transient int modCount;//HashMap被结构性修改的次数,用于判断是否发送了修改
	int threshold;//thresold = capacity * loadFactor;;当HashMap中的键值对数量超过了阈值,就会扩容
	final float loadFactor;//负载因子,上面的
}
HashMap核心源码
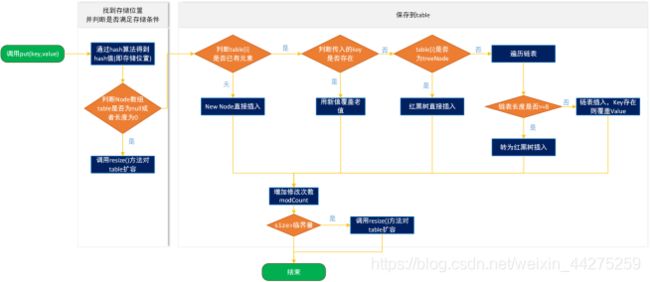
hashMap的本质:每一个元素的put的时候,所带的key利用哈希算法算出一个值,就是就是key决定映射出value的内存地址,这个值作为下标然后找到对应的数组位置存储我们的数据value,取出来也是一样的;哈希算法可以保证数据的散列性,就是保证不同对象或者值算出来的hashcode是不一样的,但是也会有冲突,晚一点我们讲hashcode是如何避免这一类的冲突
数组作为底层数据结构的原因: hashMap的本质实际上是一个数组,数组的优点在于空间连续分布易于管理;因此将数组作为hashMap的数据存储地是高性能的;这也是为什么选择数组作为底层数据结构的原因,那么带来的一个问题就是我们如何将key跟数组的下标进行关联,然后存储我们的value,那就是哈希算法;
hashcode值:默认由native方法实现,java帮我们是实现的这个值可以保证不同对象不一样
public class Object {

    public native int hashCode();
}
插入:
final V putVal(int hash, K key, V value, boolean onlyIfAbsent,
               boolean evict) {

    Node<K,V>[] tab; //表的指针
    Node<K,V> p; //存储与key可能相关的节点的数据指针
    int n, i;//n:与数组长度的相关变量;i:存储与key可能相关的节点的下标
    /**
     * @初始化,hashMap默认是空的,put的是创建表
     * 有可能put的时候初始化没未完成
     */
    if ((tab = table) == null || (n = tab.length) == 0)
        n = (tab = resize()).length;
    /**
     * @p节点是空
     * 则创建一个节点普通的节点
     */
    if ((p = tab[i = (n - 1) & hash]) == null)
        tab[i] = newNode(hash, key, value, null);
    else {

        Node<K,V> e; K k;//e指针是相邻节点的历史引用,k指针是key的引用
        /**
         * @如果哈希相等且key也相等直接替换节点
         */
        if (p.hash == hash &&
                ((k = p.key) == key || (key != null && key.equals(k))))
            e = p;
        /**
         * @p节点是红黑树
         */
        else if (p instanceof TreeNode)
            e = ((TreeNode<K,V>)p).putTreeVal(this, tab, hash, key, value);
        /**
         * @p节点是普通节点,则进行链表操作
         * 进行一个有自增变量。但没有终点的遍历,由break决定
         * 每次不遍历不断更新p指针
         * 注意代码如果来到这里,则最少链表有2个节点
         */
        else {

            for (int binCount = 0; ; ++binCount) {

                /**
                 * @链表的末尾插入元素
                 * 先进行e指针的的更新
                 * 如果下一个是空,证明是链表末端直接添加元素;此时e指针是null不参与外包的值更新
                 */
                if ((e = p.next) == null) {

                    p.next = newNode(hash, key, value, null);
                    if (binCount >= TREEIFY_THRESHOLD - 1) // 红黑树构建触发
                        treeifyBin(tab, hash);
                    break;
                }
                /**
                 * @链表中找到了已经创建过的元素
                 * 如果不是null值判断哈希和key是否一致,然后证明在链表中
                 */
                if (e.hash == hash &&
                        ((k = e.key) == key || (key != null && key.equals(k))))
                    break;
                /**
                 * 还没找到符合条件的,更新p指针继续向后推演
                 */
                p = e;
            }
        }
        /**
         * @将找到的e指针的值才这里单独进行value更新
         */
        if (e != null) {

            V oldValue = e.value;
            if (!onlyIfAbsent || oldValue == null)
                e.value = value;
            afterNodeAccess(e);//生命周期方法,空实现
            return oldValue;
        }
    }
    /**
     * 每次添加后,检查是否需要扩容
     */
    ++modCount;
    if (++size > threshold)
        resize();
    afterNodeInsertion(evict);//生命周期方法,空实现
    return null;
}
获取:
final Node<K,V> getNode(int hash, Object key) {

    Node<K,V>[] tab; Node<K,V> first, e; int n; K k;
    if ((tab = table) != null && (n = tab.length) > 0 &&
            (first = tab[(n - 1) & hash]) != null) {

        /**
         * @如果第一个刚好哈希一致
         * 则直接作为元素返回
         */
        if (first.hash == hash &&
                ((k = first.key) == key || (key != null && key.equals(k))))
            return first;
        if ((e = first.next) != null) {

            /**
             * @红黑树获取法
             */
            if (first instanceof TreeNode)
                return ((TreeNode<K,V>)first).getTreeNode(hash, key);
            /**
             * @链表获取法
             * node中对比key相等的,注意不是hash链表中所有哈希都一致;
             */
            do {

                if (e.hash == hash &&
                        ((k = e.key) == key || (key != null && key.equals(k))))
                    return e;
            } while ((e = e.next) != null);
        }
    }
    return null;
}
删除:
先查找,后删除,然后返回
final Node<K,V> removeNode(int hash, Object key, Object value,
                           boolean matchValue, boolean movable) {

    Node<K,V>[] tab; Node<K,V> p; int n, index;
    if ((tab = table) != null && (n = tab.length) > 0 &&
            (p = tab[index = (n - 1) & hash]) != null) {

        Node<K,V> node = null, e; K k; V v;
        /**
         * 第一个是吗,直接查到
         */
        if (p.hash == hash &&
                ((k = p.key) == key || (key != null && key.equals(k))))
            node = p;
        else if ((e = p.next) != null) {

            /**
             * @红黑树查找
             */
            if (p instanceof TreeNode)
                node = ((TreeNode<K,V>)p).getTreeNode(hash, key);
            /**
             * @链表查找
             */
            else {

                do {

                    if (e.hash == hash &&
                            ((k = e.key) == key ||
                                    (key != null && key.equals(k)))) {

                        node = e;
                        break;
                    }
                    p = e;
                } while ((e = e.next) != null);
            }
        }
        /**
         * @执行删除操作,链表需要进行接轨处理
         */
        if (node != null && (!matchValue || (v = node.value) == value ||
                (value != null && value.equals(v)))) {

            if (node instanceof TreeNode)
                ((TreeNode<K,V>)node).removeTreeNode(this, tab, movable);
            else if (node == p)
                tab[index] = node.next;
            else
                p.next = node.next;
            ++modCount;
            --size;
            afterNodeRemoval(node);
            return node;
        }
    }
    return null;
}
HashMap哈希算法
public V put(K key, V value) {

    return putVal(hash(key), key, value, false, true);
}
static final int hash(Object key) {

    int h;
    return (key == null) ? 0 : (h = key.hashCode()) ^ (h >>> 16);
}
Ps:很明显put的方法对key值又做了一次哈希处理;hashcode已经由native帮我们生成,但是为什么不直接用这个取余求下标呢
public class Test01 {

    public static void main(String[] args) {

        System.out.println(Integer.toBinaryString(7));
        /**
         * %:转化成int再求模效率低;
         * &:直接在内存中对二进制操作;效率高
         * 【2的次放求模定理】
         * a%2^n=(2^n-1)&a
         * Ps:利用&效率最高,所以hashMap中求模用这个符号
         */
        System.out.println(1005611%8);
        System.out.println((8-1)&(10056011));
        System.out.println((8-1)&(10056011)==1005611%8);//true
        /**
         * @【2^n-1次方的二进制特征】
         * 很显然数组长度2^n时,&具备2^n-1的二进制特征
         * 则即可(1)的把数字限制在数组长度内
         * 又可以(2)因为长度内全是1的缘故,可以哈希后直接截取结果的长度位数,让结果均匀
         * &操作符号效率也高
         * 所以我们将数组的长度定位2^n
         */
        System.out.println( Integer.toBinaryString((int)Math.pow(2,1)-1));
        System.out.println( Integer.toBinaryString((int)Math.pow(2,2)-1));
        System.out.println( Integer.toBinaryString((int)Math.pow(2,3)-1));
        System.out.println( Integer.toBinaryString((int)Math.pow(2,4)-1));
        System.out.println( Integer.toBinaryString((int)Math.pow(2,5)-1));
        System.out.println( Integer.toBinaryString((int)Math.pow(2,6)-1));
        System.out.println( Integer.toBinaryString((int)Math.pow(2,7)-1));
        System.out.println( Integer.toBinaryString((int)Math.pow(2,8)-1));
        System.out.println( Integer.toBinaryString((int)Math.pow(2,9)-1));
        System.out.println( Integer.toBinaryString((int)Math.pow(2,10)-1));
        System.out.println( Integer.toBinaryString((int)Math.pow(2,11)-1));
        System.out.println( Integer.toBinaryString((int)Math.pow(2,12)-1));
        System.out.println( Integer.toBinaryString((int)Math.pow(2,13)-1));
        System.out.println( Integer.toBinaryString((int)Math.pow(2,14)-1));
        System.out.println( Integer.toBinaryString((int)Math.pow(2,15)-1));
        System.out.println( Integer.toBinaryString((int)Math.pow(2,16)-1));
        /**
         * 0b00000000000000000000000000000001;
         * 0b00000000000000000000000000000011;
         * 0b00000000000000000000000000000111;
         * 0b00000000000000000000000000001111;
         * 0b00000000000000000000000000011111;
         * 0b00000000000000000000000000111111;
         * 0b00000000000000000000000001111111;
         * 0b00000000000000000000000011111111;
         * 0b00000000000000000000000111111111;
         * 0b00000000000000000000001111111111;
         * 0b00000000000000000000011111111111;
         * 0b00000000000000000000111111111111;
         * 0b00000000000000000001111111111111;
         * 0b00000000000000000011111111111111;
         * 0b00000000000000000111111111111111;
         * 0b00000000000000001111111111111111;
         */
    }
}
public class Test02 {

    public static void main(String[] args) {

        /**
         * @【高位丢失现象】
         * 假设数组长度的是8,数组基数要减一
         * 7的二进制是     :0b00000000000000000000000000000111
         * hashcode二进制是:0b11111111010101011111111100011111
         * 进行如下与运算:0b00000000000000000000000000000111&0b11111111010101011111111100011111=000000000100
         * Ps:很明显与运算中哈希的特征高位部分全被0砍掉了根本没参与运算,然而大多数情况数组长度是很小的,所以回经常导致这个状况
         */
        int hashcode   =0b11111111010101011111111100011111;
        int tableLength=0b00000000000000000000000000000111;
        int index;
        index=hashcode&tableLength;
        System.out.println("index-result-byte:"+Integer.toBinaryString(index));
        System.out.println("idnex-result-value:"+index);
    }
}
Hash算法奥秘(2):
public class Test03 {

    public static void main(String[] args) {

        /**
         * @【高位特征映射】
         * 由于经常数组长度很小,所以高16位经常被&屏蔽掉;我们就得想办法让高16位特征混合倒低16位,高16位自己保持不变
         * 经过数学理论验证,异或符号^是最佳选择; 异或运算能更好的保留各部分的特征,如果采用&运算计算出来的值会向0靠拢,采用|运算计算出来的值会向1靠拢
         * hashcode是一个32位的数字,因为经常数组容量是很小的,所以我们取高位变成低16位 highCode=allcode>>>16
         * 混合:allcode^highCode=allcode^allcode>>>16
         * 用allcode的好处是,低位混合高位,高位也仍然存在
         */
        int index;
        int newHashCode;
        int hashcode   =0b11111111010101011111111100011111;
        int tableLength=0b00000000000000000000000000000111;
        int highHashCode=hashcode>>>16;
        /**
         * @(1)结果非常明显,高位用异或保留的原来的特征;但是低位混合了高位的特征
         */
        System.out.println(Integer.toBinaryString(highHashCode));
        newHashCode=hashcode^highHashCode;
        System.out.println("HighCode-byte:"+Integer.toBinaryString(highHashCode));
        System.out.println("HashCode-byte:"+Integer.toBinaryString(hashcode));
        System.out.println("newHashCode-byte:"+Integer.toBinaryString(newHashCode));
        System.out.println("tableLength-byte:"+Integer.toBinaryString(tableLength));

        /**
         * @(2)利用新的哈希求出index值
         */
        index=tableLength&newHashCode;
        System.out.println("index-byte:"+Integer.toBinaryString(index));
        System.out.println("index-value:"+index);
    }
}
HashMap扩容机制(预备)
(1)对象的hash值不受到扩容的影响
需要数组容量无关,但是映射到的位置跟数组容量相关
 static final int hash(Object key) {

        int h;
        return (key == null) ? 0 : (h = key.hashCode()) ^ (h >>> 16);
    }
(2)链表中所有哈希值一致,扩容后仍然是同一个链表不会拆分——————所以我们需要改头节点的位置即可
public class Test01 {

    static class Node{

        @Override
        public int hashCode() {

            return 10;
        }
    }
    static final int hash(Object key) {

        int h;
        return (key == null) ? 0 : (h = key.hashCode()) ^ (h >>> 16);
    }
    public static void main(String[] args) {

        int sizeOne=(int)Math.pow(2,1)-1;
        int sizeTwo=(int)Math.pow(2,2)-1;
        int sizeThree=(int)Math.pow(2,3)-1;
        int sizeFour=(int)Math.pow(2,4)-1;
        int sizeFive=(int)Math.pow(2,5)-1;

        /*
          @模拟多个链表中node同一个hachcode
         */
        Node node1 = new Node();
        Node node2 = new Node();
        Node node3 = new Node();
        System.out.println("容量基数是:"+sizeOne+";node1索引的位置计算:"+String.valueOf(sizeOne & hash(node1)));
        System.out.println("容量基数是:"+sizeOne+";node2索引的位置计算:"+String.valueOf(sizeOne & hash(node2)));
        System.out.println("容量基数是:"+sizeOne+";node3索引的位置计算:"+String.valueOf(sizeOne & hash(node3)));

        System.out.println("容量基数是:"+sizeTwo+";node1索引的位置计算:"+String.valueOf(sizeTwo & hash(node1)));
        System.out.println("容量基数是:"+sizeTwo+";node2索引的位置计算:"+String.valueOf(sizeTwo & hash(node2)));
        System.out.println("容量基数是:"+sizeTwo+";node3索引的位置计算:"+String.valueOf(sizeTwo & hash(node3)));

        System.out.println("容量基数是:"+sizeThree+";node1索引的位置计算:"+String.valueOf(sizeThree & hash(node1)));
        System.out.println("容量基数是:"+sizeThree+";node2索引的位置计算:"+String.valueOf(sizeThree & hash(node2)));
        System.out.println("容量基数是:"+sizeThree+";node3索引的位置计算:"+String.valueOf(sizeThree & hash(node3)));


        System.out.println("容量基数是:"+sizeFour+";node1索引的位置计算:"+String.valueOf(sizeFour & hash(node1)));
        System.out.println("容量基数是:"+sizeFour+";node2索引的位置计算:"+String.valueOf(sizeFour & hash(node2)));
        System.out.println("容量基数是:"+sizeFour+";node3索引的位置计算:"+String.valueOf(sizeFour & hash(node3)));


        System.out.println("容量基数是:"+sizeFive+";node1索引的位置计算:"+String.valueOf(sizeFive & hash(node1)));
        System.out.println("容量基数是:"+sizeFive+";node2索引的位置计算:"+String.valueOf(sizeFive & hash(node2)));
        System.out.println("容量基数是:"+sizeFive+";node3索引的位置计算:"+String.valueOf(sizeFive & hash(node3)));


    }
}
hashcode分子1/数组分母
hashcode分子2/数组分母
hashcode分子3/数组分母
hashcode分子4/数组分母
hashcode分子5/数组分母
如果hashcode分子1=hashcode分子2=hashcode分子3=hashcode分子4 那么无论数组分母是多少
hashcode分子1/数组分母=hashcode分子2/数组分母=hashcode分子3/数组分母=hashcode分子4/数组分母=hashcode分子5/数组分母
除了求模后的比例会变 但是比例仍然是相等 所有链表仍然映射在同一个索引 只是可能索引的值发生了改变
(3)2的公倍数特性
上述实验证明,
原容量是偶次方倍 则加一倍后计算出来的值一致
原容量是奇次方倍 则加一倍后计算出来的值需要加上原来容量才一致
HashMap扩容机制(1.8)
HashMap扩容的时候,是扩充为原来的两倍,因此这种机制可以很方便扩容时的索引不变以及移位计算;
final Node<K, V>[] resize() {

    /**
     * @利用指针保存历史数据
     * 以便于扩容的时候可以用好2^n的优点
     */
    Node<K, V>[] oldTab = table;
    int oldCap = (oldTab == null) ? 0 : oldTab.length;
    int oldThr = threshold;
    int newCap, newThr = 0;
    /**
     * @步骤1:旧数组不为空
     */
    if (oldCap > 0) {

        // 步骤1.1:临界值更新(如果旧数组长度大于等于最大容量)
        if (oldCap >= MAXIMUM_CAPACITY) {

            threshold = Integer.MAX_VALUE;
            return oldTab;
        }
        // 步骤1.2:双倍扩容更新(如果旧数组容量大于默认容量且右移一位小于最大容量)
        else if ((newCap = oldCap << 1) < MAXIMUM_CAPACITY &&
                oldCap >= DEFAULT_INITIAL_CAPACITY)
            newThr = oldThr << 1; // double threshold
    }
    /**
     * @步骤2.如果旧数组为空,但有临界值大于0,设置新数组容量为临界值
     */
    else if (oldThr > 0)
        newCap = oldThr;
    /**
     * @步骤3.如果旧数组为空,且没有临界值小于等于0,设置容量与临界值为默认值
     */
    else {
                    // zero initial threshold signifies using defaults
        newCap = DEFAULT_INITIAL_CAPACITY;
        newThr = (int) (DEFAULT_LOAD_FACTOR * DEFAULT_INITIAL_CAPACITY);
    }
    /**
     * @步骤4:如果新数组临界值为0,设置临界值
     */
    if (newThr == 0) {

        float ft = (float) newCap * loadFactor;
        newThr = (newCap < MAXIMUM_CAPACITY && ft < (float) MAXIMUM_CAPACITY ?
                (int) ft : Integer.MAX_VALUE);
    }
    threshold = newThr;
    @SuppressWarnings({
     "rawtypes", "unchecked"})
    /**
     * @步骤5:创建新数组
     */
            Node<K, V>[] newTab = (Node<K, V>[]) new Node[newCap];
    table = newTab;
    /**
     * @步骤6:如果旧数组不为空,遍历旧数组将结点平移至新数组
     */
    if (oldTab != null) {

        for (int j = 0; j < oldCap; ++j) {

            Node<K, V> e;
            if ((e = oldTab[j]) != null) {

                oldTab[j] = null;
                /**
                 * @单节点的扩容,直接计算新的容量
                 */
                if (e.next == null)
                    newTab[e.hash & (newCap - 1)] = e;
                /**
                 * @红黑树的扩容,用于红黑树内部封装好的方法
                 */
                else if (e instanceof TreeNode)
                    ((TreeNode<K, V>) e).split(this, newTab, j, oldCap);
                /**
                 * @链表的扩容
                 * 如果刚进入时,e就是链表的头
                 */
                else {

                    /**
                     * @loHead:原链表头结点;loTail:原链表尾节点
                     * @hiHead:新链表头节点;hiTail:新链表尾节点
                     * @next:链表中每次元素的指针
                     */
                    Node<K, V> loHead = null, loTail = null;
                    Node<K, V> hiHead = null, hiTail = null;
                    Node<K, V> next;
                    /**
                     * 通过链表遍历分别标记两种链表
                     * (1)被key hash之后2整除的链表   loHead
                     * (2)被key hash之后2不整除的链表  hiHead
                     *  通过链表把尾指针也找出来
                     */
                    do {

                        next = e.next;
                       /*
                         【遍历链表处理连接】
                         注意以下if else在一个链表中只会出现一种情况,因为链表中所有哈希是一致的,所以取模2也是一致的
                        */
                        /**
                         * 情况(1)hash取2的模是0
                         * 数学特性:如果旧数组哈希求模是0,则扩容后索引下表不变;2的公倍数特性
                         */
                        if ((e.hash & oldCap) == 0) {

                            if (loTail == null)
                                loHead = e;//链表头赋值
                            else
                                loTail.next = e;
                            loTail = e;
                        }
                        /**
                         * 情况(2)hash取2的模不是0
                         */
                        else {

                            if (hiTail == null)
                                hiHead = e;
                            else
                                hiTail.next = e;
                            hiTail = e;
                        }
                    } while ((e = next) != null);//直到链表遍历成
                    /**
                     * 以下两个一个链表只会出现一个通过
                     */
                         /**
                         * 情况(1)hash取2的模是0
                         * 数学特性:如果旧数组哈希求模是0,则扩容后新链表头索引的位置索引下表不变;
                         */
                    if (loTail != null) {

                        loTail.next = null;//之前设置尾部的next是e,这里处理一下
                        newTab[j] = loHead;//头索引进入数组
                    }
                     /**
                       * 情况(2)hash取2的模不是0
                       * 数学特性:由于扩容了一倍,代表不能被整除,所以直接再上旧容量就能算出新链表头索引的位置
                       */
                    if (hiTail != null) {

                        hiTail.next = null;//之前设置尾部的next是e,这里处理一下
                        newTab[j + oldCap] = hiHead;//头索引进入数组
                    }
                }
            }
        }
    }
    return newTab;
}
HashMap扩容机制(1.7)
void resize(int newCapacity) {

    Entry[] oldTable = table;
    int oldCapacity = oldTable.length;
    //判断是否有超出扩容的最大值,如果达到最大值则不进行扩容操作
    if (oldCapacity == MAXIMUM_CAPACITY) {

      threshold = Integer.MAX_VALUE;
      return;
    }
    /*
        外部 已经扩大了的数字传进来了
     */
    Entry[] newTable = new Entry[newCapacity];
    /*
         接下来只需要迁移指针即可
     */
    transfer(newTable, initHashSeedAsNeeded(newCapacity));
    //设置hashmap扩容后为新的数组引用
    table = newTable;
    //设置hashmap扩容新的阈值
    threshold = (int)Math.min(newCapacity * loadFactor, MAXIMUM_CAPACITY + 1);
}
transfer(Entry[] newTable, boolean rehash) {

    int newCapacity = newTable.length;
    /*
      遍历数组的每个元素
     */
    for (Entry<K,V> e : table) {


      while(null != e) {
     //如果是链表的话,next会不断赋值给e
        Entry<K,V> next = e.next;
        if (rehash) {

          e.hash = null == e.key ? 0 : hash(e.key);
        }
        /*
          重新计算当前e的下标位置
         */
        int i = indexFor(e.hash, newCapacity);
        /*
          头插法,容易循环链表,jdk8用双向链表解决
          双向处理:
          当前元素下一个元素是原来数组索引的头元素
          将数组索引的头元素指向当前元素,成为新的头元素
          直到最后原链表的尾部成为了头节点
         */
        e.next = newTable[i];
        newTable[i] = e;
        /*
          用于继续循环
         */
        e = next;
      }
    }
 }

static int indexFor(int h, int length) {

   return h & (length-1);
}
GodSchool
致力于简洁的知识工程,输出高质量的知识产出,我们一起努力
博主私人微信:supperlzf


