走进Java接口测试之读取配置文件
前言
但在大部分用例开发环境下,添加额外配置是无所避免的,比如自定义应用端口号、服务地址、数据库的配置等,都或多或少的需要一些外部的配置项等。
在前文中我们有详细介绍在接口测试框架中如何基于 SpringBoot 快速搭建多环境配置,本文将在原有的基础上介绍集成如何快速读取配置文件的值。
走进Java接口测试之多环境配置
配置文件简要说明
SpringBoot 默认的全局配置文件名为 application.properties 或 application.yml (spring官方推荐使用的格式是 .yml 格式),程序启动时会自动加载此文件,无需手动引入。
除此之外还有一个 bootstrap 的全局文件,它是在 application 配置文件之前加载,主要是用于在应用程序上下文的引导阶段,在后 SpringCloud时,主要是利用此特性,进行配置文件的动态修改,在此 我们演示application.properties 配置。
Demo 演示
这次在多环境配置的 demo 的基础进行扩展。
自定义属性值
filter-dev.properties 配置文件增加自定义属性,比如:
host=http://127.0.0.1
port=8082
application-dev.properties 增加配置项:
Server.host=${host}
Server.port=${port}
新建配置实体类
我们可以通过两种方式配置绑定对象。
第一种方式:@Value() 方式
在类域属性上通过 @Value("${xxx}") 指定关联属性, SpringBoot 会自动加载。
@Component 注解使其在启动时被自动扫描到。
package com.zuozewei.springboot.model;

import lombok.Data;
import org.springframework.beans.factory.annotation.Value;
import org.springframework.stereotype.Component;

/**
 * 描述:
 * 配置文件实体类
 *
 * @author zuozewei
 * @create 2019-12-20 16:15
 */

@Component
@Data
public class Configurations1 {


    @Value("${Server.host}")
    private String host;

    @Value("${Server.port}")
    private String port;

}
第二种方式:@ConfigurationProperties 属性
手动书写 @Value 注解还是比较繁重的工作,好在 SpringBoot 提供了更简洁的方式。@ConfigurationProperties(prefix = “Server”)。prefix 指定了配置文件的前缀为 Server,并且按照属性名进行自动匹配。
例如:Server.host属性值会自动加载到 private String host 域中。
package com.zuozewei.springboot.model;

import lombok.Data;
import org.springframework.boot.context.properties.ConfigurationProperties;
import org.springframework.stereotype.Component;

/**
 * 描述:
 * 配置文件实体类
 *
 * @author zuozewei
 * @create 2019-12-20 16:15
 */

@Component
@Data
@ConfigurationProperties(prefix = "Server")
public class Configurations2 {


    private String host;
    private String port;

}
PS:locations 还能够指定自定义的配置文件位置,这里就不多说了。
@ConfigurationProperties(prefix = "Server", locations = "classpath:xxxx.properties")
用例读取
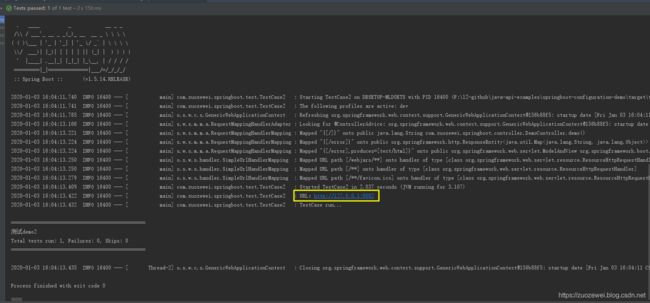
编写测试用例,通过 @Autowired 注解注入 bean 调用。
package com.zuozewei.springboot.test;

import com.zuozewei.springboot.model.Configurations1;
import lombok.extern.slf4j.Slf4j;
import org.springframework.beans.factory.annotation.Autowired;
import org.springframework.boot.test.context.SpringBootTest;
import org.springframework.test.context.testng.AbstractTestNGSpringContextTests;
import org.testng.annotations.BeforeClass;
import org.testng.annotations.Test;

/**
 * 描述:
 * 演示测试用例1
 *
 * @author zuozewei
 * @create 2020-01-03 11:02
 */

@SpringBootTest
@Slf4j
public class TestCase1 extends AbstractTestNGSpringContextTests {


    @Autowired
    private Configurations1 configurations;

    @BeforeClass
    public void beforeClass() {

        String host = configurations.getHost();
        String port = configurations.getPort();
        String url = host +":"+ port;
        log.info("URL:" + url );
    }

    @Test
    public void test(){

        log.info("TestCase run...");
    }

}
注意:
SpringBoot中读取配置文件不能放到@BeforeSuite注解,否则会导致@Autowired不能加载 Bean;SpringBoot中使用 TestNg 必须加上@SpringBootTest,并且继承AbstractTestNGSpringContextTests,如果不继承AbstractTestNGSpringContextTests,会导致@Autowired不能加载 Bean。
测试验证
小结
测试框架使用 SpingBoot 读取配置文件比我们传统方式要简单很多,上述我们主要介绍了过两种方式配置绑定对象:
@Value()注解;@ConfigurationProperties属性;
最后在测试用例开发中,结合@Autowired 注解注入 bean 调用读取即可。
希望本文对你有所启发。
示例代码:
https://github.com/zuozewei/Java-API-Test-Examples/tree/master/springboot-configuration-demo
