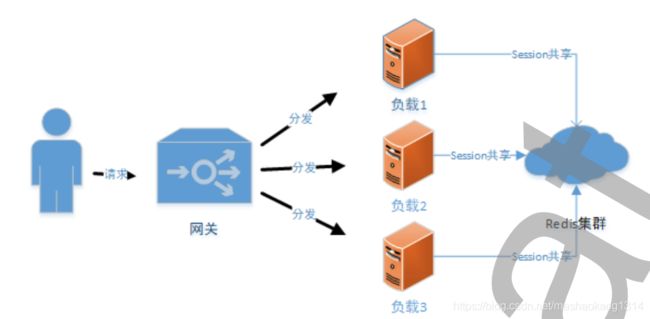
使用Redis实现session共享
Session共享
什么是session
由于HTTP协议是无状态的协议,因而服务器需要记录用户的状态时,就需要用某种机制来识别具体的用户。session是另一种记录客户状态的机制,不同的是Cookie保存在客户端浏览器中,而session保存在服务器上,客户端浏览器访问服务器的时候,服务器把客户端信息以某种形式记录在服务器上,这就是session,客户端浏览器再次访问时只需要从该session中查找该客户端的状态就可以了。
Spring Session
Spring Session提供了一套创建和管理Servlet HTTPSession的方案,Spring Session提供了集群Session功能,默认采用外置的Redis来存储Session数据,以此来解决Session共享问题。
Spring Session为企业级Java应用Session管理带来了革新,使得以下功能更加容易实现:
- API和用于管理用户会话的实现;
- HTTPSession,允许以应用程序容器中的方式替换HTTPSession;
- 将Session所保存的状态卸载到特定的外部Session存储中,如Redis,它们能够以独立于应用服务器的方式提供高质量的集群;
- 支持每个浏览器上使用多个Session,从而能够跟容易地构建更加丰富的终端用户体验;
- 控制Session ID如何在客户端和服务器之间进行交换,这样的话就能很容易地编写Restful API,因为它可以从HTTP头信息中获取SessionID,而不必依赖cookie。
- 当用户使用WebSocket发送请求的时候,能够保持HTTPSession处于活跃状态;
spring-session-data-redis
快速集成
引入依赖包
		<dependency>
            <groupId>org.springframework.sessiongroupId>
            <artifactId>spring-session-data-redisartifactId>
        dependency>
添加配置文件
# 数据库配置
spring.datasource.url=jdbc:mysql://localhost:3306/test?serverTimezone=UTC&useUnico
de=true&characterEncoding=utf-8&useSSL=true
spring.datasource.username=root
spring.datasource.password=12345678
spring.datasource.driver-class-name=com.mysql.cj.jdbc.Driver
# JPA 配置
spring.jpa.properties.hibernate.hbm2ddl.auto=create
spring.jpa.properties.hibernate.dialect=org.hibernate.dialect.MySQL5InnoDBDialect
spring.jpa.show-sql= true
# Redis 配置
# Redis 数据库索引(默认为0)
spring.redis.database=0
# Redis 服务器地址
spring.redis.host=localhost
# Redis 服务器连接端⼝
spring.redis.port=6379
# Redis 服务器连接密码(默认为空)
spring.redis.password=
# 连接池最⼤连接数(使⽤负值表示没有限制)
spring.redis.lettuce.pool.max-active=8
spring.redis.lettuce.pool.max-wait=-1
spring.redis.lettuce.shutdown-timeout=100
spring.redis.lettuce.pool.max-idle=8
spring.redis.lettuce.pool.min-idle=0
Session配置
@Configuration
@EnableRedisHttpSession(maxInactiveIntervalInSeconds = 86400 * 30)
public class SessionConfig {

}
maxInactiveIntervalInSeconds设置session失效时间,使用Redis Session之后,原Spring Boot中的server.session.timeout属性不再生效;
测试验证
@RestController
public class SessionController {


    @RequestMapping("/setSession")
    public Map<String,Object> setSession(HttpServletRequest request){

        Map<String, Object> map = new HashMap<>();
        request.getSession().setAttribute("message",request.getRequestURL());
        map.put("request Url",request.getRequestURL());
        return map;
    }

    @GetMapping("/getSession")
    public Object getSession(HttpServletRequest request){

        Map<String, Object> map = new HashMap<>();
        map.put("sessionId",request.getSession().getId());
        map.put("message",request.getSession().getAttribute("message"));
        return map;
    }
}
getSession()方法获取Session中的Session Id和Key为Message的信息,将获取到的信息封装到Map中并在页面显示。
将项目复制一份,启动并设置监听端口为9090的服务。
首先访问8088端口服务,设置session;


访问9090服务,获取session,通过对比发现,8088和9090服务返回的session信息完全一致,说明实现了session共享。

模拟登录,实现单点登录
在实际中常常使用共享session的方式去保存用户的登录状态,避免用户在不同页面多次登录。
添加登录方法,登录成功会后将用户信息放入session中。
  @RequestMapping("/login")
    public String login(HttpServletRequest request,String userName,String passWord){

        String msg = "login failure";
        User user = this.userRepository.findByUserName(userName);
        if (user!=null && user.getPassWord().equals(passWord)){

            request.getSession().setAttribute("user",user);
            msg = "login successful!";
        }
        return msg;
    }

    @RequestMapping("/loginout")
    public String loginout(HttpServletRequest request){

        request.getSession().removeAttribute("user");
        return "loginout successful!";
    }

    @RequestMapping(value = "/index")
    public String index(HttpServletRequest request){

        String msg = "index content";
        Object user = request.getSession().getAttribute("user");
        if (user==null){

            msg="please login first!";
        }
        return msg;
    }
测试
- 8088服务器登录
- 8088访问index页面
- 9090访问index页面
- 9090退出登录


