- CAN发送JSON数据
摸鱼的小羊
jsonandroidjavascript
CAN发送JSON数据文章目录CAN发送JSON数据前言一、核心问题与前提1、CAN总线的数据限制2、硬件基础二、实现步骤1.JSON数据的序列化(发送端)2.数据分片(关键步骤)3.CAN帧发送4.接收端处理5.校验与可靠性设计三、硬件与软件选型1.硬件2.软件四、示例代码片段(简化)1.发送端(C语言,基于STM32+cJSON+CAN)2.接收端(重组逻辑)总结1.数据长度优化:2.抗干扰:
- 基于单片机婴儿床/婴儿摇篮/婴儿车设计/婴儿监护系统
小新单片机
单片机设计库单片机嵌入式硬件51单片机婴儿监护
传送门其他作品题目速选一览表其他作品题目功能速览概述本设计实现了一种基于单片机的多功能智能婴儿监护系统,集成于婴儿床、摇篮或婴儿车中。系统核心由微控制器(如STM32/51单片机)、多传感器网络、执行机构及无线通信模块构成。核心功能:智能安抚:通过声音检测婴儿哭声,单片机自动触发预设安抚模式(如通过步进电机匀速摇摆、播放白噪音/摇篮曲)。环境监测:温湿度传感器实时监测环境,超限时自动调节(如控制加
- 基于STM32的智能花盆浇水系统毕业设计
看,是大狗
stm32课程设计嵌入式硬件
目录单片机毕业设计论文前言单片机毕业设计功能介绍设计视频演示单片机毕业设计论文前言随着城市化进程的加快和人们生活水平的提高,越来越多的人开始在家中种植植物,以美化环境、净化空气和陶冶情操。然而,由于工作繁忙或缺乏种植经验,许多人难以对植物进行及时、适量的浇水,导致植物生长不良甚至死亡。传统的花盆浇水方式依赖人工操作,存在效率低下、难以精准控制水量等问题,无法满足现代家庭对植物养护的智能化需求。近年
- 基于STM32的语音播报小项目课程设计程序开源
看,是大狗
stm32开源嵌入式硬件
目录单片机毕业设计论文前言单片机毕业设计功能介绍设计视频演示单片机课程设计设计论文前言随着科技的飞速发展和智能化时代的到来,人们对环境监测的需求日益增加,尤其是在温度监测方面,精准、实时的温度数据对于工业生产、农业生产以及日常生活都具有重要意义。传统的温度监测系统往往功能单一,缺乏实时反馈和智能化处理能力,难以满足现代应用场景的需求。近年来,嵌入式系统、传感器技术和语音交互技术的快速发展,为温度监
- STM32硬件I2C驱动0.96寸OLED屏幕
0.96寸OLED屏幕0.96寸:屏幕对角线长0.96英寸驱动:SSD1306驱动IC,驱动芯片内置128*64的SRAM存储器,用于缓存要显示的数据分辨率:128*64(横128,竖64)供电:3.3V(驱动内部内置升压电路,会将3.3升到7),需要与stm32共地(GND接在stm32上)针脚:4脚(GND、VCC、SCL、SDA)从机地址:0x78指令操作前缀:先发0x00表示后面的内容是对
- 自己开发I2C Bootloader -下位机开发篇
EE工程师
嵌入式系统c语言visualstudiocodestm32单片机
开发前言 下位机开发就裸机编程而言其实就是基于MCU做固件或者说驱动开发,那目前作者接触到的主流的MCU型号国外的就是STM32,国内的就是GD32,至于其它家一般都有其特定的应用领域或者细分市场战略。就本项目的i2cbootloader开发而言,这里的下位机开发要实现的功能主要就包括两点,一是要实现串口转I2C驱动,二是要实现MCU内部Flash读写,具体来讲就是基于STM32F103来实现U
- STM32微控制器的按键短按与长按检测
AI_Guru人工智能
stm32单片机嵌入式硬件
在嵌入式系统开发中,按键是最常见的输入设备之一。STM32微控制器广泛用于各种项目,包括需要按键输入的场合。本文将介绍如何在STM32微控制器上实现按键的短按和长按检测。引言按键检测是嵌入式系统中的基础功能,它允许用户通过物理按键与设备进行交互。STM32微控制器提供了丰富的GPIO(通用输入输出)引脚,可以方便地连接按键并进行检测。短按和长按是两种常见的按键操作模式,短按通常用于触发一个事件或命
- STM32 CAN 通信
STM32CAN通信文章目录STM32CAN通信前言一、硬件连接二、软件配置三、CAN通信流程四、错误处理与调试总结前言控制器局域网(ControllerAreaNetwork,CAN)是一种应用广泛的串行通信协议,特别适用于工业控制和汽车电子领域。STM32微控制器内置了CAN控制器,支持CAN协议2.0A和2.0B,能够实现高效可靠的分布式通信。本文档旨在STM32平台上实现CAN通信功能,内
- 【STM32单片机】STM32单片机按键实现长按、短按处理
森冰
单片机stm32嵌入式硬件
提示:文章写完后,目录可以自动生成,如何生成可参考右边的帮助文档文章目录前言一、为什么要实现一个按键多个功能?二、使用步骤1.开启EXTI中断及NVIC配置2.外部中断处理3.定时器中断处理4.按键处理5.长按处理6.短按处理总结前言如何使用按键完成长按、短按,在本文中使用单片机stm32f103c8t6完成。提示:以下是本篇文章正文内容,下面案例可供参考一、为什么要实现一个按键多个功能?在设计过
- STM32F407学习笔记——HC-SR04模块(基本测距应用)
duoduo study
单片机stm32
STM32F407学习笔记——HC-SR04模块(基本测距应用)一、基本原理:定义stm32的GPIO,给予Trig高电平(大于10us即可这里给予的是20us),再拉低发送超声波,超声波在碰到障碍物时返回被超声波模块接受,Echo输出高电平,通过定时器得出Echo高电平持续时间即可计算与障碍物之间的距离。二、代码功能:通过stm32控制超声波模块将测得的距离反馈在串口上。三、接线:Trig——P
- 正点原子stm32F407学习笔记7——看门狗实验
蜗牛先森i
stm32单片机stm32学习笔记
一、什么是看门狗在由单片机构成的微型计算机系统中,由于单片机的工作常常会受到来自外界电磁场的干扰,造成程序的跑飞,而陷入死循环,程序的正常运行被打断,由单片机控制的系统无法继续工作,会造成整个系统的陷入停滞状态,发生不可预料的后果,所以出于对单片机运行状态进行实时监测的考虑,便产生了一种专门用于监测单片机程序运行状态的模块或者芯片,俗称“看门狗”(watchdog)。就是在程序执行异常情况下系统复
- stm32f407文件该怎么调试编译烧录?
bug菌¹
全栈Bug调优(实战版)stm32嵌入式硬件单片机stm32f407
本文收录于《全栈Bug调优(实战版)》专栏,致力于分享我在项目实战过程中遇到的各类Bug及其原因,并提供切实有效的解决方案。无论你是初学者还是经验丰富的开发者,本文将为你指引出一条更高效的Bug修复之路,助你早日登顶,迈向财富自由的梦想!同时,欢迎大家关注、收藏、订阅本专栏,更多精彩内容正在持续更新中。让我们一起进步,Up!Up!Up! 备注:部分问题/难题源自互联网,经过精心筛选和整理,结合数
- stm32不定长数据接收,不管多少位,接受帧头帧尾
a2488220557
stm32嵌入式硬件单片机
uint8_tTX_Packet[12]={0x55,0xaa,0x00,0x00,0x00,0x00,0x00,0x00,0x00,0x00,0x0d,0x0a};//串口2发送uint8_tRX_Packet[256]={0x00,0x00,0x00,0x00,0x00,0x00};//串口2接收uint8_tRX_Packet2[256]={0x00,0x00,0x00,0x00,0x00,
- 基于STM32单片机车牌识别系统摄像头图像处理设计的论文
weixin_112233
单片机单片机stm32图像处理
摘要本设计提出了一种基于32单片机的车牌识别系统摄像头图像处理方案。该系统主要由STM32F103RCT6单片机核心板、2.8寸TFT液晶屏显示、摄像头图像采集OV7670、蜂鸣器以及LED电路组成。在车牌识别过程中,STM32F103RCT6单片机核心板发挥着关键的控制作用。摄像头图像采集OV7670负责获取车辆的图像信息,能够清晰地捕捉车牌区域。采集到的图像数据传输至单片机进行处理,通过一系列
- 基于STM32的ONENET物联网远程智能家居控制系统
QQ2193276455
单片机单片机嵌入式硬件
**单片机设计介绍,基于STM32的ONENET物联网远程智能家居控制系统文章目录一概要二、功能设计设计思路三、软件设计原理图五、程序六、文章目录一概要 基于STM32的ONENET物联网远程智能家居控制系统是一个结合了STM32微控制器和中国移动OneNET物联网平台的智能家居解决方案。以下是该系统的概要:系统核心:该系统以STM32系列微控制器(如STM32F103C8T6)作为核心控制单元
- 基于STM32无线WIFI智能家居实时控制系统设计
**单片机设计介绍,基于STM32无线WIFI智能家居实时控制系统设计文章目录一概要二、功能设计设计思路三、软件设计原理图五、程序六、文章目录一概要 基于STM32无线WiFi智能家居实时控制系统设计概要如下:一、项目概述本项目旨在设计一个基于STM32微控制器和无线WiFi技术的智能家居实时控制系统。该系统能够连接并控制各种智能家居设备,如灯光、窗帘、安防监控设备等,同时支持远程控制、环境监测
- 基于单片机宠物喂食器/智能宠物窝/智能饲养
传送门其他作品题目速选一览表其他作品题目功能速览概述深夜加班时,你是否担心家中宠物饿肚子?出差旅途中,是否焦虑宠物无人照看?这些养宠族的共同痛点,正被一枚小小的单片机悄然化解。作为智慧宠物家居的核心设备,智能喂食器已从“定时撒粮”的机械玩具,进化成融合嵌入式控制、物联网通信、健康管理的科技终端。本文将深入拆解基于单片机的喂食器设计:从STM32主控芯片的选型,到0.5g精度的闭环投喂算法;从ESP
- STM32+w5500+TcpClient学习笔记
结城明日奈是我老婆
嵌入式stm32学习笔记
文章目录参考文章本地和远程IP连接的配置(重点)TCP发送参考文章注意:SPI的CSRST脚这些都是通过cubeMX自定义的可以自行修改。用的是SPI1项目地址//MyTcpClient.h#ifndefMYTCPCLIENT_H#defineMYTCPCLIENT_H#include"main.h"#include"w5500.h"#include"socket.h"#include"wizch
- STM32F103R6的Keil和Protues仿真-点亮LED灯
怎么就重名了
stm32嵌入式硬件单片机
STM32F103R6的Keil和Protues仿真-点亮LED灯STM32F103R6的Keil和Protues仿真-点亮LED灯1、效果1.1、低电平点亮1.2、高电平点亮2、代码2.1、Keil2.2、protueshttps://gitee.com/xiaolixi/l-stm32/tree/master/STM32Protues/diandeng-lowhttps://gitee.com
- USB (四)基于 STM32 USB的开发
文章目录官网demo基于官网demo考虑的事情usb代码的架构及接口USB数据流程USB中断枚举复位挂起唤醒usbdevice收数据以MSC为例usbdevice发数据以MSC为例应用处理流程其他描述符官网demo软件代码在官网是存在的:STSW-STM32046开发板对应的是:en.stm32_f105-07_f2_f4_usb-host-device_lib\Project\USB_Devic
- STM32之TB6612电机驱动模块
如愿小李单片机设计
stm32嵌入式硬件单片机
目录一、模块概述二、模块简介2.1模块特点2.2电气特性2.3模块接口说明2.4结构与工作原理2.5原理图设计2.6实际应用注意事项三、硬件设计3.1硬件组成3.2硬件连接四、软件设计4.1开发环境配置4.2关键代码实现4.2.1PWM初始化(PWM_Init)4.2.2GPIO初始化4.2.3电机控制函数4.2.4主函数五、功能实现与优化5.1基础功能实现5.2高级功能扩展5.3性能优化建议六、
- STM32精确控制步进电机
目的:学习使用STM32+电机驱动器+步进电机,进行电机运动精确控制。测试环境:MCU主控芯片STM32F103RCT6;A4988步进电机驱动器模块;微型2相4线步进电机10mm丝杆滑台,金属丝杆安装有滑块。10mm二相四线微型步进电机电机的输入接线是4个引脚,需要自己焊线,相电阻53欧,步进角度估计18度,丝杆滑块行程32mm,丝杆转一圈铜滑块大约移动行程0.4mm。步进电机重约7.3g。主要
- STM32 驱动 步进电机代码
pollotui
stm32嵌入式硬件单片机
本文采用了28BYJ48步进电机,其中末尾的48表示4相8拍的驱动方式。ULN2003驱动模块接受来自控制器的脉冲信号,并将其转换为步进电机的相位信号,从而驱动电机按预定的步进角度转动,由于本文采用四相八拍的步进电机,四相表示电机的绕组组数为四组。拍则表示通电状态的改变次数,因此可得在四相八拍工作模式下驱动器各引脚通电状态如下表:表1四相八拍引脚电平状态变化表引脚12345678IN1000IN2
- stm32继电器使用方法
会编程的小孩
stm32嵌入式硬件单片机
介绍部分继电器:这里是一个5v的一共有6个接口:左边DC+和DC-和IN接口右边NOCOMNCDC+:注意接5vDC-:接地gnd记得和5v电源形成回路IN:接stm32信号口我这里接的是A0口(后面代码)NO:这是一个常开端:意思就是和com一直是断开,直到IN接高电平才连接,低电平就还是断开COM:公共端和NO,NC都有接口NC:常闭端:意思就是和com一直是连接,直到IN接高电平才断开,低电
- 嵌入式单片机开发实战指南: 从RISC-V到TinyML全栈技术
CodeMicro
单片机单片机risc-v嵌入式硬件
前言:嵌入式单片机的2025年技术浪潮2025年,嵌入式系统正经历开源架构与边缘智能的双重革命。RISC-V指令集打破ARM垄断,国产芯片如兆易创新GD32VF103、先楫HPM6750实现工业级可靠性;TinyML技术让STM32L4系列在1MB内存下运行神经网络;低功耗设计使物联网节点电池寿命突破10年。本文将从架构选型→开发环境→核心技术→实战项目,全方位拆解嵌入式开发的热门技术,带你从入门
- STM32 USB开发详解:CDC虚拟串口与HID键盘鼠标(基于CubeUSB库)
景彡先生
STM32stm32计算机外设嵌入式硬件
前言:STM32的USB功能为何重要?在嵌入式开发中,设备与外界通信的方式多种多样(UART、SPI、I2C等),但USB凭借"即插即用"、"高速传输"和"供电能力"三大优势,成为设备与PC/手机通信的首选方案。STM32大部分中高端型号(如F103C8T6、F407IGH6、L431RCT6等)都集成了USB外设,支持从机、主机或OTG模式,可实现虚拟串口、键盘、鼠标等多种功能。本文聚焦STM3
- stm32驱动双步进电机
会编程的小孩
stm32单片机嵌入式硬件
连线看我上一个文章,这里只是补充上一个文章的代码部分,上一个是单步进电机的,这个是双步进电机。这里外加一个32的引脚定义表:具体接线看我上一个文章。PWM.C文件:#include"stm32f10x.h"#include"math.h"//步进电机参数配置#defineSTEPS_PER_REVOLUTION200//每转步数(1.8°/步)#defineMICROSTEPS16//微步细分#d
- stm32--软件模拟IIC
GPL_6083
stm32嵌入式硬件单片机
一、IIC基于stm32F103软件模拟IIC。IIC_SCL和IIC_SDA分别复用PB6和PB7IO口。二、具体代码1.头文件#ifndef__IIC_SW_H#define__IIC_SW_H//GPIOxODR和IDR寄存器地址映射#defineGPIOA_ODR_Addr(GPIOA_BASE+0x0C)//0x4001080C#defineGPIOB_ODR_Addr(GPIOB_BA
- 【第三十二天】STM32 平台全景解析与型号选择实战指南
观熵
每日一练:嵌入式C++开发365天stm32嵌入式硬件单片机学习C++
STM32平台全景解析与型号选择实战指南关键词:STM32、MCU选型、STM32F1、STM32G4、STM32H7、Flash/RAM、外设资源、封装选型、低功耗方案、嵌入式平台摘要:STM32系列是目前嵌入式开发中应用最广泛的ARMCortex-M微控制器平台之一,覆盖从入门级控制器到高性能边缘处理器的多种应用场景。本文从STM32的平台分类、架构演进、性能指标、外设组合、功耗管理等角度展开
- STM32 HAL库详解:跨系列兼容、CubeMX自动生成与回调机制全解析
景彡先生
STM32stm32嵌入式硬件单片机
前言:为什么HAL库成为STM32开发的主流?如果你接触过STM32开发,一定听说过“库”的概念。早期开发者需要直接操作寄存器,一行行写配置代码(如RCC->CR|=RCC_CR_HSEON),不仅效率低,还容易出错。后来ST推出了标准外设库(SPL),封装了寄存器操作,但存在一个致命问题:不跨系列——STM32F1的代码无法直接在STM32F4上运行,换芯片意味着重写大量代码。2014年,ST推
- Spring中@Value注解,需要注意的地方
无量
springbean@Valuexml
Spring 3以后,支持@Value注解的方式获取properties文件中的配置值,简化了读取配置文件的复杂操作
1、在applicationContext.xml文件(或引用文件中)中配置properties文件
<bean id="appProperty"
class="org.springframework.beans.fac
- mongoDB 分片
开窍的石头
mongodb
mongoDB的分片。要mongos查询数据时候 先查询configsvr看数据在那台shard上,configsvr上边放的是metar信息,指的是那条数据在那个片上。由此可以看出mongo在做分片的时候咱们至少要有一个configsvr,和两个以上的shard(片)信息。
第一步启动两台以上的mongo服务
&nb
- OVER(PARTITION BY)函数用法
0624chenhong
oracle
这篇写得很好,引自
http://www.cnblogs.com/lanzi/archive/2010/10/26/1861338.html
OVER(PARTITION BY)函数用法
2010年10月26日
OVER(PARTITION BY)函数介绍
开窗函数 &nb
- Android开发中,ADB server didn't ACK 解决方法
一炮送你回车库
Android开发
首先通知:凡是安装360、豌豆荚、腾讯管家的全部卸载,然后再尝试。
一直没搞明白这个问题咋出现的,但今天看到一个方法,搞定了!原来是豌豆荚占用了 5037 端口导致。
参见原文章:一个豌豆荚引发的血案——关于ADB server didn't ACK的问题
简单来讲,首先将Windows任务进程中的豌豆荚干掉,如果还是不行,再继续按下列步骤排查。
&nb
- canvas中的像素绘制问题
换个号韩国红果果
JavaScriptcanvas
pixl的绘制,1.如果绘制点正处于相邻像素交叉线,绘制x像素的线宽,则从交叉线分别向前向后绘制x/2个像素,如果x/2是整数,则刚好填满x个像素,如果是小数,则先把整数格填满,再去绘制剩下的小数部分,绘制时,是将小数部分的颜色用来除以一个像素的宽度,颜色会变淡。所以要用整数坐标来画的话(即绘制点正处于相邻像素交叉线时),线宽必须是2的整数倍。否则会出现不饱满的像素。
2.如果绘制点为一个像素的
- 编码乱码问题
灵静志远
javajvmjsp编码
1、JVM中单个字符占用的字节长度跟编码方式有关,而默认编码方式又跟平台是一一对应的或说平台决定了默认字符编码方式;2、对于单个字符:ISO-8859-1单字节编码,GBK双字节编码,UTF-8三字节编码;因此中文平台(中文平台默认字符集编码GBK)下一个中文字符占2个字节,而英文平台(英文平台默认字符集编码Cp1252(类似于ISO-8859-1))。
3、getBytes()、getByte
- java 求几个月后的日期
darkranger
calendargetinstance
Date plandate = planDate.toDate();
SimpleDateFormat df = new SimpleDateFormat("yyyy-MM-dd");
Calendar cal = Calendar.getInstance();
cal.setTime(plandate);
// 取得三个月后时间
cal.add(Calendar.M
- 数据库设计的三大范式(通俗易懂)
aijuans
数据库复习
关系数据库中的关系必须满足一定的要求。满足不同程度要求的为不同范式。数据库的设计范式是数据库设计所需要满足的规范。只有理解数据库的设计范式,才能设计出高效率、优雅的数据库,否则可能会设计出错误的数据库.
目前,主要有六种范式:第一范式、第二范式、第三范式、BC范式、第四范式和第五范式。满足最低要求的叫第一范式,简称1NF。在第一范式基础上进一步满足一些要求的为第二范式,简称2NF。其余依此类推。
- 想学工作流怎么入手
atongyeye
jbpm
工作流在工作中变得越来越重要,很多朋友想学工作流却不知如何入手。 很多朋友习惯性的这看一点,那了解一点,既不系统,也容易半途而废。好比学武功,最好的办法是有一本武功秘籍。研究明白,则犹如打通任督二脉。
系统学习工作流,很重要的一本书《JBPM工作流开发指南》。
本人苦苦学习两个月,基本上可以解决大部分流程问题。整理一下学习思路,有兴趣的朋友可以参考下。
1 首先要
- Context和SQLiteOpenHelper创建数据库
百合不是茶
androidContext创建数据库
一直以为安卓数据库的创建就是使用SQLiteOpenHelper创建,但是最近在android的一本书上看到了Context也可以创建数据库,下面我们一起分析这两种方式创建数据库的方式和区别,重点在SQLiteOpenHelper
一:SQLiteOpenHelper创建数据库:
1,SQLi
- 浅谈group by和distinct
bijian1013
oracle数据库group bydistinct
group by和distinct只了去重意义一样,但是group by应用范围更广泛些,如分组汇总或者从聚合函数里筛选数据等。
譬如:统计每id数并且只显示数大于3
select id ,count(id) from ta
- vi opertion
征客丶
macoprationvi
进入 command mode (命令行模式)
按 esc 键
再按 shift + 冒号
注:以下命令中 带 $ 【在命令行模式下进行】,不带 $ 【在非命令行模式下进行】
一、文件操作
1.1、强制退出不保存
$ q!
1.2、保存
$ w
1.3、保存并退出
$ wq
1.4、刷新或重新加载已打开的文件
$ e
二、光标移动
2.1、跳到指定行
数字
- 【Spark十四】深入Spark RDD第三部分RDD基本API
bit1129
spark
对于K/V类型的RDD,如下操作是什么含义?
val rdd = sc.parallelize(List(("A",3),("C",6),("A",1),("B",5))
rdd.reduceByKey(_+_).collect
reduceByKey在这里的操作,是把
- java类加载机制
BlueSkator
java虚拟机
java类加载机制
1.java类加载器的树状结构
引导类加载器
^
|
扩展类加载器
^
|
系统类加载器
java使用代理模式来完成类加载,java的类加载器也有类似于继承的关系,引导类是最顶层的加载器,它是所有类的根加载器,它负责加载java核心库。当一个类加载器接到装载类到虚拟机的请求时,通常会代理给父类加载器,若已经是根加载器了,就自己完成加载。
虚拟机区分一个Cla
- 动态添加文本框
BreakingBad
文本框
<script> var num=1; function AddInput() { var str=""; str+="<input
- 读《研磨设计模式》-代码笔记-单例模式
bylijinnan
java设计模式
声明: 本文只为方便我个人查阅和理解,详细的分析以及源代码请移步 原作者的博客http://chjavach.iteye.com/
public class Singleton {
}
/*
* 懒汉模式。注意,getInstance如果在多线程环境中调用,需要加上synchronized,否则存在线程不安全问题
*/
class LazySingleton
- iOS应用打包发布常见问题
chenhbc
iosiOS发布iOS上传iOS打包
这个月公司安排我一个人做iOS客户端开发,由于急着用,我先发布一个版本,由于第一次发布iOS应用,期间出了不少问题,记录于此。
1、使用Application Loader 发布时报错:Communication error.please use diagnostic mode to check connectivity.you need to have outbound acc
- 工作流复杂拓扑结构处理新思路
comsci
设计模式工作算法企业应用OO
我们走的设计路线和国外的产品不太一样,不一样在哪里呢? 国外的流程的设计思路是通过事先定义一整套规则(类似XPDL)来约束和控制流程图的复杂度(我对国外的产品了解不够多,仅仅是在有限的了解程度上面提出这样的看法),从而避免在流程引擎中处理这些复杂的图的问题,而我们却没有通过事先定义这样的复杂的规则来约束和降低用户自定义流程图的灵活性,这样一来,在引擎和流程流转控制这一个层面就会遇到很
- oracle 11g新特性Flashback data archive
daizj
oracle
1. 什么是flashback data archive
Flashback data archive是oracle 11g中引入的一个新特性。Flashback archive是一个新的数据库对象,用于存储一个或多表的历史数据。Flashback archive是一个逻辑对象,概念上类似于表空间。实际上flashback archive可以看作是存储一个或多个表的所有事务变化的逻辑空间。
- 多叉树:2-3-4树
dieslrae
树
平衡树多叉树,每个节点最多有4个子节点和3个数据项,2,3,4的含义是指一个节点可能含有的子节点的个数,效率比红黑树稍差.一般不允许出现重复关键字值.2-3-4树有以下特征:
1、有一个数据项的节点总是有2个子节点(称为2-节点)
2、有两个数据项的节点总是有3个子节点(称为3-节
- C语言学习七动态分配 malloc的使用
dcj3sjt126com
clanguagemalloc
/*
2013年3月15日15:16:24
malloc 就memory(内存) allocate(分配)的缩写
本程序没有实际含义,只是理解使用
*/
# include <stdio.h>
# include <malloc.h>
int main(void)
{
int i = 5; //分配了4个字节 静态分配
int * p
- Objective-C编码规范[译]
dcj3sjt126com
代码规范
原文链接 : The official raywenderlich.com Objective-C style guide
原文作者 : raywenderlich.com Team
译文出自 : raywenderlich.com Objective-C编码规范
译者 : Sam Lau
- 0.性能优化-目录
frank1234
性能优化
从今天开始笔者陆续发表一些性能测试相关的文章,主要是对自己前段时间学习的总结,由于水平有限,性能测试领域很深,本人理解的也比较浅,欢迎各位大咖批评指正。
主要内容包括:
一、性能测试指标
吞吐量、TPS、响应时间、负载、可扩展性、PV、思考时间
http://frank1234.iteye.com/blog/2180305
二、性能测试策略
生产环境相同 基准测试 预热等
htt
- Java父类取得子类传递的泛型参数Class类型
happyqing
java泛型父类子类Class
import java.lang.reflect.ParameterizedType;
import java.lang.reflect.Type;
import org.junit.Test;
abstract class BaseDao<T> {
public void getType() {
//Class<E> clazz =
- 跟我学SpringMVC目录汇总贴、PDF下载、源码下载
jinnianshilongnian
springMVC
----广告--------------------------------------------------------------
网站核心商详页开发
掌握Java技术,掌握并发/异步工具使用,熟悉spring、ibatis框架;
掌握数据库技术,表设计和索引优化,分库分表/读写分离;
了解缓存技术,熟练使用如Redis/Memcached等主流技术;
了解Ngin
- the HTTP rewrite module requires the PCRE library
流浪鱼
rewrite
./configure: error: the HTTP rewrite module requires the PCRE library.
模块依赖性Nginx需要依赖下面3个包
1. gzip 模块需要 zlib 库 ( 下载: http://www.zlib.net/ )
2. rewrite 模块需要 pcre 库 ( 下载: http://www.pcre.org/ )
3. s
- 第12章 Ajax(中)
onestopweb
Ajax
index.html
<!DOCTYPE html PUBLIC "-//W3C//DTD XHTML 1.0 Transitional//EN" "http://www.w3.org/TR/xhtml1/DTD/xhtml1-transitional.dtd">
<html xmlns="http://www.w3.org/
- Optimize query with Query Stripping in Web Intelligence
blueoxygen
BO
http://wiki.sdn.sap.com/wiki/display/BOBJ/Optimize+query+with+Query+Stripping+in+Web+Intelligence
and a very straightfoward video
http://www.sdn.sap.com/irj/scn/events?rid=/library/uuid/40ec3a0c-936
- Java开发者写SQL时常犯的10个错误
tomcat_oracle
javasql
1、不用PreparedStatements 有意思的是,在JDBC出现了许多年后的今天,这个错误依然出现在博客、论坛和邮件列表中,即便要记住和理解它是一件很简单的事。开发者不使用PreparedStatements的原因可能有如下几个: 他们对PreparedStatements不了解 他们认为使用PreparedStatements太慢了 他们认为写Prepar
- 世纪互联与结盟有感
阿尔萨斯
10月10日,世纪互联与(Foxcon)签约成立合资公司,有感。
全球电子制造业巨头(全球500强企业)与世纪互联共同看好IDC、云计算等业务在中国的增长空间,双方迅速果断出手,在资本层面上达成合作,此举体现了全球电子制造业巨头对世纪互联IDC业务的欣赏与信任,另一方面反映出世纪互联目前良好的运营状况与广阔的发展前景。
众所周知,精于电子产品制造(世界第一),对于世纪互联而言,能够与结盟
 准备好一个基础的屏幕程序,我用的是野火霸道搭配3.2屏幕
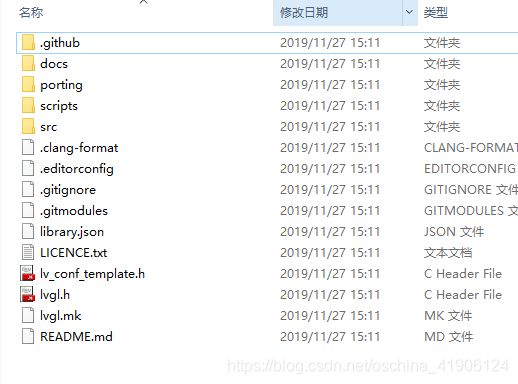
 打开工程添加src下面文件夹中的所有文件,proting中lv_port_disp_template.c文件
 修改一下设置
 修改lv_conf.h文件,使能文件,开头的0改为有1,之后还会遇到,屏幕大小,gpu是否使能,没有gpu改为0,修改lv_port_disp_template.h

