【体系】Prometheus监控技术
目录
- 01.简介
- 02.安装prometheus
- 03.搭建exporter采集数据
- 04.简单实例
- 05.Prometheus 命令行使用扩展
- 06.企业级监控数据采集方法
- 07.企业级监控数据采集脚本开发实践
- 08.企业级实际使用
- 09.Grafana介绍图形
- 10.Pagerduty的联用
01.简介
监控⼀般可分为 : 业务级别监控 / 系统级别监控 / ⽹络监控 / 程序代码监控/ ⽇志监控 / ⽤户⾏为分析监控/ 其他种类监控
- 业务监控 可以包含 ⽤户访问QPS,DAU⽇活,访问状态(http code), 业务接⼜(登陆,注
册,聊天,上传,留⾔,短信,搜索),产品转化率,充值额度,⽤户投诉 等等这些很宏观的概
念(上层) - 系统监控 主要是跟操作系统相关的 基本监控项 CPU/ 内存 / 硬盘 / IO / TCP链接 / 流量 等等
(Nagios - plugins, prometheus) - ⽹络监控 (IDC)对⽹络状态的监控(交换机,路由器,防⽕墙,VPN) 互联⽹公司必不可
少 但是很多时候又被忽略 例如:内⽹之间(物理内⽹,逻辑内⽹ 可⽤区 创建虚拟机 内⽹IP )
外⽹ 丢包率 延迟 等等 - ⽇志监控 监控中的重头戏(Splunk,ELK),往往单独设计和搭建, 全部种类的⽇志都有需要采
集 (syslog, soft, ⽹络设备,⽤户⾏为) • 程序监控 ⼀般需要和开发⼈员配合,程序中嵌⼊各种接⼜ 直接获取数据 或者特质的⽇志格式 - 监控技术的⽅案/软件选取(主观因素)
数据采集的形式分类:
-
一次性采集:例如我们使用比较简单的shelll ./monitor.sh(ps -ef | grep, netstats -an | wc)+ crontab的形式 按10秒/30秒/一分钟,这样的频率去 单词采集这种形式。其优点:一次性采集的模式,稳定性较好,不容易出现各种错误和性能瓶颈,且开发逻辑简单,实现快速;缺点:一次性采集对于有些采集项目实现起来不够智能,也不够到位,例如 日志的实时采集(使用一次性采集 日志文件 200/5xx diff grep 也可以实现,但是很low不够准确,不够直接)
-
后台式采集:采集程序以守护进程运行在Linux后台,持续不断的采集数据:prometheus exporter 例如 python/go开发的daemon程序,后台持续不断的采集。其优点:后台采集程序,数据准确性高,采集密度精细,管理方便;缺点:后台采集程序,如果开发过程不够仔细,可能会出现各种内心泄露、僵尸进程、性能瓶颈的问题,且开发周期较长
-
桥接式采集:本身以后台进程运行,但是采集不能独立,依然跟服务器关联,以桥接方式收集采集数据。例如:NRPE for nagios
02.安装prometheus
安装Prometheus之前必须先安装ntp时间同步(prometheus T_S 对系统时间的准确性要求很高,必须保证本机时间实时同步)
# 同步时间
[root@devops ~]# timedatectl set-timezone Asia/Shanghai
[root@devops ~]# ntpdate -u cn.pool.ntp.org
 5 Apr 23:14:37 ntpdate[3114]: step time server 193.182.111.143 offset -1.006787 sec
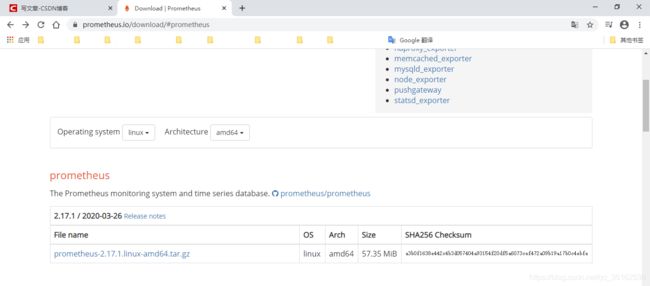
[root@devops opt]# tar -xvzf prometheus-2.17.1.linux-amd64.tar.gz
prometheus-2.17.1.linux-amd64/
prometheus-2.17.1.linux-amd64/NOTICE
prometheus-2.17.1.linux-amd64/LICENSE
prometheus-2.17.1.linux-amd64/prometheus.yml
prometheus-2.17.1.linux-amd64/prometheus
prometheus-2.17.1.linux-amd64/promtool
prometheus-2.17.1.linux-amd64/console_libraries/
prometheus-2.17.1.linux-amd64/console_libraries/menu.lib
prometheus-2.17.1.linux-amd64/console_libraries/prom.lib
prometheus-2.17.1.linux-amd64/consoles/
prometheus-2.17.1.linux-amd64/consoles/prometheus-overview.html
prometheus-2.17.1.linux-amd64/consoles/index.html.example
prometheus-2.17.1.linux-amd64/consoles/node-cpu.html
prometheus-2.17.1.linux-amd64/consoles/node-overview.html
prometheus-2.17.1.linux-amd64/consoles/node.html
prometheus-2.17.1.linux-amd64/consoles/node-disk.html
prometheus-2.17.1.linux-amd64/consoles/prometheus.html
prometheus-2.17.1.linux-amd64/tsdb
[root@devops opt]# cp -rf prometheus-2.17.1.linux-amd64 /usr/local/prometheus
[root@devops opt]# cd /usr/local/prometheus
[root@devops prometheus]# ls
[root@devops prometheus]# ls
console_libraries  consoles  LICENSE  NOTICE  prometheus  prometheus.yml  promtool  tsdb
[root@devops ~]# cd /usr/local/prometheus/
[root@devops prometheus]# ls
console_libraries  consoles  data  LICENSE  NOTICE  prometheus  prometheus.yml  promtool  tsdb
[root@devops prometheus]# vim prometheus.yml
# my global config
global:
  scrape_interval:     15s # Set the scrape interval to every 15 seconds. Default is every 1 minute.(采集时间间隔)
  evaluation_interval: 15s # Evaluate rules every 15 seconds. The default is every 1 minute.(监控规则)
  # scrape_timeout is set to the global default (10s).

# Alertmanager configuration
alerting:
  alertmanagers:
  - static_configs:
    - targets:
      # - alertmanager:9093

# Load rules once and periodically evaluate them according to the global 'evaluation_interval'.
rule_files:
  # - "first_rules.yml"
  # - "second_rules.yml"

# A scrape configuration containing exactly one endpoint to scrape:
# Here it's Prometheus itself.
scrape_configs:
  # The job name is added as a label `job=` to any timeseries scraped from this config.
  - job_name: 'prometheus'

    # metrics_path defaults to '/metrics'
    # scheme defaults to 'http'.

    static_configs:
    #配置监听
    - targets: ['localhost:9100'] #定义被监听的监听项
    #生产环境中,经常:
    #static_configs:
    #  -targets:['server04:9100','web3:9100','nginx06:9100','web7:9100','redis1:9100','log:9100','redis2:9100']
    #web3、nginx06等机器名必须在prometheus服务器 _/etc/hosts解析文件先存在,要么有个DNS(local_dns)服务器可以提供运维解析,再要么直接用IP地址
03.搭建exporter采集数据
下载并启动
[root@devops prometheus]# tar -xvzf node_exporter-0.18.1.linux-amd64.tar.gz
node_exporter-0.18.1.linux-amd64/
node_exporter-0.18.1.linux-amd64/node_exporter
node_exporter-0.18.1.linux-amd64/NOTICE
node_exporter-0.18.1.linux-amd64/LICENSE
[root@devops prometheus]# cp -rf node_exporter-0.18.1.linux-amd64 /usr/local/node_exporter
[root@devops prometheus]# cd /usr/local/node_exporter/
[root@devops node_exporter]# ls
LICENSE  node_exporter  NOTICE
[root@devops node_exporter]# ./node_exporter
INFO[0000] Starting node_exporter (version=0.18.1, branch=HEAD, revision=3db77732e925c08f675d7404a8c46466b2ece83e)  source="node_exporter.go:156"
INFO[0000] Build context (go=go1.12.5, user=root@b50852a1acba, date=20190604-16:41:18)  source="node_exporter.go:157"
INFO[0000] Enabled collectors:                           source="node_exporter.go:97"
INFO[0000]  - arp                                        source="node_exporter.go:104"
...
INFO[0000] Listening on :9100
# node_exporter默认工作在9100端口,以响应prometheus_server发过来的HTTP_GET请求,也可以响应其他方式的HTTP_GET请求
[root@devops ~]# netstat -tnlp | grep node
tcp6       0      0 :::9100                 :::*                    LISTEN      5470/./node_exporte
#也可自行发送 测试
[root@devops ~]# curl localhost:9100/metrics
# HELP go_gc_duration_seconds A summary of the GC invocation durations.
# TYPE go_gc_duration_seconds summary
go_gc_duration_seconds{
     quantile="0"} 0
go_gc_duration_seconds{
     quantile="0.25"} 0
go_gc_duration_seconds{
     quantile="0.5"} 0
...
#执行curl后可以看到node_exporter返回了大量metrics类型K/V数据,其中Key的名称就可以直接在prometheus的查询命令行来查看结果
04.简单实例
在prometheus当中,如果想要查询每台服务器每1分钟的CPU负载是多少,则需要使用如下的查询语句进行查询:
(1-((sum(increase(node_cpu_seconds_total{
     mode="idle"}[1m])) by (instance)) /(sum(increase(node_cpu_seconds_total[1m])) by (instance)))) * 100
- user(us):表示用户态空间或者说是用户进程(running user space processes)使用CPU所耗费的时间。这是日常我们部署的应用所在的层面,最常见常用。
- system(sy):表示内核态层级使用CPU所耗费的时间。分配内存、IO操作、创建子进程……都是内核操作。这也表明,当IO操作频繁时,System参数会很高。
- steal(st):当运行在虚拟化环境中,花费在其它 OS 中的时间(基于虚拟机监视器 hypervisor 的调度);可以理解成由于虚拟机调度器将 cpu 时间用于其它 OS 了,故当前 OS 无法使用 CPU 的时间。
- softirq(si):从系统启动开始,累计到当前时刻,软中断时间
- irq(hi):从系统启动开始,累计到当前时刻,硬中断时间
- nice(ni):从系统启动开始,累计到当前时刻, 低优先级(低优先级意味着进程 nice 值小于 0)用户态的进程所占用的CPU时间
- iowait(wa):从系统启动开始,累计到当前时刻,IO等待时间
- idle(id):从系统启动开始,累计到当前时刻,除IO等待时间以外的其它等待时间,亦即空闲时间
即total = user + nice + system + idle + iowait + irq + softirq + steal(注意: guest 以及 guest_nice 不参与求和计算,因为这两种时间分别作为 user 以及 nice 的一部分统计在其中了)
逐步分析:
- Linux系统开启后,CPU开始进⼊⼯作状态,每⼀个不同状态的CPU使⽤时间都从零开始累计。⽽我们在被监控客户端安装的node_exporter 会抓取 并返回给我们 常⽤的⼋种CPU状态的累积时间数值
- CPU的使⽤率 = (所有⾮空闲状态的CPU使⽤时间总和 )/ (所有状态CPU时间的总和)。所以空闲时间 除以 总时间 等于 空闲CPU的⽐例
- 那么中间的某⼀分钟之内CPU的总平均时间是多少 ?对于向CPU这种实时变化的监控数据,我们往往需要更精确的单位 去判断当前时刻 或者过去某⼀时刻 更细节的即时状况 所以 只知道30分钟的平均值是没有太⼤意思的。现在⾯临的问题是 30分钟内 CPU使⽤时间持续增长 UP, 我们需要截取其中⼀段增长的增量值如果我们能获得 1分钟的增量值 然后拿这个数值再去使⽤刚才同样的 计算公式那么 我们不就顺理成章的 得到了 1分钟的平均值了嘛?
- increase 函数 在promethes中,是⽤来 针对Counter 这种持续增长的数值,截取其中⼀段时间的增量。increase(node_cpu[1m])这样 就获取了 CPU总使⽤时间在1分钟内的增量
- 实际⼯作中的CPU ⼤多数都是多核的,有什么办法可以解决这个问题?sum() 函数可以起到value 加合的作⽤。sum( increase(node_cpu[1m]) )外⾯套⽤⼀个sum 即可把所有核数值加合。然后 我们⼀切就绪 接下来 我们把整个prometheus计算公式 在下⼀个阶段进⾏拆分讲解
- node_cpu_seconds_total是 我们需要使⽤的 key name
- 咱们把idle空闲的CPU时间 和 全部CPU时间 都给过滤出来key 使⽤{} 做过滤:node_cpu{mode="idle”} => 空闲 node_cpu all
- 我们使⽤ increase( [1m]) 把 node_cpu{mode=“idle”} 包起来=》increase(node_cpu{mode=“idle”}[1m]). => 代表 空闲CPU 1分钟内的增量increase(node_cpu[1m]) =》 all_CPu 1mins这样就是 把⼀分钟的增量 的CPU时间给取出来了。到这⼀步以后 有点那个意思了,不过 因为CPU核数太多 曲线太混杂了 我们需要进⼀步加强公式
- 我们使⽤ sum() 再包⼀层 increase(node_cpu{mode=“idle”}[1m]).到这⾥以后 感觉更像样⼦了,不过我们这个CPU的监控 其实采集的是 多台服务器的监控数据。怎么现在变成就⼀条线了?其实 是由于这个 sum()函数的原因这个sum()函数其实默认状况下是把所有数据 不管是什么内容 全部进⾏加合了……不光把 每⼀台机器的 多个核加⼀起了(这个是我们需要的)还把 所有机器的CPU 也全都加到⼀起了……变成 服务器集群总CPU平均值了….
- by (instance)个函数 可以把 sum加合到⼀起的数值 按照指定的⼀个⽅式进⾏⼀层的拆分instance代表的是 机器名:sum(increase(node_cpu{mode=“idle”}[1m])) by (instance)
- sum(increase(node_cpu{mode=“idle”}[1m])) by (instance) =》是空闲CPU时间 1分钟的增量;sum(increase(node_cpu[1m])) by (instance) 是全部CPU时间 1分钟增量;1-(sum(increase(node_cpu{mode=“idle”}[1m])) by (instance) / sum(increase(node_cpu[1m])) by (instance))
- 最后⼀步 ⽤ 1 去减掉 整个上⾯的公式 再 * 100。(1-((sum(increase(node_cpu{mode=“idle”}[1m])) by (instance)) / (sum(increase(node_cpu[1m])) by (instance)))) * 100。这样我们就得到了 最终我们期望的结果
05.Prometheus 命令行使用扩展
数据类型
- gauge 属于随机变化数值,把⼀个key 直接输⼊命令⾏之后得到的是最原始的数据输出
- counter 属于累积增长数据, 常用increase() rate() 之类的函数去计算
标签
下图{.}部分属于标签,可以⾃定义 也可以直接使⽤默认的exporter提供的标签项,标签中最重要的是exported_instance(指定机器名)。例如:count_netstat_wait_connections{exported_instance=“log”}(指明是那台被监控服务器 “log” 是⼀台⽇志服务器的机器名),其中过滤除了精确匹配 还有 模糊匹配count_netstat_wait_connections{exported_instance=~"web."}(把所有机器名中带有 web的机器都显⽰出来,其中. 属于正则表达式;模糊匹配 =~ ;模糊不匹配 !)。亦可进行数值过滤:count_netstat_wait_connections{exported_instance=“web.*”} > 400(wait_connection数量 ⼤于200的)
![]()
函数
- rate 函数:rate(.) 函数 是专门搭配counter类型数据使⽤的函数它的功能 是按照设置⼀个时间段,取counter在这个时间段中的平均每秒的增量,例如:rate(node_network_receive_bytes_total[1m])(在1分钟时间内,平均每秒钟的增量)
- increase函数:increase(.) 则 取⼀段时间增量的总量。比如increase(node_network_receive_bytes[1m])取的是1分钟内的增量总量。而rate(node_network_receive_bytes[1m])取的是1分钟内的增量除以60秒每秒数量
- sum函数:会把结果集的输出 进⾏总加合。⽐如:rate(node_network_receive_bytes[1m]) 显⽰的结果集会返回各个服务器的监控数据。但我们用sum()函数后,sum(rate(node_network_receive_bytes[1m]))就只有一条监控数据,等于是给出了所有机器的每秒请求量,如果要进行下一层的拆分需要在sum()的后面加上by(instance)可以按照机器名拆分出⼀层来、加上by(cluster_name)可以实现集群输出(注意:cluster_name默认node_exporter是没有办法提供的,若希望⽀持cluster_name,我们需要自行定义标签)
- topk函数:显示最高的指定数值 Gauge类型的使⽤:topk(3,count_netstat_wait_connections);Counter类型的使⽤:topk(3,rate(node_network_receive_bytes[20m]))。这个函数 ⼀般在使⽤的时候 只适合于 在console查看 graph的意义不⼤
- count函数:把数值符合条件的输出数⽬进⾏加合。例如count(count_netstat_wait_connections > 200),找出当前(或者历史的)当TCP等待数⼤于200的 机器数量。⼀般⽤它count进⾏⼀些模糊的监控判断。⽐如说 企业中有100台服务器,那么当只有10台服务器CPU⾼ 于80%的时候 这个时候不需要报警,但是当符合80%CPU的服务器数量超过 30台的时候那么就会触发报警
- 其他更多的函数
06.企业级监控数据采集方法
screen(放入后台工具):
#安装screen工具
[root@devops ~]# yum install screen
已加载插件:fastestmirror, langpacks
Loading mirror speeds from cached hostfile
...
#启动prometheus服务端
[root@devops prometheus]# ./prometheus
...
level=info ts=2020-04-08T06:24:31.564Z caller=main.go:635 msg="Server is ready to receive web requests."
 #启动node_exporter
[root@devops ~]# cd /usr/local/node_exporter/
[root@devops node_exporter]# ./node_exporter
...
 INFO[0000] Listening on :9100                            source="node_exporter.go:170"
 #按Ctrl+AD将服务放入后台运行
 #查看被放入后台运行的进程
 [root@devops ~]# screen -ls
There are screens on:
	3650.pts-2.devops	(Detached)
	3329.pts-2.devops	(Attached)
2 Sockets in /var/run/screen/S-root.
#返回前台
[root@devops ~]# screen -r 3650
...
INFO[0000] Listening on :9100                            source="node_exporter.go:170"
#screen优点:可以随时切换进⼊程序前台窗查看各种调试信息
#screen缺点:不够正规化总觉得还是个临时办法;后台列表不够⼈性化;
daemonize(放入后台工具):
#简介:Unix系统后台守护进程管理软件
#优点:更加正规 后台运⾏更稳定
#下载
[root@devops opt]# git clone git://github.com/bmc/daemonize.git
正克隆到 'daemonize'...
#配置安装
[root@devops daemonize]# sh configure && make && sudo make install
...
#启动prometheus
web上直接输⼊ ip:port 就可以进⼊⾸页

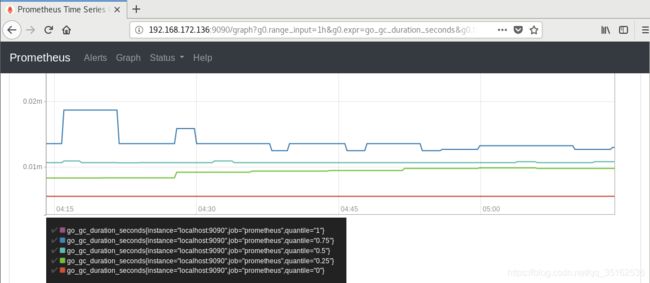
出现这个问题是因为prometheus对系统时间⾮常敏感,⼀定要时时刻刻保证系统时间同步,不然曲线是乱的ntpdate 循环同步时间后,错误提⽰就没有了
prometheus 运⾏时存放的历史数据都存放在/usr/local/prometheus/data
其中这些长串字母的是历史数据保留,⽽当前近期数据实际上保留在内存中并且按照⼀定间隔存放在wal/⽬录中防⽌突然断电或者重启以⽤来恢复内存中的数据
配置文件/data/prometheus/prometheus.yml
# my global config
global:
  #获取数据采集频率
  scrape_interval:     15s # Set the scrape interval to every 15 seconds. Default is every 1 minute.
  evaluation_interval: 15s # Evaluate rules every 15 seconds. The default is every 1 minute.
  # scrape_timeout is set to the global default (10s).

# Alertmanager configuration
alerting:
  alertmanagers:
  - static_configs:
    - targets:
      # - alertmanager:9093

# Load rules once and periodically evaluate them according to the global 'evaluation_interval'.
rule_files:
  # - "first_rules.yml"
  # - "second_rules.yml"

# A scrape configuration containing exactly one endpoint to scrape:
# Here it's Prometheus itself.
scrape_configs:
  # The job name is added as a label `job=` to any timeseries scraped from this config.
  #取任务名称
  - job_name: 'prometheus'

    # metrics_path defaults to '/metrics'
    # scheme defaults to 'http'.
    #在这个任务下所有要被监控的服务器
    static_configs:
     #格式:服务器:端口
     #hostname server01 可以正常被 prometheus 服务器 DNS解析
     #可以在/etc/hosts 设置别名
     #亦可作local dns server
    - targets: ['localhost:9100']
启动node_exporter并放入后台运行
[root@devops node_exporter]# ps -ef | grep node_exporter
root       8647   3330  0 15:29 pts/3    00:00:00 grep --color=auto node_exporter
[root@devops node_exporter]#
针对这个 node_exporter 进⾏初步的⼿动查询以确保正常获取监控数据
[root@devops prometheus]#  curl localhost:9100/metrics
# HELP go_gc_duration_seconds A summary of the GC invocation durations.
# TYPE go_gc_duration_seconds summary
go_gc_duration_seconds{
     quantile="0"} 0
...
常用的key:
- node_cpu CPU
- node_memory 内存
- node_disk 硬盘
07.企业级监控数据采集脚本开发实践
介绍:是另⼀种采⽤被动推送的⽅式(⽽不是exporter主动获取)获取监控数据的prometheus 插件,它是可以单独运⾏在任何节点上的插件(并不⼀定要在被监控客户端,然后通过⽤户⾃定义开发脚本把需要监控的数据发送给pushgateway,pushgateway再把数据推送给prometheus server
安装:
pushgateway官网位置
配置:
[root@devops prometheus]# ls
console_libraries  data     node_exporter-0.18.1.linux-amd64         NOTICE      prometheus.yml  tsdb
consoles           LICENSE  node_exporter-0.18.1.linux-amd64.tar.gz  prometheus  promtool
[root@devops prometheus]# vim prometheus.yml
  - job_name: 'pushgateway'
    static_configs:
    - targets: ['localhost:9091','localhost:9092']
⾃定义编写脚本发送 pushgateway 采集
pushgateway 本⾝是没有任何抓取监控数据的功能的 它只是被动的等待推送过来
#如下是段使⽤shell编写的pushgateway脚本,⽤于抓取 TCP waiting_connection 瞬时数量
[root@devops prometheus]# cd  /usr/local/node_exporter
[root@devops node_exporter]# vim node_exporter_shell.sh
[root@devops node_exporter]# vim node_exporter_shell.sh
#实例1
#!/bin/bash
instance_name=`hostname -f | cut -d'.' -f1`  #获取本机名,用于后面的的标签
label="count_netstat_wait_connections"  #定义key名
count_netstat_wait_connections=`netstat -an | grep -i wait | wc -l`  #获取数据的命令
echo "$label: $count_netstat_wait_connections"
echo "$label  $count_netstat_wait_connections" | curl --data-binary @- http://localhost:9091/metrics/job/pushgateway/instance/$instance_name
#实例2
#!/bin/bash
instance_name=`hostname -f | cut -d'.' -f1` #本机机器名 变量 用于之后的标签
if [ $instance_name == "localhost" ];then # 要求机器名不能是localhost 不然标签就没有区分了
echo "Must FQDN hostname"
exit 1
fi
# For waitting connections
label="count_netstat_wait_connections" # 定义一个新的 key
count_netstat_wait_connections=`netstat -an | grep -i wait | wc -l`
#定义一个新的数值 netstat中 wait 的数量
echo "$label : $count_netstat_wait_connections"
echo "$label $count_netstat_wait_connections"  | curl --data-binary @- http://localhost:9091/metrics/job/pushgateway/instance/$instance_name
#curl --data-binary
#最后 把 key & value 推送给 pushgatway
#将HTTP POST请求中的数据发送给HTTP服务器(pushgateway)
#与用户提交HTML表单时浏览器的行为完全一样
#HTTP POST请求中的数据为纯二进制数据
# http://prometheus.server.com:9091/metrics/job/pushgateway1/instance/$instance_name  ⽤POST ⽅式 把 key & value 推送给 pushgatway的URL地址
# http://prometheus.server.com:9091/metrics/job/pushgateway1   URL的主location
# job/pushgateway1   这⾥是 第⼆部分 第⼀个标签: 推送到 哪⼀个prometheus.yml定义的 job⾥
# {instance=“server01"}  instance/$instance_name  第⼆个标签 推送后 显⽰的 机器名是什么
通过这样的脚本编程⽅式就可以很快速的⾃定义我们需要的任何监控数据(Linux 命
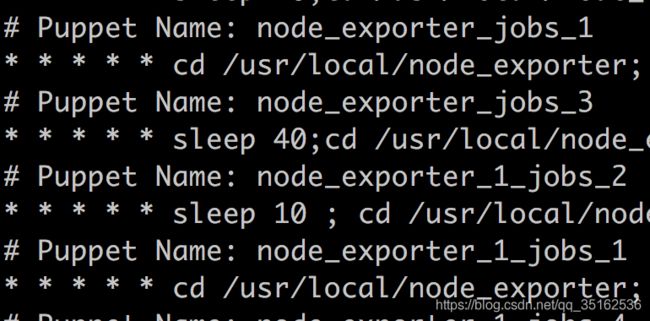
令⽅式),最后这个我们编写的监控bash脚本是⼀次性执⾏的 bash script.sh 我们需要按时间段反复执⾏,⾃然就得结合 contab。这⾥顺带提⼀句,crontab 默认只能最短⼀分钟的间隔,如果希望⼩于⼀分钟的间隔 15s 我们使⽤如下的⽅法:sleep 10 / sleep 20
08.企业级实际使用
-
在企业中对CPU使⽤率监控的实例,使⽤prometheus公式(1-((sum(increase(node_cpu{mode=“idle”}[1m])) by (instance)) / (sum(increase(node_cpu[1m])) by (instance)))) * 100
-
企业实际内存监控案例,使⽤prometheus公式(1-((node_memory_Buffers + node_memory_Cached + node_memory_MemFree) / node_memory_MemTotal)) * 100
-
企业硬盘/IO监控 真实案例,使⽤prometheus公式 (node_filesystem_free / node_filesystem_size) < 0.2(nagios )
- 硬盘使⽤率我在这⾥ 给⼤家推荐另⼀个 难度较⾼的 prometheus 函数 predict_linear(),对比硬盘百分⽐报警的案例(剩余空间的百分⽐),该函数可以起到对曲线变化速率的计算,以及在⼀段时间加速度的未来预测,简单来说,它可以实时监测硬盘使⽤率曲线的变化情况,假如在⼀个很⼩的时间段中 发现硬盘使⽤率 急速的下降(跟之前平缓时期相⽐较)
-
硬盘IO使⽤的监控,使用的prometheus公式((rate(node_disk_bytes_read[1m] )+ rate(node_disk_bytes_written[1m])) / 1024 /1024) > 0
-
企业⽹络传输真实案例,使⽤的prometheus公式 rate(node_network_transimit_btyes[1m]) /1024 /1024
-
等待链接监控,使用的prometheus公式 count_netstat_wait_connections ⼀个key⾜够
-
⽂件描述符监控,使用的prometheus公式 (node_filefd_allocated / node_filefd_maxumum) * 100
-
⽹络丢包率监控,使用一下脚本
#pushgateway + shell
# ping prometheus server
#ping + ip
lostpk=`timeout 5 ping -q -A -s 500  -W 1000 -c 100 prometheus |
grep transmitted | awk '{print $6}'`
rrt=`timeout 5 ping -q -A -s 500  -W 1000 -c 100 prometheus |
grep transmitted | awk '{
     print $10}’`
# -s ⼀个ping包的⼤⼩
# -W 延迟timeout
# -c 发送多少个数据包

#T-S
value_lostpk=`echo $lostpk | sed "s/%//g"`
value_rrt=`echo $rrt | sed "s/ms//g" `
echo "lostpk_"$instance_name"_to_prometheus  : $value_lostpk"
echo "lostpk_"$instance_name"_to_prometheus  $value_lostpk"  |
curl --data-binary @- http://prometheus.monitor.com:9092/
metrics/job/pushgateway1/instance/localhost:9092
echo "rrt_"$instance_name"_to_prometheus  : $value_rrt"
echo "rrt_"$instance_name"_to_prometheus  $value_rrt"  | curl --
data-binary @- http://prometheus.monitor.com:9092/metrics/job/pushgateway1/instance/localhost:9092
#如上就是 使⽤scripts 获取⽹络延迟和丢包率的实例
09.Grafana介绍图形
定义: Grafana是⼀款近⼏年新兴的开源数据绘图⼯具平台,现如今在各⼤企业被⼴泛使⽤中,4.0之后更是增加了报警功能
#安装
wget https://dl.grafana.com/oss/release/grafana-6.7.2-1.x86_64.rpm
sudo yum install grafana-6.7.2-1.x86_64.rpm
#运行
[root@devops grafana]# systemctl start grafana-server.service
[root@devops grafana]# netstat  -lntup |grep grafana
tcp6       0      0 :::3000                 :::*                    LISTEN      11336/grafana-serve
访问:浏览器中3000端口,用户名密码默认admin
注意:使用火狐浏览器时会出现一系列问题。例如提示修改密码,但提交会报Grafana Unauthorized错误
登录:进入grafana

设置数据源:连接prometheus_server


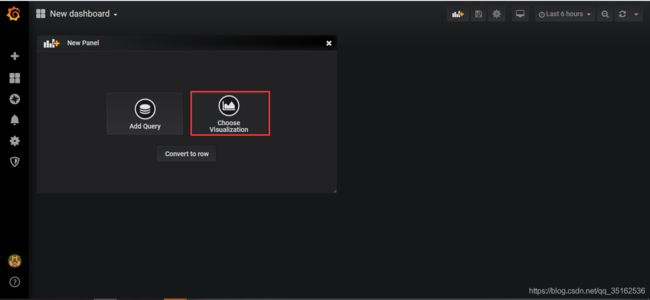
Grafana 建⽴ Dashboard


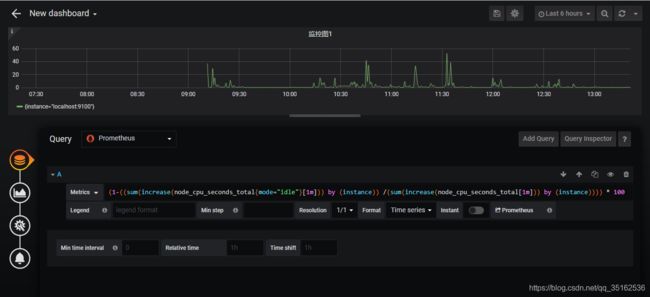


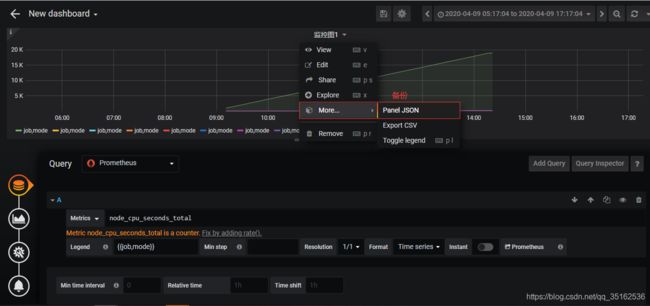

grafana报警功能:

设置grafana的报警功能
先去Pagerduty 获取⼀个 Integration Key,作为让其他软件连接到⾃⼰的认证码
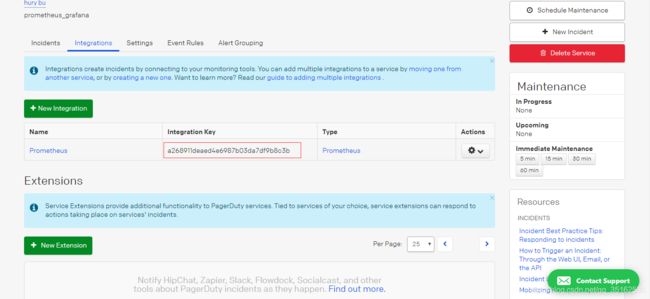
然后 我们进⼊Grafana的 Alerting选项卡,点击 Notification channels

在新建channel中 设置如下
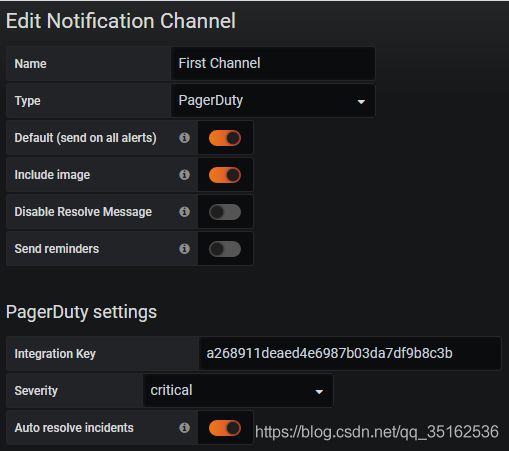
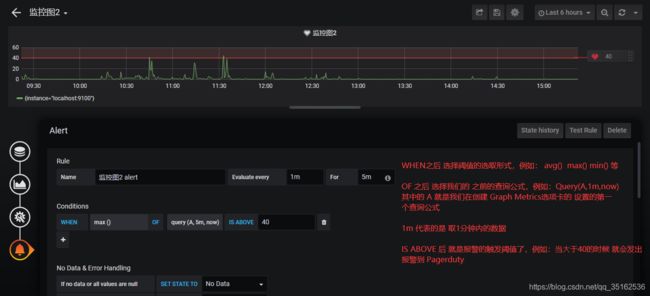
继续设置 我们的 notification

在Pagerduty对应页面可以看到传送过来的信息:

10.Pagerduty的联用
pagerduty 注册新账号 (免费试⽤14天)
pagerduty 创建新的service


pagerduty 报警信息的设置



电话 / 短信 / 邮箱 ,之后 我们就可以正式开始使⽤了,另外在企业中使⽤的时候我们需要在这⾥把所有需要接受报警信息的员⼯⼿机号/邮箱地址同时都设置上,这样⼀来每⼀次发送报警所有被加⼊的员⼯就都会收到了

