- Spring Cloud 基础
文章目录
- GitHub项目代码地址
- >> Spring Cloud 基础 - Netflix
- ~ Spring Cloud 简介
- ~ Spring Cloud 创建统一的依赖管理项目 dependencies
- ~ Spring Cloud 服务注册与发现
- ~ Spring Cloud 创建服务提供者(单体的API)
- ~ Spring Cloud 创建服务消费者 - Ribbon(单体的UI)
- Ribbon 简介
- ~ Spring Cloud 创建服务消费者 - Feign(单体的UI)
- Feign 简介
- ~ Spring Cloud 使用熔断器防止服务雪崩
- 熔断 概述
- Ribbon 中使用熔断器
- Feign 中使用熔断器
- ~ Spring Cloud 使用熔断器仪表盘监控熔断
- Hystrix 说明
- ~ Spring Cloud 使用路由网关统一访问接口
- 概述
- Zuul 简介
- 创建服务
- 配置网关路由失败时的回调
- ~ Spring Cloud 使用路由网关的服务过滤功能
- >> Spring Cloud 服务配置
- ~ Spring Cloud 分布式配置中心
- ~分布式配置中心服务端 - Config Server
- 附:HTTP 请求地址和资源文件映射
- ~分布式配置中心客户端 - Config Client
- >> Spring Cloud 服务追踪 - ZipKin
- ~ Spring Cloud 服务链路追踪
- ZipKin 简介
- 服务追踪说明
- 创建 ZipKin 服务端
- 术语解释
- ~ Spring Boot Admin 服务监控
- Spring Boot Admin 服务端
- Spring Boot Admin 客户端
GitHub项目代码地址
>> Spring Cloud 基础 - Netflix
~ Spring Cloud 简介
Spring Boot + Spring Cloud = Java 原生云开发
Spring Cloud 是一个相对比较新的微服务框架,相比 Dubbo 等 RPC 框架, Spring Cloud 提供的全套的分布式系统解决方案;
Spring Cloud 为开发者提供了在分布式系统(配置管理,服务发现,熔断,路由,微代理,控制总线,一次性 Token,全局锁,Leader 选举,分布式 Session,集群状态)中快速构建的工具,使用 Spring Cloud 的开发者可以快速的启动服务或构建应用、同时能够快速和云平台资源进行对接;
Spring Cloud 项目都是基于 Spring Boot 进行开发,并且都是使用 Maven 做项目管理工具;在实际开发中,我们一般都会创建一个依赖管理项目dependencies 作为 Maven 的 Parent 项目使用,这样做可以极大的方便我们对 Jar 包版本的统一管理;
~ Spring Cloud 创建统一的依赖管理项目 dependencies
在实际开发中,我们所有的项目都会依赖这个 dependencies 项目,整个项目周期中的所有第三方依赖的版本也都由该项目进行管理;
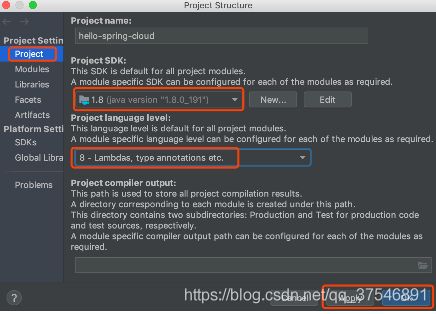
1、创建一个文件夹:hello-spring-cloud,这个文件夹专门用来存放所有工程;然后使用IDEA open项目;
以前是模块式开发,会在这个文件夹下创建pom.xml文件,然后创建module;现在是分布式开发,在该文件夹下继续创建目录,然后再在目录下创建pom.xml文件,每一个目录都是一个工程;之前是一整个工程模块化;
2、创建目录:hello-spring-cloud-dependencies,在该目录下创建pom.xml;
(1)
(2)
(3)
(4)
(5)加入常用插件:Maven默认有自己的插件,但是实际上我们可能需要使用比较新的版
本,新的版本就要基于spring boot 的parent启动器,parent基于spring-boot-dependencies,dependencies里面有Maven相关的插件,并管理了版本号;我们基于这些版本的插件来对Maven管理的spring应用进行打包会更好一些;
(6)资源文件配置:jar包打包不会打包静态资源文件,所以需要使用Maven把资源文件打包进去;
(7)指定仓库:
- 阿里云仓库加快下载速度;
- 官方仓库;
- spring仓库:一定要依赖Spring的仓库,不然所需的spring的新的依赖下载不了;
- 阿里云的插件仓库;
- 自己的私服仓库;
3、手动托管项目到IDEA的Maven:

~ Spring Cloud 服务注册与发现
Spring Cloud 使用的服务注册与发现的组件是Spring Cloud Netflix 提供的 Eureka,Eureka 是一个服务注册和发现模块,它的作用和Zookeeper的作用一模一样;spring把Netflix的Eureka整合进了spring cloud中;
1、在项目文件夹下创建一个新的目录:hello-spring-cloud-eureka,然后创建pom.xml;
(1)
(2)
(3)
(4)
(5)
(6)
之前创建spring boot的时候,直接右键run就行了,现在项目打包成jar包;运行jar包需要使用java -jar jar包名字命令,对于spring来说,要告诉它谁是入口类,jar在运行时必须要指明入口类是谁,所以在打包的时候就让这个jar包有一个默认的入口,使用Maven插件来指定这个入口;不设置运行不了jar包;
2、手动让IDEA的Maven管理项目;
3、创建目录:src/main/java、src/main/resources,右键:Mark Directory as --> Test Sources Root;
4、在src/main/resources下创建application.yml:
Spring Cloud项目都是基于Spring Boot项目的,所以每个项目中都应该有一个配置文件:application.yml;
Eureka 是一个高可用的组件,它没有后端缓存,每一个实例注册之后需要向注册中心发送心跳(因此可以在内存中完成),在默认情况下Erureka Server 也是一个 Eureka Client ,必须要指定一个 Server;
服务注册与发现:调用服务要先找到服务,可以根据应用程序的名字来查找,所以需要使用spring.application.name给项目起一个名字;
spring:
  application:
    name: hello-spring-cloud-eureka # 指定服务的名称
server:
  port: 8761
eureka:
  instance:
    hostname: localhost       # 指定eureka服务器的地址
  client:                     # 设置下面两个false表示当前项目使用了eureka的服务端模式;
    registerWithEureka: false # 指定该项目作为eureka服务端存在
    fetchRegistry: false      # 不设置为false表示该项目是客户端;
    serviceUrl:               # 设置eureka服务器的地址
      defaultZone: http://${eureka.instance.hostname}:${server.port}/eureka/
5、在src/main/java下创建包:com.zxj.hello.spring.cloud.eureka,在包下创建Spring Boot应用程序的入口类:EurekaApplication,然后配置SDK;【命名规范:项目名+Application】
@SpringBootApplication
@EnableEurekaServer  // 开启一个Eureka服务注册中心;
public class EurekaApplication {
    public static void main(String[] args) {
        SpringApplication.run(EurekaApplication.class, args);
    }
}
6、右键运行项目:
- 若报错:找不到或无法加载主类,install项目;
Updating port to 8761:端口在8761;- 浏览器访问:
http://localhost:8761
~ Spring Cloud 创建服务提供者(单体的API)
当 Client 向 Server 注册时,它会提供一些元数据,例如主机和端口,URL,主页等;Eureka Server 从每个 Client 实例接收心跳消息; 如果心跳超时,则通常将该实例从注册 Server 中删除;
1、在项目文件夹下创建一个新的目录:hello-spring-cloud-service-admin,然后创建pom.xml;
2、手动让IDEA的Maven管理项目;
3、创建目录:src/main/java、src/main/resources,右键:Mark Directory as --> Test Sources Root;
4、在src/main/resources下创建application.yml:
spring:
  application:
    name: hello-spring-cloud-service-admin
server:
  port: 8762
eureka:
  client:
    serviceUrl: # 指定服务端地址,根据此地址注册到服务端;
      defaultZone: http://localhost:8761/eureka/
5、在src/main/java下创建包:com.zxj.hello.spring.cloud.service.admin,在包下创建Spring Boot应用程序的入口类:ServiceAdminApplication;
@SpringBootApplication
@EnableEurekaClient  // 表明自己是一个 Eureka Client
public class ServiceAdminApplication {
    public static void main(String[] args) {
        SpringApplication.run(ServiceAdminApplication.class, args);
    }
}
6、运行项目:
提示:多个springboot应用程序在一个地方启动;
可以选择Show run configurations in Run Dashboard,然后停掉所有启动的项目,直接在Dashboard启动项目:在Run Dashboard里面项目处右键run即可;
注意:先启动服务端,再启动客户端!

7、浏览器访问:http://localhost:8761,可以在服务注册与发现中心查看到已经注册的服务提供者;
Eureka帮我们管理所有启动的服务的地址与端口,当消费者来消费的时候,消费者也要注册到Eureka上,消费者要调用服务提供者提供的内容的时候,由Eureka来分配消费者需要的服务提供者的IP和端口号;通过应用程序的名字来查找服务的IP地址和端口;这样,服务与服务之间的通信就能实现了;而且我们不用关心服务到底部署在哪个服务器上,不用关心服务的端口号是多少;因为这些信息在服务注册的时候都会自己告诉服务注册与发现中心;
所有的服务都注册到注册中心, 调用服务者去注册中心拿所需服务的IP与端口;

8、创建controller包,在包下创建AdminController:
@RestController
public class AdminController {
    // 使用spring的EL表达式,自动注入application.yml中设置的port的值;
    @Value("${server.port}")
    private String port; // 获取本项目的服务的端口号;
    @RequestMapping(value="hi", method = RequestMethod.GET)
    public String sayHi(String message){
        return String.format("Hi, your message is : %s , port : %s", message, port);
    }
}
9、重启服务,浏览器访问:http://localhost:8762/hi?message=HelloSpringCloud;
~ Spring Cloud 创建服务消费者 - Ribbon(单体的UI)
服务消费者有2种模式:Ribbon和Feign;
在微服务架构中,业务都会被拆分成一个独立的服务,服务与服务的通讯是基于 http restful 的;Spring cloud 有两种服务调用方式,一种是 ribbon + restTemplate,另一种是 feign;
Ribbon 简介
Ribbon 是一个负载均衡客户端,可以很好的控制 http 和 tcp 的一些行为;
0、准备工作:
- 启动服务提供者(
hello-spring-cloud-service-admin),端口号为:8762; - 修改配置文件的端口号为:
8763,启动后在 Eureka 中会注册两个实例,这相当于一个小集群;
1、在项目文件夹下创建一个新的目录:hello-spring-cloud-web-admin-ribbon,然后创建pom.xml;(主要是增加了 Ribbon 的依赖)
2、手动让IDEA的Maven管理项目;
3、创建目录:src/main/java、src/main/resources,右键:Mark Directory as --> Test Sources Root;
4、在src/main/resources下创建application.yml:
spring:
  application:
    name: hello-spring-cloud-web-admin-ribbon
  thymeleaf:
    cache: false
    mode: LEGACYHTML5
    encoding: UTF-8
    servlet:
      content-type: text/html
server:
  port: 8764
eureka:
  client:
    serviceUrl:
      defaultZone: http://localhost:8761/eureka/
5、在src/main/java下创建包:com.zxj.hello.spring.cloud.web.admin.ribbon,在包下创建Spring Boot应用程序的入口类:WebAdminRibbonApplication;
@SpringBootApplication
@EnableDiscoveryClient  // 注解注册到服务中心,并发现服务提供者;
public class WebAdminRibbonApplication {
    public static void main(String[] args) {
        SpringApplication.run(WebAdminRibbonApplication.class, args);
    }
}
6、Configuration配置负载均衡:
做一个Configuration配置,配置注入RestTemplate的Bean,并通过
@LoadBalanced注解表明开启负载均衡功能;因为本项目是Ribbon+RestTemplate的方式来请求服务的,所以需要使用负载均衡功能,使
hello-spring-cloud-service-admin成为一个负载均衡(有多台这个服务);
创建config包,创建RestTemplateConfiguration类:
@Configuration // 注解相当于使用Java的方式,创建了一个单体中的SpringContext.xml文件;
public class RestTemplateConfiguration {
@Bean // 定义Bean,返回RestTemplate实例,相当于7、访问:http://localhost:8761,可以看到服务提供者hello-spring-cloud-service-admin只启动了一台;
会显示一大串红色错误:这个错误的意思是,这个服务注册与发现中心的服务端,现在只部署了一个,容易出现单点故障;要避免单点故障,就要实现高可用:部署多态Eureka服务,部署成集群模式;(目前不管这个提示)
8、 在 IDEA 中配置一个工程启动多个实例:
启动两台hello-spring-cloud-service-admin:(开启负载均衡)
- 勾选
Allow parallel run; - 修改
application.yml中的端口号8762为8763; - 在
com.zxj.hello.spring.cloud.service.admin.ServiceAdminApplication右键运行;
(通过修改 application.yml 配置文件的 server.port 的端口,启动多个实例,需要多个端口,分别进行启动即可;) - 浏览器刷新地址:
http://localhost:8761

**9、创建service去访问服务提供者:**在com.zxj.hello.spring.cloud.web.admin.ribbon.service创建AdminService类
@Service
public class AdminService {
    @Autowired  // 自动注入RestTemplateConfiguration配置类中定义的Bean;
    private RestTemplate restTemplate;
    // 使用restTemplate.getForObject方法远程调用hello-spring-cloud-service-admin服务的sayHi方法;
    // 参数1:application.yml里面配置的服务提供者的名字/接口?参数列表;
    //       hi是服务提供者项目中Controller里面方法上@RequestMapping处定义的value值;
    //       eureka根据该方法提供的服务提供者的名字找到其对应的服务的IP和端口号;
    // 参数2:返回值的类型.classR
    public String sayHi(String message){
        return restTemplate.getForObject("Http://hello-spring-cloud-service-admin/hi?message=" + message, String.class);
    }
}
10、创建AdminController调用AdminService的方法:
AdminController调用AdminService的方法,AdminService通过Ribbon的方式去调用服务提供者提供的方法;
@RestController
public class AdminController {
    @Autowired
    private AdminService adminService;
    @RequestMapping(value="hi", method = RequestMethod.GET)
    public String sayHi(String message){
        return adminService.sayHi(message);
    }
}
11、项目入口类上右键运行: 浏览器访问http://localhost:8764/hi?message=HelloRibbon
页面交替显示:Hi, your message is : HelloRibbon , port : 8763,Hi, your message is : HelloRibbon , port : 8762,请求成功则表示我们已经成功实现了负载均衡功能来访问不同端口的实例;
Eureka刷新:两台服务提供者,一台服务消费者;

此时的架构:
- 一个服务注册中心,
Eureka Server,端口号为:8761; service-admin工程运行了两个实例,端口号分别为:8762,8763;web-admin-ribbon工程端口号为:8764;web-admin-ribbon通过RestTemplate调用service-admin接口时因为启用了负载均衡功能故会轮流调用它的 8762 和 8763 端口;

~ Spring Cloud 创建服务消费者 - Feign(单体的UI)
Feign 简介
Feign 是一个声明式的伪 Http 客户端,它使得写 Http 客户端变得更简单;使用 Feign,只需要创建一个接口并注解;它具有可插拔的注解特性,可使用 Feign 注解和 JAX-RS 注解;Feign 支持可插拔的编码器和解码器;Feign 默认集成了 Ribbon,并和 Eureka 结合,默认实现了负载均衡的效果;【实际开发使用Feign】
- Feign 采用的是基于接口的注解;
- Feign 整合了 ribbon;
1、在项目文件夹下创建一个新的目录:hello-spring-cloud-web-admin-feign,然后创建pom.xml;(主要是增加了 Feign 的依赖,删除了Ribbon依赖)
2、手动让IDEA的Maven管理项目;
3、创建目录:src/main/java、src/main/resources,右键:Mark Directory as --> Test Sources Root;
4、在src/main/resources下创建application.yml:
spring:
  application:
    name: hello-spring-cloud-web-admin-feign
  thymeleaf:
    cache: false
    mode: LEGACYHTML5
    encoding: UTF-8
    servlet:
      content-type: text/html
server:
  port: 8765
eureka:
  client:
    serviceUrl:
      defaultZone: http://localhost:8761/eureka/
5、在src/main/java下创建包:com.zxj.hello.spring.cloud.web.admin.feign,在包下创建Spring Boot应用程序的入口类:WebAdminFeignApplication;
@SpringBootApplication
@EnableFeignClients  // 表示这是一个Feign客户端,开启Feign功能;
@EnableDiscoveryClient  // 寻找Eureka,注册本项目到Eureka上;
public class WebAdminFeignApplication {
    public static void main(String[] args) {
        SpringApplication.run(WebAdminFeignApplication.class, args);
    }
}
6、创建 Feign 接口:com.zxj.hello.spring.cloud.web.admin.feign.service.AdminService
// value指定服务提供者的yml中配置的名字;
@FeignClient(value="hello-spring-cloud-service-admin")
public interface AdminService {
	@RequestMapping(value = "hi", method = RequestMethod.GET)
    // 要加上@RequestParam这个注解,以确保它可以和服务提供者的Controller的方法的参数能匹配上;
    public String sayHi(@RequestParam(value = "message") String message); // 抽象方法;Ribbon的Controller方法一样;
}
7、创建AdminController调用AdminService的方法:
@RestController
public class AdminController {
    @Autowired
    private AdminService adminService;
    @RequestMapping(value = "hi", method = RequestMethod.GET)
    public String sayHi(@RequestParam String message){
        return adminService.sayHi(message);
    }
}
8、入口类上启动服务,浏览器访问:http://localhost:8765/hi?message=HelloFeign,页面交替显示Hi,your message is :"HelloFeign" i am from port:8762、Hi,your message is :"HelloFeign" i am from port:8763;请求成功则表示我们已经成功实现了 Feign 功能来访问不同端口的实例;默认集成了负载均衡;
~ Spring Cloud 使用熔断器防止服务雪崩
熔断 概述
在微服务架构中,根据业务来拆分成一个个的服务,服务与服务之间可以通过 RPC 相互调用,在 Spring Cloud 中可以用 RestTemplate + Ribbon 或 Feign 来调用;为了保证其高可用,单个服务通常会集群部署;但是由于网络原因或者自身的原因(网络震荡),服务并不能保证 100% 可用,如果单个服务出现问题,调用这个服务就会出现线程阻塞,此时若有大量的请求涌入,Servlet 容器的线程资源会被消耗完毕,导致服务瘫痪;服务与服务之间的依赖性,故障会传播,会对整个微服务系统造成灾难性的严重后果,这就是服务故障的 “雪崩” 效应;
为了解决这个问题,业界提出了熔断器模型;Netflix 开源了 Hystrix 组件,实现了熔断器模式,Spring Cloud 对这一组件进行了整合;
在微服务架构中,一个请求需要调用多个服务是非常常见的,如下图:多个请求并发过来调用API网关,由API网关去调用不同的服务,服务A还会调用服务A1,形成一个链式调用模式,这时候就是一个微服务聚合器模式:由API网关聚合所有服务;
链式调用就会出现阻塞:因为网络原因导致服务A调用不到服务A1、因为服务A1自身原因导致其停止提供服务,就会导致连锁故障,这时候就会造成阻塞,若有大量并发请求通过API网关请求服务A1,就会造成不可弥补的问题;这时候就可以采用Hystrix熔断器模式,在客户端中增加熔断器;
当对特定的服务的调用的不可用达到一个阀值(Hystrix 是 5 秒 20 次) 熔断器将会被打开;熔断器打开后,为了避免连锁故障,通过 fallback 方法可以直接返回一个固定值;

Ribbon 中使用熔断器
1、在hello-spring-cloud-web-admin-ribbon项目的 pom.xml 中增加依赖:
<dependency>
    <groupId>org.springframework.cloudgroupId>
    <artifactId>spring-cloud-starter-netflix-hystrixartifactId>
dependency>
2、在入口类中增加 @EnableHystrix 注解开启熔断器;
3、在 AdminService 中的Ribbon 调用方法上增加 @HystrixCommand 注解,并指定 fallbackMethod 熔断方法;
@Service
public class AdminService {
    private RestTemplate restTemplate;
    // HystrixCommand注解指定回调方法:连不上后面的服务就返回这个方法的结果;
    @HystrixCommand(fallbackMethod = "hiError")
    public String sayHi(String message){
        return restTemplate.getForObject("Http://hello-spring-cloud-service-admin/hi?message=" + message, String.class);
    }
    public String hiError(String message){
        // 请求失败,因为链式结构后面的服务连接不上,直接返回结果:连接失败;
        return String.format("Hi your message is : %s, but request bad!", message);
    }
}
4、在Run Dashboard重启服务,浏览器访问http://localhost:8764/hi?message=HelloRibbon,可以访问;
测试熔断:停掉service-admin提供的8762、8763两个服务,然后再访问8764,页面显示Hi your message is : HelloRibbon, but request bad!;
Feign 中使用熔断器
hello-spring-cloud-web-admin-feign
Feign 是自带熔断器的,但默认是关闭的,需要在配置文件中配置打开它;
1、在配置文件增加以下代码,开启feign熔断机制:
feign:
  hystrix:
    enabled: true
若是测试熔断器时,熔断失效,则在hello-spring-cloud-eureka的yml配置文件中添加:
eureka:
  server:
    enable-self-preservation: false     # 关闭自我保护模式(缺省为打开)
    eviction-interval-timer-in-ms: 1000 # 续期时间,即扫描失效服务的间隔时间(毫秒)
2、创建熔断器类AdminServiceHystrix实现对应的Feign的AdminService接口:
@Component
public class AdminServiceHystrix implements AdminService {
    @Override
    public String sayHi(String message) {
        return "Hi,your message is :\"" + message + "\" but request error.";
    }
}
3、在Feign接口AdminService中的@FeignClient注解中添加参数fallback指定熔断类:
@FeignClient(value="hello-spring-cloud-service-admin", fallback = AdminServiceHystrix.class)
public interface AdminService {
	@RequestMapping(value = "hi", method = RequestMethod.GET)
    public String sayHi(@RequestParam(value = "message") String message);
}
4、测试熔断器: 关闭服务提供者,Maven install项目,重启消费者服务,访问8765,页面显示Hi,your message is :"HelloFeign" but request error.;
~ Spring Cloud 使用熔断器仪表盘监控熔断
有大量请求并发访问某服务时,不知道什么时候出发熔断,当链路比较长的时候,有服务在阻塞,或者是某服务崩了、或者是网络原因等,我们要监控,看这个服务是不是一直在被熔断,一直熔断肯定是不行的,说明这个服务有问题,得跟踪出来然后解决,只能是服务压力太大的时候短时间熔断才正常;所以需要有熔断监视器实时监视熔断;
在 Ribbon 和 Feign 项目增加 Hystrix 仪表盘功能,两个项目的改造方式相同;
hello-spring-cloud-web-admin-feign
1、在pom.xml文件中添加依赖:
<dependency>
    <groupId>org.springframework.cloudgroupId>
    <artifactId>spring-cloud-starter-netflix-hystrix-dashboardartifactId>
dependency>
2、在入口类中添加注解,开启熔断器仪表盘监控:@EnableHystrixDashboard
3、创建 hystrix.stream 的 Servlet 配置:
(Spring Boot 2.x 版本开启 Hystrix Dashboard 与 Spring Boot 1.x 的方式略有不同,需要增加一个 HystrixMetricsStreamServlet 的配置;)
在单体时,手动创建一个servlet时,创建一个servlet类继承HttpServlet类,然后在web.xml中配置Servlet访问,现在项目中不使用web.xml了,没法手动配置Servlet了;这时候使用ServletRegistrationBean 注册我们创建的Servlet,替代web.xml;
@Configuration
public class HystrixDashboardConfiguration {
    @Bean
    public ServletRegistrationBean getServlet() {
        // new 一个Servlet(我们自己创建的Servlet)
        HystrixMetricsStreamServlet streamServlet = new HystrixMetricsStreamServlet();
        // 使用ServletRegistrationBean 注册我们创建的Servlet;
        ServletRegistrationBean registrationBean = new ServletRegistrationBean(streamServlet);
        registrationBean.setLoadOnStartup(1);  // 配置servlet启动顺序;
        registrationBean.addUrlMappings("/hystrix.stream");// servlet-mapping
        registrationBean.setName("HystrixMetricsStreamServlet");// servlet-name
        return registrationBean;
    }
}
4、Maven install项目,重启服务,测试 Hystrix Dashboard: 浏览器端访问 http://localhost:8765/hystrix 界面如下:
注意: Servlet指定根路径是
/hystrix.stream,但是熔断器的地址不是这个,而是http://localhost:8765/hystrix;

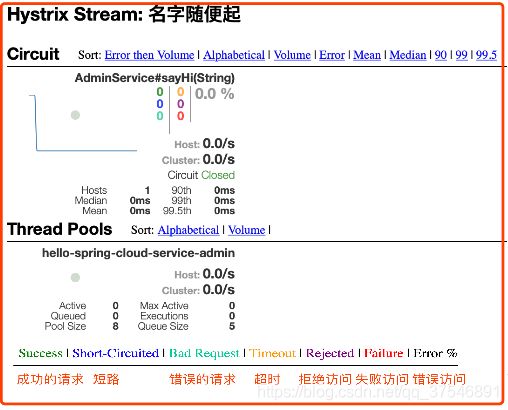
点击 Monitor Stream,进入下一个界面,访问 http://localhost:8765/hi?message=HelloRibbon 此时会出现监控界面:
Hystrix 说明
1、什么情况下会触发 fallback 方法:
| 名字 | 描述 | 触发fallback |
|---|---|---|
| EMIT | 值传递 | NO |
| SUCCESS | 执行完成,没有错误 | NO |
| FAILURE | 执行抛出异常 | YES |
| TIMEOUT | 执行开始,但没有在允许的时间内完成 | YES |
| BAD_REQUEST | 执行抛出HystrixBadRequestException | NO |
| SHORT_CIRCUITED | 断路器打开,不尝试执行 | YES |
| THREAD_POOL_REJECTED | 线程池拒绝,不尝试执行 | YES |
| SEMAPHORE_REJECTED | 信号量拒绝,不尝试执行 | YES |
2、fallback 方法在什么情况下会抛出异常:
| 名字 | 描述 | 抛异常 |
|---|---|---|
| FALLBACK_EMIT | Fallback值传递 | NO |
| FALLBACK_SUCCESS | Fallback执行完成,没有错误 | NO |
| FALLBACK_FAILURE | Fallback执行抛出出错 | YES |
| FALLBACK_REJECTED | Fallback信号量拒绝,不尝试执行 | YES |
| FALLBACK_MISSING | 没有Fallback实例 | YES |
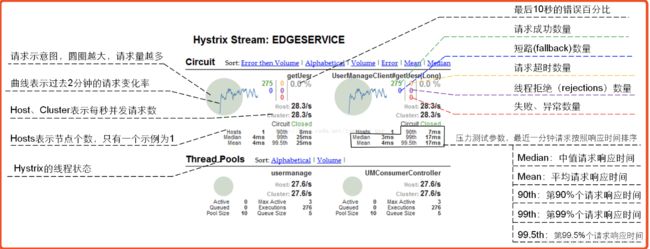
3、Hystrix Dashboard 界面监控参数:
4、Hystrix 常用配置信息:
-
超时时间(默认1000ms,单位:ms)
hystrix.command.default.execution.isolation.thread.timeoutInMilliseconds:在调用方配置,被该调用方的所有方法的超时时间都是该值,优先级低于下边的指定配置;hystrix.command.HystrixCommandKey.execution.isolation.thread.timeoutInMilliseconds:在调用方配置,被该调用方的指定方法(HystrixCommandKey 方法名)的超时时间是该值;
-
线程池核心线程数:
hystrix.threadpool.default.coreSize:默认为 10; -
Queue:
hystrix.threadpool.default.maxQueueSize:最大排队长度;
默认 -1,使用SynchronousQueue;其他值则使用 LinkedBlockingQueue;如果要从 -1 换成其他值则需重启,即该值不能动态调整,若要动态调整,需要使用到下边这个配置;hystrix.threadpool.default.queueSizeRejectionThreshold:排队线程数量阈值,默认为 5,达到时拒绝,如果配置了该选项,队列的大小是该队列;- 注意: 如果 maxQueueSize=-1 的话,则该选项不起作用;
-
断路器:
hystrix.command.default.circuitBreaker.requestVolumeThreshold:当在配置时间窗口内达到此数量的失败后,进行短路;默认 20 个(10s 内请求失败数量达到 20 个,断路器开);hystrix.command.default.circuitBreaker.sleepWindowInMilliseconds:短路多久以后开始尝试是否恢复,默认 5s;hystrix.command.default.circuitBreaker.errorThresholdPercentage:出错百分比阈值,当达到此阈值后,开始短路;默认 50%;
-
fallback:
hystrix.command.default.fallback.isolation.semaphore.maxConcurrentRequests:调用线程允许请求 HystrixCommand.GetFallback() 的最大数量,默认 10;超出时将会有异常抛出,注意:该项配置对于 THREAD 隔离模式也起作用
-
属性配置参数:
- 参数说明:
https://github.com/Netflix/Hystrix/wiki/Configuration - HystrixProperty 参考代码:
http://www.programcreek.com/java-api-examples/index.php?source_dir=Hystrix-master/hystrix-contrib/hystrix-javanica/src/test/java/com/netflix/hystrix/contrib/javanica/test/common/configuration/command/BasicCommandPropertiesTest.java
- 参数说明:
~ Spring Cloud 使用路由网关统一访问接口
使用Zuul来实现Spring Cloud的API网关;
概述
在微服务架构中,需要几个基础的服务治理组件,包括服务注册与发现、服务消费、负载均衡、熔断器、智能路由、配置管理等,由这几个基础组件相互协作,共同组建了一个简单的微服务系统;
一个简单的微服务系统如下图:

-
客户端请求一个负载均衡服务器(
Nginx),由Nginx分发请求到API网关Zuul,API网关Zuul来统一维护所有的服务,服务1、服务2等又是集群部署,服务与服务之间要相互通信,Zuul和服务都要注册到服务注册与发现中心Eureka; -
配置服务放在
Git仓库里面,而不是放在服务本身里面,也就是说,服务的配置、Eureka的配置文件都要放到Git里面,然后配置文件也要独立部署;独立部署表示的是,项目里面是不需要application.yml配置文件的;而是从Git仓库里面读取配置;也就是说要把配置文件上线,以后我们只要动态的修改配置文件,然后直接上传到Git仓库,我们的服务和Eureka就可以随时获取到最新的配置;就不需要再修改代码,不需要重启服务了;这就是配置的云部署模式; -
在
Spring Cloud微服务系统中,一种常见的负载均衡方式是,客户端的请求首先经过负载均衡(Zuul、Ngnix),再到达服务网关(Zuul 集群),然后再到具体的服务;服务统一注册到高可用的服务注册中心Eureka集群,服务的所有的配置文件由配置服务管理,配置服务的配置文件放在 GIT 仓库,方便开发人员随时改配置;
Zuul 简介
Zuul 的主要功能是路由转发和过滤器;Zuul 默认和 Ribbon 结合实现了负载均衡的功能;
路由功能是微服务的一部分,比如 /api/user(Rest风格的API) 转发到到 User 服务,/api/shop 转发到到 Shop 服务;
创建服务
1、在项目文件夹下创建一个新的目录:hello-spring-cloud-zuul,然后创建pom.xml;
主要是增加了 Zuul 的依赖:
<dependency>
    <groupId>org.springframework.cloudgroupId>
    <artifactId>spring-cloud-starter-netflix-zuulartifactId>
dependency>
2、手动让IDEA的Maven管理项目;
3、创建目录:src/main/java、src/main/resources,右键:Mark Directory as --> Test Sources Root;
4、在src/main/resources下创建application.yml:
spring:
  application:
    name: hello-spring-cloud-zuul
server:
  port: 8769
eureka:
  client:
    serviceUrl:
      defaultZone: http://localhost:8761/eureka/
zuul:
  routes:   # 路由
    api-a:  # 自己起的;
      path: /api/a/**  # 以/api/a开头的请求都转发给hello-spring-cloud-web-admin-ribbon服务
      serviceId: hello-spring-cloud-web-admin-ribbon
    api-b:
      path: /api/b/**  # 以/api/b开头的请求都转发给hello-spring-cloud-web-admin-feign服务
      serviceId: hello-spring-cloud-web-admin-feign
5、在src/main/java下创建包:com.zxj.hello.spring.cloud.zuul,在包下创建Spring Boot应用程序的入口类:ZuulApplication;
@SpringBootApplication
@EnableEurekaClient
@EnableZuulProxy    // 开启 Zuul 功能
public class ZuulApplication {
    public static void main(String[] args) {
        SpringApplication.run(ZuulApplication.class, args);
    }
}
API网关聚合了Ribbon和feign两个客户端服务,统一管理两个服务的地址,这两个服务依赖后面的Service-Admin服务,聚合器+链式服务模式合在一起;
6、开启服务: 先开启Service-Admin服务和Ribbon和feign两个客户端服务,然后再在入口类上右键运行Zuul服务;
打开浏览器访问:http://localhost:8769/api/a/hi?message=HelloZuul 浏览器显示Hi,your message is :"HelloZuul" i am from port:8763
打开浏览器访问:http://localhost:8769/api/b/hi?message=HelloZuul 浏览器显示 Hi,your message is :"HelloZuul" i am from port:8763
至此说明 Zuul 的路由功能配置成功;
配置网关路由失败时的回调
1、在hello-spring-cloud-zuul项目中的com.zxj.hello.spring.cloud.zuul.fallback包下,创建WebAdminFeignFallbackProvider类实现spring提供的FallBackProvider接口:
@Component
public class WebAdminFeignFallbackProvider implements FallbackProvider {

    // 失败的时候才会调用这个方法,路由到指定的服务ID;
    // 值与Zuul服务的application.yml方法中的serviceId对应;
    // 如果需要所有调用都支持回退,则 return "*" 或 return null;
    @Override
    public String getRoute() {
        return "hello-spring-cloud-web-admin-feign";
    }
    // 如果请求服务失败,则返回指定的信息给调用者;
    @Override
    public ClientHttpResponse fallbackResponse(String route, Throwable cause) {
        // 返回类型是ClientHttpResponse接口,需要实现接口的方法;
        return new ClientHttpResponse() {
            // 返回状态码 - OK;
            // 客户端浏览器在请求网关Zuul,请求是成功的,网关请求服务的时候失败了,对于请求者来说请求是成功的;
            // 所以返回的请求应该是成功的;
            // 服务器不应该把 api 的 404,500 等问题抛给客户端,
            // 网关和 api 服务集群对于客户端来说是黑盒;
            @Override
            public HttpStatus getStatusCode() throws IOException {return HttpStatus.OK; }
            @Override  // 返回状态码对应的值;
            public int getRawStatusCode() throws IOException {return HttpStatus.OK.value();}
            @Override
            public String getStatusText() throws IOException {return HttpStatus.OK.getReasonPhrase();}
            @Override
            public void close() {}
            @Override  // 返回响应的内容;
            public InputStream getBody() throws IOException {
                ObjectMapper objectMapper = new ObjectMapper(); // 封装JSON的对象;
                Map<String, Object> map = new HashMap<>();
                map.put("status", 200);                         // 封装一个新的状态码200,表示请求成功;
                map.put("message", "无法连接,请检查网络!");       // 返回给前端的提示信息;
                return new ByteArrayInputStream(objectMapper.writeValueAsString(map).getBytes("utf-8"));
            }

            @Override // 设置request请求头,
            public HttpHeaders getHeaders() {
                HttpHeaders headers = new HttpHeaders();
                // 设置响应json数据,和getBode方法中的内容编码一致;
                headers.setContentType(MediaType.APPLICATION_JSON_UTF8);
                return headers;
            }
        };
    }
}
2、测试: 依次启动项目EurekaApplication、ServiceAdminApplication、WebAdminRibbonApplication、WebAdminFeignApplication、ZuulApplication
浏览器访问:http://localhost:8769/api/b/hi?message=HelloZuul,偶尔会输出{"message":"无法连接,请检查网络!","status":200},说明测试成功;
3、若启动项目时报错:Caused by: java.net.BindException: Address already in use
$ lsof -i:8769
COMMAND   PID USER   FD   TYPE             DEVICE SIZE/OFF NODE NAME
java    51474  zxj  203u  IPv6 0x7a273e0c58863a87      0t0  TCP *:8769 (LISTEN)
$ sudo kill -9 51474
~ Spring Cloud 使用路由网关的服务过滤功能
学习SpringMVC的时候需要配置过滤器,现在使用SpringCloud进行Java原生云开发,过滤器由Zuul来提供;过滤器可以用来拦截登录请求,进行安全验证;
之前Servlet创建过滤器需要创建类继承Servlet接口,后来的SpringMVC需要类实现IntercepterHandler拦截器接口,现在的Zuul需要创建类继承ZuulFilter类;
1、在hello-spring-cloud-zuul项目中创建服务过滤器类LoginFilter:
package com.zxj.hello.spring.cloud.zuul.filter;
@Component
public class LoginFilter extends ZuulFilter {
    private static final Logger logger = LoggerFactory.getLogger(LoginFilter.class);
    // 配置过滤器类型:有四种不同生命周期的过滤器类型:
    // pre:路由之前;
    // routing:路由之时;
    // post:路由之后;
    // error:发送错误调用;
    @Override
    public String filterType() {
        return "pre";  // 本过滤器设置为路由之前,进行登录与否验证;
    }
    // 配置过滤器的执行顺序:数值越小执行顺序越靠前;
    @Override
    public int filterOrder() {
        return 0;
    }
    // 配置是否需要过滤:true需要、false不需要;
    @Override
    public boolean shouldFilter() {
        return true;
    }
    // 过滤器的具体业务代码;
    @Override
    public Object run() throws ZuulException {
        RequestContext currentContext = RequestContext.getCurrentContext(); // 获取当前上下文;
        // 根据当前上下文获取HttpServletRequest;
        HttpServletRequest request = currentContext.getRequest();
        logger.info("{} >>> {}", request.getMethod(), request.getRequestURL().toString());
        String token = request.getParameter("token");
        if(token == null){
            logger.warn("Token is empty");
            // 发送Zuul的响应为false,表示不发送响应;
            currentContext.setSendZuulResponse(false);
            // 设置响应码401,表示没有得到授权,没有权限,不能访问请求的API资源;
            currentContext.setResponseStatusCode(401);
            // 设置响应的内容,可以是json格式的数据;
            try {
                HttpServletResponse response = currentContext.getResponse();
                response.setContentType("text/html;charset=utf-8");
                currentContext.getResponse().getWriter().write("非法请求!");
            } catch (IOException e) {
                e.printStackTrace();
            }
        }else{
            logger.info("OK");
        }
        return null;
    }
}
2、重启Zuul服务,进行测试:
浏览器访问:http://localhost:8769/api/a/hi?message=HelloZuul 网页显示:非法请求!
浏览器访问:http://localhost:8769/api/b/hi?message=HelloZuul&token=123 网页显示Hi, your message is : HelloZuul , port : 8763
>> Spring Cloud 服务配置
~ Spring Cloud 分布式配置中心
单体应用中配置文件是放在项目中的application.xml文件,是在本地进行配置的;
在分布式系统中,一般的小型项目服务的数量是一百个左右,大型项目可能有上千上万个,由于服务数量巨多,为了方便服务配置文件统一管理,实时更新,所以需要分布式配置中心组建 - 云配置;
在Spring Cloud中,有分布式配置中心组件Spring Cloud Config (除了这个框架,Apollo也可以);它支持配置服务放在配置服务的内存中(即本地),也支持放在远程 Git 仓库中;
在 Spring Cloud Config 组件中,分两个角色,一是 Config Server,二是 Config Client;服务端存放配置文件,客户端从服务端读取配置文件的内容;
~分布式配置中心服务端 - Config Server
1、创建服务hello-spring-cloud-config,创建pom.xml,托管到Maven;
主要增加了
2、创建目录:src/main/java、src/main/resources,右键:Mark Directory as --> Test Sources Root;
3、创建入口类:
package com.zxj.hello.spring.cloud.config;
@EnableConfigServer    // 开启配置服务器功能
@EnableEurekaClient   // 表明这个服务是一个服务提供者;
@SpringBootApplication
public class ConfigApplication {
    public static void main(String[] args) {
        SpringApplication.run(ConfigApplication.class, args);
    }
}
4、创建服务spring-cloud-config :里面专门存放各个服务的application.yml配置文件;但是统一放到这个项目中的时候,要修改配置文件的名字为项目名,以便区分服务;
5、创建application.yml:
-
配置服务器
Spring Cloud Config默认端口8888,不能直接在application.yml中修改,要想修改,需要在resources目录下创建一个配置文件bootstrap.properties,在这里面增加server.port=8889;
因为,如果修改了默认端口,则客户端项目就不能在application.yml或application.properties中配置spring.cloud.config.uri,必须在bootstrap.yml或是bootstrap.properties中配置,原因是 bootstrap 开头的配置文件会被优先加载和配置; -
SpringBoot有四种配置文件:
Application.properties、application.yml、bootstrap.properties、bootstrap.yml;正常的起动流程是会优先加载bootstrap.xxx配置文件的; -
相关配置说明,如下:
spring.cloud.config.label:配置仓库的分支;spring.cloud.config.server.git.uri:配置 Git 仓库地址(GitHub、GitLab、码云 …);spring.cloud.config.server.git.search-paths:配置仓库路径(存放配置文件的目录);spring.cloud.config.server.git.username:访问 Git 仓库的账号;spring.cloud.config.server.git.password:访问 Git 仓库的密码;- 注意:如果使用 GitLab 作为仓库的话,git.uri 需要在结尾加上 .git,GitHub 则不用;
spring:
  application:
    name: hello-spring-cloud-config
  cloud:
    config:
      label: master
      server:
        git:
          uri: https://github.com/zxj-5203/hello-spring-cloud
          search-paths: spring-cloud-config/respo
          username: zxj-5203
          password: ......
server:
  port: 8888 # 修改spring cloud config默认端口号要在bootstrap.yml中;
eureka:
  client:
    serviceUrl:
      defaultZone: http://localhost:8761/eureka/
6、将hello-spring-cloud-web-admin-feign服务中的application.yml配置文件复制到spring-cloud-config服务的respo目录下,改名字为web-admin-feign.yml,并push到git仓库中;
7、测试: 刷新Maven,就会解析hello-spring-cloud-config服务的pom文件,就会解析plugin,就会找到服务的mianclass,找到mainclass就会放到DashBoard中,然后启动服务;
浏览器访问:http://localhost:8888/web-admin-feign/master,能通过application.yml里面的配置访问到仓库里面的配置就说明云分布式配置中心服务端配置成功;

附:HTTP 请求地址和资源文件映射
http://ip:port/{application}/{profile}[/{label}]
http://ip:port/{application}-{profile}.yml
http://ip:port/{label}/{application}-{profile}.yml
http://ip:port/{application}-{profile}.properties
http://ip:port/{label}/{application}-{profile}.properties
~分布式配置中心客户端 - Config Client
将普通的项目hello-spring-cloud-web-admin-feign改造成分布式配置中心客户端: 把feign的配置改造成从spring-cloud-config里面去读取配置,代替读取项目中的application.yml配置文件,实现分布式配置的效果;(将本地配置移植成云配置)
配置中心存放的配置文件命名:不会直接写成项目名,因为在实际开发项目的时候,开发环境、测试环境、生产环境的配置不一样:开发环境的Eureka的配置的serverUrl地址是localhost,生产环境肯定不可能是localhost,而是独立部署,分配给它一个公有的IP和端口;
可是我们又不可能随时在配置文件中修改服务的地址,所以需要在配置中心提供3套配置文件,把不同环境的配置分开;Spring Boot Profile提供了区分配置文件的功能;只需要在配置文件名字后面加上-dev、-prod、-test等标识即可;横杠后面的字可以随便写,但是通常有这三种;
在配置中心客户端上,修改application.yml文件内容,删除原有配置,添加spring-cloud.config的配置,引用存储在Git仓库的配置;其中spring.cloud.config.proile=dev指定的是引用Git上配置文件名后缀为-dev的配置,但是上生产时要使用profiel=prod的配置,而我们又不能在配置文件中修改dev为prod,所以一般会再在客户端上创建一个生产环境下的配置文件application-prod.yml,里面指定spring.cloud.config.proile=prod,用于开启生产环境的配置,然后在使用java -jar命令启动jar包时通过传入启动参数来装载生产环境的prod配置文件;--spring.profiles.active=prod;
真正上生产环境运行项目是使用java -jar命令来运行的,因为项目都会打包成jar包;
- 项目打包:命令行进入到项目根目录的路径下,执行命令:
mvn clean package; - 运行jar包:打包成功cd到target目录下,执行命令
java -jar xxx.jar;若执行该命令不传入任何启动参数,默认加载application.yml配置文件;
使用云配置加上默认启动参数,就可以根据不同环境装载不同的配置文件,启动不同的端口; - 注意:运行
java -jar命令时,项目的pom文件中必须要指定plugin-mainClass,否则启动不了;
在resource目录下提供多个环境的配置,每个配置都会使用springcloud来做配置中心,所有配置都放在git仓库中;
1、在hello-spring-cloud-web-admin-feign项目中的pom文件中添加依赖:
<dependency>
    <groupId>org.springframework.cloudgroupId>
    <artifactId>spring-cloud-starter-configartifactId>
dependency>
2、修改spring-cloud-config项目中的respo目录下的配置文件的名字为web-admin-feign-dev,server.port=8765,表明这个配置文件是用于开发环境的,里面配置的地址是localhost;
再复制一份命名为web-admin-feign-prod,修改server.port=8766,表明这个配置文件是用于生产环境的,里面配置的地址是公共的IP和端口;然后提交更新到git上;
重启服务测试一下:http://localhost:8888/web-admin-feign/dev/master,看改名是否成功;
3、修改hello-spring-cloud-web-admin-feign项目中的application.yml文件,添加spring.cloud.config的地址、name等配置,删除其余配置,因为是云配置,这些配置都在云上配置了,所以本地不需要再配置了,只需要指定spring.cloud.config的配置信息即可;
spring:
  cloud:
    config:
      uri: http://localhost:8888 # 配置服务中心spring-cloud-config的地址;
      name: web-admin-feign      # 配置文件的名字的前缀;
      label: master              # 配置仓库的分支;
      profile: dev      # 配置文件的环境标识:指定激活dev环境的配置文件;
4、在hello-spring-cloud-web-admin-feign项目中复制一份application.yml文件,改名字为application-prod.yml,修改里面的profile: prod;
5、测试: 停掉DashBoard中的feign服务,打包hello-spring-cloud-web-admin-feign服务,命令行执行命令:
-
cd /Users/zxj/Document/IDEA/hello-spring-cloud/hello-spring-cloud-web-admin-feign -
mvn clean package -
cd /Users/zxj/Document/IDEA/hello-spring-cloud/hello-spring-cloud-web-admin-feign/target -
java -jar hello-spring-cloud-web-admin-feign-1.0.0-SNAPSHOT.jar
可以看到运行日志中运行的端口号是8765; -
java -jar hello-spring-cloud-web-admin-feign-1.0.0-SNAPSHOT.jar --spring.profiles.active=prod:可以看到运行日志中运行的端口是8766; -
浏览器访问:
http://localhost:8766/hi?message=HelloFergn,页面输出Hi, your message is : HelloFergn , port : 8763;测试OK;
>> Spring Cloud 服务追踪 - ZipKin
~ Spring Cloud 服务链路追踪
ZipKin 简介
ZipKin 是一个开放源代码的分布式跟踪系统,由 Twitter 公司开源,它致力于收集服务的定时数据,以解决微服务架构中的延迟问题,包括数据的收集、存储、查找和展现;
每个服务向 ZipKin 报告计时数据,ZipKin 会根据调用关系通过 ZipKin UI 生成依赖关系图,显示了多少跟踪请求通过每个服务,该系统让开发者可通过一个 Web 前端轻松的收集和分析数据,例如用户每次请求服务的处理时间等,可方便的监测系统中存在的瓶颈;
服务追踪说明
微服务架构是通过业务来划分服务的,使用 REST 调用;对外暴露的一个接口,可能需要很多个服务协同才能完成这个接口功能,如果链路上任何一个服务出现问题或者网络超时,都会形成导致接口调用失败;随着业务的不断扩张,服务之间互相调用会越来越复杂;
接口调用失败会触发熔断器,但是熔断只是解决阻塞问题,服务之间的依赖关系长什么样还不知道,所以需要追踪服务的调用;
用户请求A服务,A服务通过RPC方式调用B服务,进行服务与服务之间的通信,B服务再返回数据给A服务,A服务再响应给用户,这就形成了一个链式调用;调用链也可能是ACD、ACE;随着服务的越来越多,对调用链的分析会越来越复杂,所以需要一个服务链路追踪组件来帮我们管理服务之间的调用关系;

创建 ZipKin 服务端
1、创建服务hello-spring-cloud-zipkin,创建pom.xml,托管到IDEA:
主要增加了 3 个依赖:io.zipkin.java:zipkin、io.zipkin.java:zipkin-server、io.zipkin.java:zipkin-autoconfigure-ui;
2、将这三个依赖托管都hello-spring-cloud-dependencies中,因为SpringBoot的超级pom没有处理这个依赖的版本,没有托管这三个依赖,所以需要手动托管到dependencies中;
在dependencies中添加:
	<properties>
        <zipkin.version>2.10.1zipkin.version>
    properties>
    <dependencyManagement>
        <dependencies>
            <dependency>
                <groupId>io.zipkin.javagroupId>
                <artifactId>zipkinartifactId>
                <version>${zipkin.version}}version>
            dependency>
            <dependency>
                <groupId>io.zipkin.javagroupId>
                <artifactId>zipkin-serverartifactId>
                <version>${zipkin.version}}version>
            dependency>
            <dependency>
                <groupId>io.zipkin.javagroupId>
                <artifactId>zipkin-autoconfigure-uiartifactId>
                <version>${zipkin.version}}version>
            dependency>
        dependencies>
    dependencyManagement>
3、创建目录:src/main/java、src/main/resources,右键:Mark Directory as --> Test Sources Root;
4、在src/main/resources下创建application.yml:
spring:
  application:
    name: hello-spring-cloud-zipkin
server:
  port: 9411  # Zipkin Server 的默认端口号;
eureka:
  client:
    serviceUrl:
      defaultZone: http://localhost:8761/eureka/
management: # 2.8版本不需要这段配置,2.10之后才有;
  metrics:
    web:
      server:
        auto-time-requests: false
5、创建入口类:
package com.zxj.hello.spring.cloud.zipkin;
@SpringBootApplication
@EnableZipkinServer  // 开启 Zipkin Server 功能
@EnableEurekaClient  // Eureka服务提供者
public class ZipKinApplication {
    public static void main(String[] args) {
        SpringApplication.run(ZipKinApplication.class, args);
    }
}
6、在所有需要被追踪的项目中增加依赖和配置: (除了hello-spring-cloud-dependencies项目,包括 Eureka Server)
<dependency>
    <groupId>org.springframework.cloudgroupId>
    <artifactId>spring-cloud-starter-zipkinartifactId>
dependency>
spring:
  zipkin:
    base-url: http://localhost:9411   #  Zipkin Server 的地址
7、启动服务:顺序为:
- 服务注册与发现Erueka -
EruekaApplication; - 分布式服务配置中心 -
ConfigApplication; - 服务追踪 -
ZipKinApplication; - 服务监管系统 -
AdminApplication; - 服务提供者 -
ServiceAdminApplication; - 服务消费者 -
WebAdminApplication; - 服务网关 -
ZuulApplication;
启动全部项目,打开浏览器访问:http://localhost:9411/ 会出现以下界面:

8、测试追踪效果:
浏览器访问:http://localhost:8769/api/b/hi?message=HelloZuul,然后多次刷新,再回到http://localhost:9411/刷新,可以看到追踪到的服务;

点击 Find a trace,可以看到具体服务相互调用的数据:

点击 Dependencies,可以发现服务的依赖关系:

术语解释
Span:基本工作单元,例如,在一个新建的 Span 中发送一个 RPC 等同于发送一个回应请求给 RPC,Span 通过一个 64 位 ID 唯一标识,Trace 以另一个 64 位 ID 表示;Trace:一系列 Spans 组成的一个树状结构,例如,如果你正在运行一个分布式大数据工程,你可能需要创建一个 Trace;Annotation:用来即使记录一个事件的存在,一些核心 Annotations 用来定义一个请求的开始和结束cs:Client Sent,客户端发起一个请求,这个 Annotation 描述了这个 Span 的开始sr:Server Received,服务端获得请求并准备开始处理它,如果将其 sr 减去 cs 时间戳便可得到网络延迟ss:Server Sent 表明请求处理的完成(当请求返回客户端),如果 ss 减去 sr 时间戳便可得到服务端需要的处理请求时间cr:Client Received 表明 Span 的结束,客户端成功接收到服务端的回复,如果 cr 减去 cs 时间戳便可得到客户端从服务端获取回复的所有所需时间
- 将 Span 和 Trace 在一个系统中使用 Zipkin 注解的过程图形化:

~ Spring Boot Admin 服务监控
ZipKin是状态追踪,Spring Boot Admin 是健康检查,状态收集;
随着开发周期的推移,项目会不断变大,切分出的服务也会越来越多,这时一个个的微服务构成了错综复杂的系统;对于各个微服务系统的健康状态、会话数量、并发数、服务资源、延迟等度量信息的收集就成为了一个挑战;Spring Boot Admin 应运而生,它正式基于这些需求开发出的一套功能强大的监控管理系统;
Spring Boot Admin 有两个角色组成,一个是 Spring Boot Admin Server,一个是 Spring Boot Admin Client;
Spring Boot Admin 服务端
1、创建服务hello-spring-cloud-admin,创建pom.xml:
主要增加了 2 个依赖:org.jolokia:jolokia-core、de.codecentric:spring-boot-admin-starter-server;
<dependency>
    <groupId>org.jolokiagroupId>
    <artifactId>jolokia-coreartifactId>
dependency>
<dependency>
    <groupId>de.codecentricgroupId>
    <artifactId>spring-boot-admin-starter-serverartifactId>
dependency>
2、将spring-boot-admin-starter-server依赖托管都hello-spring-cloud-dependencies中:
	<properties>
        <spring-boot-admin.version>2.0.1spring-boot-admin.version>
    properties>
    <dependencyManagement>
        <dependencies>
            <dependency>
                <groupId>de.codecentricgroupId>
                <artifactId>spring-boot-admin-starter-serverartifactId>
                <version>${spring-boot-admin.version}version>
            dependency>
        dependencies>
    dependencyManagement>
3、创建目录:src/main/java、src/main/resources,右键:Mark Directory as --> Test Sources Root;
4、在src/main/resources下创建application.yml:
spring:
  application:
    name: hello-spring-cloud-admin
  zipkin:
    base-url: http://localhost:9411
server:
  port: 8084
management:
  endpoint:
    health:
      show-details: always
  endpoints:
    web:
      exposure:
        # 注意:此处在视频里是 include: ["health", "info"] 但已无效了,请修改
        include: health,info
eureka:
  client:
    serviceUrl:
      defaultZone: http://localhost:8761/eureka/
5、创建入口类:
package com.zxj.hello.spring.cloud.admin;
@SpringBootApplication
@EnableEurekaClient
@EnableAdminServer   // 开启 Admin 功能
public class AdminApplication {
    public static void main(String[] args) {
        SpringApplication.run(AdminApplication.class, args);
    }
}
6、启动服务,浏览器访问:http://localhost:8084,会出现以下界面;
若启动服务报错,Maven clean一下即可;

Spring Boot Admin 客户端
1、在dependences的pom文件中添加依赖:
<dependency>
	<groupId>de.codecentricgroupId>
	<artifactId>spring-boot-admin-starter-clientartifactId>
	<version>${spring-boot-admin.version}version>
dependency>
2、在除了hello-spring-cloud-dependences、hello-spring-cloud-admin服务的其他每个服务的pom文件中添加依赖:
<dependency>
    <groupId>org.jolokiagroupId>
    <artifactId>jolokia-coreartifactId>
dependency>
<dependency>
    <groupId>de.codecentricgroupId>
    <artifactId>spring-boot-admin-starter-clientartifactId>
dependency>
在application.yml中添加配置,告诉项目服务的地址;
spring:
  boot:
    admin:
      client:
        url: http://localhost:8084
注意feign服务的配置在spring-cloud-config上,feign服务的配置文件不需要修改;
3、按顺序启动服务:
4、浏览器访问:http://localhost:8084,可以看到所有服务都已经上线,并被Spring Cloud Admin监管上了;
文章参考博客视频教程