Java业务开发常见错误100例笔记
一、多线程相关
1、ThreadLocal
ThreadLocal适用于变量在线程间隔离,而在方法或类间共享的场景
程序运行在Tomcat中,执行程序的线程是Tomcat的工作线程,而Tomcat的工作线程是基于线程池的。线程池会重用固定的几个线程,所以使用ThreadLocal来存放一些数据时,需要特别注意在代码运行完后,需要在代码的finally代码块中,显式清除ThreadLocal中的数据
2、ConcurrentHashMap
ConcurrentHashMap只能保证提供的原子性读写操作是线程安全的
- 使用了ConcurrentHashMap,不代表对它的多个操作之间的状态是一致的,如果需要确保需要手动加锁
- 诸如
size()、isEmpty()和containsValue()等聚合方法,在并发情况下可能会反映ConcurrentHashMap的中间状态。因此在并发情况下,这些方法的返回值只能用作参考,而不能用于流程控制 - 诸如
putAll()这样的聚合方法也不能确保原子性,在putAll()的过程中去获取数据可能会获取到部分数据
3、CopyOnWriteArrayList
CopyOnWriteArrayList虽然是一个线程安全的ArrayList,但因为其实现方式是,每次修改数据时都会复制一份数据出来,适用于读多写少或者说希望无锁读的场景。如果读写比例均衡或者有大量写操作的话,使用CopyOnWriteArrayList的性能会非常糟糕
二、Spring事务
1、@Transactional生效策略
- 除非特殊配置(比如使用AspectJ静态织入实现AOP),否则只有定义在public方法上的
@Transactional才能生效。原因是,Spring默认通过动态代理的方式实现AOP,对目标方法进行增强,private方法无法代理到,Spring自然也无法动态增强事务处理逻辑 - 必须通过代理过的类从外部调用目标方法才能生效
2、事务回滚
- 只有异常传播出了标记了
@Transactional注解的方法,事务才能回滚 - 默认情况下,出现
RuntimeException或Error的时候,Spring才会回滚事务
三、判等问题
- 对基本类型,比如int、long,进行判等,只能使用==,比较的是直接值。因为基本类型的值就是其数值
- 对引用类型,比如Integer、Long和String,进行判等,需要使用
equals()进行内容判等。因为引用类型的直接值是指针,使用==的话,比较的是指针,也就是两个对象在内存中的地址,即比较它们是不是同一个对象,而不是比较对象的内容
比较值的内容,除了基本类型只能使用==外,其他类型都需要使用equals()
1、Integer与int
        //案例一
        Integer a = 127; //Integer.valueOf(127)
        Integer b = 127; //Integer.valueOf(127)
        System.out.println("\nInteger a = 127;\n" + "Integer b = 127;\n" + "a == b ? " + (a == b)); //true

        //案例二
        Integer c = 128; //Integer.valueOf(128)
        Integer d = 128; //Integer.valueOf(128)
        System.out.println("\nInteger c = 128;\n" + "Integer d = 128;\n" + "c == d ? " + (c == d)); //false

        //案例三
        Integer e = 127; //Integer.valueOf(127)
        Integer f = new Integer(127); //new instance
        System.out.println("\nInteger e = 127;\n" + "Integer f = new Integer(127);\n" + "e == f ? " + (e == f)); //false

        //案例四
        Integer g = new Integer(127); //new instance
        Integer h = new Integer(127); //new instance
        System.out.println("\nInteger g = new Integer(127);\n" + "Integer h = new Integer(127);\n" + "g == h ? " + (g == h)); //false

        //案例五
        Integer i = 128; //unbox
        int j = 128;
        System.out.println("\nInteger i = 128;\n" + "int j = 128;\n" + "i == j ? " + (i == j)); //true
案例一,编译器会把Integer a = 127转换为Integer.valueOf(127),转换在内部其实做了缓存,使得两个Integer指向同一个对象,所以==返回true,默认会缓存[-128, 127]的数值,所以案例二==返回false
    public static Integer valueOf(int i) {

        if (i >= IntegerCache.low && i <= IntegerCache.high)
            return IntegerCache.cache[i + (-IntegerCache.low)];
        return new Integer(i);
    }

    private static class IntegerCache {

        static final int low = -128;
        static final int high;
        static final Integer cache[];

        static {

            // high value may be configured by property
            int h = 127;
            String integerCacheHighPropValue =
                sun.misc.VM.getSavedProperty("java.lang.Integer.IntegerCache.high");
            if (integerCacheHighPropValue != null) {

                try {

                    int i = parseInt(integerCacheHighPropValue);
                    i = Math.max(i, 127);
                    // Maximum array size is Integer.MAX_VALUE
                    h = Math.min(i, Integer.MAX_VALUE - (-low) -1);
                } catch( NumberFormatException nfe) {

                    // If the property cannot be parsed into an int, ignore it.
                }
            }
            high = h;

            cache = new Integer[(high - low) + 1];
            int j = low;
            for(int k = 0; k < cache.length; k++)
                cache[k] = new Integer(j++);

            // range [-128, 127] must be interned (JLS7 5.1.7)
            assert IntegerCache.high >= 127;
        }

        private IntegerCache() {
     }
    }
案例三和案例四中,new出来的Integer始终是不走缓存的新对象。比较两个新对象,或者比较一个新对象和一个来自缓存的对象,结果肯定不是相同的对象,因此返回false
案例五中,把装箱的Integer和基本类型int比较,前者会先拆箱再比较,比较的肯定是数值而不是引用,因此返回true
2、String
        String a = "1";
        String b = "1";
        System.out.println("\nString a = \"1\";\n" + "String b = \"1\";\n" + "a == b ? " + (a == b)); //true

        String c = new String("2");
        String d = new String("2");
        System.out.println("\nString c = new String(\"2\");\n" + "String d = new String(\"2\");\n" + "c == d ? " + (c == d)); //false

        String e = new String("3").intern();
        String f = new String("3").intern();
        System.out.println("\nString e = new String(\"3\").intern();\n" + "String f = new String(\"3\").intern();\n" + "e == f ? " + (e == f)); //true

        String g = new String("4");
        String h = new String("4");
        System.out.println("\nString g = new String(\"4\");\n" + "String h = new String(\"4\");\n" + "g == h ? " + g.equals(h)); //true
Java的字符串常量池机制设计初衷是节省内存。当代码中出现双引号形式创建字符串对象时,JVM会先对这个字符串进行检查,如果字符串常量池中存在相同内容的字符串对象的引用,则将这个引用返回;否则,创建新的字符串对象,然后将这个引用放入字符串常量池,并返回该引用。这种机制,就是字符串驻留或池化
案例一返回 true,因为Java的字符串驻留机制,直接使用双引号声明出来的两个String对象指向常量池中的相同字符串
案例二,new出来的两个String是不同对象,引用当然不同,所以得到false的结果
案例三,使用String提供的intern()方法也会走常量池机制,所以同样能得到true
案例四,通过equals()对值内容判等,是正确的处理方式,当然会得到true
虽然使用new声明的字符串调用intern()方法,也可以让字符串进行驻留,但在业务代码中滥用intern(),可能会产生性能问题
3、实现equals方法
对于自定义类型,如果不重写equals()的话,默认就是使用Object基类的按引用的比较方式
String的equals()的实现:
    public boolean equals(Object anObject) {

        if (this == anObject) {

            return true;
        }
        if (anObject instanceof String) {

            String anotherString = (String)anObject;
            int n = value.length;
            if (n == anotherString.value.length) {

                char v1[] = value;
                char v2[] = anotherString.value;
                int i = 0;
                while (n-- != 0) {

                    if (v1[i] != v2[i])
                        return false;
                    i++;
                }
                return true;
            }
        }
        return false;
    }
重写equals()的步骤:
- 考虑到性能,可以先进行指针判等,如果对象是同一个那么直接返回true
- 需要对另一方进行判空,空对象和自身进行比较,结果一定是fasle
- 需要判断两个对象的类型,如果类型都不同,那么直接返回false
- 确保类型相同的情况下再进行类型强制转换,然后逐一判断所有字段
重写equals方法时总要重写hashCode
public class Point {

    private int x;
    private int y;

    public Point(int x, int y) {

        this.x = x;
        this.y = y;
    }

    @Override
    public boolean equals(Object o) {

        if (this == o) return true;
        if (o == null || getClass() != o.getClass()) return false;
        Point that = (Point) o;
        return x == that.x && y == that.y;
    }

    @Override
    public int hashCode() {

        return Objects.hash(x, y);
    }

}
4、Lombok使用
Lombok的@Data注解会帮我们实现equals()和hashcode()方法
@Data
public class Person {

    private String name; //姓名
    private String identity; //身份证

    public Person(String name, String identity) {

        this.name = name;
        this.identity = identity;
    }
}
对于身份证相同、姓名相同的两个Person对象:
        Person person1 = new Person("xiaoming", "001");
        Person person2 = new Person("xiaoming", "001");
        System.out.println("person1.equals(person2) ? " + person1.equals(person2)); //true
如果只要身份证一致就认为是同一个人的话,可以使用@EqualsAndHashCode.Exclude注解来修饰name字段,从equals()和hashCode()的实现中排除name字段:
@Data
public class Person {

    @EqualsAndHashCode.Exclude
    private String name; //姓名

    private String identity; //身份证

    public Person(String name, String identity) {

        this.name = name;
        this.identity = identity;
    }
}
        Person person1 = new Person("xiaoming", "001");
        Person person2 = new Person("xiaohong", "001");
        System.out.println("person1.equals(person2) ? " + person1.equals(person2)); //true
Employee类继承Person,并新定义一个公司属性
@Data
public class Employee extends Person {

    private String company;

    public Employee(String name, String identity, String company) {

        super(name, identity);
        this.company = company;
    }
}
声明两个Employee实例,它们具有相同的公司名称,但姓名和身份证均不同,结果返回为true
        Employee employee1 = new Employee("zhuye", "001", "bkjk.com");
        Employee employee2 = new Employee("Joseph", "002", "bkjk.com");
        System.out.println("employee1.equals(employee2) ? " + employee1.equals(employee2)); //true
@EqualsAndHashCode默认实现没有使用父类属性,可以手动设置callSuper开关为true
@Data
@EqualsAndHashCode(callSuper = true)
public class Employee extends Person {
四、数值计算
1、BigDecimal使用
小数点的加减乘除都使用BigDecimal来解决,因为double或者float会丢失精度
- 使用BigDecimal表示和计算浮点数,且务必使用字符串的构造方法来初始化BigDecimal
- 如果一定要用Double来初始化BigDecimal的话,可以使用
BigDecimal.valueOf()方法
2、丢失精度原因
        double a = 0.3;
        double b = 0.1;
        System.out.println(a - b); //0.19999999999999998
        BigDecimal bigDecimal = new BigDecimal(0.3);
        System.out.println(bigDecimal); //0.299999999999999988897769753748434595763683319091796875
对于十进制的小数转换成二进制采用乘2取整法进行计算,取掉整数部分后,剩下的小数继续乘以2,直到小数部分全为0
将0.3转成二进制的过程:
0.3 * 2 = 0.6 => .0 (.6)取0剩0.6
0.6 * 2 = 1.2 => .01 (.2)取1剩0.2
0.2 * 2 = 0.4 => .010 (.4)取0剩0.4
0.4 * 2 = 0.8 => .0100 (.8) 取0剩0.8
0.8 * 2 = 1.6 => .01001 (.6)取1剩0.6
.............
由于double不能精确表示为0.3,因此用double构造函数传递的值不完全等于0.3。使用BigDecimal时,必须使用String字符串参数构造方法来创建它。BigDecimal是不可变的,在进行每一步运算时,都会产生一个新的对象。double的问题是从小数点转换到二进制丢失精度,二进制丢失精度。而BigDecimal在处理的时候把十进制小数扩大N倍让它在整数上进行计算,并保留相应的精度信息
3、equals做判等
System.out.println(new BigDecimal("1.0").equals(new BigDecimal("1"))); //false
BigDecimal的equals()方法比较的是BigDecimal的value和scale,1.0的scale是1,1的scale是0,所以结果是false
如果希望只比较BigDecimal的value,可以使用compareTo()方法
System.out.println(new BigDecimal("1.0").compareTo(new BigDecimal("1")) == 0); //true
BigDecimal的equals()和hashCode()方法会同时考虑value和scale,如果结合HashSet或HashMap使用的话就可能会出现麻烦。比如,把值为1.0的BigDecimal加入HashSet,然后判断其是否存在值为1的BigDecimal,得到的结果是false:
        Set<BigDecimal> hashSet1 = new HashSet<>();
        hashSet1.add(new BigDecimal("1.0"));
        System.out.println(hashSet1.contains(new BigDecimal("1"))); //false
解决这个问题的办法有两个:
1)使用TreeSet替换HashSet。TreeSet不使用hashCode()方法,也不使用equals()比较元素,而是使用compareTo()方法,所以不会有问题
        Set<BigDecimal> treeSet = new TreeSet<>();
        treeSet.add(new BigDecimal("1.0"));
        System.out.println(treeSet.contains(new BigDecimal("1"))); //true
2)把BigDecimal存入HashSet或HashMap前,先使用stripTrailingZeros()方法去掉尾部的零,比较的时候也去掉尾部的0,确保value相同的BigDecimal,scale也是一致的
        Set<BigDecimal> hashSet2 = new HashSet<>();
        hashSet2.add(new BigDecimal("1.0").stripTrailingZeros());
        System.out.println(hashSet2.contains(new BigDecimal("1.000").stripTrailingZeros())); //true
五、Arrays.asList把数据转换为List
1、不能直接使用Arrays.asList来转换基本类型数组
        int[] arr = {
     1, 2, 3};
        List<int[]> list = Arrays.asList(arr);
        System.out.println(list.size()); //1
只能是把int装箱为Integer,不可能把int数组装箱为Integer数组。Arrays.asList()方法传入的是一个泛型T类型可变参数,最终int数组整体作为了一个对象成为了泛型类型T
2、Arrays.asList返回的List不支持增删操作
Arrays.asList()返回的List并不是java.util.ArrayList,而是Arrays的内部类ArrayList。ArrayList内部类继承自AbstractList类,并没有覆写父类的add()方法,而父类中add()方法的实现,就是抛出UnsupportedOperationException
    public static <T> List<T> asList(T... a) {

        return new ArrayList<>(a);
    }

    private static class ArrayList<E> extends AbstractList<E>
        implements RandomAccess, java.io.Serializable
    {

        private static final long serialVersionUID = -2764017481108945198L;
        private final E[] a;

        ArrayList(E[] array) {

            a = Objects.requireNonNull(array);
        }

        @Override
        public E get(int index) {

            return a[index];
        }

        @Override
        public E set(int index, E element) {

            E oldValue = a[index];
            a[index] = element;
            return oldValue;
        }

        //...
    }
3、对原始数组的修改会影响到通过Arrays.asList获得的那个List
ArrayList的实现是直接使用了原始的数组。所以,把通过Arrays.asList()获得的List交给其他方法处理,很容易因为共享了数组,相互修改产生Bug
修复方式比较简单,重新new一个ArrayList初始化Arrays.asList()返回的List即可
        String[] arr = {
     "1", "2", "3"};
        List list = new ArrayList(Arrays.asList(arr));
        arr[1] = "4";
        list.add("5");
六、Map是否支持空值
| key为null | value为null | |
|---|---|---|
| HashMap | 支持 | 支持 |
| ConcurrentHashMap | 不支持 | 不支持 |
| Hashtable | 不支持 | 不支持 |
| TreeMap | 不支持 | 支持 |
1、ConcurrentHashMap和Hashtable不允许空值的原因
主要是因为会产生歧义,如果支持空值,在使用map.get(key)时,返回值为null,可能有两种情况:该key映射的值为null,或者该key未映射到。如果是非并发映射中,可以使用map.contains(key)进行检查,但是在并发的情况下,两次调用之间的映射可能已经更改了
2、TreeMap对空值的支持
TreeMap线程不安全,但是因为需要排序,进行key的compareTo()方法,所以key是不能null值,value是可以的
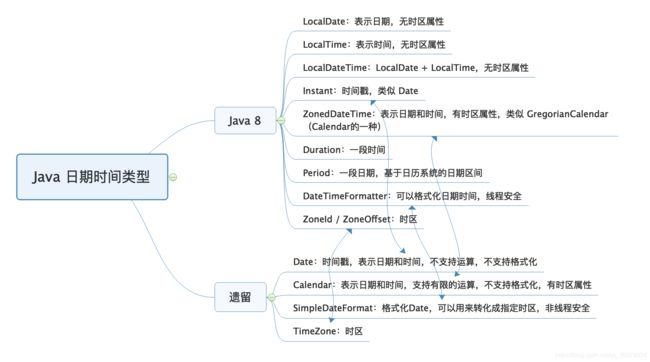
七、日期类
1、初始化日期时间
Date的构造函数中,年应该是和1900的差值,月应该是从0到11而不是从1到12
        Date date = new Date(2020 - 1900, 11, 31, 10, 28, 30);
        SimpleDateFormat formatter = new SimpleDateFormat("yyyy-MM-dd HH:mm:ss");
        //2020-12-31 10:28:30
        System.out.println(formatter.format(date));
Calendar的构造函数中,初始化时年参数直接使用当前年即可,月还是从0到11而不是从1到12
        SimpleDateFormat formatter = new SimpleDateFormat("yyyy-MM-dd HH:mm:ss");
        Calendar calendar = Calendar.getInstance();
        calendar.set(2020, 11, 31, 10, 28, 30);
        //2020-12-31 10:28:30(当前时区)
        System.out.println(formatter.format(calendar.getTime()));
        Calendar calendar2 = Calendar.getInstance(TimeZone.getTimeZone("America/New_York"));
        calendar2.set(2020, Calendar.DECEMBER, 31, 10, 28, 30);
        //2020-12-31 23:28:30(纽约时区)
        System.out.println(formatter.format(calendar2.getTime()));
2、时区问题
Date没有时区的概念,保存的是一个时间戳,代表的是从1970年1月1日0点(Epoch时间)到现在的毫秒数
        System.out.println(new Date(0));
        System.out.println(TimeZone.getDefault().getID());
得到的是1970年1月1日8点。因为我电脑当前的时区是中国上海,相比UTC时差+8小时:
Thu Jan 01 08:00:00 CST 1970
Asia/Shanghai
1)、字符串转Date
对于同一个时间表示,比如2020-01-02 22:00:00,不同时区的人转换成Date会得到不同的时间(时间戳)
        String dateStr = "2020-01-02 22:00:00";
        SimpleDateFormat formatter = new SimpleDateFormat("yyyy-MM-dd HH:mm:ss");
        //默认时区解析时间表示
        Date date1 = formatter.parse(dateStr);
        System.out.println(date1);
        //纽约时区解析时间表示
        formatter.setTimeZone(TimeZone.getTimeZone("America/New_York"));
        Date date2 = formatter.parse(dateStr);
        System.out.println(date2);
把2020-01-02 22:00:00这样的时间表示,对于当前的上海时区和纽约时区,转化为UTC时间戳是不同的时间:
Thu Jan 02 22:00:00 CST 2020
Fri Jan 03 11:00:00 CST 2020
对于同一个本地时间的表示,不同时区的人解析得到的UTC时间一定是不同的,反过来不同的本地时间可能对应同一个UTC
2)、Date转字符串
同一个Date,在不同的时区下格式化得到不同的时间表示。比如,在我的当前时区和纽约时区格式化2020-01-02 22:00:00
        String stringDate = "2020-01-02 22:00:00";
        SimpleDateFormat inputFormat = new SimpleDateFormat("yyyy-MM-dd HH:mm:ss");
        //同一Date
        Date date = inputFormat.parse(stringDate);
        //默认时区格式化输出
        System.out.println(new SimpleDateFormat("[yyyy-MM-dd HH:mm:ss Z]").format(date));
        //纽约时区格式化输出
        TimeZone.setDefault(TimeZone.getTimeZone("America/New_York"));
        System.out.println(new SimpleDateFormat("[yyyy-MM-dd HH:mm:ss Z]").format(date));
我当前时区的Offset(时差)是+8小时,对于-5小时的纽约,晚上10点对应早上9点:
[2020-01-02 22:00:00 +0800]
[2020-01-02 09:00:00 -0500]
3)、小结
要正确处理时区,在于存进去和读出来两方面:存的时候,需要使用正确的当前时区来保存,这样 UTC 时间才会正确;读的时候,也只有正确设置本地时区,才能把 UTC 时间转换为正确的当地时间
八、反射、注解和泛型
1、反射调用方法不是以传参决定重载
反射的功能包括,在运行时动态获取类和类成员定义,以及动态读取属性、调用方法
有两个叫age的方法,入参分别是基本类型int和包装类型Integer
public class ReflectionIssueApplication {

    public void age(int age) {

        System.out.println("int age = " + age);
    }

    public void age(Integer age) {

        System.out.println("Integer age = " + age);
    }
}
使用反射时的误区是,认为反射调用方法还是根据入参确定方法重载
        Class<ReflectionIssueApplication> clazz = ReflectionIssueApplication.class;
        clazz.getDeclaredMethod("age", Integer.TYPE)
                .invoke(clazz.newInstance(), Integer.valueOf("36"));
执行结果:
int age = 36
要通过反射进行方法调用,第一步就是通过方法签名来确定方法。具体到这个案例,getDeclaredMethod()传入的参数类型Integer.TYPE代表的是int,所以实际执行方法时无论传的是包装类型还是基本类型,都会调用int入参的age方法
把Integer.TYPE改为Integer.class,执行的参数类型就是包装类型的Integer。这时,无论传入的是Integer.valueOf(“36”)还是基本类型的36
反射调用方法,是以反射获取方法时传入的方法名称和参数类型来确定调用方法的
2、泛型经过类型擦除多出桥接方法的坑
父类是这样的:有一个泛型占位符T;有一个AtomicInteger计数器,用来记录value字段更新的次数,其中value字段是泛型T类型的,setValue()方法每次为value赋值时对计数器进行+1操作
public class Parent<T> {

    //用于记录value更新的次数,模拟日志记录的逻辑
    AtomicInteger updateCount = new AtomicInteger();
    private T value;

    //重写toString,输出值和值更新次数
    @Override
    public String toString() {

        return String.format("value: %s updateCount: %d", value, updateCount.get());
    }

    //设置值
    public void setValue(T value) {

        System.out.println("Parent.setValue called");
        this.value = value;
        updateCount.incrementAndGet();
    }
}
子类Child1的实现是这样的:继承父类,但没有提供父类泛型参数;定义了一个参数为String的setValue()方法,通过super.setValue调用父类方法实现日志记录。开发人员这么设计是希望覆盖父类的setValue()实现
public class Child1 extends Parent {

    public void setValue(String value) {

        System.out.println("Child1.setValue called");
        super.setValue(value);
    }
}
子类方法的调用是通过反射进行的。实例化Child1类型后,通过getClass().getMethods()方法获得所有的方法;然后按照方法名过滤出setValue()方法进行调用,传入字符串test作为参数
        Child1 child1 = new Child1();
        Arrays.stream(child1.getClass().getMethods())
                .filter(method -> method.getName().equals("setValue"))
                .forEach(method -> {

                    try {

                        method.invoke(child1, "test");
                    } catch (Exception e) {

                        e.printStackTrace();
                    }
                });
        System.out.println(child1.toString());
执行结果:
Child1.setValue called
Parent.setValue called
Parent.setValue called
value: test updateCount: 2
父类的setValue()方法被调用了两次,是因为getClass().getMethods()方法找到了两个名为setValue的方法,分别是父类和子类的setValue()方法
这个案例中,子类方法重写父类方法失败的原因,包括两方面:
- 子类没有指定String泛型参数,父类的泛型方法
setValue(T value)在泛型擦除后是setValue(Object value),子类中入参是String的setValue()方法被当作了新方法 - 子类的
setValue()方法没有增加@Override注解,因此编译器没能检测到重写失败的问题。这就说明,重写子类方法时,标记@Override是一个好习惯
public class Child2 extends Parent<String> {

    @Override
    public void setValue(String value) {

        System.out.println("Child2.setValue called");
        super.setValue(value);
    }
}
修复后,还是出现了重复记录的问题:
Child2.setValue called
Parent.setValue called
Child2.setValue called
Parent.setValue called
value: test updateCount: 2
通过调试发现,Child2类其实有2个setValue()方法,入参分别是String和Object

Java 的泛型类型在编译后擦除为 Object。虽然子类指定了父类泛型 T 类型是 String,但编译后 T 会被擦除成为 Object,所以父类 setValue 方法的入参是 Object,value 也是 Object。如果子类 Child2 的 setValue 方法要覆盖父类的 setValue 方法,那入参也必须是 Object。所以,编译器会为我们生成一个所谓的 bridge 桥接方法,实际上是入参为 Object 的 setValue 方法在内部调用了入参为 String 的 setValue 方法,也就是代码里实现的那个方法
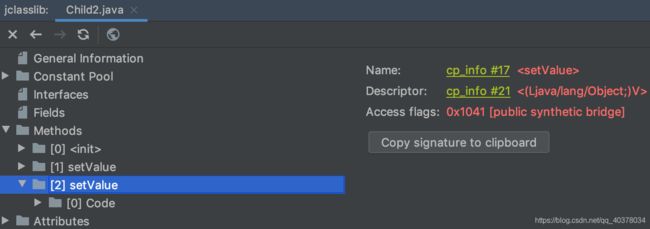
使用jclasslib工具打开Child2类,同样可以看到入参为Object的桥接方法上标记了public + synthetic + bridge三个属性。synthetic代表由编译器生成的不可见代码,bridge代表这是泛型类型擦除后生成的桥接代码
通过getDeclaredMethods()方法获取到所有方法后,必须同时根据方法名setValue和非isBridge两个条件过滤,才能实现唯一过滤
        Child2 child2 = new Child2();
        Arrays.stream(child2.getClass().getMethods())
                .filter(method -> method.getName().equals("setValue") && !method.isBridge())
                .forEach(method -> {

                    try {

                        method.invoke(child2, "test");
                    } catch (Exception e) {

                        e.printStackTrace();
                    }
                });
        System.out.println(child2.toString());
3、注解可以继承吗?
自定义的注解标注了@Inherited,子类可以自动继承父类的该注解