Java权限设计与控制
1.场景还原
近期,由于项目中要引用权限模块,于是笔者趁着空暇时间写了一个权限控制的小Demo,现在跟大伙讲讲权限的原理。
2.权限数据库设计
user:用户表
user_role:用户角色表(用户跟角色多对多关系 )
role:角色表
role_permission:角色权限表(角色跟权限多对多关系)
permisssion:权限表
3.权限需求设计
该工程实现的需求:
1.通过用户id得到该用户的所有角色集合;
2.通过用户的角色得到该用户的所有权限;
3.通过角色id对该用户对应的角色权限进行增删操作;
4.对某用户拥有权限下的所有前端操作进行放行访问,反之拦截;
5.对某用户的角色类型进行判断
6.用户角色的赋予
7.用户角色的删除
4.准备工作
① springboot导入velocity模板
  org.springframework.boot
  spring-boot-starter-velocity
②配置velocity自动识别html
spring.velocity.suffix=.html这样,springboot就会自动在src/main/resources/templates中寻找.html的文件;
③权限控制拦截器
public class PermissionInterceptor extends HandlerInterceptorAdapter {
    @Override
    public boolean preHandle(HttpServletRequest request, HttpServletResponse response, Object handler) throws Exception {
        //controller访问的相对路径
        String path=request.getServletPath();
        //取出session中的permission
        Set permissionList = (Set) request.getSession().getAttribute(SESSION_PERMISSION);
        if("/page/selectOne".equals(path)){
            if(permissionList.contains("user.select")){
                return true;
            }else{
                response.sendRedirect("error");
                return false;
            }

        }else if("/page/addOne".equals(path)){
            if(permissionList.contains("user.add")){
                return true;
            }else{
                response.sendRedirect("error");
                return false;
            }
        }else if("/page/updateOne".equals(path)){
            if(permissionList.contains("user.update")){
                return true;
            }else{
                response.sendRedirect("error");
                return false;
            }
        }else if("/page/deleteOne".equals(path)){
            if(permissionList.contains("user.delete")){
                return true;
            }else{
                response.sendRedirect("error");
                return false;
            }
        }else{
            return  true;
        }

    }
}
④注册该拦截器,使工程能够识别
@Configuration
public class CustomWebMvcConfigurerAdapter extends WebMvcConfigurerAdapter {
    @Override
    public void addInterceptors(InterceptorRegistry registry) {
        //拦截所有的controller
        registry.addInterceptor(new LoginInterceptor()).addPathPatterns("/**");
        registry.addInterceptor(new PermissionInterceptor()).addPathPatterns("/page/**");

    }
}
对page下的所有资源进行拦截,符合条件的放行,反之拦截抛出异常;
⑤前端通过控制相应的pageController进行页面跳转
/**
 * Created by zhangxing on 2017/6/13.
 */
@Controller
@CrossOrigin
public class PageController {

    @RequestMapping("/login")
    public String login(){
        return "hello";
    }

    @RequestMapping("/success")
    public String success(){
        return "first";
    }


    @RequestMapping("/quit")
    public String quit(){
        return "quit";
    }

    /**
     * 增加用户
     */
    @RequestMapping("/page/addOne")
    public String addOne(){
        return "add";
    }


    /**
     * 删除用户
     */
    @RequestMapping("/page/deleteOne")
    public String deleteOne(){
        return "delete";
    }

    /**
     * 查询用户
     */
    @RequestMapping("/page/selectOne")
    public String selectOne(){
        return "select";
    }


    /**
     * 查询用户
     */
    @RequestMapping("/page/updateOne")
    public String updateOne(){
        return "update";
    }

    /**
     * 用户注册
     */
    @RequestMapping("/page/submit")
    public String submit(){
        return "submit";
    }

    /**
     * 查询用户
     */
    @RequestMapping("/page/change")
    public String addPermission(){
        return "change";
    }

    /**
     * 更新权限
     */
    @RequestMapping("/page/flushPermission")
    public String flushPermission(){
        return "flush";
    }

    /**
     * 得到角色列表
     */
    @RequestMapping("/page/getRole")
    public String getRole(){
        return "flushRole";
    }
}window.location.href ="flushPermission";5.具体实施步骤
①通过用户id得到该用户的所有角色集合
后台代码:
@GetMapping(value = "/getRoleId")
public Map getRoleId(Integer uid){
    List rid = userService.getRoleId(uid);
    Map map = new HashMap();
    map.put("status",true);
    map.put("roleId",rid);
    return map;
}
②通过用户的角色得到该用户的所有权限
@GetMapping(value = "/getPermissionByRid")
public Map getPermissionByRid(Integer rid){
    Set permission =  userService.getUserPermissionByRid(rid);

    Map map = new HashMap();
    map.put("newPermission",permission);
    map.put("change",true);
    return map;
}
登录成功后,对用户的角色进行遍历,获取该用户下的所有角色的权限集合
登录代码:
@GetMapping(value = "/login")
public Map getLogin(String loginName,String password){
    String zhangxing = Token.genetateToken();
    session.setAttribute(SESSION_TOKEN,zhangxing);
    //设置session的保质期为10s
    //session.setMaxInactiveInterval(10);
    //根据userId请求权限集合,将权限集合存入session
    int uid = userService.getUid(loginName);
    Set permission =  userService.getUserAuth(uid);
    if(permission != null){
        session.setAttribute(SESSION_PERMISSION,permission);

    }
    List rid = userService.getRoleId(uid);
    boolean login = false;
    String pwd = loginService.getPassword(loginName);
    Map map = new HashMap();
    if(pwd.equals(password)){
        login = true;
    }
    map.put("uid",uid);
    map.put("login",login);
    map.put("token",zhangxing);
    map.put("roleId",rid);
    map.put("permission",permission);
    return map;
}
前端代码:
function getlogin(){

        $.ajax({
        type: "get",
        url: "http://localhost:8089/user/login",
        data:{
        "loginName":$("#username").val(),
        "password":$("#pwd").val()
        },
        xhrFields:{withCredentials:true},
        beforeSend: function(XMLHttpRequest){
        },
        //请求成功回调
        success: function(data, textStatus){

              if(data.login){
                 alert(data.roleId);
                  localStorage.setItem("token",data.token);
                  localStorage.setItem("roleId",JSON.stringify(data.roleId));
                  localStorage.setItem("uid",data.uid);

                  localStorage.setItem("data",JSON.stringify(data));
                  console.log(localStorage.getItem("data"));
                  window.location.href ="success";

              }

        },
        complete: function(XMLHttpRequest, textStatus){

        },
        error: function(){
            alert("请求网络失败!。。。。。。");
        }
    });
}
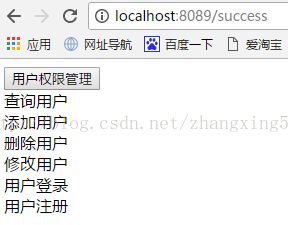
登录成功进入首页
Title
加载该界面就开始通过用户的权限集合对权限做隐藏或显现处理
 function check(){
        var data = localStorage.getItem("data");
        var arr = JSON.parse(data).permission;
        console.log(arr);

        if(contains(arr, "user.add")){
            document.getElementById("add").style.display="block";
        }
        if(contains(arr,"user.delete")){
            document.getElementById("delete").style.display="block";
        }
        if(contains(arr,"user.update")){
            document.getElementById("update").style.display="block";
        }
        if(contains(arr,"user.select")){
            document.getElementById("select").style.display="block";
        }
        if(contains(arr,"user.login")){
            document.getElementById("login").style.display="block";
        }
        if(contains(arr,"user.submit")){
            document.getElementById("submit").style.display="block";
        }
    }
③对某用户拥有权限下的所有前端操作进行放行访问,反之拦截
该需求代码在准备工作已陈列,此处省略!
④通过角色id对该用户对应的角色权限进行增删操作
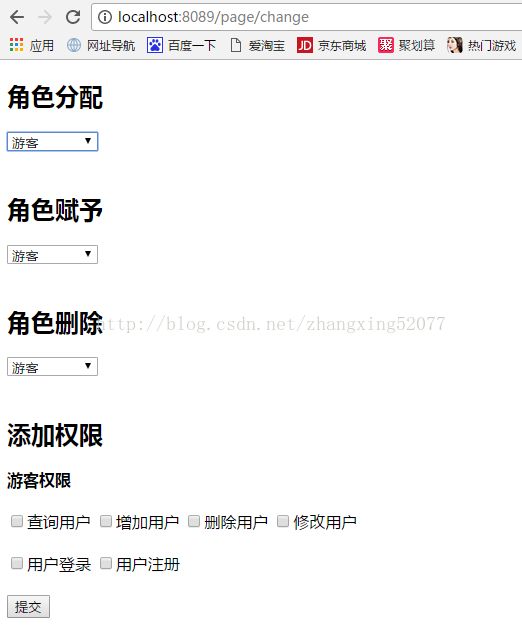
效果图:
点击角色分配,其中的角色是通过后台得到的,前端代码如下
/**
 * 得到角色数组
 */
function getRoleArray() {

        if(contains(roleArray,1)){
           document.getElementById("r1").style.display="block";
            document.getElementById("super").style.display="block";
        }

        if(contains(roleArray,2)){
            document.getElementById("r2").style.display="block";
            document.getElementById("ad").style.display="block";
        }

        if(contains(roleArray,3)){
            document.getElementById("r3").style.display="block";
            document.getElementById("tu").style.display="block";
        }


}
拥有该角色就显示,没有就隐藏,随机点击一项,然后勾选对应角色的权限
点击提交
这样,就为游客赋予了所有的权限了,同样地,删除权限也是相同的道理。
⑥用户角色的赋予
前端选择待添加角色代码:
/**
 * 选择待添加角色
 */
function selectRole() {
    var role = $("#roleSelecte").val();
    var rid;
   alert(roleArray+","+role);

    if("超级管理员" == role){

        rid = 1;
        if(contains(roleArray,1)){
            alert("该用户已拥有此权限")
        }else{
            addRole(rid);
        }
    }else if("管理员" == role){
        rid = 2;
        if(contains(roleArray,2)){
            alert("该用户已拥有此权限")
        }else{
            addRole(rid);
        }
    }else{
        rid = 3;
        if(contains(roleArray,3)){
            alert("该用户已拥有此权限")
        }else{
            addRole(rid);
        }

    }
}
添加角色代码
function addRole(rid) {
    $.ajax({
        type: "get",
        url: "http://localhost:8089/user/addRole",
        data:{
            "uid":uid,
            "rid":rid
        },
        xhrFields:{withCredentials:true},
        beforeSend: function(XMLHttpRequest){
        },
        //请求成功回调
        success: function(data, textStatus){
            if(data.isAdd){
          window.location.href="getRole"
          // alert("添加角色成功!")

            }

        },
        complete: function(XMLHttpRequest, textStatus){

        },
        error: function(){
            alert("请求网络失败!。。。。。。");
        }
    });
}
⑦用户角色的删除
前端选择待删除角色代码:
function SelectDelRole() {
    var role = $("#roleDelete").val();
    var rid;
    alert(roleArray+","+role);

    if("超级管理员" == role){

        rid = 1;
        if(contains(roleArray,1)){
            deleteRole(rid);
        }else{
            alert("该用户无此权限");
        }
    }else if("管理员" == role){
        rid = 2;
        if(contains(roleArray,2)){
            deleteRole(rid);

        }else{
            alert("该用户无此权限");
        }
    }else{
        rid = 3;
        if(contains(roleArray,3)){
            deleteRole(rid);

        }else{
            alert("该用户无此权限");
        }

    }
}
删除角色代码:
function deleteRole(rid) {
    $.ajax({
        type: "get",
        url: "http://localhost:8089/user/deleteRole",
        data:{
            "uid":uid,
            "rid":rid
        },
        xhrFields:{withCredentials:true},
        beforeSend: function(XMLHttpRequest){
        },
        //请求成功回调
        success: function(data, textStatus){
            if(data.isDelete){
                window.location.href="getRole"
               // alert("角色删除成功!")

            }

        },
        complete: function(XMLHttpRequest, textStatus){

        },
        error: function(){
            alert("请求网络失败!。。。。。。");
        }
    });
}
无论添加或者删除角色,都对角色进行刷新操作
var uid = localStorage.getItem("uid");
function flushRole() {
    $.ajax({
        type: "get",
        url: "http://localhost:8089/user/getRoleId",
        data:{
            "uid":uid
        },
        xhrFields:{withCredentials:true},
        beforeSend: function(XMLHttpRequest){
        },
        //请求成功回调
        success: function(data, textStatus){
            if(data.status){
                localStorage.setItem("roleId",JSON.stringify(data.roleId));
               window.location.href = "change";

            }

        },
        complete: function(XMLHttpRequest, textStatus){

        },
        error: function(){
            alert("请求网络失败!。。。。。。");
        }
    });
}
好了,权限就讲到这了;我是张星,如果后期有更多需求,请私信我;欢迎大家加入博主技术交流群,群号:313145288


