Kubernetes&Database-k8s中helm方式安装postgresql及pgadmin
Kubernetes&Database-k8s中helm方式安装postgresql及pgadmin
-
- 安装 helm
- 安装postgresql
- 安装pgadmin
安装 helm
这里使用脚本的方式安装
#curl https://raw.githubusercontent.com/helm/helm/master/scripts/get > get_helm.sh
  % Total    % Received % Xferd  Average Speed   Time    Time     Time  Current
                                 Dload  Upload   Total   Spent    Left  Speed
100  7160  100  7160    0     0   8035      0 --:--:-- --:--:-- --:--:--  8026

#chmod 700 get_helm.sh
#./get_helm.sh
Downloading https://get.helm.sh/helm-v2.16.10-darwin-amd64.tar.gz
Preparing to install helm and tiller into /usr/local/bin
Password:
helm installed into /usr/local/bin/helm
tiller installed into /usr/local/bin/tiller
Run 'helm init' to configure helm.
Tiller服务器运行在Kubernetes集群中,它会处理Helm客户端的请求,与Kubernetes API Server交互。
安装tiller服务:
#helm init --upgrade --tiller-image registry.cn-hangzhou.aliyuncs.com/google_containers/tiller:v2.16.10 --stable-repo-url https://kubernetes.oss-cn-hangzhou.aliyuncs.com/charts
Creating /Users/bytedance/.helm
Creating /Users/bytedance/.helm/repository
Creating /Users/bytedance/.helm/repository/cache
Creating /Users/bytedance/.helm/repository/local
Creating /Users/bytedance/.helm/plugins
Creating /Users/bytedance/.helm/starters
Creating /Users/bytedance/.helm/cache/archive
Creating /Users/bytedance/.helm/repository/repositories.yaml
Adding stable repo with URL: https://kubernetes.oss-cn-hangzhou.aliyuncs.com/charts
Adding local repo with URL: http://127.0.0.1:8879/charts
$HELM_HOME has been configured at /Users/bytedance/.helm.

Tiller (the Helm server-side component) has been installed into your Kubernetes Cluster.

Please note: by default, Tiller is deployed with an insecure 'allow unauthenticated users' policy.
To prevent this, run `helm init` with the --tiller-tls-verify flag.
For more information on securing your installation see: https://v2.helm.sh/docs/securing_installation/
tiller授权:
# kubectl create serviceaccount --namespace kube-system tiller
serviceaccount/tiller created

# kubectl create clusterrolebinding tiller-cluster-rule --clusterrole=cluster-admin --serviceaccount=kube-system:tiller
clusterrolebinding.rbac.authorization.k8s.io/tiller-cluster-rule created

# kubectl patch deploy --namespace kube-system tiller-deploy -p '{"spec":{"template":{"spec":{"serviceAccount":"tiller"}}}}'
deployment.apps/tiller-deploy patched

查看授权情况:
# kubectl get deploy -n kube-system tiller-deploy -o yaml | grep serviceAccount
      serviceAccount: tiller
      serviceAccountName: tiller
查看是否安装成功:
#kubectl -n kube-system get pods|grep tiller
tiller-deploy-648df857bb-224ph           1/1     Running   0          13m

# helm version
Client: &version.Version{
     SemVer:"v2.16.10", GitCommit:"bceca24a91639f045f22ab0f41e47589a932cf5e", GitTreeState:"clean"}
Server: &version.Version{
     SemVer:"v2.16.10", GitCommit:"bceca24a91639f045f22ab0f41e47589a932cf5e", GitTreeState:"clean"}
安装postgresql
这里是单机模式
参考:https://hub.helm.sh/charts/bitnami/postgresql(建议看下内容,根据需要修改相关参数,这里为默认配置)
# helm repo add bitnami https://charts.bitnami.com/bitnami
# helm install bitnami/postgresql --version 9.2.1

查看:
# helm list

NAME         	REVISION	UPDATED                 	STATUS  	CHART           	APP VERSION	NAMESPACE
hardy-termite	1       	Thu Aug 20 14:20:00 2020	DEPLOYED	postgresql-9.2.1	11.9.0     	default

查看状态:
# helm status hardy-termite

LAST DEPLOYED: Thu Aug 20 14:20:00 2020
NAMESPACE: default
STATUS: DEPLOYED

RESOURCES:
==> v1/Pod(related)
NAME                        READY  STATUS   RESTARTS  AGE
hardy-termite-postgresql-0  1/1    Running  0         16m

==> v1/Secret
NAME                      TYPE    DATA  AGE
hardy-termite-postgresql  Opaque  1     16m

==> v1/Service
NAME                               TYPE       CLUSTER-IP     EXTERNAL-IP  PORT(S)   AGE
hardy-termite-postgresql           ClusterIP  10.104.189.33  <none>       5432/TCP  16m
hardy-termite-postgresql-headless  ClusterIP  None           <none>       5432/TCP  16m

==> v1/StatefulSet
NAME                      READY  AGE
hardy-termite-postgresql  1/1    16m

NOTES:
** Please be patient while the chart is being deployed **

PostgreSQL can be accessed via port 5432 on the following DNS name from within your cluster:

    hardy-termite-postgresql.default.svc.cluster.local - Read/Write connection

To get the password for "postgres" run:

    export POSTGRES_PASSWORD=$(kubectl get secret --namespace default hardy-termite-postgresql -o jsonpath="{.data.postgresql-password}" | base64 --decode)

To connect to your database run the following command:

    kubectl run hardy-termite-postgresql-client --rm --tty -i --restart='Never' --namespace default --image docker.io/bitnami/postgresql:11.9.0-debian-10-r0 --env="PGPASSWORD=$POSTGRES_PASSWORD" --command -- psql --host hardy-termite-postgresql -U postgres -d postgres -p 5432


To connect to your database from outside the cluster execute the following commands:

    kubectl port-forward --namespace default svc/hardy-termite-postgresql 5432:5432 &
    PGPASSWORD="$POSTGRES_PASSWORD" psql --host 127.0.0.1 -U postgres -d postgres -p 5432

按照以上提示:
获取passwd定义为环境变量
# export POSTGRES_PASSWORD=$(kubectl get secret --namespace default hardy-termite-postgresql -o jsonpath="{.data.postgresql-password}" | base64 --decode)

连接数据库:
# kubectl run hardy-termite-postgresql-client --rm --tty -i --restart='Never' --namespace default --image docker.io/bitnami/postgresql:11.9.0-debian-10-r0 --env="PGPASSWORD=$POSTGRES_PASSWORD" --command -- psql --host hardy-termite-postgresql -U postgres -d postgres -p 5432
If you don't see a command prompt, try pressing enter.

postgres=#
postgres=#
安装pgadmin
# helm repo add runix https://helm.runix.net/
# helm install --name my-release runix/pgadmin4
查看状态:
# helm status my-release
LAST DEPLOYED: Thu Aug 20 14:58:22 2020
NAMESPACE: default
STATUS: DEPLOYED

RESOURCES:
==> v1/Deployment
NAME                 READY  UP-TO-DATE  AVAILABLE  AGE
my-release-pgadmin4  0/1    1           0          50s

==> v1/NetworkPolicy
NAME                 POD-SELECTOR                                                           AGE
my-release-pgadmin4  app.kubernetes.io/instance=my-release,app.kubernetes.io/name=pgadmin4  50s

==> v1/PersistentVolumeClaim
NAME                 STATUS  VOLUME                                    CAPACITY  ACCESS MODES  STORAGECLASS  AGE
my-release-pgadmin4  Bound   pvc-8e990ec4-eab0-4d96-96d4-c18875f6ee88  10Gi      RWO           hostpath      50s

==> v1/Pod(related)
NAME                                  READY  STATUS   RESTARTS  AGE
my-release-pgadmin4-85b5c9647b-79wsv  0/1    Running  0         50s

==> v1/Secret
NAME                 TYPE    DATA  AGE
my-release-pgadmin4  Opaque  1     50s

==> v1/Service
NAME                 TYPE       CLUSTER-IP     EXTERNAL-IP  PORT(S)  AGE
my-release-pgadmin4  ClusterIP  10.108.86.177  <none>       80/TCP   50s


NOTES:
1. Get the application URL by running these commands:
  export POD_NAME=$(kubectl get pods --namespace default -l "app.kubernetes.io/name=pgadmin4,app.kubernetes.io/instance=my-release" -o jsonpath="{.items[0].metadata.name}")
  echo "Visit http://127.0.0.1:8080 to use your application"
  kubectl port-forward $POD_NAME 8080:80
按照提示转发端口到8080:
# kubectl port-forward $POD_NAME 8080:80
Forwarding from 127.0.0.1:8080 -> 80
Forwarding from [::1]:8080 -> 80
Handling connection for 8080
。。。。。。。。。。。。输出略
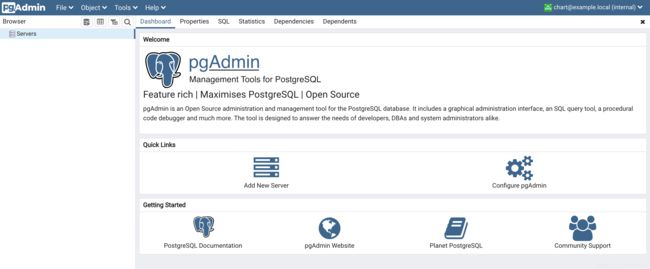
web登陆127.0.0.1:8080,此处的邮箱和密码可参考
https://github.com/rowanruseler/helm-charts/tree/master/charts/pgadmin4中默认的字段:

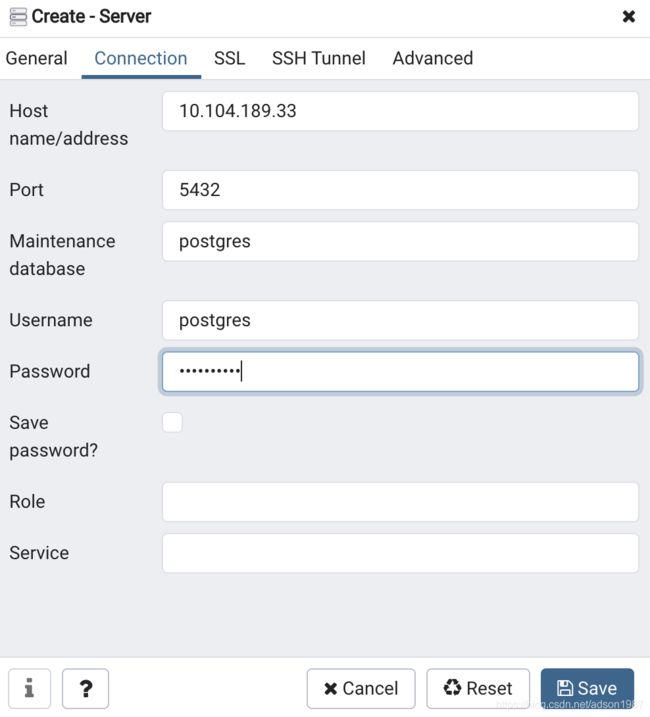
连接之前创建的pg数据库:
查看svc hardy-termite-postgresql :
# kubectl get svc
NAME                                TYPE        CLUSTER-IP      EXTERNAL-IP   PORT(S)    AGE
hardy-termite-postgresql            ClusterIP   10.104.189.33   <none>        5432/TCP   55m
hardy-termite-postgresql-headless   ClusterIP   None            <none>        5432/TCP   55m
kubernetes                          ClusterIP   10.96.0.1       <none>        443/TCP    16d
my-release-pgadmin4                 ClusterIP   10.108.86.177   <none>        80/TCP     17m
nginx-dns                           ClusterIP   10.97.238.255   <none>        80/TCP     11d


查看pg的密码:
kubectl get secret --namespace default hardy-termite-postgresql -o jsonpath="{.data.postgresql-password}" | base64 --decode
6FyHqQXN0U%
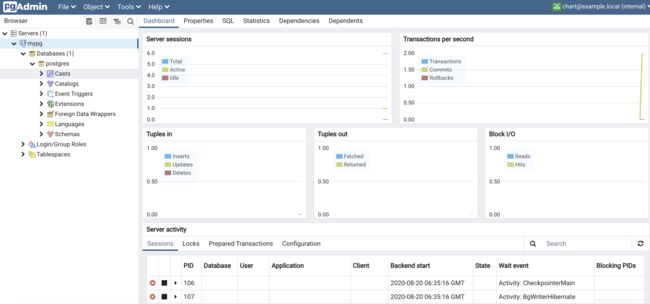
连接配置如下: