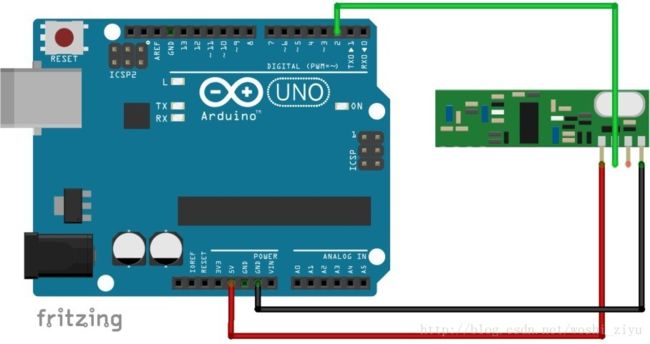
实验硬件
发射端
Arduino + 433超外差发射机 高,低电平和悬空三种模式切换 由简单的官方库修改
/*
  This is a minimal sketch without using the library at all but only works for
  the 10 pole dip switch sockets. It saves a lot of memory and thus might be
  very useful to use with ATTinys :)

  https://github.com/sui77/rc-switch/
*/

int RCLpin = 10;

void setup() {
    pinMode(RCLpin, OUTPUT);
}

void loop() {
   // RCLswitch(0b010001000001);  // DIPs an Steckdose: 0100010000 An:01
 //  delay(2000);

  //  RCLswitch(0b010001000010);  // DIPs an Steckdose: 0100010000 Aus:10
 //  RCLswitch(0);
 //   delay(2000);


// digitalWrite(RCLpin, LOW);// 不停触发
   digitalWrite(RCLpin, HIGH);// 不处发
}

void RCLswitch(uint16_t code) {
    for (int nRepeat=0; nRepeat<6; nRepeat++) {
        for (int i=4; i<16; i++) {
            RCLtransmit(1,3);
            if (((code << (i-4)) & 2048) > 0) {
                RCLtransmit(1,3);
            } else {
                RCLtransmit(3,1);
            }
        }
        RCLtransmit(1,31);
    }
}

void RCLtransmit(int nHighPulses, int nLowPulses) {
    digitalWrite(RCLpin, HIGH);
    delayMicroseconds( 350 * nHighPulses);
    digitalWrite(RCLpin, LOW);
    delayMicroseconds( 350 * nLowPulses);
}
STM8+ 433超外差发射机 命令 = 引导码+一系列高低电平
--------------------
接收端
Arduino + 433超外差接收机 四种中断模式切换
int pin =13;
volatile int state = LOW;
 int i=0;
void setup()
{Serial.begin(9600);
  pinMode(pin, OUTPUT);
//attachInterrupt(0, blink, CHANGE);// 低 一直触发   高 一直不触发
   attachInterrupt(0, blink,LOW);  // 低 一直触发  高 一直触发
  //attachInterrupt(0, blink,RISING);   //低 一直触发  高 不触发
//  attachInterrupt(0, blink,FALLING); //低 一直触发  高 不触发  很稳

     digitalWrite(pin,!state);
     delay(10000);
     digitalWrite(pin, state);
     delay(10000);
}

void loop()
{
// digitalWrite(pin, state);
}

void blink()
{ Serial.println(i+1);
  state = !state;
}
Arduino + 433超外差接收机 官方库正常解码模式
/*
  Simple example for receiving

  https://github.com/sui77/rc-switch/
*/

#include
#define led1 10
#define led2 11
RCSwitch mySwitch = RCSwitch();

void setup() {
  Serial.begin(9600);
    pinMode(led1, OUTPUT);
      pinMode(led2, OUTPUT);
  mySwitch.enableReceive(0);  // Receiver on interrupt 0 => that is pin #2
}

void loop() {
  if (mySwitch.available()) {

    int value = mySwitch.getReceivedValue();

    if (value == 0) {
      Serial.print("Unknown encoding");
    } else {
      if (value ==17) {
        if( digitalRead(led1)==0){
        digitalWrite(led1, HIGH);
        }
        else{
           digitalWrite(led1, LOW);
          }
        }
      if (value ==18) {

         if( digitalRead(led2)==0){
        digitalWrite(led2, HIGH);
        }
        else{
           digitalWrite(led2, LOW);
          }


      }
      Serial.print("Received ");
      Serial.print( mySwitch.getReceivedValue() );
      Serial.print(" / ");
      Serial.print( mySwitch.getReceivedBitlength() );
      Serial.print("bit ");
      Serial.print("Protocol: ");
      Serial.println( mySwitch.getReceivedProtocol() );
    }

    mySwitch.resetAvailable();
  }
}
| 发射信号引脚状态\接收信号引脚中断触发方式 | 上升沿 | 下降沿 | 改变(上升+下降) | 低电平 |
| 高电平 | 不触发 | 不触发 | 不触发 | 一直触发 |
| 低电平 | 一直触发 | 一直触发 | 一直触发 | 一直触发 |
| 悬空 | 一直触发 | 一直触发 | 一直触发 | 一直触发 |
测试结果
可怕结论: 433和330MH信号很容易被针对干扰(又何止是这个频段),具体怎么实现懂的人看表格就能分析出来吧。(让所有这个频段的设备在干扰范围不起作用,怪不国家要严格控制频带的划分和使用还有监测,这么大的弊端)。
可使用到产品的基础:只要没人特意干扰你,大多数的干扰都是随机的,可以通过接收端编码过滤掉。
可用结论:接收端使用上升沿或下降沿或改变三种方式来解码命令
---恢复内容结束---

