iOS开发图片美白处理,图像处理,,磨皮,马赛克基于UIKit下自写算法
一:前言
1.0 : 站在巨人的肩膀上编程,学习别人的思想,学习别人的代码风格,整理好了,就是自己的。
1.1 :最近听了直播课程,了解了图片处理功能,然后自己突发奇想做磨皮效果。
1.2 :无demo说话不硬气,上github地址:https://github.com/horisea/PictureWhitening
欢迎star,你的星星是我持续创作的动力
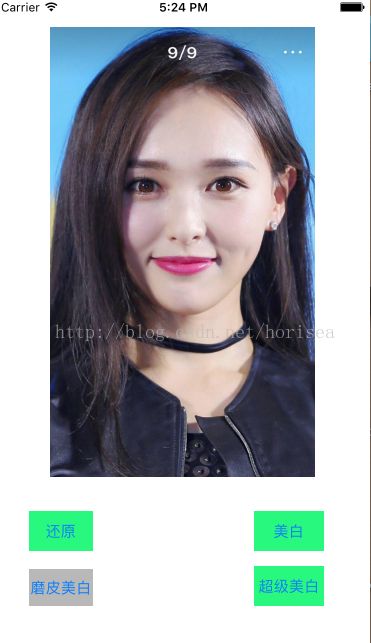
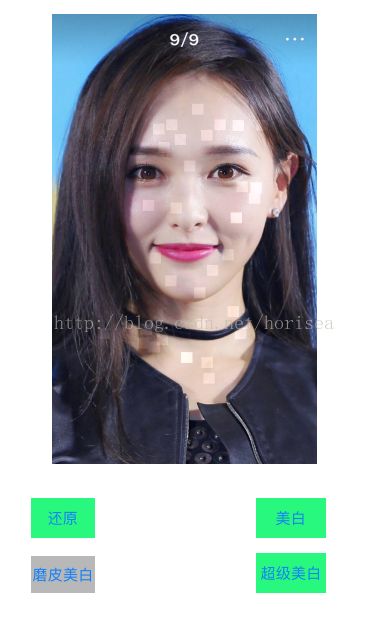
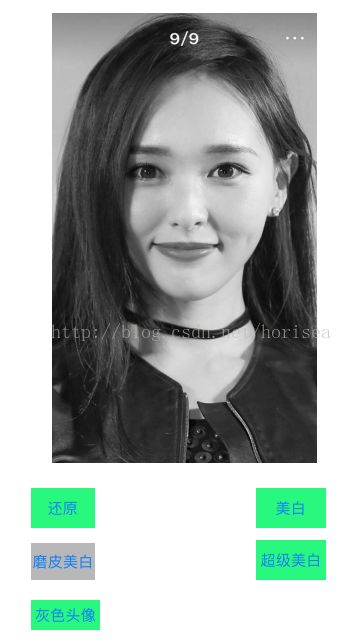
二:先上效果图
马丹:给我唐神弄一脸蒙蔽,话说我好不开心的。。
三:下面说具体实现思路:
3.1 : 大概实现思路(美白原理): 图像的显示,是一个个像素点的集合,每个像素点有自己的颜色空间,即是RGBA的单独分量,我们可以通过CGImage获取像素点集合,然后循环遍历每一个像素点集合,改变RGBA的值(每个值的范围是0-255,而且数值越大,越白),那我们把每个像素点的值增加30,是不是就整体变白了。。蒙蔽吧,上核心代码了,重要部分的注释代码,需要你自己理解和查阅资料了 。。
3.2 先上美白部分的核心代码
/**
 *  美白图片
 *  @param imageName        图片名称
 *  @param whiteness        美白系数  10-150之间  越大越白
 */
+ (UIImage *)whiteImageWithName:(NSString *)imageName
                      Whiteness:(int)whiteness;
/// 美白
+ (UIImage *)whiteImageWithName:(NSString *)imageName Whiteness:(int)whiteness {
if (!whiteness || whiteness < 10 || whiteness > 150) {
return [UIImage imageNamed:imageName];
}
// 1.拿到图片,获取宽高
CGImageRef imageRef = [UIImage imageNamed:imageName].CGImage;
NSInteger width = CGImageGetWidth(imageRef);
NSInteger height = CGImageGetHeight(imageRef);
// 2:创建颜色空间(灰色空间, 彩色空间)-> 开辟一块内存空间
CGColorSpaceRef colorSpaceRef = CGColorSpaceCreateDeviceRGB();
// 3:创建图片上下文
// 为什么是UInt32类型,即是无符号32为int型 取值范围就是0-255之间
// inputPixels是像素点集合的首地址
UInt32 * inputPixels = (UInt32*)calloc(width * height, sizeof(UInt32));
CGContextRef contextRef = CGBitmapContextCreate(inputPixels,
width,
height,
8, // 固定写法 8位
width * 4, // 每一行的字节 宽度 乘以32位 = 4字节
colorSpaceRef,
kCGImageAlphaPremultipliedLast | kCGBitmapByteOrder32Big); // 自己查咯
// 4:根据图片上线纹绘制图片
CGContextDrawImage(contextRef, CGRectMake(0, 0, width, height), imageRef);
// 5:循环遍历每个像素点进行修改
for (int i = 0; i < height; i ++) {
for (int j = 0; j < width; j ++) {
UInt32 * currentPixels = inputPixels + (i * width) + j; // 改变指针的指向 每一个像素点都能遍历到了
UInt32 color = *currentPixels;
UInt32 colorA,colorR,colorG,colorB;
colorR = R(color); // 此处宏定义 计算RGBA的值 是通过位运算算的 自己百度咯
colorR = colorR + whiteness;
colorR = colorR > 255 ? 255 : colorR;
colorG = G(color);
colorG = colorG + whiteness;
colorG = colorG > 255 ? 255 : colorG;
colorB = B(color);
colorB = colorB + whiteness;
colorB = colorB > 255 ? 255 : colorB;
colorA = A(color);
*currentPixels = RGBAMake(colorR, colorG, colorB, colorA);
}
}
// 6:创建Image对象
CGImageRef newImageRef = CGBitmapContextCreateImage(contextRef);
UIImage * newImage = [UIImage imageWithCGImage:newImageRef];
// 7:释放内存
CGColorSpaceRelease(colorSpaceRef);
CGContextRelease(contextRef);
CGImageRelease(newImageRef);
free(inputPixels);
return newImage;
}最后返回一个美白后的图片,在imageView上显示就可以了。。
3.3 在此代码的基础上,笔者就试了一下脸部磨皮美白效果的实现。。。
1.想了想实现思路:
控制器里点击imageView,获取点击事件的坐标,传递坐标值,修改图片对应位置的像素点的值,进行美白,就实现了,,那 么开始干。
2。但是会有问题:下面说处理的时候的注意点
2.1: 每个像素点是很小的,那么美白效果肯定不明显。所以处理单独的像素点,连带周围的像素点也一起处理了,那么就会是一个 面 变白,而不是一个点变白。
2.2 :获取的点击事件只是imageView上的点,而不是对应的像素点。。因为图片可能很大,而是按照imageView的宽高显示的, 那么我们需要拿到宽高比,乘以imageView上的点,就是像素点了。。
还是很蒙蔽吗?举个例子: 图片宽200 高400 , imageView宽100,高200 ,那么这个图片就是等比压缩显示的。
现在我们点击了imageView上的(50,100)的点,
那么对应的像素点就是(50 * (200 / 100), 100 * (400 / 200));是这个道理吧;
3.那么我们上磨皮(做成了和马赛克效果差不多)代码
/**
 *  磨皮美白图片
 *  @param image        图片
 *  @param touch        touch view上的点击点
 *  @param view         view 点击所在的View
 */
+ (UIImage *)dermabrasionImage:(UIImage *)image  touch:(UITouch *)touch view:(UIView *)view;
+ (UIImage *)dermabrasionImage:(UIImage *)image touch:(UITouch *)touch view:(UIView *)view {
int whiteness = 20; // 越大美白月明显
// 1.拿到图片,获取宽高
CGImageRef imageRef = image.CGImage;
NSInteger width = CGImageGetWidth(imageRef);
NSInteger height = CGImageGetHeight(imageRef);
// 2:创建颜色空间(灰色空间, 彩色空间)-> 开辟一块内存空间
CGColorSpaceRef colorSpaceRef = CGColorSpaceCreateDeviceRGB();
// 3:创建图片上下文
UInt32 * inputPixels = (UInt32*)calloc(width * height, sizeof(UInt32));
CGContextRef contextRef = CGBitmapContextCreate(inputPixels,
width,
height,
8,
width * 4,
colorSpaceRef,
kCGImageAlphaPremultipliedLast | kCGBitmapByteOrder32Big);
// 4:根据图片上线纹绘制图片
CGContextDrawImage(contextRef, CGRectMake(0, 0, width, height), imageRef);
// 5.0 获取点击的坐标
CGPoint currentPoint = [touch locationInView:touch.view];
// 图片大小 和imageView的大小不一致 且能获取到的坐标为imageView的坐标 而不是像素点
// 此处拿到缩放比例
CGFloat widthScale = width / view.frame.size.width;
CGFloat heightScale = height / view.frame.size.height;
int x = ceilf(currentPoint.x * widthScale); // imageView的x 乘以缩放比例 就成了像素点
int y = ceilf(currentPoint.y * heightScale);
// 5.1:修改当前像素点
int magin = 15;
for (int i = y - magin; i < y + magin; i ++) { // 操作像素点附近区域的像素点
for (int j = x - magin; j < x + magin ; j ++) {
if (i != j) { // 这里想着 4个拐角不处理 就不会那么方
UInt32 * currentPixels = inputPixels + (i * width) + j;
UInt32 color = *currentPixels;
UInt32 colorA,colorR,colorG,colorB;
colorR = R(color);
colorR = colorR + whiteness;
colorR = colorR > 255 ? 255 : colorR;
colorG = G(color);
colorG = colorG + whiteness;
colorG = colorG > 255 ? 255 : colorG;
colorB = B(color);
colorB = colorB + whiteness;
colorB = colorB > 255 ? 255 : colorB;
colorA = A(color);
*currentPixels = RGBAMake(colorR, colorG, colorB, colorA);
}
}
}
// 6:创建Image对象
CGImageRef newImageRef = CGBitmapContextCreateImage(contextRef);
UIImage * newImage = [UIImage imageWithCGImage:newImageRef];
// 7:释放内存
CGColorSpaceRelease(colorSpaceRef);
CGContextRelease(contextRef);
CGImageRelease(newImageRef);
free(inputPixels);
return newImage;
}3.3 最后上下灰色图片的核心代码
/**
 *  return 灰色图片
 *  @param imageName        图片名称
 */
+ (UIImage *)imageToGrary:(NSString *)imageName;
+ (UIImage *)imageToGrary:(NSString *)imageName {
// 1.拿到图片,获取宽高
CGImageRef imageRef = [UIImage imageNamed:imageName].CGImage;
NSInteger width = CGImageGetWidth(imageRef);
NSInteger height = CGImageGetHeight(imageRef);
// 2:创建颜色空间(灰色空间
CGColorSpaceRef colorSpaceRef = CGColorSpaceCreateDeviceGray();
CGContextRef contextRef = CGBitmapContextCreate(nil,
width,
height,
8, // 固定写法 8位
width * 4, // 每一行的字节 宽度 乘以32位 = 4字节
colorSpaceRef,
kCGImageAlphaNone); // 无透明度
if (!contextRef) {
return [UIImage imageNamed:imageName];
}
CGContextDrawImage(contextRef, CGRectMake(0, 0, width, height), imageRef);
CGImageRef grayImageRef = CGBitmapContextCreateImage(contextRef);
UIImage * graryImage = [UIImage imageWithCGImage:grayImageRef];
//释放内存
CGColorSpaceRelease(colorSpaceRef);
CGContextRelease(contextRef);
CGImageRelease(grayImageRef);
return graryImage;
}最后:后续可能还会写很多类似图片处理的demo,比如QQ中的灰色头像的实现等等。。
再说下github地址:https://github.com/horisea/PictureWhitening
若有什么问题,也可以联系楼主,http://blog.csdn.net/horisea/article/details/52025886 ,里面有楼主联系方式
如果你喜欢这篇文章,或者有任何疑问,可以扫描第一个二维码,加楼主好友哦
也可以扫第二个二维码,关注楼主个人微信公众号。这里有很多生活,职业,技术相关的文章哦。欢迎您的到来。
微信号:![]() 公众号
公众号![]()


