Spark——基于Spark Graphx的图形数据分析
Spark Graphx
- 基于Spark Graphx的图形数据分析
-
- 一、图计算的好处
- 二、图的概念
-
- 1、图的基本概念
- 2、图的术语
-
- (1)顶点(Vertex)和边(Edge)
- (2)有向图和无向图
- (3)有环图和无环图
- (4)度
- 3、图的经典表示法
- 三、Spark GraphX
-
- 1、简介
- 2、GraphX核心抽象
- 3、GraphX API
- 4、图的算子
-
- (1)属性算子
- (2)结构算子
-
- a、reverse
- b、subgraph
- c、mask
- d、groupEdges
- (3)join算子
-
- a、outerJoinVertices
- b、joinVertices
- 7、GraphX API 应用
- 8、练习
- 四、PageRank
-
- 1、PageRank(PR)算法
- 2、PageRank应用
- 五、Pregel
-
- 1、连通分量
- 2、Pregel概述
- 3、Pregel API
基于Spark Graphx的图形数据分析
官网指导https://spark.apache.org/docs/latest/graphx-programming-guide.html#pregel-api
一、图计算的好处
- 许多大数据以大规模图或网络的形式呈现
- 许多非图结构的大数据,常会被转换为图模型进行分析
- 图数据结构很好地表达了数据之间的关联性
二、图的概念
1、图的基本概念
- 图是由顶点集合(vertex)及顶点间的关系集合(边edge)组成的一种网状数据结构
- 通常表示为二元组:Gragh=(V,E)
- 可以对事物之间的关系建模
- 应用场景
- 在地图应用中寻找最短路径
- 社交网络关系
- 网页间超链接关系
2、图的术语
(1)顶点(Vertex)和边(Edge)
一般关系图中,事物为顶点,关系为边
定义一个图:
Graph=(V,E)
集合V={
     v1,v2,v3}
集合E={
     (v1,v2),(v1,v3),(v2,v3)}
(2)有向图和无向图
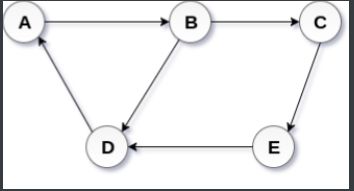
- 有向图:在有向图中,一条边的两个顶点一般扮演者不同的角色,比如父子关系、页面A连接向页面B;
G=(V,E)
V={
     A,B,C,D,E}
E={
     <A,B>,<B,C>,<B,D>,<C,E>,<D,A>,<E,D>}
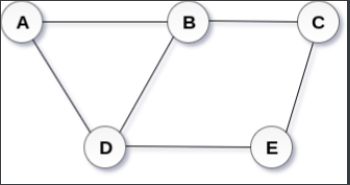
- 无向图:在一个无向图中,边没有方向,即关系都是对等的,比如qq中的好友。
G=(V,E)
V={
     A,B,C,D,E}
E={
     (A,B),(A,D),(B,C),(B,D),(C,E),(D,E)}
(3)有环图和无环图
- 有环图:有环图是包含循环的,一系列顶点连接成一个环,在有环图中,如果不关心终止条件,算法可能永远在环上执行,无法退出。
- 无环图:不包含循环,不能形成环,DAG即为有向无环图
(4)度
- 度:一个顶点所有边的数量
- 出度:指从当前顶点指向其他顶点的边的数量
- 入度:其他顶点指向当前顶点的边的数量
3、图的经典表示法
- 邻接矩阵:
1、对于每条边,矩阵中相应单元格值为1
2、对于每个循环,矩阵中相应单元格值为2,方便在行或列上求得顶点度数
三、Spark GraphX
1、简介
-
GraphX是Spark提供分布式图计算API
-
GraphX特点
- 基于内存实现了数据的复用与快速读取
- 通过弹性分布式属性图(Property Graph)统一了图视图与表视图
- 与Spark Streaming、Spark SQL和Spark MLlib等无缝衔接
-
针对某些领域,如社交网络、语言建模等,graph-parallel系统可以高效地执行复杂的图形算法,比一般的data-parallel系统更快
-
Graphx是将graph-parallel的data-parallel统一到一个系统中。允许用户将数据当成一个图或一个集合RDD,而简化数据移动或复杂操作。
2、GraphX核心抽象
- 弹性分布式属性图(Resilient Distributed Property Graph)
- 顶点和边都带属性的有向多重图
- 一份物理存储,两种视图
对Graph视图的所有操作,最终都会转换成其关联的Table视图的RDD操作来完成
3、GraphX API
- Graph[VD,ED]
- VertexRDD[VD]
- EdgeRDD[ED]
- EdgeTriplet[VD,ED]
- Edge:样例类
- VertexId:Long的别名
创建一个简单的GraphX:
object MyGraghx {

  def main(args: Array[String]): Unit = {

    val conf = new SparkConf().setAppName("ghx").setMaster("local[*]")
    val sc = new SparkContext(conf)
    //建立所有的点
    val vects = sc.makeRDD(Seq((3L,("rxin","stu")),(5L,("zs","prof")),(5L,("ls","prof")),(7L,("xx","pst"))))
    //建立所有的边
    val edges = sc.makeRDD(Seq(Edge(2L,5L,"ts"),Edge(5L,3L,"zd"),Edge(5L,7L,"pi"),Edge(3L,7L,"collab")))
    //建立图
    val graph = Graph(vects,edges)
    //要添加新点
    val newPoint = sc.parallelize(Array((3L,"hehe"),(5L,"xixi"),(4L,"cici")))
    println("***********************************************************")
    graph.joinVertices(newPoint)((id,src,newval)=>(src._1+"@"+newval,src._2)).vertices.foreach(f=>println(f._2))
    println("***********************************************************")
    println(graph.numEdges,graph.numVertices,graph.edges)
    println("***********************************************************")
    graph.vertices.foreach(x=>println(x._1,x._2))
    println("***********************************************************")
    graph.edges.foreach(x=>println(x.srcId,x.dstId,x.attr))
    println("***********************************************************")
    graph.triplets.foreach(x=>println(x.srcAttr,x.dstAttr,x.attr))
    println("***********************************************************")
    graph.inDegrees.foreach(x=>println(x))
    println("***********************************************************")
    graph.degrees.foreach(println)
    println("***********************************************************")
    graph.mapEdges(e=>Edge(e.srcId,e.dstId,e.attr+",Hello")).edges.foreach(x=>println(x))
  }
}
输出结果:
***********************************************************
(zs@xixi,prof)
(xx,pst)
null
(rxin@hehe,stu)
***********************************************************
(4,4,EdgeRDDImpl[13] at RDD at EdgeRDD.scala:41)
***********************************************************
(3,(rxin,stu))
(2,null)
(7,(xx,pst))
(5,(zs,prof))
***********************************************************
(5,3,zd)
(3,7,collab)
(2,5,ts)
(5,7,pi)
***********************************************************
(null,(zs,prof),ts)
((zs,prof),(rxin,stu),zd)
((zs,prof),(xx,pst),pi)
((rxin,stu),(xx,pst),collab)
***********************************************************
(7,2)
(3,1)
(5,1)
***********************************************************
(2,1)
(3,2)
(7,2)
(5,3)
***********************************************************
Edge(2,5,Edge(2,5,ts,Hello))
Edge(3,7,Edge(3,7,collab,Hello))
Edge(5,3,Edge(5,3,zd,Hello))
Edge(5,7,Edge(5,7,pi,Hello))
4、图的算子
(1)属性算子
- 类似于RDD的map操作
- mapVertices
- mapEdges
- mapTriplets
class Graph[VD, ED] {

  def mapVertices[VD2](map: (VertexId, VD) => VD2): Graph[VD2, ED]
  def mapEdges[ED2](map: Edge[ED] => ED2): Graph[VD, ED2]
  def mapTriplets[ED2](map: EdgeTriplet[VD, ED] => ED2): Graph[VD, ED2]
}
val t1_graph = tweeter_graph.mapVertices {
      case(vertextId, (name, age)) => (vertextId, name) }
val t2_graph = tweeter_graph.mapVertices {
      (vertextId, attr) => (vertextId, attr._1) }
val t3_graph = tweeter_graph.mapEdges(e => Edge(e.srcId, e.dstId, e.attr*7.0))
这里每一个操作产生一个新图,其顶点和边被用户定义的map函数修改了。
注意:
在每一个实例图结构不受影响。这是这些操作的关键特征,这允许结果图重复利用原始图的结构索引。下面的代码片段逻辑上是等同的,但是第一个没有保存结构索引,其不会从GraphX系统优化中获益。
(2)结构算子
- reverse
- subgraph
- mask
- groupEdges
演化一下这四个结构算子。
首先先创建一个新图,三个参数:
- users就是所有顶点的rdd(RDD[(VertexId, VD)])
- relationships就是所有边的集合RDD[Edge[ED]]
- defaultUser是默认的顶点,也就是说如果relationships里面的源id或者目标id在users里面找不到,就会把找不到的id的那个人当成是defaultUser
val users: RDD[(VertexId, (String, String))] =
  sc.parallelize(Array((1L, ("a", "student")), (2L, ("b", "salesman")),
    (3L, ("c", "programmer")), (4L, ("d", "doctor")),
    (5L, ("e", "postman"))))

val relationships: RDD[Edge[String]] =
  sc.parallelize(Array(Edge(1L, 2L, "customer"),Edge(3L, 2L, "customer"),
    Edge(3L, 4L, "patient"), Edge(5L, 4L, "patient"),
    Edge(3L, 4L, "friend"),   Edge(5L, 99L, "father")))

val defaultUser = ("f", "none")

val graph = Graph(users, relationships, defaultUser)
然后打印一下这个图:
graph.triplets.map(
      triplet => triplet.srcAttr._1 + " ——(" + triplet.attr + ")——> " + triplet.dstAttr._1
    ).collect.foreach(println(_))
输出图中各点的关系:打印结果如下,这个graph表示的是a到f这几个人之间的关系,a是b的客户,c是b的客户,c是d的病人,c是d的病人,c是d的朋友,e是f的爸爸
a ——(customer)——> b
c ——(customer)——> b
c ——(patient)——> d
e ——(patient)——> d
c ——(friend)——> d
e ——(father)——> f
a、reverse
reverse算子的作用就是把edge的方向反过来,在这里就是把每个人的关系反过来一下
代码如下:
val reverseGraph = graph.reverse
reverseGraph.triplets.map(
  triplet => triplet.srcAttr._1 + " ——(" + triplet.attr + ")——> " + triplet.dstAttr._1
).collect.foreach(println(_))
输出结果:
-------------------------原始关系--------------------------------
a ——(customer)——> b
c ——(customer)——> b
c ——(patient)——> d
e ——(patient)——> d
c ——(friend)——> d
e ——(father)——> f
-------------------------reverse--------------------------------
b ——(customer)——> a
b ——(customer)——> c
d ——(patient)——> c
d ——(patient)——> e
d ——(friend)——> c
f ——(father)——> e
如图比较所有的关系双方都反过来了
b、subgraph
subgraph顾名思义就是取原来graph的子graph,获取子graph肯定是有条件过滤掉一部分数据,剩下来的就是子graph
代码如下:
val subGraph = graph.subgraph(vpred = (id, attr) => attr._1 > "b")
subGraph.triplets.map(
  triplet => triplet.srcAttr._1 + " ——(" + triplet.attr + ")——> " + triplet.dstAttr._1
).collect.foreach(println(_))
输出结果:
-------------------------原始关系--------------------------------
a ——(customer)——> b
c ——(customer)——> b
c ——(patient)——> d
e ——(patient)——> d
c ——(friend)——> d
e ——(father)——> f
-------------------------subgraph-------------------------------
c ——(patient)——> d
e ——(patient)——> d
c ——(friend)——> d
e ——(father)——> f
这个子graph,只保留了父graph中第一个属性比b的ascii码大的vertex
c、mask
mask算子就是求当前graph和另外一个graph的交集
代码如下,我们使用了上一个算子的结果作为当前graph进行mask的参数:
val maskGraph = graph.mask(subGraph)
    maskGraph.triplets.map(
      triplet => triplet.srcAttr._1 + " ——(" + triplet.attr + ")——> " + triplet.dstAttr._1
    ).collect.foreach(println(_))
输出结果:
-------------------------原始关系--------------------------------
a ——(customer)——> b
c ——(customer)——> b
c ——(patient)——> d
e ——(patient)——> d
c ——(friend)——> d
e ——(father)——> f
---------------------------mask-------------------------------
c ——(patient)——> d
e ——(patient)——> d
c ——(friend)——> d
e ——(father)——> f
d、groupEdges
groupEdges的作用是将2个vertex之间的所有edge进行合并,我们知道graphx处理的是多重图,多重图的特征就是2个顶点之间可能有多个平行边,这里的groupEdges就可以把这些平行边合并
代码如下:
val combineGraph = graph
  .partitionBy(PartitionStrategy.EdgePartition1D)
  .groupEdges(merge = (e1, e2) => e1 + " and " + e2)
combineGraph.triplets.map(
  triplet => triplet.srcAttr._1 + " ——(" + triplet.attr + ")——> " + triplet.dstAttr._1
).collect.foreach(println(_))
我们这里将平行边的元素用and连接起来了,这里要注意的是,使用groupEdges算子之前,必须先用一下partitionBy,不然不起作用的
打印结果如下:
-------------------------原始关系--------------------------------
a ——(customer)——> b
c ——(customer)——> b
c ——(patient)——> d
e ——(patient)——> d
c ——(friend)——> d
e ——(father)——> f
---------------------------groupEdges-------------------------------
a ——(customer)——> b
c ——(customer)——> b
c ——(patient and friend)——> d
e ——(patient)——> d
e ——(father)——> f
(3)join算子
定义一个graph来测试join:
val users: RDD[(VertexId, (String, String))] =
  sc.parallelize(Array(
    (1L, ("a", "student")), (2L, ("b", "salesman")),
    (3L, ("c", "programmer")), (4L, ("d", "doctor")),
    (5L, ("e", "postman"))
  ))

val relationships: RDD[Edge[String]] =
  sc.parallelize(Array(Edge(1L, 2L, "customer"), Edge(3L, 2L, "customer"),
    Edge(3L, 4L, "patient"), Edge(5L, 4L, "patient"),
    Edge(3L, 4L, "friend"), Edge(5L, 99L, "father")))

val defaultUser = ("f", "none")

val graph = Graph(users, relationships, defaultUser)
这个graph描述了每个人的名字和工作,这里我们给每个人增加除了名字和工作的其他属性,这个属性就是年龄属性
因此,我们需要定义一个rdd,描述每个人的年龄。
代码如下:
 val userWithAge: RDD[(VertexId, Int)] =
      sc.parallelize(Array(
        (3L, 2), (4L, 19), (5L, 23), (6L, 42), (7L, 59)
      ))
这里我们定义了id为3到7的这5个人的年龄,注意我们原来的graph的所有人的id为1到5,接下来有2种方法来把这个年龄属性加到我们graph中的每个人上面:
a、outerJoinVertices
第一种方法就是outerJoinVertices,代码如下:
graph.outerJoinVertices(userWithAge) {
      (id, attr, age) =>
      age match {

        case Some(a) => (attr._1, attr._2, a)
        case None => (attr._1, attr._2,"none")
      }
    }.vertices.collect.foreach(println)
b、joinVertices
第二种方法就是joinVertices,代码如下:
graph.joinVertices(userWithAge) {
      (id, attr, age) => {

  (attr._1 + "", attr._2 + "、" + age)
}}.vertices.collect.foreach(println)
输出结果:
-------------------------outerJoinVertices--------------------------------
(1,(a,student,none))
(2,(b,salesman,none))
(3,(c,programmer,2))
(99,(f,none,none))
(4,(d,doctor,19))
(5,(e,postman,23))
-------------------------joinVertices--------------------------------
(1,(a,student))
(2,(b,salesman))
(3,(c,programmer、2))
(99,(f,none))
(4,(d,doctor、19))
(5,(e,postman、23))
7、GraphX API 应用
- 计算用户粉丝数量
case class User(name: String, age: Int, inDeg: Int, outDeg: Int)
//修改顶点属性
val initialUserGraph: Graph[User, Int] = tweeter_graph.mapVertices{

     case (id, (name, age)) => User(name, age, 0, 0)
}
//将顶点入度、出度存入顶点属性中
val userGraph = initialUserGraph.outerJoinVertices(initialUserGraph.inDegrees) {

     case (id, u, inDegOpt) => User(u.name, u.age, inDegOpt.getOrElse(0), u.outDeg)
}.outerJoinVertices(initialUserGraph.outDegrees) {

    case (id, u, outDegOpt) => User(u.name, u.age, u.inDeg, outDegOpt.getOrElse(0))
}
//顶点的入度即为粉丝数量
for ((id, property) <- userGraph.vertices.collect)
   println(s"User $id is ${property.name} and is liked by ${property.inDeg} people.")
8、练习
四、PageRank
1、PageRank(PR)算法
- PageRank(PR)算法670
- 用于评估网页链接的质量和数量,以确定该网页的重要性和权威性的相对分数,范围为0到10
- 从本质上讲,PageRank是找出图中顶点(网页链接)的重要性
- GraphX提供了PageRank API用于计算图的PageRank
2、PageRank应用
五、Pregel
1、连通分量
- 连通分量是一个子图,其中任何两个顶点通过一条边或一系列边相互连接,其顶点是原始图顶点集的子集,其边是原始图边集的子集
class Graph[VD, ED] {

  def connectedComponents(): Graph[VertexID, ED]
}
2、Pregel概述
- Pregel是Google提出的用于大规模分布式图计算框架
- 图遍历(BFS)
- 单源最短路径(SSSP)
- PageRank计算
- Pregel的计算由一系列迭代组成,称为supersteps
- Pregel迭代过程
- 每个顶点从上一个superstep接收入站消息
- 计算顶点新的属性值
- 在下一个superstep中向相邻的顶点发送消息
- 当没有剩余消息时,迭代结束
3、Pregel API
- initialMsg:在“superstep 0”之前发送至顶点的初始消息
- maxIterations:将要执行的最大迭代次数
- activeDirection:发送消息方向(默认是出边方向:EdgeDirection.Out)
- vprog:用户定义函数,用于顶点接收消息
- sendMsg:用户定义的函数,用于确定下一个迭代发送的消息及发往何处
- mergeMsg:用户定义的函数,在vprog前,合并到达顶点的多个消息
例子1:
object GraphPrepel extends App {
  //1、创建SparkContext
  val sparkConf = new SparkConf().setAppName("GraphxHelloWorld").setMaster("local[*]")
  val sparkContext = new SparkContext(sparkConf)

  //2、创建顶点
  val vertexArray = Array(
    (1L, ("Alice", 28)),
    (2L, ("Bob", 27)),
    (3L, ("Charlie", 65)),
    (4L, ("David", 42)),
    (5L, ("Ed", 55)),
    (6L, ("Fran", 50))
  )
  val vertexRDD: RDD[(VertexId, (String,Int))] = sparkContext.makeRDD(vertexArray)

  //3、创建边,边的属性代表 相邻两个顶点之间的距离
  val edgeArray = Array(
    Edge(2L, 1L, 7),
    Edge(2L, 4L, 2),
    Edge(3L, 2L, 4),
    Edge(3L, 6L, 3),
    Edge(4L, 1L, 1),
    Edge(2L, 5L, 2),
    Edge(5L, 3L, 8),
    Edge(5L, 6L, 3)
  )
  val edgeRDD: RDD[Edge[Int]] = sparkContext.makeRDD(edgeArray)


  //4、创建图(使用aply方式创建)
  val graph1 = Graph(vertexRDD, edgeRDD)

  /* ************************** 使用pregle算法计算 ,顶点5 到 各个顶点的最短距离 ************************** */

  //被计算的图中 起始顶点id
  val srcVertexId = 5L
  val initialGraph = graph1.mapVertices{case (vid,(name,age)) => if(vid==srcVertexId) 0.0 else Double.PositiveInfinity}

  //5、调用pregel
  val pregelGraph = initialGraph.pregel(
    Double.PositiveInfinity,
    Int.MaxValue,
    EdgeDirection.Out
  )(
    (vid: VertexId, vd: Double, distMsg: Double) => {
      val minDist = math.min(vd, distMsg)
      println(s"顶点${vid},属性${vd},收到消息${distMsg},合并后的属性${minDist}")
      minDist
    },
    (edgeTriplet: EdgeTriplet[Double,PartitionID]) => {
      if (edgeTriplet.srcAttr + edgeTriplet.attr < edgeTriplet.dstAttr) {
        println(s"顶点${edgeTriplet.srcId} 给 顶点${edgeTriplet.dstId} 发送消息 ${edgeTriplet.srcAttr + edgeTriplet.attr}")
        Iterator[(VertexId, Double)]((edgeTriplet.dstId, edgeTriplet.srcAttr + edgeTriplet.attr))
      } else {
        Iterator.empty
      }
    },
    (msg1: Double, msg2: Double) => math.min(msg1, msg2)
  )

  //6、输出结果
  //  pregelGraph.triplets.collect().foreach(println)
  //  println(pregelGraph.vertices.collect.mkString("\n"))

  //7、关闭SparkContext
  sparkContext.stop()

}
//输出结果
//------------------------------------------ 各个顶点接受初始消息initialMsg ------------------------------------------
顶点3,属性Infinity,收到消息Infinity,合并后的属性Infinity
顶点2,属性Infinity,收到消息Infinity,合并后的属性Infinity
顶点4,属性Infinity,收到消息Infinity,合并后的属性Infinity
顶点6,属性Infinity,收到消息Infinity,合并后的属性Infinity
顶点1,属性Infinity,收到消息Infinity,合并后的属性Infinity
顶点5,属性0.0,收到消息Infinity,合并后的属性0.0
//------------------------------------------ 第一次迭代 ------------------------------------------
顶点5 给 顶点6 发送消息 3.0
顶点5 给 顶点3 发送消息 8.0
顶点3,属性Infinity,收到消息8.0,合并后的属性8.0
顶点6,属性Infinity,收到消息3.0,合并后的属性3.0
//------------------------------------------ 第二次迭代 ------------------------------------------
顶点3 给 顶点2 发送消息 12.0
顶点2,属性Infinity,收到消息12.0,合并后的属性12.0
//------------------------------------------ 第三次迭代 ------------------------------------------
顶点2 给 顶点4 发送消息 14.0
顶点2 给 顶点1 发送消息 19.0
顶点1,属性Infinity,收到消息19.0,合并后的属性19.0
顶点4,属性Infinity,收到消息14.0,合并后的属性14.0
//------------------------------------------ 第四次迭代 ------------------------------------------
顶点4 给 顶点1 发送消息 15.0
顶点1,属性19.0,收到消息15.0,合并后的属性15.0
//------------------------------------------ 第五次迭代不用发送消息 ------------------------------------------
例子2:
// 创建顶点集RDD
val vertices: RDD[(VertexId, (Int, Int))] = sc.parallelize(Array((1L, (7,-1)), (2L, (3,-1)),  (3L, (2,-1)), (4L, (6,-1))))
// 创建边集RDD
val relationships: RDD[Edge[Boolean]] = sc.parallelize(Array(Edge(1L, 2L, true), Edge(1L, 4L, true),  Edge(2L, 4L, true), Edge(3L, 1L, true),  Edge(3L, 4L, true)))
// 创建图
val graph = Graph(vertices, relationships)
//Pregel
val minGraph = graph.pregel(initialMsg, Int.MaxValue,  EdgeDirection.Out)(vprog, sendMsg, mergeMsg)
minGraph.vertices.collect.foreach{

  case (vertexId, (value, original_value)) => println(value)
}

val initialMsg = 9999
def vprog(vertexId: VertexId, value: (Int, Int), message: Int): (Int, Int) = {

  if (message == initialMsg)  value else (message min value._1, value._1)
}

def sendMsg(triplet: EdgeTriplet[(Int, Int), Boolean]): Iterator[(VertexId, Int)] = {

  val sourceVertex = triplet.srcAttr
  if (sourceVertex._1 == sourceVertex._2) Iterator.empty  else  Iterator((triplet.dstId, sourceVertex._1))
}

def mergeMsg(msg1: Int, msg2: Int): Int = msg1 min msg2
![\[外链图片转存失败,源站可能有防盗链机制,建议将图片保存下来直接上传(img-IZQpa4kP-1597625203080)(../../../imgs/pregel2.png)\]](https://img-blog.csdnimg.cn/20200817085122232.png#pic_center)


