SSM框架
SSM框架(spring+springmvc+mybatis)
简介
本次简单的介绍一下大致的ssm框架的构造。主要创建包(package和文件夹)说起。然后就是一些相关配置问题(springmvc+mybatis)。因为是教学,需要手动搭建比较费时间。
工具
IDEA,相关jar,还有一些前端的东东(美化工具,这里以bootstrap为例)
基本框架
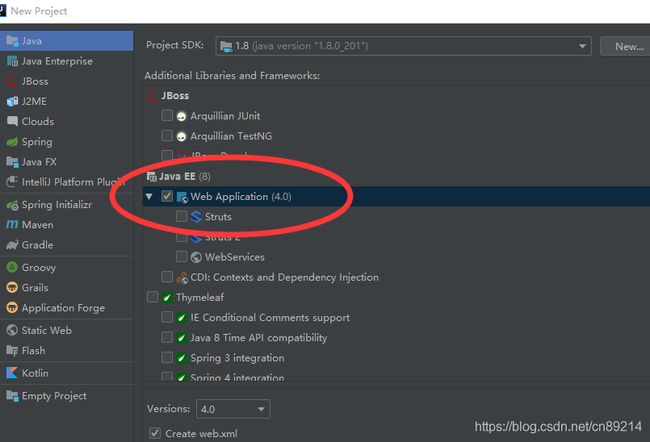
首先要创建一个工程项目Project,名字随意。注意要添加Web
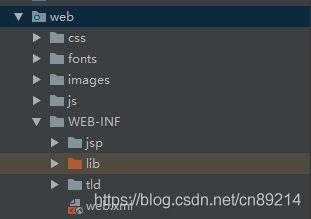
搭建好后可以先在web文件夹下创建一些文件夹还有WEB-INF(有些人喜欢全放在WEB-INF中,也可以,记住路径可以)
css:当然是前端美化工具css(bootstrap)
fonts:同上
images:图片储存地方
js:jquery和bootstrap相关储存地方
jsp:放jsp文件
lib:夹包,IDEA需要设置Excluded(否则会添加很久很久)
tld:翻页功能设置tld
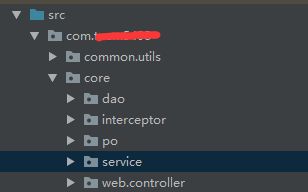
然后就是src文件夹下的创建夹包简单介绍一下
common.utils下放得是翻页功能的类
core下的就是后台相关功能的夹包如
interceptor是拦截器配置
po是模板连接数据库的样式需要加get和set
service就是服务接口
dao就是数据库连接相关类和xml
最后就是web.controller控制台,就是前端访问后端的请求响应即springmvc相关
配置文件
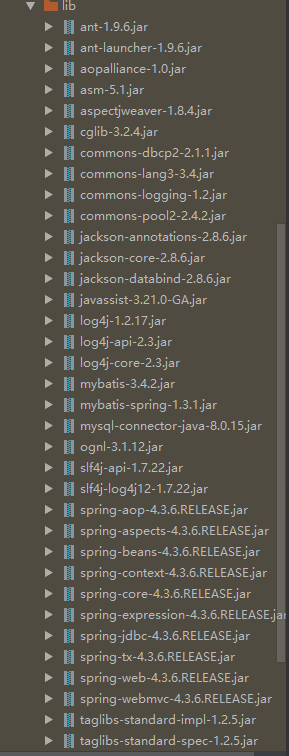
首先是lib文件夹下(一共35个,可以看自己需要添加):
web.xml配置spring和springmvc及中文乱码问题
        contextConfigLocation
        classpath:applicationContext.xml


            org.springframework.web.context.ContextLoaderListener


        encoding

            org.springframework.web.filter.CharacterEncodingFilter


            encoding
            UTF-8


        encoding
        *.action


        crm

            org.springframework.web.servlet.DispatcherServlet


            contextConfigLocation
            classpath:springmvc-config.xml


        1


        crm
        *.action


        index.jsp
springmvc-config.xml
applicationContext.xml
db.properties(配置数据库连接信息)

还有一些配置文件这里就不展示了
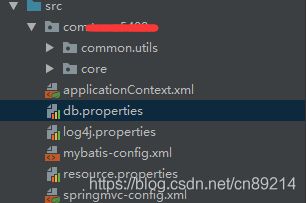
总结:这里只是处设置好配置文件,注意自己mysql版本设置,还有一些夹包的版本遗留问题,到目前为止就没什么问题。
登录功能的实现
jsp和po就不介绍,前面几章就介绍过了。
主要看代码。首先是controller包下主要代码
@Controller
public class AdminController {
    @Autowired
    private AdminService adminService;
    /**
     *登录验证
     * 获取admincode,password,进行判断
     * 没有通过判定创建model,返回主页面
     */
    @RequestMapping(value="/alogin.action",method = RequestMethod.POST)
    public String alogin(String admincode, String password, Model model, HttpSession session){
        Admin admin=adminService.findAdmin(admincode, password);
        if(admin!=null){
            session.setAttribute("AMDIN_SESSION",admin);
            return "redirect:admin/list.action";
        }else {
            model.addAttribute("msg","管理账号或密码错误,请重新输入");
            return "login";
        }
    }
}
interceptor拦截器下代码
package com.team5408.core.interceptor;
import javax.servlet.http.HttpServletRequest;
import javax.servlet.http.HttpServletResponse;
import javax.servlet.http.HttpSession;
import org.springframework.web.servlet.HandlerInterceptor;
import org.springframework.web.servlet.ModelAndView;
import com.team5408.core.po.Admin;
/**
 * 登录拦截器
 */
public class LoginInterceptor implements HandlerInterceptor {
    @Override
    public boolean preHandle(HttpServletRequest request,
                             HttpServletResponse response, Object handler)
            throws Exception {
        // 获取请求的URL
        String url = request.getRequestURI();
        // URL:除了登录请求外,其他的URL都进行拦截控制
        if (url.indexOf("/alogin.action") >= 0) {
            return true;
        }
        // 获取Session
        HttpSession session = request.getSession();
        Admin user = (Admin) session.getAttribute("AMDIN_SESSION");
        // 判断Session中是否有用户数据,如果有,则返回true,继续向下执行
        if (user != null) {
            return true;
        }
        // 不符合条件的给出提示信息,并转发到登录页面
        request.setAttribute("msg", "您还没有登录,请先登录!");
        request.getRequestDispatcher("/WEB-INF/jsp/login.jsp")
                .forward(request, response);
        return false;
    }
    @Override
    public void postHandle(HttpServletRequest request,
                           HttpServletResponse response, Object handler,
                           ModelAndView modelAndView) throws Exception {
    }
    @Override
    public void afterCompletion(HttpServletRequest request,
                                HttpServletResponse response, Object handler, Exception ex)
            throws Exception {
    }
}
service包下接口及service.impl包下代码
public interface AdminService {
    //通过账号和密码查询管理员
    public Admin findAdmin(String admincode,String password);
}
@Service("AdminService")
@Transactional
public class AdminServiceImpl implements AdminService {
    //注入AdminDao
    @Autowired
    private AdminDao adminDao;
    //通过账号和密码查询用户
    @Override
    public Admin findAdmin(String admincode,String password){
        Admin admin=this.adminDao.findAdmin(admincode,password);
        return admin;
    }
}
dao包下接口和xml配置
public interface AdminDao {
    /**
     *通过账号和密码查询管理员
     */
    public Admin findAdmin(@Param("admincode") String admincode,
                           @Param("password") String password);
}
到这里就可以完成基本的登录功能。