iOS持续集成jenkins+xcode+svn+七牛
吐个槽:随着代码的不断累积每次iOS打包都要焦急等待小十分钟,Xcode卡爆了有没有,Archives有时证书都无法验证,上传20M的.ipa文件一定要看网络给不给力。
jenkins实现目标:
- 生成ipa文件
- 生成plist文件
- ipa、plist七牛自动上传
- 邮件反馈,生成下载链接、链接二维码等
思路:将生成的.ipa文件放在${WORKSPACE}/build/${BUILD_NUMBER}/下,通过Execute shell生成.plist文件(让plist与ipa文件名称保持一致),Inject environment variables将ipa文件名称定义全局变量,构建成功后通过qiniu-plugin将plist、ipa文件上传到七牛,然后邮件将构建信息、线上plist链接告知。
一、jenkins安装以及系统配置
jenkins安装配置
- brew install jenkins(安装)
- jenkins (启动)
- http://localhost:8080(浏览器输入默认 8080)
/Users/apple(电脑用户名)/.jenkins(brew安装jenkins位置,${WORKSPACE} 值为/Users/apple(电脑用户名)/.jenkins/jobs/qiniuTest(job名称)/workspace/)
管理插件(系统管理–管理插件)
- Subversion Plug-in(svn)
- Xcode integration(Xcode)
- Environment Injector Plugin(自定义全局变量)
- Email Extension Plugin(邮件)
- qiniu-plugin(七牛上传)
系统设置(系统管理–系统设置)
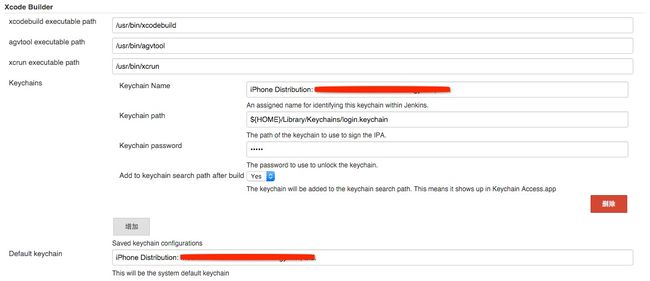
Xcode Builder(钥匙串设置)
需填写的内容:
- Keychain Name:iPhone Distribution: *(dis证书常用名)
- Keychain path:${HOME}/Library/Keychains/login.keychain(dis证书路径)
- Keychain password:*
- Add to keychain search path after build:Yes
- Default keychain:iPhone Distribution: *
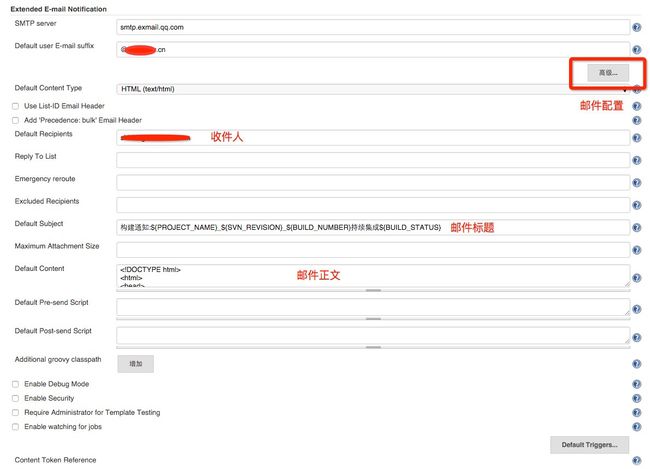
Extended E-mail Notification(邮件配置)
需填写的内容:
- SMTP server:smtp.exmail.qq.com(我用的是QQ邮箱)
- Default Subject:构建通知:${PROJECT_NAME}${SVN_REVISION}${BUILD_NUMBER}持续集成${BUILD_STATUS}
- Default Content: 后文有写到
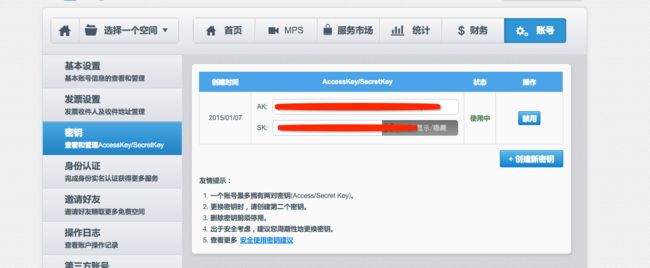
七牛设置项(七牛Accesskey/Secretkey配置)
Accesskey/Secretkey 值可在七牛中查看
二、job构建
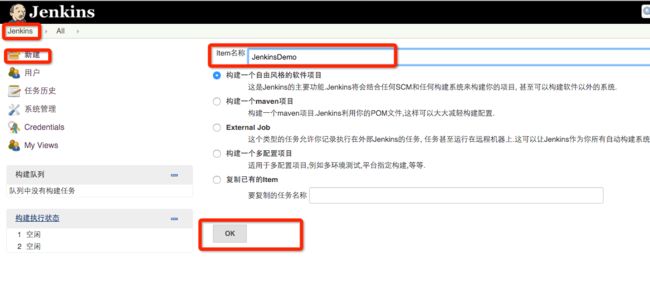
jenkins–新建
“新建”–“构建一个自由风格的软件项目”–“OK”
- Item名称(job名称)
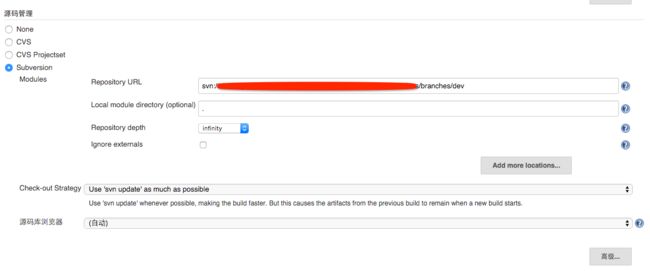
源码管理(svn配置)
选择的Subversion,仓库路径:svn打包的代码路径(一般是trunk上吧)
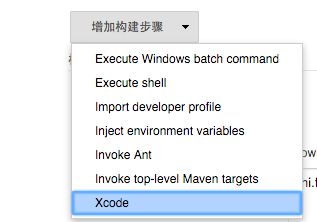
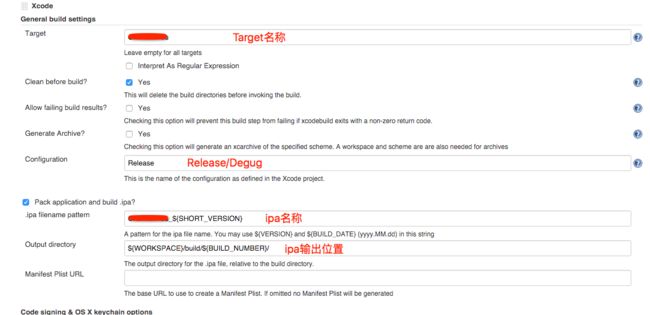
xcode配置
需填写的内容:
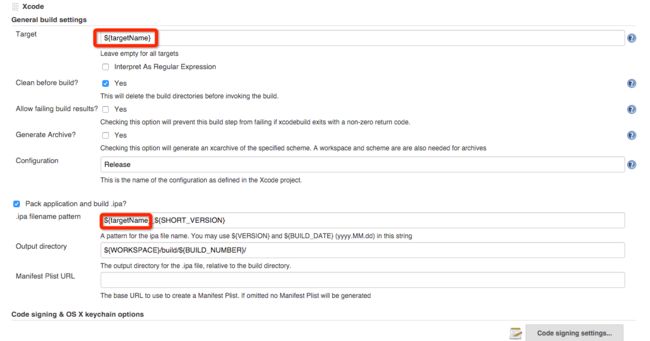
General build settings:
Target:为集成的Target名称 targetName
勾选“Clean before build?”
Configution:Release(Debug/Release按需求可选)勾选“Pack application and build ipa?”
ipa filename pattern:targetName_${SHORT_VERSION}(target名称_version版本)
Output directory:${WORKSPACE}/build/${BUILD_NUMBER}/Code signing & OS X keychain options:
在系统Xcode Builder(钥匙串设置)已配置Advanced Xcode build options:
勾选“Clean test reports?”
Build output directory:${WORKSPACE}/build/${BUILD_NUMBER}/
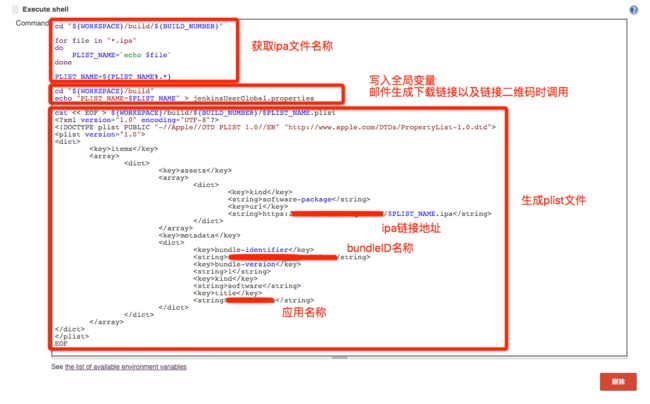
Execute shell
需填写的内容:(获取生成的ipa文件名称,写入全局变量,生成plist文件)
Command:"${WORKSPACE}/build/${BUILD_NUMBER}" for file in "*.ipa" do PLIST_NAME=`echo $file` done PLIST_NAME=${PLIST_NAME%.*} cd "${WORKSPACE}/build" echo "PLIST_NAME=$PLIST_NAME" > jenkinsUserGlobal.properties cat << EOF > ${WORKSPACE}/build/${BUILD_NUMBER}/$PLIST_NAME.plist <plist version="1.0"> <dict> <key>itemskey> <array> <dict> <key>assetskey> <array> <dict> <key>kindkey> <string>software-packagestring> <key>urlkey> <string>https://******/$PLIST_NAME.ipastring> dict> array> <key>metadatakey> <dict> <key>bundle-identifierkey> <string>***.***.***string> <key>bundle-versionkey> <string>1string> <key>kindkey> <string>softwarestring> <key>titlekey> <string>***string> dict> dict> array> dict> plist> EOFInject environment variables
需填写的内容:(将在Execute shell中生成的全局变量文件地址放入 Properties File Path中)
Properties File Path:${WORKSPACE}/build/jenkinsUserGlobal.propertiesEditable Email Notification(邮件配置)
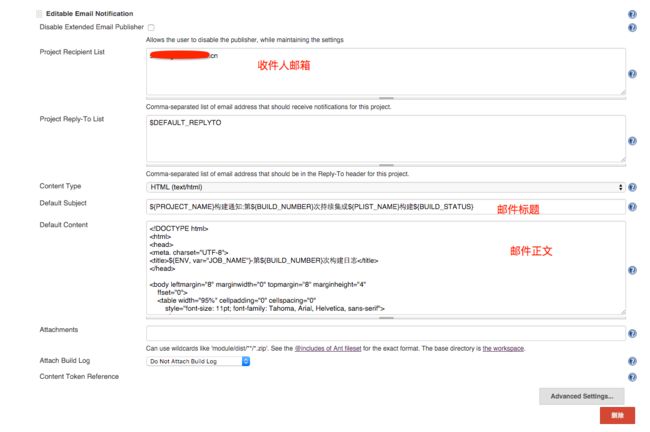
邮件配置
触发器:构建成功、失败触发(扩展一下:失败点“高级”设置只发送给自己)
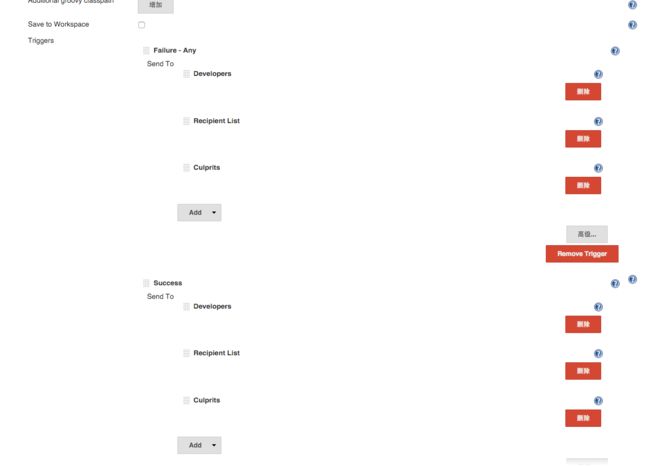
需填写的内容:
Project Recipient List: 邮件接收人(多个时用”,“分割)
Project Reply-To List:$DEFAULT_REPLYTO
Content Type:选择”HTML(text/html)“
Default Subject:${PROJECT_NAME}构建通知:第${BUILD_NUMBER}次持续集成${PLIST_NAME}构建${BUILD_STATUS}
- Default Content:(将ipa全局变量传递到邮件生成下载链接和链接二维码)
<html>
<head>
<meta charset="UTF-8">
<title>${ENV, var="JOB_NAME"}-第${BUILD_NUMBER}次构建日志title>
head>

<body leftmargin="8" marginwidth="0" topmargin="8" marginheight="4"
    ffset="0">
    <table width="95%" cellpadding="0" cellspacing="0"
        style="font-size: 11pt; font-family: Tahoma, Arial, Helvetica, sans-serif">
        <tr>
            <td><h2>
                    <font color="#0000FF">构建结果 - ${BUILD_STATUS}font>
                h2>td>
        tr>
        <tr>
                <td><h2>
                    <font color="#FF0000">App下载链接:<a href="itms-services://?action=download-manifest&url=https://******/${PLIST_NAME}.plist">itms-services://?action=download-manifest&url=https://******/${PLIST_NAME}.plista>font>
                h2>td>
        tr>
        <tr>
               <td><h2>
                      <font color="#FF0000">二维码图片:font>
               h2>td>
        tr>
        <tr>
                <td>
                    <img src="http://qr.liantu.com/api.php?text=itms-services://?action=download-manifest%26url=https://******/${PLIST_NAME}.plist" height="300" width="300">
                td>
        tr>
        <tr>
            <td><br />
            <b><font color="#0B610B">构建信息font>b>
            <hr size="2" width="100%" align="center" />td>
        tr>
        <tr>
            <td>
                <ul>
                    <li>项目名称 : ${PROJECT_NAME}li>
                    <li>构建编号 : 第${BUILD_NUMBER}次构建li>
                    <li>SVN 版本: ${SVN_REVISION}li>
                    <li>触发原因: ${CAUSE}li>
                    <li>构建日志: <a href="${BUILD_URL}console">${BUILD_URL}consolea>li>
                    <li>构建  Url : <a href="${BUILD_URL}">${BUILD_URL}a>li>
                    <li>工作目录 : <a href="${PROJECT_URL}ws">${PROJECT_URL}wsa>li>
                    <li>项目  Url : <a href="${PROJECT_URL}">${PROJECT_URL}a>li>
                ul>
            td>
        tr>
        <tr>
            <td><b><font color="#0B610B">Changes Since Last
                        Successful Build:font>b>
            <hr size="2" width="100%" align="center" />td>
        tr>
        <tr>
            <td>
                <ul>
                    <li>历史变更记录 : <a href="${PROJECT_URL}changes">${PROJECT_URL}changesa>li>
                ul> ${CHANGES_SINCE_LAST_SUCCESS,reverse=true, format="Changes for Build #%n:<br />%c<br />",showPaths=true,changesFormat="<pre>[%a]<br />%mpre>",pathFormat="    %p"}
            td>
        tr>
        <tr>
            <td><b>Failed Test Resultsb>
            <hr size="2" width="100%" align="center" />td>
        tr>
        <tr>
            <td><pre
                    style="font-size: 11pt; font-family: Tahoma, Arial, Helvetica, sans-serif">$FAILED_TESTSpre>
                <br />td>
        tr>
        <tr>
            <td><b><font color="#0B610B">构建日志 (最后 100行):font>b>
            <hr size="2" width="100%" align="center" />td>
        tr>
        <tr>
            <td><textarea cols="80" rows="30" readonly="readonly"
                    style="font-family: Courier New">${BUILD_LOG, maxLines=100}textarea>
            td>
        tr>
    table>
body>
html>
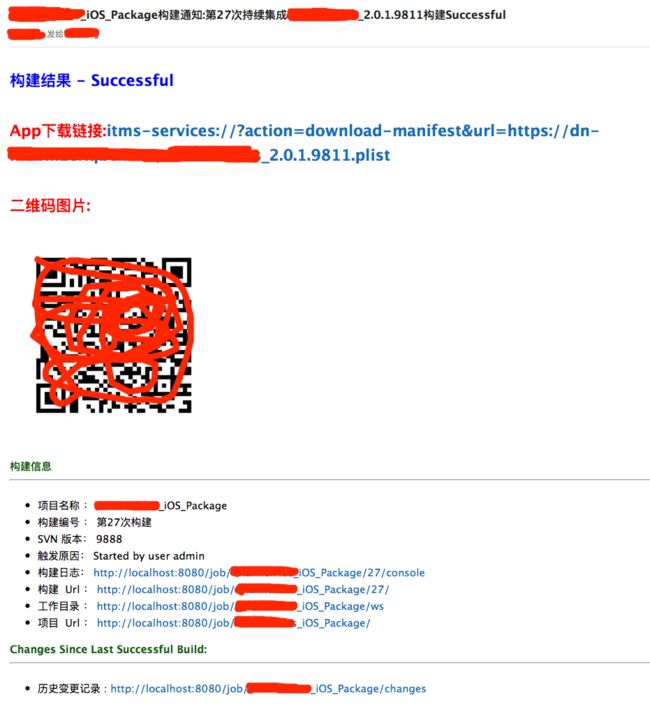
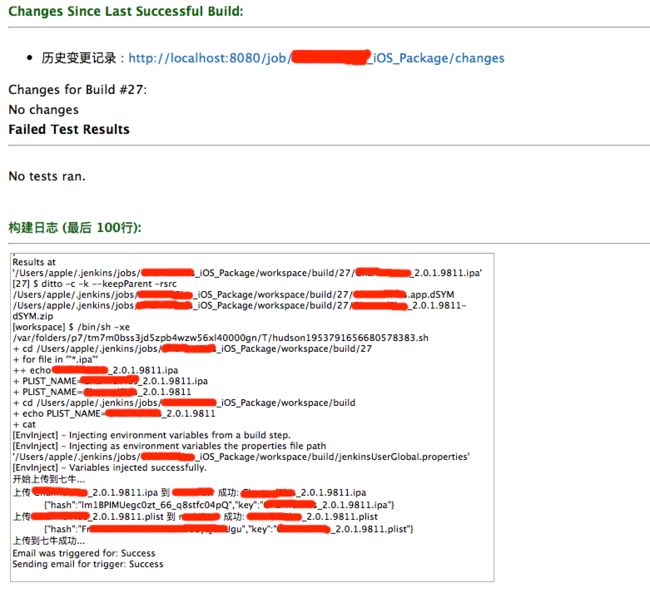
邮件截图
上传到七牛
上传到七牛配置
需填写的内容:
- 七牛配置项:系统设置-七牛-设置项名称
- 文件路径:
**/build/${BUILD_NUMBER}/*.ipa,**/build/${BUILD_NUMBER}/*.plist - 要上传到的 bucke:上传到七牛的 空间 名称
- 勾选“构建失败则不上传”
qiniu-plugin重新编译
在七牛开发者中心-Jenkins 七牛插件找到的上传插件,有2点需要注意
1、编译过程中发现在我的mac上会报错,查看源代码发现
System.console().printf(profile.getName() + "\n");是这个引起的(System.console returns the unique Console object associated with the current Java virtual machine, if any.可能电脑上么有java虚拟机吧,so就屏蔽这行代码吧或者使用前进行判断一下Console c = System.console();(这个还未验证))
if (c == null) {
System.out.println("No console available");
} else {
// Use the returned Console.
}构建日志: Failed控制台输出 Started by user admin Building in workspace /Users/apple/.jenkins/jobs/qiniuTest/workspace 开始上传到七牛... ERROR: Build step failed with exception java.lang.NullPointerException at net.zouxin.lab.qiniuplugin.QiniuPublisher$DescriptorImpl.getProfileByName(QiniuPublisher.java:183) at net.zouxin.lab.qiniuplugin.QiniuPublisher.perform(QiniuPublisher.java:89) at hudson.tasks.BuildStepMonitor$2.perform(BuildStepMonitor.java:32) at hudson.model.AbstractBuild$AbstractBuildExecution.perform(AbstractBuild.java:782) at hudson.model.AbstractBuild$AbstractBuildExecution.performAllBuildSteps(AbstractBuild.java:723) at hudson.model.Build$BuildExecution.post2(Build.java:185) at hudson.model.AbstractBuild$AbstractBuildExecution.post(AbstractBuild.java:668) at hudson.model.Run.execute(Run.java:1763) at hudson.model.FreeStyleBuild.run(FreeStyleBuild.java:43) at hudson.model.ResourceController.execute(ResourceController.java:98) at hudson.model.Executor.run(Executor.java:410) Build step '上传到七牛' marked build as failure Finished: FAILURE2、上传到七牛的bucket中的文件路径对我来说可能有点多余,作者传递的
"key":"build/${BUILD_NUMBER}/*.plist"这样的,生成的路径会成https://***/build/${BUILD_NUMBER}/*.plist,在源代码107行进行替换,这样生成的链接就会变成https://***/*.plist。//String keyPath = path.getRemote().replace(wsPath, ""); //String key = keyPath.replace(File.separator, "/"); String fileName = path.getName();jenkins插件是.hpi文件(可以在这下载我已编译好的hpi文件),编译需要安装maven,然后package,具体流程如下:
1、首先在网上下载qiniu-plugin,我就放在Downloads下。按需修改QiniuPublisher.java文件
2、brew install maven
3、双击执行qiniu-plugin-master下Debug文件
(export MAVEN_OPTS="-Xdebug -Xrunjdwp:transport=dt_socket,server=y,address=8000,suspend=n")
mvn hpi:run
4、cd /Users/apple/Downloads/qiniu-plugin-master
5、man clean//删除target,第一次无需执行这个
6、man package//打包生成Tagret,新生成的.hpi文件就在target下安装jenkins插件
系统管理–管理插件–高级–上传插件
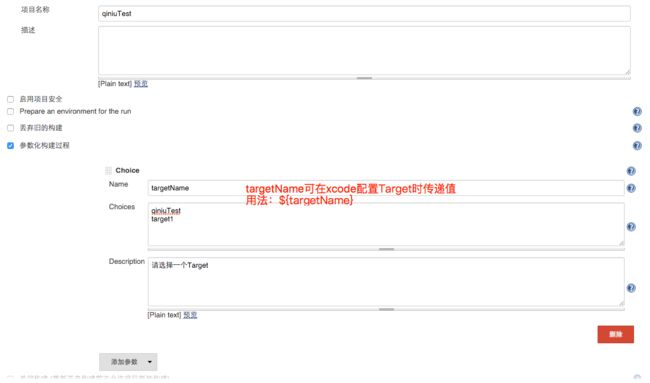
三、多Target扩展
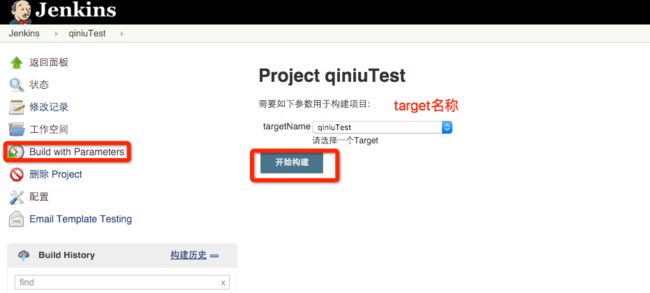
对多Target的工程我们可在”开始构建“前手工选择Target,然后将这target名称在xcode编译时传递过去。
