物联网方案之“Android+Apache服务器(PHP+Mysql)+Arduino(+以太网盾板)”(四.点播客户端)
记录《用于物联网Arduino 项目开发实用案例解析》第七章 物联网模式:点播客户端的实践过程(没有用ios,采用android)
一、Apache服务器部分
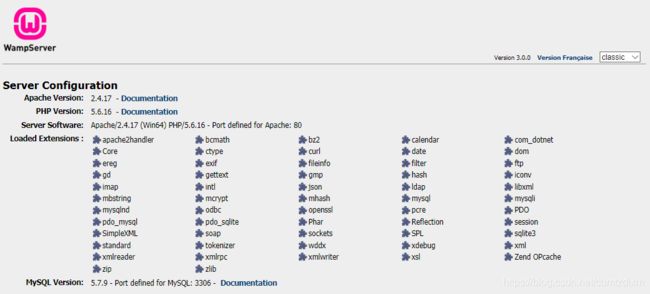
1.安装WampServer3.0,其中apache2.4.17……见下图
本机127.0.0.1,或者192.168.31.154都可以打开。但同一局域网的其他电脑没法打开(浏览器访问报的一直是403 Forbidden,报 You don't have permission to access / ……on this server错误),需要修改apache的配置文件。
(1)apache2.2版本
打开apache配置文件httpd.conf,找到这么一段:
Options FollowSymLinks
AllowOverride None
Order deny,allow
deny from all
Satisfy all
然后试着把deny from all中的deny改成了allow,保存后重起了apache,然后再一测试我的网页,哈哈!居然问题就出在这,访问测试网站完全正常了。
(2)apache2.4版本
2.4+中是把Order deny,allow Deny from all两项合并为Require all denied的。好那么现在我将Require all denied改为允许状态Require all granted就ok了。
DocumentRoot "c:/wamp64/www/"


    Options Indexes FollowSymLinks
    AllowOverride none
    Require all granted
二、Mysql数据库部分
WAMP安装好后,在cmd中输入mysql -h 127.0.0.1 -u root -p 19***2,就可以登录mysql数据库客户端了(root用户的密码我之前改为自己的了,初始默认为空)。show databases;查看当前系统中共有多少个数据库。use dbofcumtzd1020;使用之前建立的一个数据库。
select database();显示当前使用的是那个数据库。然后按教程方法创建parking_spots_data表并插入一条数据。
三、PHP部分(代码都放在C:\wamp64\www\smartparking文件夹中)
1.util_dbconn.php,教程中的连接方法不能用,改用mysqli_connect()函数。
connect_error) {
		die("[ERROR] Connection Failed:".$mysqli->connect_error);
	}

?>
2.update.php
query($sql)) {
		# code...
		echo "[error]".mysqli_error()."\n";
		exit();
	}

	$mysqli->close();
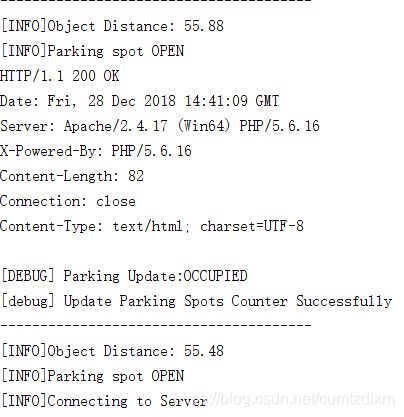
	echo "[debug] Update Parking Spots Counter Successfully\n";

?>
3.getcount.php(教程中的$result->相关函数及属性不能用)
0) {
		# code...
		$row=mysqli_fetch_assoc($result);
		print(json_encode($row));
		//echo $row["COUNT"];
	} else {
		# code...
		echo "0 results";
	}

	$mysqli->close();

?>
四、Arduino部分
#include
#include


//1.网络连接所需变量及函数
byte mac[] = { 0xDE, 0xAD, 0xBE, 0xEF, 0xFE, 0xED };
IPAddress staticIP(192, 168, 31, 159);
EthernetClient client;
const int ledPin = 3;
long int lastMsg = 0;
int tryTimes = 1;

void connectToInternet()
{
  //最初使用的是以下注释的代码,DHCP第一次一般都连不上,静态ip连接的一般都不能用
  /*if (Ethernet.begin(mac) == 0)
    {
    Serial.print("[ERROR] Failed to Configure Ethernet using DHCP");
    Ethernet.begin(mac, staticIP);
    }*/
  //最终用多次连接实现DHCP,试5次,不行再静态连接,一般3次就连上了
  while (Ethernet.begin(mac) == 0 && tryTimes <= 5)
  {
    Serial.print("[ERROR] Failed to Configure Ethernet using DHCP ");
    Serial.print(tryTimes);
    Serial.println("times,Try again 5s later;");
    tryTimes = tryTimes + 1;
    delay(5000);
  }
  //静态连接Ethernet.begin(mac, staticIP)的返回值是void,没法判断连接的是否合理,留疑???
  if (tryTimes >= 6) {
    Ethernet.begin(mac, staticIP);
  }
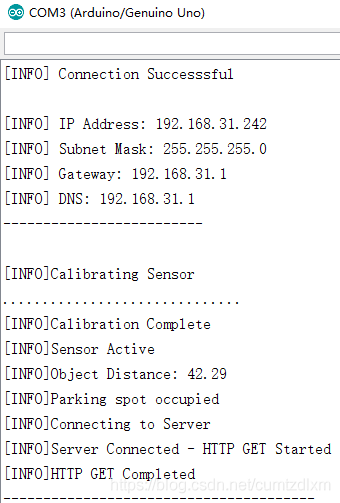
  Serial.println("[INFO] Connection Successsful");
  Serial.println("");
  printConnectionInformation();
  Serial.println("-------------------------");
  Serial.println("");
}
void printConnectionInformation()
{
  Serial.print("[INFO] IP Address: ");
  Serial.println(Ethernet.localIP());
  Serial.print("[INFO] Subnet Mask: ");
  Serial.println(Ethernet.subnetMask());
  Serial.print("[INFO] Gateway: ");
  Serial.println(Ethernet.gatewayIP());
  Serial.print("[INFO] DNS: ");
  Serial.println(Ethernet.dnsServerIP());
}
//3.读取传感器数据变量及函数
int calibrationTime = 30;
#define TRIGPIN 2
#define ECHOPIN 3

void calibrateSensor()
{
  Serial.println("[INFO]Calibrating Sensor");
  for (int i = 0; i < calibrationTime; i++)
  {
    Serial.print(".");
    delay(1000);
  }
  Serial.println("");
  Serial.println("[INFO]Calibration Complete");
  Serial.println("[INFO]Sensor Active");
  delay(50);
}

void readSensorData()
{
  //产生一个检查物体的脉冲
  digitalWrite(TRIGPIN, LOW);
  delayMicroseconds(10);
  digitalWrite(TRIGPIN, HIGH);
  delayMicroseconds(10);
  digitalWrite(TRIGPIN, LOW);
  //计算距离
  float distance = pulseIn(ECHOPIN, HIGH) / 58.0;
  Serial.println("[INFO]Object Distance: " + String(distance));

  if (distance < 50) {
    Serial.println("[INFO]Parking spot occupied");
    publishSensorData("OCCUPIED");
  } else {
    Serial.println("[INFO]Parking spot OPEN");
    publishSensorData("OPEN");
  }
}


//2.通过HTTP发布数据
char server[] = {"192.168.31.154"};
int port = 80;

unsigned long lastConnectionTime = 0;
const unsigned long postingInterval = 10L * 1000L;

void publishSensorData(String updateParkingSpot) {
  while (client.available()) {
    char c = client.read();
    Serial.write(c);
  }
  if (millis() - lastConnectionTime > postingInterval) {
    client.stop();
    Serial.println("[INFO]Connecting to Server");
    String requestData = "parkingUpdate=" + updateParkingSpot;
    if (client.connect(server,port)) {
      Serial.println("[INFO]Server Connected - HTTP GET Started");
      client.println("GET /smartparking/update.php?" + requestData + " HTTP/1.1");
      client.println("Host: " + String(server));
      client.println("Connection:close");
      client.println();

      lastConnectionTime = millis();
      Serial.println("[INFO]HTTP GET Completed");
    } else {
      Serial.println("[INFO]Connection Failed");
    }
  }
  Serial.println("---------------------------------------");
}

void setup() {
  Serial.begin(9600);
  pinMode(TRIGPIN, OUTPUT);
  pinMode(ECHOPIN, INPUT);
  connectToInternet();
  calibrateSensor();
}

void loop() {
  readSensorData();
  delay(5000);
}
五、Android部分
1.APP/build.gradle
dependencies {
    compile fileTree(dir: 'libs', include: ['*.jar'])
    androidTestCompile('com.android.support.test.espresso:espresso-core:2.2.2', {
        exclude group: 'com.android.support', module: 'support-annotations'
    })
    compile 'com.android.support:appcompat-v7:24.2.1'
    testCompile 'junit:junit:4.12'
    compile "com.squareup.okhttp3:okhttp:3.4.1"
    compile "com.google.code.gson:gson:2.7"
}
2.activity_main.xml
3.MainActivity.java(使用okhttp进行http连接,使用gson解析返回的JSON格式数据)
package com.lxm.smartparking;

import android.support.v7.app.AppCompatActivity;
import android.os.Bundle;
import android.util.Log;
import android.view.View;
import android.widget.Button;
import android.widget.TextView;

import com.google.gson.Gson;

import org.json.JSONArray;
import org.json.JSONException;
import org.json.JSONObject;

import java.io.IOException;

import okhttp3.OkHttpClient;
import okhttp3.Request;
import okhttp3.Response;

public class MainActivity extends AppCompatActivity implements View.OnClickListener {
    private static final String TAG = "MainActivity";
    TextView responseText;

    @Override
    protected void onCreate(Bundle savedInstanceState) {
        super.onCreate(savedInstanceState);
        setContentView(R.layout.activity_main);

        Button sendRequest = (Button) findViewById(R.id.send_request);
        responseText = (TextView) findViewById(R.id.reponse_text);
        sendRequest.setOnClickListener(this);
    }

    @Override
    public void onClick(View v) {
        if (v.getId()==R.id.send_request) {
            sendRequestWithOkhttp();
        }
    }

    private void sendRequestWithOkhttp(){
        new Thread(new Runnable() {
            @Override
            public void run() {
                try {
                    OkHttpClient client=new OkHttpClient();
                    Request request=new Request.Builder()
                            .url("http://192.168.31.154/smartparking/getcount.php")
                            .build();
                    //url()中不加http:还不行,报错!!
                    Response response=client.newCall(request).execute();
                    String responseData=response.body().string();
                    parseJSONWithGSON(responseData);
                } catch (IOException e) {
                    e.printStackTrace();
                }
            }
        }).start();
    }

    private void showResponse(final String response) {
        runOnUiThread(new Runnable() {
            @Override
            public void run() {
                responseText.setText(response);
            }
        });
    }

    private void parseJSONWithGSON(String jsonData) {
        //方法二:采用Gson解析JSON数据
        Gson gson =new Gson();
        Car_Num car_num=gson.fromJson(jsonData,Car_Num.class);
        final String count=car_num.getCount();
        Log.i(TAG, "parseJSONWithGSON: "+jsonData);
        Log.i(TAG, "parseJSONWithGSON: "+count);
        showResponse(count);
        //方法一:采用JSONObject解析,因为jsonData为字符串{"COUNT":"0"},报错说无法转换为JSONArray
        /*try {
             JSONArray jsonArray = new JSONArray(jsonData);
            for (int i=0;i
4.Car_Num.java
package com.lxm.smartparking;

/**
 * Created by lxm on 2018/12/28.
 */

public class Car_Num {
    private String COUNT;

    public String getCount() {
        return COUNT;
    }

    public void setCount(String count) {
        this.COUNT = count;
    }
}
5.在AndroidManifest.xml中加入英特网权限
心得:整个系统反应很流畅,一是arduino定时采集距离信息,将信息通过http的get方法发送给apache服务器端的php后台程序update.php,php解析get得到的数据更新mysql数据库。二是Android程序也通过http方法访问apache服务器端的php后台程序getcount.php,该程序查询mysql中的相关信息后以JSON格式数据返回给Android程序,Android解析返回的数据后在界面上更新。
可以用浏览器组装get方法来调用php程序更新数据库
1.http://192.168.31.154/smartparking/update.php?parkingUpdate=OPEN
2.http://192.168.31.154/smartparking/getcount.php


