win10 caffe GPU环境搭建
一、准备
系统:win10
显卡:gtx1050Ti
前期的一些必要软件安装,包括python3.5、vs2015、git,
可参考:win10+vs2015编译caffe的cpu debug版本、部署https://blog.csdn.net/chris_zhangrx/article/details/79096015
gpu版 https://blog.csdn.net/Chris_zhangrx/article/details/83339684
二、安装
1、安装显卡驱动388.13-desktop-win10-64bit-international-whql.exe
官网下载
2、安装cuda_8.0.61_win10.exe,注意安装的时候要自定义安装,只选上cuda就好了,其他的不要安装,否则会将之前的显卡驱动覆盖掉,导致电脑黑屏。
官网下载
3、下载cudnn-8.0-windows10-x64-v5.1-zip后解压到 CUDA目录下
官网下载
三、编译
1、进入文件夹 D:\caffe,下载源码

git clone:git clone https://github.com/BVLC/caffe.git
如git下载缓慢,直接下载压缩包
2、进入caffe文件夹
cd caffe
3、切换分支
git checkout windows(直接下载压缩包跳过这步)
4、修改scripts\build_win.cmd ,高亮为修改内容
@echo off
@setlocal EnableDelayedExpansion

:: Default values
if DEFINED APPVEYOR (
    echo Setting Appveyor defaults
    if NOT DEFINED MSVC_VERSION set MSVC_VERSION=14
    if NOT DEFINED WITH_NINJA set WITH_NINJA=1
    if NOT DEFINED CPU_ONLY set CPU_ONLY=1
    if NOT DEFINED CUDA_ARCH_NAME set CUDA_ARCH_NAME=Auto
    if NOT DEFINED CMAKE_CONFIG set CMAKE_CONFIG=Release
    if NOT DEFINED USE_NCCL set USE_NCCL=0
    if NOT DEFINED CMAKE_BUILD_SHARED_LIBS set CMAKE_BUILD_SHARED_LIBS=0
    if NOT DEFINED PYTHON_VERSION set PYTHON_VERSION=2
    if NOT DEFINED BUILD_PYTHON set BUILD_PYTHON=1
    if NOT DEFINED BUILD_PYTHON_LAYER set BUILD_PYTHON_LAYER=1
    if NOT DEFINED BUILD_MATLAB set BUILD_MATLAB=0
    if NOT DEFINED PYTHON_EXE set PYTHON_EXE=python
    if NOT DEFINED RUN_TESTS set RUN_TESTS=1
    if NOT DEFINED RUN_LINT set RUN_LINT=1
    if NOT DEFINED RUN_INSTALL set RUN_INSTALL=1

    :: Set python 2.7 with conda as the default python
    if !PYTHON_VERSION! EQU 2 (
        set CONDA_ROOT=C:\Miniconda-x64
    )
    :: Set python 3.5 with conda as the default python
    if !PYTHON_VERSION! EQU 3 (
        set CONDA_ROOT=C:\Miniconda35-x64
    )
    set PATH=!CONDA_ROOT!;!CONDA_ROOT!\Scripts;!CONDA_ROOT!\Library\bin;!PATH!

    :: Check that we have the right python version
    !PYTHON_EXE! --version
    :: Add the required channels
    conda config --add channels conda-forge
    conda config --add channels willyd
    :: Update conda
    conda update conda -y
    :: Download other required packages
    conda install --yes cmake ninja numpy scipy protobuf==3.1.0 six scikit-image pyyaml pydotplus graphviz

    if ERRORLEVEL 1  (
      echo ERROR: Conda update or install failed
      exit /b 1
    )

    :: Install cuda and disable tests if needed
    if !WITH_CUDA! == 1 (
        call %~dp0\appveyor\appveyor_install_cuda.cmd
        set CPU_ONLY=0
        set RUN_TESTS=0
        set USE_NCCL=1
    ) else (
        set CPU_ONLY=1
    )

    :: Disable the tests in debug config
    if "%CMAKE_CONFIG%" == "Debug" (
        echo Disabling tests on appveyor with config == %CMAKE_CONFIG%
        set RUN_TESTS=0
    )

    :: Disable linting with python 3 until we find why the script fails
    if !PYTHON_VERSION! EQU 3 (
        set RUN_LINT=0
    )

) else (
    :: Change the settings here to match your setup
    :: Change MSVC_VERSION to 12 to use VS 2013
    if NOT DEFINED MSVC_VERSION set MSVC_VERSION=14
    :: Change to 1 to use Ninja generator (builds much faster)
    if NOT DEFINED WITH_NINJA set WITH_NINJA=0
    :: Change to 1 to build caffe without CUDA support
    if NOT DEFINED CPU_ONLY set CPU_ONLY=0
    :: Change to generate CUDA code for one of the following GPU architectures
    :: [Fermi  Kepler  Maxwell  Pascal  All]
    if NOT DEFINED CUDA_ARCH_NAME set CUDA_ARCH_NAME=Auto
    :: Change to Debug to build Debug. This is only relevant for the Ninja generator the Visual Studio generator will generate both Debug and Release configs
    if NOT DEFINED CMAKE_CONFIG set CMAKE_CONFIG=Release
    :: Set to 1 to use NCCL
    if NOT DEFINED USE_NCCL set USE_NCCL=0
    :: Change to 1 to build a caffe.dll
    if NOT DEFINED CMAKE_BUILD_SHARED_LIBS set CMAKE_BUILD_SHARED_LIBS=0
    :: Change to 3 if using python 3.5 (only 2.7 and 3.5 are supported)
    if NOT DEFINED PYTHON_VERSION set PYTHON_VERSION=3
    :: Change these options for your needs.
    if NOT DEFINED BUILD_PYTHON set BUILD_PYTHON=1
    if NOT DEFINED BUILD_PYTHON_LAYER set BUILD_PYTHON_LAYER=1
    if NOT DEFINED BUILD_MATLAB set BUILD_MATLAB=1
    :: If python is on your path leave this alone
    if NOT DEFINED PYTHON_EXE set PYTHON_EXE=python
    :: Run the tests
    if NOT DEFINED RUN_TESTS set RUN_TESTS=0
    :: Run lint
    if NOT DEFINED RUN_LINT set RUN_LINT=0
    :: Build the install target
    if NOT DEFINED RUN_INSTALL set RUN_INSTALL=1
)

:: Set the appropriate CMake generator
:: Use the exclamation mark ! below to delay the
:: expansion of CMAKE_GENERATOR
if %WITH_NINJA% EQU 0 (
    if "%MSVC_VERSION%"=="14" (
        set CMAKE_GENERATOR=Visual Studio 14 2015 Win64
    )
    if "%MSVC_VERSION%"=="12" (
        set CMAKE_GENERATOR=Visual Studio 12 2013 Win64
    )
    if "!CMAKE_GENERATOR!"=="" (
        echo ERROR: Unsupported MSVC version
        exit /B 1
    )
) else (
    set CMAKE_GENERATOR=Ninja
)

echo INFO: ============================================================
echo INFO: Summary:
echo INFO: ============================================================
echo INFO: MSVC_VERSION               = !MSVC_VERSION!
echo INFO: WITH_NINJA                 = !WITH_NINJA!
echo INFO: CMAKE_GENERATOR            = "!CMAKE_GENERATOR!"
echo INFO: CPU_ONLY                   = !CPU_ONLY!
echo INFO: CUDA_ARCH_NAME             = !CUDA_ARCH_NAME!
echo INFO: CMAKE_CONFIG               = !CMAKE_CONFIG!
echo INFO: USE_NCCL                   = !USE_NCCL!
echo INFO: CMAKE_BUILD_SHARED_LIBS    = !CMAKE_BUILD_SHARED_LIBS!
echo INFO: PYTHON_VERSION             = !PYTHON_VERSION!
echo INFO: BUILD_PYTHON               = !BUILD_PYTHON!
echo INFO: BUILD_PYTHON_LAYER         = !BUILD_PYTHON_LAYER!
echo INFO: BUILD_MATLAB               = !BUILD_MATLAB!
echo INFO: PYTHON_EXE                 = "!PYTHON_EXE!"
echo INFO: RUN_TESTS                  = !RUN_TESTS!
echo INFO: RUN_LINT                   = !RUN_LINT!
echo INFO: RUN_INSTALL                = !RUN_INSTALL!
echo INFO: ============================================================

:: Build and exectute the tests
:: Do not run the tests with shared library
if !RUN_TESTS! EQU 1 (
    if %CMAKE_BUILD_SHARED_LIBS% EQU 1 (
        echo WARNING: Disabling tests with shared library build
        set RUN_TESTS=0
    )
)

if NOT EXIST build mkdir build
pushd build

:: Setup the environement for VS x64
set batch_file=!VS%MSVC_VERSION%0COMNTOOLS!..\..\VC\vcvarsall.bat
call "%batch_file%" amd64

:: Configure using cmake and using the caffe-builder dependencies
:: Add -DCUDNN_ROOT=D:/Projects/caffe_gpu/cuda ^
:: below to use cuDNN
cmake -G"!CMAKE_GENERATOR!" ^
      -DBLAS=Open ^
      -DCMAKE_BUILD_TYPE:STRING=%CMAKE_CONFIG% ^
      -DBUILD_SHARED_LIBS:BOOL=%CMAKE_BUILD_SHARED_LIBS% ^
      -DBUILD_python:BOOL=%BUILD_PYTHON% ^
      -DBUILD_python_layer:BOOL=%BUILD_PYTHON_LAYER% ^
      -DBUILD_matlab:BOOL=%BUILD_MATLAB% ^
      -DCPU_ONLY:BOOL=%CPU_ONLY% ^
      -DCOPY_PREREQUISITES:BOOL=1 ^
      -DINSTALL_PREREQUISITES:BOOL=1 ^
      -DUSE_NCCL:BOOL=!USE_NCCL! ^
      -DCUDA_ARCH_NAME:STRING=%CUDA_ARCH_NAME% ^
      "%~dp0\.."

if ERRORLEVEL 1 (
  echo ERROR: Configure failed
  exit /b 1
)

:: Lint
if %RUN_LINT% EQU 1 (
    cmake --build . --target lint  --config %CMAKE_CONFIG%
)

if ERRORLEVEL 1 (
  echo ERROR: Lint failed
  exit /b 1
)

:: Build the library and tools
cmake --build . --config %CMAKE_CONFIG%

if ERRORLEVEL 1 (
  echo ERROR: Build failed
  exit /b 1
)

:: Build and exectute the tests
if !RUN_TESTS! EQU 1 (
    cmake --build . --target runtest --config %CMAKE_CONFIG%

    if ERRORLEVEL 1 (
        echo ERROR: Tests failed
        exit /b 1
    )

    if %BUILD_PYTHON% EQU 1 (
        if %BUILD_PYTHON_LAYER% EQU 1 (
            :: Run python tests only in Release build since
            :: the _caffe module is _caffe-d is debug
            if "%CMAKE_CONFIG%"=="Release" (
                :: Run the python tests
                cmake --build . --target pytest

                if ERRORLEVEL 1 (
                    echo ERROR: Python tests failed
                    exit /b 1
                )
            )
        )
    )
)

if %RUN_INSTALL% EQU 1 (
    cmake --build . --target install --config %CMAKE_CONFIG%
)

popd
@endlocal
5、编译caffe
scripts\build_win.cmd
备注:
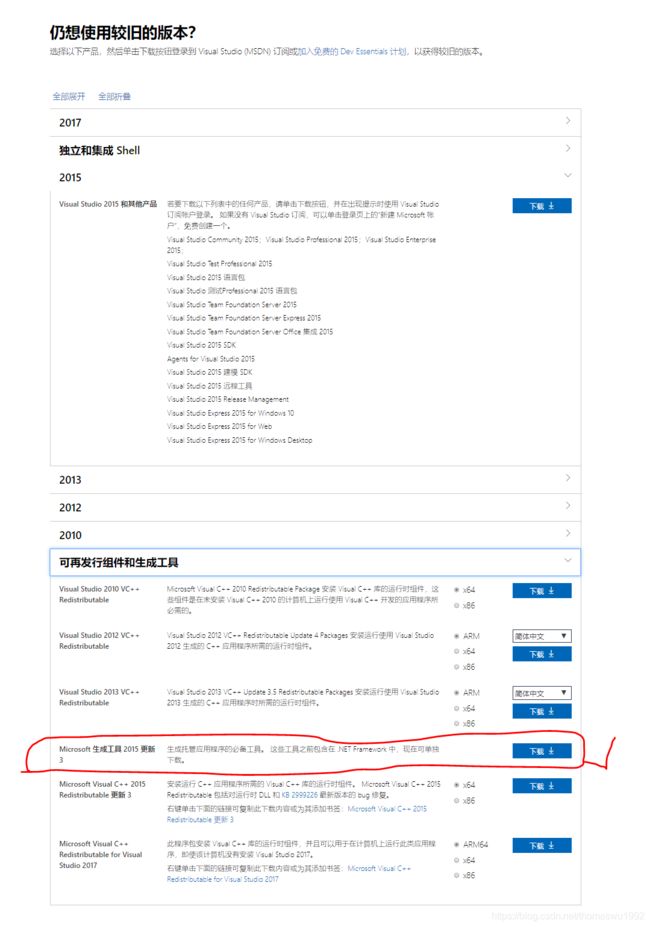
问题1:

下载 Visual C++ 2015 Build Tools 并安装
C++ 生成工具:https://visualstudio.microsoft.com/zh-hans/visual-cpp-build-tools/
旧版本下载:https://visualstudio.microsoft.com/zh-hans/vs/older-downloads/
问题2:
Windows 下用 build_win.cmd 编译 caffe-windows 出错类似Could not find url for MSVC version = 1900 and Python
caffe,这里Python的版本只支持python2.7 或者 python3.5
所以我们需要先准备好:
a) anaconda3: 因为现在官网最新下载的anaconda3都是python3.6版本的了,而目前caffe官方只支持到python3.5,这里给出anaconda3-python3.5版本的百度云下载链接。[密码:y05j]
下载安装anaconda3-python3.5 删除之前较高版本的anaconda3 ,否则无效
问题3:
How to remove CMAKE’s error in caffe’s installation,“Doesn’t match the generator used previously:NINJA”?
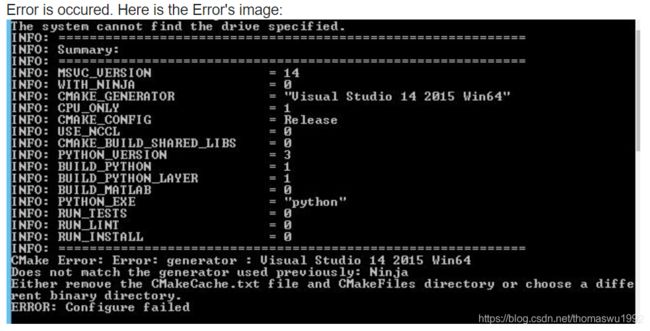
删除scripts->build文件夹中所有CMakeCachex.txt以及CMakeFiles文件及文件夹
6、用vs2015打开build\Caffe.sln,设置为Release,对着ALL_BUILD,点击生成。
######################################
卸载cuda10所有相关程序(我是将之前装的英伟达的所有产品都卸载掉),然后重新装上2080TI对应的显卡驱动程序,然后装上cuda 9.2。
cuda9.2: cuda_9.2.148_win10.exe
cudnn7.3.1: cudnn-9.2-windows10-x64-v7.3.1.20.zip
或者cudnn7.1.4: cudnn-9.2-windows10-x64-v7.1.zip
(考虑到tensorflow:[tensorflow_gpu-1.9.0-cp36-cp36m-win_amd64.whl 下载地址:https://github.com/fo40225/tensorflow-windows-wheel], 我采用的cudnn7.1.4)
即将cuda10 换成了 cuda9.2重新编译了caffe,观察是否会出现“Check failed: error == cudaSuccess (4 vs. 0) unspecified launch failure” 错误。
运行了一天,没有再报上面的错误!
Caffe 运行正常!
#####################################
需要修改的6个文件:
build_win.cmd
Cuda.cmake
WindowsDownloadPrebuiltDependencies.cmake
OpenCVConfig.cmake
nvcc.hpp
cudnn.hpp
路径分别为:
E:\caffe-windows\scripts\build_win.cmd
E:\caffe-windows\cmake\Cuda.cmake
E:\caffe windows\cmake\WindowsDownloadPrebuiltDependencies.cmake
E:\caffe-windows\scripts\build\libraries\OpenCVConfig.cmake
E:\caffe-windows\scripts\build\libraries\include\boost 1_61\boost\config\compiler\nvcc.hpp
E:\caffe-windows\include\caffe\util\cudnn.hpp
注意:
通过上面的路径可以看出,OpenCVConfig.cmake 和 nvcc.hpp 文件是在执行build_win之后生成的,因此需要在执行完build_win后,进行修改(为了解决build_win执行时的错误)。
修改内容分别如下:
修改内容1:build_win.cmd
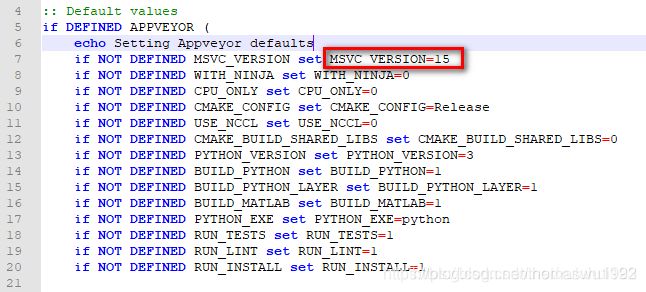
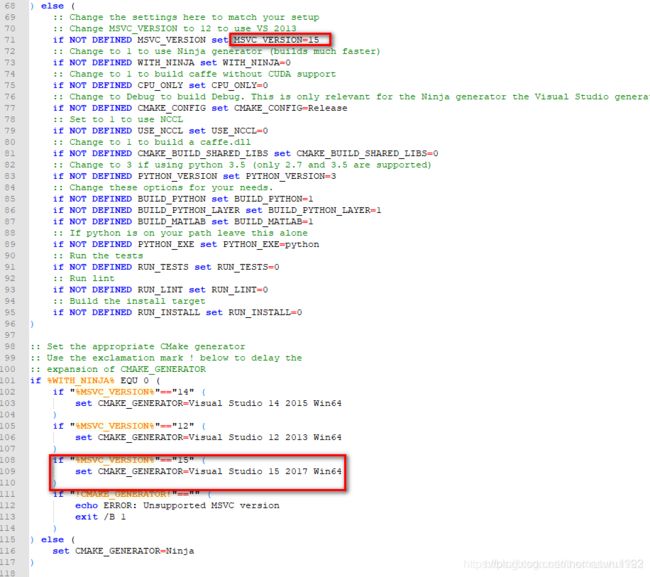
修改内容2:Cuda.cmake


修改内容3:WindowsDownloadPrebuiltDependencies.cmake

修改内容4:OpenCVConfig.cmake

修改内容5:nvcc.hpp
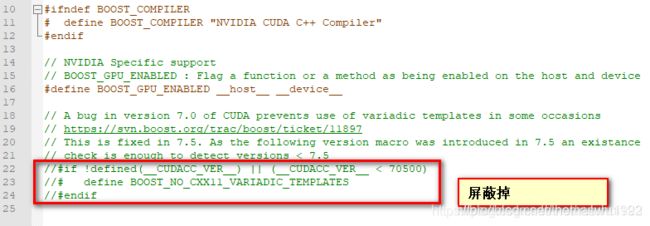
修改内容6:cudnn.hpp
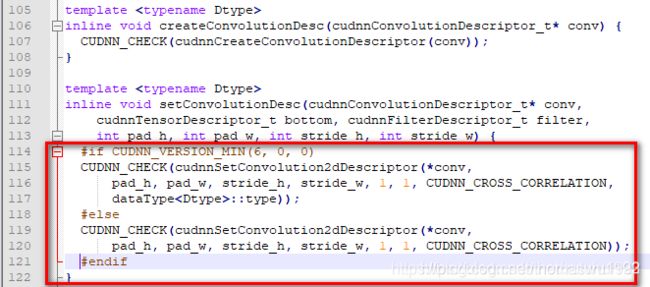
为了方便正确复制,6个文件的下载地址:
链接:https://pan.baidu.com/s/1iV99eLYTSnCganF57XZ-xg
提取码:3yx4
注释:
文件中的行号可能与下载的caffe_window原版不严格一致(修改导致的)。
在修改过程中,请认真检查核对。
上述过程可能有遗漏的地方,请参考下面的4个文献。
修改内容2中 gpu_archs: 50 52 60 61 70 75 表示 Turing 兼容的计算能力,详情参考文献2.
百度云盘下载的WindowsDownloadPrebuiltDependencies.cmake 中,47或者48行被修改了,请修改为原样。
参考文献:
1.https://binvec.me/archives/build_caffe_with_vs2017_in_windows
2.https://docs.nvidia.com/cuda/turing-compatibility-guide/index.html [Turing兼容性]
3.https://blog.csdn.net/qq_20226441/article/details/82788799
4.https://blog.csdn.net/mao_hui_fei/article/details/80326464 [cudnn版本问题】
作者:机器学习的小学生
来源:CSDN
原文:https://blog.csdn.net/raby_gyl/article/details/84643160
版权声明:本文为博主原创文章,转载请附上博文链接!
