Apollo Cyber RT学习日记 (一)
ROS学习日记 (一)
-
- Cyber RT介绍
- Cyber官方文档总结
-
- 1.Cyber RT的专有名词解释
- 2.创建并运行一个新的组件 in Apollo Cyber RT
-
- 2.1 初始化组件文件结构
- 2.2 实现组件类
-
- 2.2.1 实现组件头文件,组件类PlanningComponent的声明
- 2.2.2 实现组件源文件,组件类PlanningComponent的实现
- 在这里引出Cyber RT如何收发消息
-
- (1)如何接收消息
- (2)如何发布消息
- 2.2.3 创建 BUILD 编译文件
- 2.3 设置配置文件
-
- 2.3.1 配置 DAG 依赖文件
- 2.3.2 配置 launch 启动文件
- 2.4 启动这个组件
Cyber RT介绍
Apollo Cyber RT是百度自研得无人车计算任务实时并行计算框架,Apollo Cyber RT框架基于组件的概念构建、加载各功能模块。Localization、 Perception、Prediction、Planning、Control等功能模块均作为Apollo Cyber RT框架的一个组件而存在,基于Cyber RT提供的调度程序mainboard加载运行。实际上,在框架中,每个组件代表一个专用的算法模块。
Apollo Cyber RT framework is built based on the concept of component. As a basic building block of Apollo Cyber RT framework, each component contains a specific algorithm module which process a set of data inputs and generate a set of outputs.
Apollo Cyber RT is an open source, high performance runtime framework designed specifically for autonomous driving scenarios. Based on a centralized computing model, it is greatly optimized for high concurrency, low latency, and high throughput in autonomous driving.
During the last few years of the development of autonomous driving technologies, we have learned a lot from our previous experience with Apollo. The industry is evolving and so is Apollo. Going forward, Apollo has already moved from development to productization, with volume deployments in the real world, we see the demands for the highest level of robustness and performance. That’s why we spent years building and perfecting Apollo Cyber RT, which addresses that requirements of autonomous driving solutions.
Cyber官方文档总结
由于我学习Cyber RT是通过查看apollo的源码中的帮助文档学习,所以在此将文档内容进行总结,具体细节可以查看apollo源码中的相关文档。
1.Cyber RT的专有名词解释
目录:apollo/docs/cyber/CyberRT_Terms.md
Component
In an autonomous driving system, modules(like perception, localization, control systems…) exist in the form of components under Cyber RT. Each component communicates with the others through Cyber channels. The component concept not only decouples modules but also provides the flexibility for modules to be divided into components based individual module design.
Channel
Channels are used to manage data communication in Cyber RT. Users can publish/subscribe to the same channel to achieve p2p communication.
Task
Task is the abstract description of an asynchronous computation task in Cyber RT.
Node
Node is the fundamental building block of Cyber RT; every module contains and communicates through the node. A module can have different types of communication by defining read/write and/or service/client in a node.
Reader/Writer
Message read/write class from/to channel. Reader/Writer are normally created within a node as the major message transfer interface in Cyber RT.
Service/Client
Besides Reader/writer, Cyber RT also provides service/client pattern for module communication. It supports two-way communication between nodes. A client node will receive a response when a request is made to a service.
Parameter
Parameter service provides a global parameter access interface in Cyber RT. It’s built based on the service/client pattern.
Service discovery
As a decentralized design framework, Cyber RT does not have a master/central node for service registration. All nodes are treated equally and can find other service nodes through service discovery. UDP is used in Service discovery.
CRoutine
Referred to as Coroutine concept, Cyber RT implemented CRoutine to optimize thread usage and system resource allocation.
Scheduler
To better support autonomous driving scenarios, Cyber RT provides different kinds of resource scheduling algorithms for developers to choose from.
Message
Message is the data unit used in Cyber RT for data transfer between modules.
Dag file
Dag file is the config file of module topology. You can define components used and upstream/downstream channels in the dag file.
Launch files
The Launch file provides an easy way to start modules. By defining one or multiple dag files in the launch file, you can start multiple modules at the same time.
Record file
The Record file is used to record messages sent/received to/from channels in Cyber RT. Reply record files can help reproduce the behavior of previous operations of Cyber RT.
2.创建并运行一个新的组件 in Apollo Cyber RT
目录:apollo/docs/cyber/CyberRT_Quick_Start.md
文档所述,要创建并启动一个算法组件,需要通过以下 4 个步骤:
- 初始化组件的文件结构
- 实现组件类
- 实现组件头文件
- 实现组件源文件
- 创建 BUILD 编译文件
- 设置配置文件
- 配置 DAG 依赖文件
- 配置 launch 启动文件
- 启动组件
如果想更深入的探索 Apollo Cyber RT 框架,可以在这个目录/apollo/cyber/examples/找到很多例子,这些例子详细展示了如何使用 Cyber 框架的各种功能。
Note: 这些例子必须运行在 Apollo docker 环境, 且需要通过 Bazel 来编译。
因此可以按该流程将原基于ROS的module移植到基于Cyber RT,接下来将基于该官方指导文档,以Planning模块为例讲述如何移植。
2.1 初始化组件文件结构
基于路径${APOLLO_HOME}/modules/planning(${APOLLO_HOME}表示Apollo项目的根目录,以我的机器为例,Docker外部为/home/charles/code/apollo,Docker内部全部为/apollo。为描述简单起见,下文全部以Docker内部的路径/apollo为准)设置如下组件文件结构:
- Header file: planning_component.h
- Source file: planning_component.cc
- Build file: BUILD
- DAG dependency file: dag/planning.dag
- Launch file: launch/planning.launch
2.2 实现组件类
实现组件类步骤如下:
- 基于模板类 Component 派生出规划模块的组件类PlanningComponent
- 在派生类PlanningComponent中覆盖虚函数Init()和Proc(),其中Proc()需要指定输入数椐类型。
- 使用宏
CYBER_REGISTER_COMPONENT(PlanningComponent)注册组件类PlanningComponent,以便Cyber RT能正确创建并加载该类对象。这里可以参考博客Link
2.2.1 实现组件头文件,组件类PlanningComponent的声明
文件目录:/apollo/modules/planning/planning_component.h
namespace apollo {

namespace planning {


class PlanningComponent final
    : public cyber::Component<prediction::PredictionObstacles, canbus::Chassis,
                              localization::LocalizationEstimate> {

 public:
  PlanningComponent() = default;

  ~PlanningComponent() = default;

 public:
  bool Init() override;

  bool Proc(const std::shared_ptr<prediction::PredictionObstacles>&
                prediction_obstacles,
            const std::shared_ptr<canbus::Chassis>& chassis,
            const std::shared_ptr<localization::LocalizationEstimate>&
                localization_estimate) override;

 private:
  void CheckRerouting();
  bool CheckInput();

 private:
  std::shared_ptr<cyber::Reader<perception::TrafficLightDetection>>
      traffic_light_reader_;
  std::shared_ptr<cyber::Reader<routing::RoutingResponse>> routing_reader_;
  std::shared_ptr<cyber::Reader<planning::PadMessage>> pad_msg_reader_;
  std::shared_ptr<cyber::Reader<relative_map::MapMsg>> relative_map_reader_;

  std::shared_ptr<cyber::Writer<ADCTrajectory>> planning_writer_;
  std::shared_ptr<cyber::Writer<routing::RoutingRequest>> rerouting_writer_;

  std::mutex mutex_;
  perception::TrafficLightDetection traffic_light_;
  routing::RoutingResponse routing_;
  planning::PadMessage pad_msg_;
  relative_map::MapMsg relative_map_;

  LocalView local_view_;

  std::unique_ptr<PlanningBase> planning_base_;

  PlanningConfig config_;
};

CYBER_REGISTER_COMPONENT(PlanningComponent)

}  // namespace planning
}  // namespace apollo
注意到基类Component的定义为:

可见,Component类最多接受4个模板参数,每个模板参数均表示一种输入的消息类型,这些消息在Proc函数中被周期性地接收并处理;而PlanningComponent继承的是该模板类接受3个参数的一个特化版本:
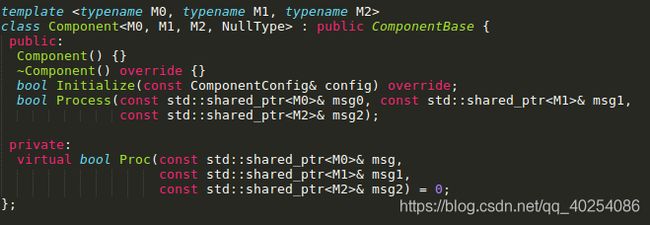
即PlanningComponent继承自cyber::Component,3个消息参数分别为:prediction::PredictionObstacles、canbus::Chassis、localization::LocalizationEstimate,这些消息在Proc函数中被周期性地接收并处理。
2.2.2 实现组件源文件,组件类PlanningComponent的实现
文件目录:/apollo/modules/planning/planning_component.cc
对于源文件 common_component_example.cc, Init 和 Proc 这两个函数需要实现。所以对于PlanningComponent的实现主要包括两个覆盖的虚函数Init() and Proc()函数:
*****************************************************************************/
bool PlanningComponent::Init() {

  if (FLAGS_use_navigation_mode) {

    planning_base_ = std::make_unique<NaviPlanning>();
  } else {

    planning_base_ = std::make_unique<OnLanePlanning>();
  }

  CHECK(apollo::cyber::common::GetProtoFromFile(FLAGS_planning_config_file,
                                                &config_))
      << "failed to load planning config file " << FLAGS_planning_config_file;
  planning_base_->Init(config_);
//Lamda
  routing_reader_ = node_->CreateReader<RoutingResponse>(
      FLAGS_routing_response_topic,
      [this](const std::shared_ptr<RoutingResponse>& routing) {

        AINFO << "Received routing data: run routing callback."
              << routing->header().DebugString();
        std::lock_guard<std::mutex> lock(mutex_);
        routing_.CopyFrom(*routing);
      });
  traffic_light_reader_ = node_->CreateReader<TrafficLightDetection>(
      FLAGS_traffic_light_detection_topic,
      [this](const std::shared_ptr<TrafficLightDetection>& traffic_light) {

        ADEBUG << "Received traffic light data: run traffic light callback.";
        std::lock_guard<std::mutex> lock(mutex_);
        traffic_light_.CopyFrom(*traffic_light);
      });

  pad_msg_reader_ = node_->CreateReader<PadMessage>(
      FLAGS_planning_pad_topic,
      [this](const std::shared_ptr<PadMessage>& pad_msg) {

        ADEBUG << "Received pad data: run pad callback.";
        std::lock_guard<std::mutex> lock(mutex_);
        pad_msg_.CopyFrom(*pad_msg);
      });

  if (FLAGS_use_navigation_mode) {

    relative_map_reader_ = node_->CreateReader<MapMsg>(
        FLAGS_relative_map_topic,
        [this](const std::shared_ptr<MapMsg>& map_message) {

          ADEBUG << "Received relative map data: run relative map callback.";
          std::lock_guard<std::mutex> lock(mutex_);
          relative_map_.CopyFrom(*map_message);
        });
  }
  planning_writer_ =
      node_->CreateWriter<ADCTrajectory>(FLAGS_planning_trajectory_topic);

  rerouting_writer_ =
      node_->CreateWriter<RoutingRequest>(FLAGS_routing_request_topic);

  return true;
}
其中Init()函数用于创建实际规划类对象,创建除prediction::PredictionObstacles、canbus::Chassis、localization::LocalizationEstimate三类消息以外的其他消息处理回调函数,创建Planning模块的输出器:轨迹输出器planning_writer_和重新生成路由输出器rerouting_writer_。
bool PlanningComponent::Proc(
    const std::shared_ptr<prediction::PredictionObstacles>&
        prediction_obstacles,
    const std::shared_ptr<canbus::Chassis>& chassis,
    const std::shared_ptr<localization::LocalizationEstimate>&
        localization_estimate) {

  CHECK(prediction_obstacles != nullptr);

  // check and process possible rerouting request
  CheckRerouting();

  // process fused input data
  local_view_.prediction_obstacles = prediction_obstacles;
  local_view_.chassis = chassis;
  local_view_.localization_estimate = localization_estimate;
  {

    std::lock_guard<std::mutex> lock(mutex_);
    if (!local_view_.routing ||
        hdmap::PncMap::IsNewRouting(*local_view_.routing, routing_)) {

      local_view_.routing =
          std::make_shared<routing::RoutingResponse>(routing_);
    }
  }
  {

    std::lock_guard<std::mutex> lock(mutex_);
    local_view_.traffic_light =
        std::make_shared<TrafficLightDetection>(traffic_light_);
    local_view_.relative_map = std::make_shared<MapMsg>(relative_map_);
  }
  {

    std::lock_guard<std::mutex> lock(mutex_);
    local_view_.pad_msg = std::make_shared<PadMessage>(pad_msg_);
  }

  if (!CheckInput()) {

    AERROR << "Input check failed";
    return false;
  }

  ADCTrajectory adc_trajectory_pb;
  planning_base_->RunOnce(local_view_, &adc_trajectory_pb);
  auto start_time = adc_trajectory_pb.header().timestamp_sec();
  common::util::FillHeader(node_->Name(), &adc_trajectory_pb);

  // modify trajectory relative time due to the timestamp change in header
  const double dt = start_time - adc_trajectory_pb.header().timestamp_sec();
  for (auto& p : *adc_trajectory_pb.mutable_trajectory_point()) {

    p.set_relative_time(p.relative_time() + dt);
  }
  planning_writer_->Write(adc_trajectory_pb);

  // record in history
  auto* history = History::Instance();
  history->Add(adc_trajectory_pb);

  return true;
}
而Proc()函数周期性地接收prediction::PredictionObstacles、canbus::Chassis、localization::LocalizationEstimate三类消息,调用planning_base_->RunOnce()函数执行实际的路径与速度规划,并将规划结果adc_trajectory_pb借助函数planning_writer_->Write()将生成的规划轨迹输出给控制模块执行。
在这里引出Cyber RT如何收发消息
(1)如何接收消息
基于Cyber RT接收消息分两种情形(其实还有第三种service,但不常用),第一种是在2.2.1小节描述的在虚函数PlanningComponent::Proc()中处理指定的消息类型,这类消息是周期性触发,但最多只能接收4种(因为cyber::Component的模板参数最多只有4个),一般用于模块主要输入消息的接收。第二种是直接创建消息接收器,一般用于接收非周期性消息或模块的次要输入消息,示例代码如下,注意消息处理回调函数均以Lambda表达式的方式展现:
Reader,Writer可以参考
 routing_reader_ = node_->CreateReader<RoutingResponse>(
      FLAGS_routing_response_topic,
      [this](const std::shared_ptr<RoutingResponse>& routing) {

        AINFO << "Received routing data: run routing callback."
              << routing->header().DebugString();
        std::lock_guard<std::mutex> lock(mutex_);
        routing_.CopyFrom(*routing);
      });
  traffic_light_reader_ = node_->CreateReader<TrafficLightDetection>(
      FLAGS_traffic_light_detection_topic,
      [this](const std::shared_ptr<TrafficLightDetection>& traffic_light) {

        ADEBUG << "Received traffic light data: run traffic light callback.";
        std::lock_guard<std::mutex> lock(mutex_);
        traffic_light_.CopyFrom(*traffic_light);
      });
(2)如何发布消息
基于Cyber RT发布消息非常直观,首先创建发布器对象,然后填充消息,最后发布消息,示例代码如下:
// 1.创建发布器
  planning_writer_ =
      node_->CreateWriter<ADCTrajectory>(FLAGS_planning_trajectory_topic);

  // 2.填充消息
  ADCTrajectory adc_trajectory_pb;
  planning_base_->RunOnce(local_view_, &adc_trajectory_pb);
  auto start_time = adc_trajectory_pb.header().timestamp_sec();
  common::util::FillHeader(node_->Name(), &adc_trajectory_pb);

  // modify trajecotry relative time due to the timestamp change in header
  const double dt = start_time - adc_trajectory_pb.header().timestamp_sec();
  for (auto& p : *adc_trajectory_pb.mutable_trajectory_point()) {

    p.set_relative_time(p.relative_time() + dt);
  }

  // 3.发布消息
  planning_writer_->Write(std::make_shared<ADCTrajectory>(adc_trajectory_pb));
2.2.3 创建 BUILD 编译文件
BUILD文件的书写规则,可以参考博客
文件目录:/apollo/modules/planning/BUILD
该文件基于planning_component_lib库最终生成了一个共享库文件libplanning_component.so,而该共享库通过Cyber RT调度程序mainboard动态加载运行:
load("//tools:cpplint.bzl", "cpplint")

package(default_visibility = ["//visibility:public"])

cc_library(
    name = "planning_component_lib",
    srcs = [
        "planning_component.cc",
    ],
    hdrs = [
        "planning_component.h",
    ],
    copts = [
        "-DMODULE_NAME=\\\"planning\\\"",
    ],
    deps = [
        ":planning_lib",
        "//cyber",
        "//modules/common/adapters:adapter_gflags",
        "//modules/common/util:message_util",
        "//modules/localization/proto:localization_proto",
        "//modules/map/relative_map/proto:navigation_proto",
        "//modules/perception/proto:perception_proto",
        "//modules/planning/proto:planning_proto",
        "//modules/prediction/proto:prediction_proto",
    ],
)

cc_binary(
    name = "libplanning_component.so",
    linkshared = True,
    linkstatic = False,
    deps = [":planning_component_lib"],
)

# ...
这里需要提到:
There are two options to use Cyber RT framework for applications:
- Binary based: the application is compiled separately into a binary, which communicates with other cyber modules by creating its own Reader and Writer.
- Component based: the application is compiled into a Shared Library. By inheriting the Component class and writing the corresponding dag description file, the Cyber RT framework will load and run the application dynamically.
Apollo 3.5使用Cyber启动Localization、Perception、Prediction、Planning、Control等功能模块。若只看各模块的BUILD文件,保证你无法找到该模块的启动入口main函数(Apollo 3.5之前的版本均是如此处理)。可以看到上述BUILD文件中binary文件的配置项中并没有source文件,仅有一个依赖项planning_component_lib。那么该binary文件libplanning_component.so,在没有main函数情况下是如何启动的呢?答案很简单,planning模块的binary文件libplanning_component.so作为cyber的一个组件启动,不需要main函数。
2.3 设置配置文件
2.3.1 配置 DAG 依赖文件
文件目录:/apollo/dag/planning.dag
DAG配置文件是Cyber RT调度程序mainboard动态加载Planning模块的最终配置文件,一个dag文件对应一个component,在 DAG 依赖配置文件中配置下面的项:
- Channel names: 输入输出数椐的 Channel 名字
- Library path: 此组件最终编译出的库的名字
- Class name: 此组件的入口类的名字
标准模式的DAG配置文件如下:
# Define all coms in DAG streaming.
module_config {

  # 共享库文件路径
  module_library : "/apollo/bazel-bin/modules/planning/libplanning_component.so"
  components {

    # 组件类名称,一定不能写错,否则mainboard无法动态创建PlanningComponent组件对象
    class_name : "PlanningComponent"
    config {

      # 模块名
      name: "planning"
      # GFlag配置文件路径,注意路径一定写成绝对路径,否则可能无法找到配置文件,导致模块加载失败
      flag_file_path:  "/apollo/modules/planning/conf/planning.conf"
      # PlanningComponent组件Proc()函数中使用的三个消息接收器
      readers: [
        {

          channel: "/apollo/prediction"
        },
        {

          channel: "/apollo/canbus/chassis"
          qos_profile: {

              depth : 15
          }
          pending_queue_size: 50
        },
        {

          channel: "/apollo/localization/pose"
          qos_profile: {

              depth : 15
          }
          pending_queue_size: 50
        }
      ]
    }
  }
}

2.3.2 配置 launch 启动文件
文件目录:/apollo/launch/planning.launch
Launch配置文件是Cyber RT提供的一个Python工具程序cyber_launch加载Planning模块所需的配置文件,在 launch 启动文件中需 配置下面的项:
- 组件的名字
- 上一步创建的 dag 配置的名字。
- 组件运行时所在的进程目录。
标准模式的Launch配置文件如下:
<cyber>
    <module>
        <name>planningname>
        <dag_conf>/apollo/modules/planning/dag/planning.dagdag_conf>
        <process_name>planningprocess_name>
    module>
cyber>
2.4 启动这个组件
通过下面的命令来编译组件:
bash /apollo/apollo.sh build
Note: 确定组件正常编译成功
然后配置环境:
cd /apollo/cyber
source setup.bash
有两种方法来启动组件:
- 使用 launch 文件来启动 (最终仍归结与mainboard加载)
cyber_launch start /apollo/launch/planning.launch
- 使用 dag 文件来启动
/apollo/bazel-bin/cyber/mainboard -d /apollo/modules/planning/dag/planning.dag
本文主要参考:
百度开源代码:link
Apollo开发者社区:link
博客:Link