安卓属性动画小技巧
首先,最重要的一点也是务必要记住的一点
view 的 getX() getY()方法取得的是以父 view 为参考系的相对坐标
很多人第一次看到 view 的 getX getY 方法以为是取得相对于整个屏幕上的坐标,很容易在写一些动画效果出现不是预期的效果。
以 getX 方法举例
方法的定义如下:
    /**
     *返回的是该 view 的视觉上的 x 轴坐标值,以像素为单位。这个值等于 translationX 属性值加上当前的 left  属性值。
     * The visual x position of this view, in pixels. This is equivalent to the
     * {@link #setTranslationX(float) translationX} property plus the current
     * {@link #getLeft() left} property.
     *
     * @return The visual x position of this view, in pixels.
     */
    @ViewDebug.ExportedProperty(category = "drawing")
    public float getX() {
        return mLeft + getTranslationX();
    }
好我们看看,left 属性值 和 translationX 属性值,即 mLeft 、getTranslationX() 的定义。
    /**
     *返回的是该 view 的父 view 的左边界与该 view 左边界的距离(这里就已经体现了是相对父 view 的意思了)
     * The distance in pixels from the left edge of this view's parent
     * to the left edge of this view.
     * {@hide}
     */
    @ViewDebug.ExportedProperty(category = "layout")
    protected int mLeft;
/**返回的是 该 view 相对于其 mLeft 属性值的差值
* The horizontal location of this view relative to its {@link #getLeft() left} position.
* This position is post-layout, in addition to wherever the object's
* layout placed it.
*
* @return The horizontal position of this view relative to its left position, in pixels.
*/
@ViewDebug.ExportedProperty(category = "drawing")
public float getTranslationX() {
return mRenderNode.getTranslationX();
}看到这,大概有些人已经明白了getX 为啥是相对父 view 的坐标值。
在正常情况下,当布局完毕后,子 view 的 mLeft 值被定下来。
- view 从未执行属性动画或者人为设置偏移量(如调用 setTranslationX()),偏移量就是 0,而 mLeft 是据其父 view 的左边界的距离。getX() 的结果就是距其父 view 的左边界距离。
- view 执行过属性动画过后或者被设置了偏移量(如调用 setTranslationX(),此时 view 的位置已经改变到新的位置), 偏移量就是 getTranslationX(),其实就是距离最初 view 的左边界的距离。换言之,getTranslationX()就是新位置与旧位置的差值。所以 getX() 的结果还是距其父 view 的左边界距离。
所以大家记住这两点
1.view 的 getX() getY() 方法取得的是以父 view 为参考系的相对坐标
2.view 的 getTranslationX() getTranslationY() 得到是新位置与最初位置的差值,也即移动了多少距离
第二点的概念,其实会给写动画带来一些好处。比如一个 view被执行动画后跑到新的位置,要恢复到最初位置这么办?
其实很简单,直接把偏移量设置为零,即调用 setTranslationX(0),setTranslationY(0) 。要是使用 setX(),setY()方法,就要自己去记录一下最初的坐标值。
灵活应用“相对坐标”和“偏移量”可以简化写动画的难度。
下面以一个实际场景为例:
布局文件
<android.support.constraint.ConstraintLayout xmlns:android="http://schemas.android.com/apk/res/android"
    xmlns:app="http://schemas.android.com/apk/res-auto"
    xmlns:tools="http://schemas.android.com/tools"
    android:id="@+id/container"
    android:layout_width="match_parent"
    android:layout_height="match_parent"
    tools:context="com.example.administrator.demo.MainActivity">

    <Button
        android:id="@+id/button"
        android:layout_width="wrap_content"
        android:layout_height="wrap_content"
        android:layout_marginBottom="30dp"
        android:layout_marginEnd="8dp"
        android:layout_marginStart="8dp"
        android:text="Hello World!"
        app:layout_constraintBottom_toBottomOf="@id/container"
        app:layout_constraintEnd_toEndOf="parent"
        app:layout_constraintStart_toStartOf="parent" />

android.support.constraint.ConstraintLayout>
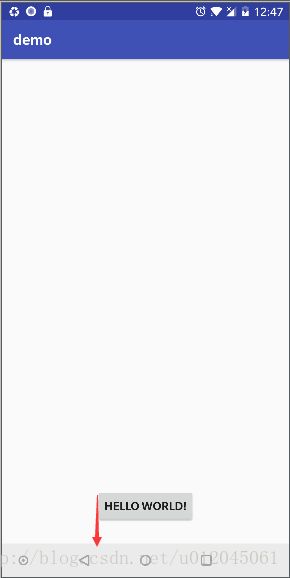
如图布局,需求是点击屏幕时,button 需要下滑到屏幕外
通常我们想到的是将 button 向下移动 button 顶部距离屏幕底部的距离。但是这个距离就得知道 button 父 view 的高度。我们假定我们获取到父 view 的高度为 H,获取到 button 的 初始 Y 值为 originY
所求的距离 d = H - originY;
采用 setY() 方法,隐藏动画代码如下:
ObjectAnimator.ofFloat(mButton, View.Y, originY,originY+d)采用 setTranslationY() 方法,只需让 button 向下偏移距离 d(动画效果就是偏移量逐渐由 0 至 d)
ObjectAnimator.ofFloat(mButton, View.TRANSLATION_Y, 0,d);在这我们发现是不是采用 setTranslationY() 会让代码简单点,因为我们不需要知道 originY 的值。
扯,距离 d 中不就需要 originY 的值吗?
这里我想说的在写动画中,采用 setTranslationY() 方法,动画只需知道向下偏移 d 距离,不需要知道具体的坐标值概念。
而采用 setY() 需要知道初始 Y 值坐标和最终 Y 值坐标。当然概念理解了,用哪一种方法都不会出问题。
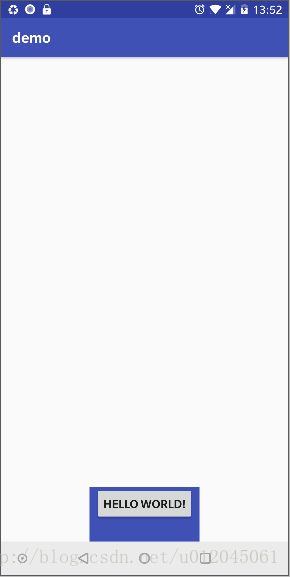
我们换一种思路,同样的位置效果我们给 button 包裹一个父 view,而父 view 的底边正好最外层的 View 的底边平齐。
<android.support.constraint.ConstraintLayout xmlns:android="http://schemas.android.com/apk/res/android"
    xmlns:app="http://schemas.android.com/apk/res-auto"
    xmlns:tools="http://schemas.android.com/tools"
    android:id="@+id/container"
    android:layout_width="match_parent"
    android:layout_height="match_parent"
    tools:context="com.example.administrator.demo.MainActivity">

    <LinearLayout
        android:id="@+id/ll_container"
        android:layout_width="wrap_content"
        android:layout_height="wrap_content"
        android:background="@color/colorPrimary"
        app:layout_constraintBottom_toBottomOf="@id/container"
        app:layout_constraintEnd_toEndOf="parent"
        app:layout_constraintStart_toStartOf="parent">

        <Button
            android:id="@+id/button"
            android:layout_width="wrap_content"
            android:layout_height="wrap_content"
            android:layout_marginBottom="30dp"
            android:layout_marginEnd="8dp"
            android:layout_marginStart="8dp"
            android:text="Hello World!" />
    LinearLayout>
android.support.constraint.ConstraintLayout>
我们假定 button 现在的父 view 为 buttonParent。这里为了容易在视觉上辨认给 buttonParent 设置了一个背景色。
现在我们在试着在写一下动画代码
首先采用 setY() 方法
这里不需要计算 originY 的值了,相对于 buttonParent ,button 的 originY 就是 0(这里一定记住 view.getY() 是相对于自身父View的,这里指的就是 buttonParent ),而下滑的高度就是 buttonParent 的高度。
ObjectAnimator.ofFloat(mButton, View.Y, 0,buttonParent.getHeight());采用 TranslationY() 方法
ObjectAnimator.ofFloat(mButton, View.TRANSLATION_Y, 0,buttonParent.getHeight());这里代码好像和上面一样,但是思考时的方式可不一样,大家应该也能体会到了。
同样对于 buttonParent 向下偏移 buttonParent.getHeight() 同样可以达到效果
ObjectAnimator.ofFloat(buttonParent, View.TRANSLATION_Y, 0,buttonParent.getHeight());当然实际项目中的需求肯定更加复杂,大家合理应布局技巧和上面提到的概念,会简化写动画的难度。希望对大家有所帮助。

